NEFF B27CR22N1 User Manual And Installation Instructions Download Page 19

Rails

 en

19

Note: 

White residues on the enamel surfaces may

be caused by heavy soiling. These food residues
are harmless. The deposits do not compromise the
functionality of the appliance.

4.

Attach the shelf supports. 
→ 

"Rails", Page 19

14.2 EasyClean cleaning aid

You can use the "EasyClean" cleaning aid to clean light
soiling from the cooking compartment between full
cleans. The "EasyClean" cleaning aid soaks dirt by
evaporating soapy water. It is then easier to remove the
dirt.

Setting the EasyClean cleaning aid

WARNING ‒ Risk of scalding!

If there is water in the cooking compartment when it is
hot, this may create hot steam.

Never pour water into the cooking compartment
when the cooking compartment is hot.

Requirements

¡

You can only start the cleaning aid once the cooking
compartment is cold (room temperature) and the ap-
pliance door is closed.

¡

Do not open the appliance door while the appliance
is in operation, as this will abort the cleaning aid.

¡

To remove particularly stubborn dirt, leave the soapy
water to work for a while before starting the cleaning
aid.

¡

To remove particularly stubborn dirt, rub washing-up
liquid onto dirty areas on the smooth surfaces before
starting the cleaning aid.

1.

Remove any accessories from the cooking compart-
ment.

2. ATTENTION!

Distilled water in the cooking compartment leads to
corrosion.

Do not use distilled water.

Mix 0.4 litres water with a drop of washing-up liquid
and pour into the centre of the cooking compart-
ment floor.

3.

Press   to switch the appliance on.

4.

Press  ⁠.

5.

Use the   or   button to select "EasyClean"  ⁠.

6.

Use the   button to navigate to the next row.

7.

Press   to start the cleaning aid.

a

The cleaning aid will start. The duration will count
down on the display.

a

Once the cleaning aid has run through to the end,
an audible signal will sound.

8.

Press any button to end the audible signal.

9.

After using the cleaning aid, finish cleaning the
cooking compartment. 
→ 

"Wiping down the cooking compartment",

Page 19

Wiping down the cooking compartment

ATTENTION!

The prolonged presence of moisture in the cooking
compartment leads to corrosion.

After using the cleaning aid, wipe the cooking com-
partment clean and allow it to dry fully.

Requirement:

 The cooking compartment must have

cooled down.

1.

Open the appliance door and remove the remaining
water with an absorbent sponge cloth.

2.

Clean the smooth surfaces in the cooking compart-
ment with a dish cloth or a soft brush. Remove stub-
born food remnants using a stainless steel scouring
pad.

3.

Remove limescale with a cloth soaked in vinegar.
Then wipe with clean water and rub dry with a soft
cloth (including under the door seal).

4.

If there is any stubborn dirt that you are unable to
remove, run the cleaning aid again once the cook-
ing compartment has cooled down.

5.

In order to dry the cooking compartment, leave the
appliance door open in the detent position (approx.
30°) for approx. one hour.
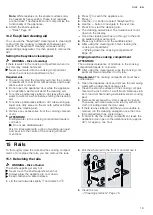
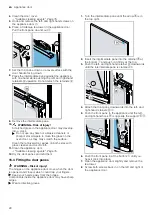
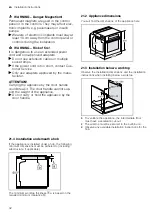
15  Rails

To thoroughly clean the rails and the cooking compart-
ment, or to replace the rails, you can remove the rails.

15.1 Detaching the rails

WARNING ‒ Risk of burns!

The shelf supports get very hot

Never touch the shelf supports when hot.

Always allow the appliance to cool down.

Keep children at a safe distance.

1.

Lift the rail forwards slightly   and detach it  ⁠.

2.

Pull the whole rail to the front   and remove it.

3.

Clean the rail. 
→ 

"Cleaning products", Page 16

Summary of Contents for B27CR22N1

Page 1: ...Oven en User manual and installation instructions B27CR22N1...

Page 2: ...s and drinks In private households and in enclosed spaces in a domestic environment Up to an altitude of max 4000 m above sea level 1 3 Restriction on user group This appliance may be used by children...

Page 3: ...door move when the door is opened and closed which could trap your fingers Keep your hands away from the hinges Components inside the appliance door may have sharp edges Wear protective gloves WARNING...

Page 4: ...stick baking trays or bak ing tins using the cleaning function Only clean enamelled accessories at the same time WARNING Risk of harm to health The cleaning function heats up the cooking compartment...

Page 5: ...certain models accessories may scratch the door pane when closing the appliance door Always push accessories fully into the cooking com partment 3 Environmental protection and saving energy 3 1 Dispo...

Page 6: ...etting options childproof lock Set the timer cooking time or Ready at time for delayed starts Activate or deactivate the childproof lock Information View additional information View the current temper...

Page 7: ...on is ideal for cakes with moist toppings The heat is emitted evenly from above and below Circo roasting 50 250 C Roast poultry whole fish or large pieces of meat The grill element and the fan switch...

Page 8: ...g for cleaning Rails Page 19 Lighting One or more oven lights illuminate the cooking com partment When you open the appliance door the light in the cooking compartment switches on If the appliance doo...

Page 9: ...ight way round This is the only way to en sure that accessories can be pulled out approximately halfway without tipping 1 Turn the accessories so that the notch is at the rear and is facing downwards...

Page 10: ...Use the button to navigate back to the top row 4 Use the button to select the next setting 5 Use the button to navigate to the next row 6 Use the or button to select the correct month 7 Use the button...

Page 11: ...food is ready press to switch the appli ance off 7 5 Changing the temperature You can also change the temperature once you have started the appliance 1 Use the or button to select the temperature row...

Page 12: ...ng function Setting the cooking time 1 Set a heating function and a temperature 2 Press 3 Select the default value Button Default value 10 minutes 30 minutes 4 Use the or button to select the required...

Page 13: ...ct the required settings 6 Use the button to set the lock to Activated 7 Press 8 Use the button to save your settings a When you switch off the appliance will appear on the display 9 3 Interrupting th...

Page 14: ...e display a Once the set temperature has been reached the PowerBoost function will switch itself off automatic ally and an audible signal will sound will go out on the display 10 5 Deactivating the Po...

Page 15: ...out rails retrofitted Factory settings Load 1 Depending on the appliance specifications 12 2 Changing basic settings 1 Press to switch the appliance on 2 Press 3 Use the or button to select Settings...

Page 16: ...instructions on cleaning the appliance Cleaning the appliance Page 17 Appliance front Surface Suitable cleaning agents Information Stainless steel Hot soapy water Special stainless steel cleaning prod...

Page 17: ...f age must be kept away from the appliance WARNING Risk of fire Loose food remnants fat and meat juices may catch fire Before using the appliance remove the worst of the food residues and remnants fro...

Page 18: ...ing compartment gets very hot when the cleaning function is in progress Never open the appliance door Allow the appliance to cool down Keep children at a safe distance The outside of the appliance get...

Page 19: ...on to navigate to the next row 7 Press to start the cleaning aid a The cleaning aid will start The duration will count down on the display a Once the cleaning aid has run through to the end an audible...

Page 20: ...Components inside the appliance door may have sharp edges Wear protective gloves The hinges on the appliance door move when the door is opened and closed which could trap your fingers Keep your hands...

Page 21: ...ect opening Slide the appliance door straight onto the two hinges Slide the appliance door on as far as it will go 2 Using both hands press down on the left and right of the door cover from above to c...

Page 22: ...Clean the appliance door Suitable cleaning agents Page 16 12 Dry the door panes and refit them 16 4 Fitting the door panes WARNING Risk of injury The hinges on the appliance door move when the door i...

Page 23: ...t breaker is faulty Check the circuit breaker in the fuse box There has been a power cut Check whether the lighting in your kitchen or other appliances are working Language English appears on the dis...

Page 24: ...display e g D0111 or E0111 The electronics have detected a fault 1 Switch the appliance off and on again a If the fault was a one off the message disappears 2 If the message appears again call the aft...

Page 25: ...and electronic appliances waste electrical and electronic equip ment WEEE The guideline determines the frame work for the return and recycling of used appliances as applicable throughout the EU 19 Cu...

Page 26: ...on two or more levels Shelf position 2 levels Universal pan Baking tray 3 1 2 levels Baking tins on two wire racks 3 1 Baking on two or more levels Shelf position 3 levels Baking tray Universal pan B...

Page 27: ...be unevenly pre baked Uneven browning may remain even after baking 20 5 Cooking ready meals Take ready meals out of the packaging If you are warming or cooking the ready meal in cookware make sure th...

Page 28: ...y 3 190 210 30 40 Tarte flamb e Universal pan 3 260 280 1 10 15 Bake savoury cooked ingredi ents Ovenproof dish 2 200 220 30 50 Potato gratin raw ingredients 4 cm deep Ovenproof dish 2 160 190 50 70 C...

Page 29: ...artment and cookware for approx 15 minutes 4 Sear the meat on all sides on the hob at a very high heat 5 Immediately place the meat into the pre warmed cookware in the cooking compartment To ensure th...

Page 30: ...liance on baking trays or in baking tins dishes at the same time will not necessarily be ready at the same time Shelf positions when baking on 2 levels Universal pan Shelf position 3 Baking tray Shelf...

Page 31: ...with these installation instructions The in staller shall be liable for damages incurred as a result of incorrect installation Do not use the door handle for the trans port or installation Check the a...

Page 32: ...ce by the door handle could break it The door handle cannot sup port the weight of the appliance Do not carry or hold the appliance by the door handle 21 2 Appliance dimensions You will find the dimen...

Page 33: ...a clicking sound A 3 m power cable can be obtained from the after sales service The power cable must only be replaced with a cable from the original manufacturer This is available from after sales se...

Page 34: ...he bottom 7 If required the gap between the appliance door and the side panels can be adjusted using the screws at the top left and right Note The gap between the worktop and the appliance must not be...

Page 35: ......

Page 36: ...Wery Stra e 34 81739 M nchen GERMANY 9001637649 9001637649 010507 en Valid within Great Britain Imported to Great Britain by BSH Home Appliances Ltd Grand Union House Old Wolverton Road Wolverton Mil...

Reviews: