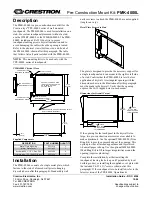
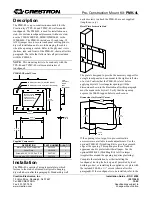
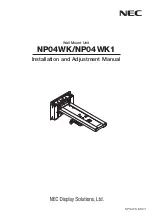
background image

ENG-3

 Warning

•  Do not install in places subject to constant vibration. Extended vibration may cause 

loosening  of  the  screws  and  result  in  the  Wall  Mount  Unit  and  projector  falling  and 

causing injury. Also, it may cause breakdown of the projector. 

•  To ensure safety, be sure to tighten the bolts, screws and safety lock screws secure

-

ly. Failure to do so may result in the projector falling and causing injury.

•  Do not modify any parts. Doing so may result in the projector and the Wall Mount Unit 

falling and causing injury.

•  Do not use broken parts. Doing so may result in the projector and the Wall Mount Unit 

falling and causing injury. If a part should break, consult your dealer. 

•  Do not look into the projection window, mirror or lens when the projector is turned 

on. Doing so could damage your eyesight.

•  Do not hang from the projector and the Wall Mount Unit. Doing so may result in the 

projector and the Wall Mount Unit falling and causing injury. Be especially careful of 

children.

•  Do not use adhesive for the locking screws, lubricant agent, oil and so on for the wall 

adapter. Doing so may cause the material of the wall adapter to deteriorate and result 

in the projector falling and causing injury. 

 Caution

•  Do not obstruct the projector’s ventilation holes. Doing so will prevent the dissipation 

of heat and may result in fire. In particular, do not use the projector in the following 

ways:

  installing  the  projector  in  a  place  such  as  wall  and  so  on  where  ventilation  is  poor, 

covering it, etc. 

•  Do not install the projector in front of the outlets of an air conditioner or heater or in 

a  place  exposed  to  significant  vibrations.  Doing  so  may  result  in  fires  and  electric 

shock.

•  Do  not  install  the  projector  in  humid  or  dusty  places  or  those  exposed  to  greasy 

smoke or steam (such as near cooking equipment or humidifiers). Doing so may result 

in fires.

•  When installing the projector, leave sufficient space between it and surrounding ob

-

jects. Failure to do so will prevent the dissipation of heat and may result in fires.

Please:

•  Avoid rooms with significant dust, humidity, greasy smoke, or tobacco smoke. 

  Dirt will adhere to the optical parts such as mirrors and lenses, which will cause image quality 

to deteriorate.

•  Avoid places in which the screen is exposed to direct sunlight or illuminated light. 

  When surrounding light directly hits the screen, the image appears washed out and is difficult 

to view.

•  Avoid locations exposed to particularly high or low temperatures. 
  Doing  so  may  result  in  breakdown.  (For  the  ambient  operating  temperature,  see  the  user’s 

manual included with the projector.)

Summary of Contents for NP-UM330W Series

Page 1: ...Wall Mount Unit NP04WK NP04WK1 Installation and Adjustment Manual NP04WK IAM 01...

Page 2: ...to install the wall mount unit This work should never be performed by the customer To the Dealer and Installer To ensure customer safety we ask that the installation work be started after careful atte...

Page 3: ...d in this manual The projector may fall and cause injury if installed and adjusted improperly To prevent the projector from falling install it in a location and fasten it so as to ensure sufficient st...

Page 4: ...njury Caution Do not obstruct the projector s ventilation holes Doing so will prevent the dissipation of heat and may result in fire In particular do not use the projector in the following ways instal...

Page 5: ...ce M4 8 mm screws 4 These are used to mount the projector Hexagonal wrench 1 This is a wrench for tightening the safety lock screws Wall plate 1 This is used to mount the wall adapter in the North Ame...

Page 6: ...Arm unit Vertical position reference line Wall adapter wall adapter unit arm unit View from above Slide arm Cap Left right tilt adjustment knob Safety lock screws 2 Cable hole Fixing screws B 2 Horiz...

Page 7: ...and the amount of movement when mounting the projector Center of wall adapter 572 min to 994 max When wall plate mounted 575 min to 997 max 422 arm unit movement range Center of wall adapter Center of...

Page 8: ...front of the wall surface the distance between the projector and the screen will be shorter the sliding range is reduced Check before installing Be sure to line up the center of the wall adapter with...

Page 9: ...0 193 9 121 2 35 4 69 8 28 9 100 215 4 134 6 43 2 77 6 31 3 NP U300X NP U250X Screen Projection distance Height between wall adapt er s lower edge screw hole center and screen s upper edge H1 cm Size...

Page 10: ...the screen is to be installed and determine the position in which the wall mount unit is to be mounted See page ENG 7 It is not possible to install in such a way that the image is projected at an angl...

Page 11: ...he wall adapter to the wall s structural material Use the included washers and spacers to attach the wall adapter with the M6 screws or bolts For the position for mounting the wall adapter onto the wa...

Page 12: ...m is as seen from below 4 Insert the slide arm on the arm unit 5 Attach the safety lock screws and fixing screws B 1 Use the included hexagonal wrench to securely tighten the two safety lock screws 2...

Page 13: ...to the lowermost position 2 Temporarily fasten the fixing screw A This completes the initial setting of the arm unit s vertical position Do not remove the safety lock screws other than for assembly Do...

Page 14: ...e in the slide arm and three cable holes in the wall adapter upward through to wall and downward Select the cable holes to be used according to the cabling conditions 1 Pass the cables through the cab...

Page 15: ...d with the projector At Installation or Settings on the on screen menu select Ceiling Front for the projec tion method For projectors with a test pattern function adjustment is easier by projecting th...

Page 16: ...Turn the vertical tilt adjustment knob and adjust so that the left and right edges of the projected image are paral lel The adjustment range is 5 3 Adjust the projector s tilt in the rotational direct...

Page 17: ...uctions under Projection Distance and Screen Size the image is projected at about the center The slide arm moves a maximum of 422 mm In consideration of change over time of the position to which the p...

Page 18: ...the base of the arm and move the arm upwards targeting the reference line Adjust so that the projected image is at the center of the screen surface If the projected image moves too far upwards with re...

Page 19: ...er fixing the cover in place 2 Insert cover B from an angle then rotate it paying attention to the tabs The four tabs on the back of the cover fit into the notches in the wall adapter fixing the cover...

Page 20: ...projector For instructions on attaching the cover see the user s manual This completes installation and adjustment Do not bundle the power cord together with the cables and put it under the cable cove...

Page 21: ...e Using the wall plate NP04WK1 only When attaching the wall adapter using the wall plate make 16 holes in the wall at the posi tions indicated below Make holes with the proper depth and diameter for t...

Reviews: