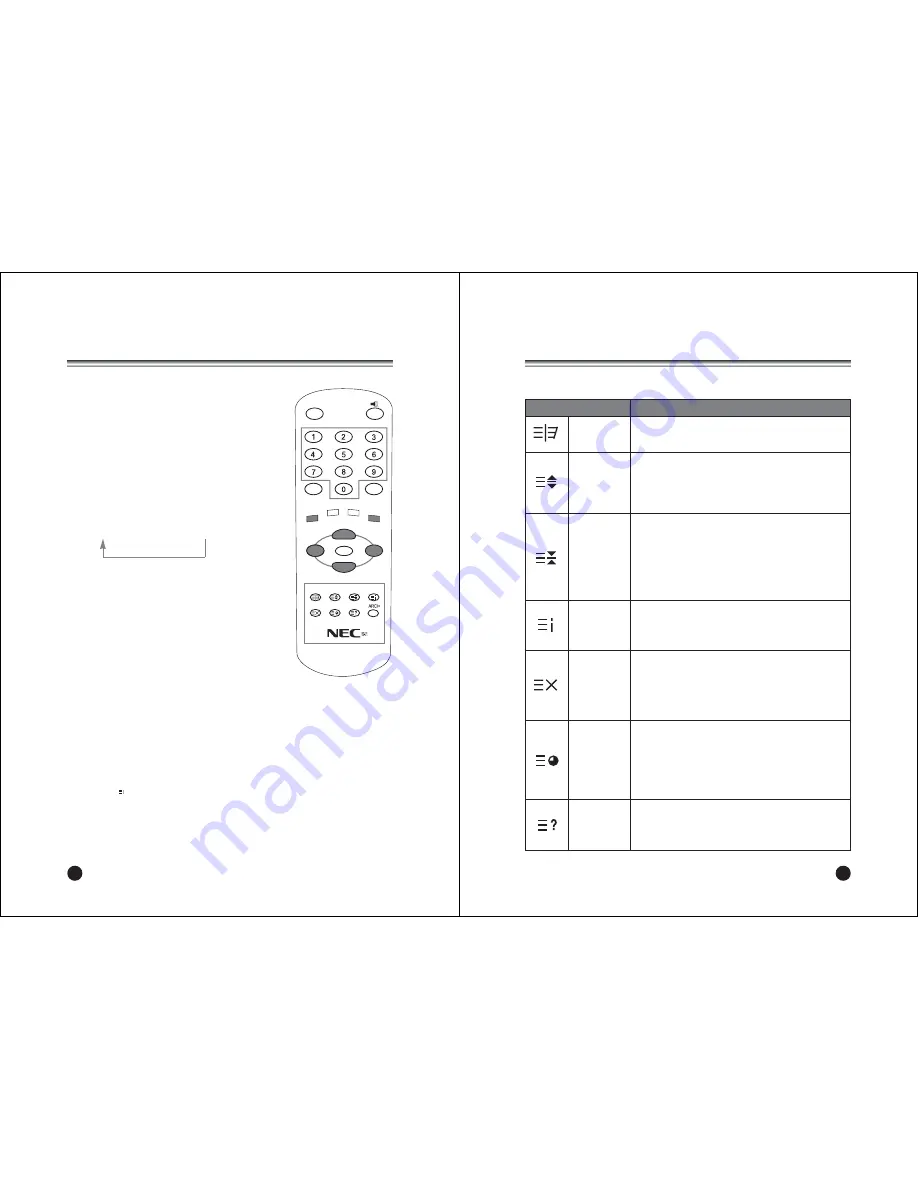
background image

18

Teletext

POWER

SSM

MENU

TEXT/MIX

UPDA TE

TIME

REVEAL

SIZE

SLEEP

INDEX

TV/AV

I/II

Q.VIEW

PSM

OK

C

VOL

VOL

B

PR

W

PR

V

TEXT On/Off

Press the TEXT/MIX button to switch to teletext. The initial
page or last selected page appears on the screen. Two
page numbers, TV Programme name, date and time are
displayed on the screen headline. The first page number
indicates your selection, while the second shows the
current page displayed.

1. Press 

TEXT/MIX

button once to set the TEXT mode.

2. Press 

TEXT/MIX

button once more displays the

teletext pages superimposed on the TV picture.

3. Press the 

TEXT/MIX

button to switch off teletext.

Text mode is off and TV mode appears.

4. If you press 

TEXT/MIX

button repeatedly displays

are changed as below. 

TEXT

؋

MIX

؋

TV mode

TOP text

The user guide displays four fields-red, green, yellow and
blue at the bottom of the screen. The yellow field denotes
the next group and the blue field indicates the next block.

Group/block/page selection

1. With the BLUE button you can progress from block to

block.

2. Use the YELLOW button to proceed to the next group

with automatic overflow to the next block.

3. With the GREEN button you can proceed to the next

existing page with automatic overflow to the next
group. Alternatively the 

PR

x

button can be used.

4. The RED button permits to return to previous selection.

Alternatively the 

PR

y

button can be used. 

FLOF text

The teletext pages are colour coded along the bottom of
the screen and are selected by pressing the corresponding
coloured button.

Page selection

1. Press the 

button to select the index page.

2. You can select the pages which are colour coded along

the bottom line with the same coloured buttons.

3. The 

VOL

Ïq

button can be used to select the

preceding or following page.

19

Teletext

Special Teletext functions

Changes teletext mode 
; only teletext mode, text mode superimposed on the
TV picture, TV mode

Selects double height text.
Press this button to enlarge the top half of the page.
Press this button again to enlarge the bottom half of
the page.
Press this button again to return to the normal display.

Stops the automatic page change which will occur if a
teletext page consists of 2 or more sub pages. The
number of sub pages and the sub page displayed is,
usually, shown on the screen below the time. When
this button is pressed the stop symbol is displayed at
the top left-hand corner of the screen and the
automatic page change is inhibited. To continue press
this button again.

Return to index page

TEXT/MIX

Functions

MENU

SIZE

HOLD

INDEX

Displays the TV picture on the screen while waiting for
the new teletext page. The display will appear at the
top left hand corner of the screen. When the updated
page is available then display will change to the page
number.
Press this button to view the updated teletext page.

UPDATE

When viewing a TV programme, press this button to
display the time at the top right hand corner of the
screen. Press this button again to remove the display.
In teletext mode press this button to select and hold or
change a four digit sub page number. This is displayed
along the bottom of the screen. Press this button again
to exit this function.

TIME

Press this button to display the concealed information,
such as solutions of riddles or puzzles.
Press this button again to remove the information from
the display.

REVEAL

Summary of Contents for NLT-15

Page 1: ...11 Manual programme 12 Programme edit 13 Picture Control 14 Manual picture control 14 Auto picture control 14 Sound Control 15 Other functions 16 17 TV COMPONENT VIDEO S VIDEO mode 16 Auto sleep 16 Blue back 16 Sleep timer 17 Sound output selection 17 Teletext 18 19 Text On Off 18 TOP text 18 FLOF text 18 Special Teletext function 19 Connecting external equipment 20 21 Antenna connection 20 COMPON...

Page 2: ...ric shock do not remove cover or back No user serviceable parts inside Refer servicing to qualified service personnel The lightning flash with arrowhead symbol within an equilateral triangle is intended to alert the user to the presence of uninsulated dangerous voltage within the product s enclosure that may be of sufficient magnitude to constitute a risk of electric shock to persons The exclamati...

Page 3: ...n when the TV is switched on 4 POWER Switches TV set on or off 5 Remote control sensor Accepts the IR signal of remote controller 6 ÏVOLq Volume Up Down Adjusts the volume Adjusts menu settings 7 TV AV Selects TV COMPONENT VIDEO S VIDEO or PC mode Clears the menu from the screen 1 Ant Antenna input 2 DC12V adaptor input 3 PC DTV INPUT 4 COMPONENT INPUT 5 HEADPHONE out Connect a headphone to this s...

Page 4: ...justs the sound level 13 SLEEP Sets the sleep timer Note In teletext mode the SLEEP is used for teletext function 14 TELETEXT buttons These buttons are used for teletext For further details see the Teletext section 15 ARC Aspect Ratio Control Selects a screen mode 4 3 16 9 or ZOOM ż Only the ARC button is operated at LCD 17 Wide NEC NLT 17W 10 14 12 11 13 15 POWER SSM MENU TEXT MIX UPDA TE TIME RE...

Page 5: ...wer button again on the remote controller or the TV itself to turn the TV off Note If the TV is on and the power button is pressed to turn the TV off the TV goes into standby mode Programme selection You can select a Programme number with the PRxy button or NUMBER buttons Volume adjustment Press the VOLÏq button to adjust the sound level Quick view Press the Q VIEW button to view the last channel ...

Page 6: ...Programme edit Ș Language Ș 3Pb 11 Setting up TV Programme Up to 100 TV Programmes can be stored in this set by programme numbers Once you have preset the programmes you will be able to use the PRxy or NUMBER button to scan the programmes you programmed Programmes can be tuned using automatic or manual modes Auto programme All Programmes that can be received are stored by this method It is recomme...

Page 7: ...e another Programme repeat steps 5 to 11 12 If the TV picture reception is not good then do the fine tuning Select FINE then adjust the received signal with the VOLÏq button POWER SSM MENU TEXT MIX UPDA TE TIME REVEAL SIZE SLEEP INDEX TV AV I II Q VIEW PSM OK CVOL VOLB PRW PRV ƇƉ ȖȘ 73 Manual programme System BG Channel V UHF 1 Fine Ș Ș Ș Search Ș Ș Ș Name C 01 Storage 1 13 Setting up TV Programme...

Page 8: ...Music Movie or Speech and you can also adjust the sound frequency of equalizer balance If you switch AVL to on the set automatically keeps on an equal volume level even if you change programmes 1 Press the MENU button 2 Select the Sound menu Then press the VOLÏq button 3 Press the PRxy button to select the desired sound item Equalizer Balance AVL or Surround 4 Press the VOLÏq button to make desire...

Page 9: ... On 5 Press the TV AV button to return to normal TV viewing Blue back No signal channel is expressed as a blue screen POWER SSM MENU TEXT MIX UPDA TE TIME REVEAL SIZE SLEEP INDEX TV AV I II Q VIEW PSM OK CVOL VOLB PRW PRV ƇƉ ȖȘ 5 6 Special Input TV Auto sleep Off Blue back Off 17 Other functions Sleep timer You don t have to remember to switch the set off before you go to sleep The sleep timer aut...

Page 10: ...x page 2 You can select the pages which are colour coded along the bottom line with the same coloured buttons 3 The VOLÏq button can be used to select the preceding or following page 19 Teletext Special Teletext functions Changes teletext mode only teletext mode text mode superimposed on the TV picture TV mode Selects double height text Press this button to enlarge the top half of the page Press t...

Page 11: ...na input on the rear of the TV 2 Connect the antenna cable to the antenna in jack on the VCR 3 Press the TV AV button to select Antenna input source 4 Press the PLAY button on the VCR VCR POWER ANT POWER L R COMPONENT DVD VCR A V IN L MONO R 21 External Equipment Connection S VIDEO INPUT If using an S VIDEO source the picture quality will be improved over a video source 1 Connect the S VIDEO outpu...

Page 12: ...l Vertical position Clock Phase Auto and Reset as you prefer 1 Press the TV AV button to select the PC mode 2 Press the MENU button 3 Press the PRxy button to select the desired picture item 4 Press the VOLÏq button to make appropriate adjustments Contrast This function is to adjust picture to light dark Brightness This function is to adjust brightness of picture Temperature Temperature is a measu...

Page 13: ...ed Check the brightness setting of the display Lamp may have malfunction Check the sound setting Make sure the sound is not muted Make sure the connectors of the optional speaker system are securely inserted Make sure COLOR and CONTRAST settings PC image not centered Check the horizontal vertical position setting PC image not clear or has stripes Check Clock and phase settings Try using Auto funct...

Page 14: ...nd Brisbane Unit 4 305 Montague Road West End 4101 131 632 Southport Shop 1 48 Ferry Road Southport 4215 07 5591 3670 South Adelaide Adelaide 84A Richmond Rd Keswick 5053 08 8375 5710 Western Australia Perth 45 Sarich Court Osbome Park 6017 08 9445 5901 For Service in outer areas please contact your NEC retailer for the address of the nearest Authorised NEC Service Centre NEC Australia Pty Ltd Hom...

Reviews: