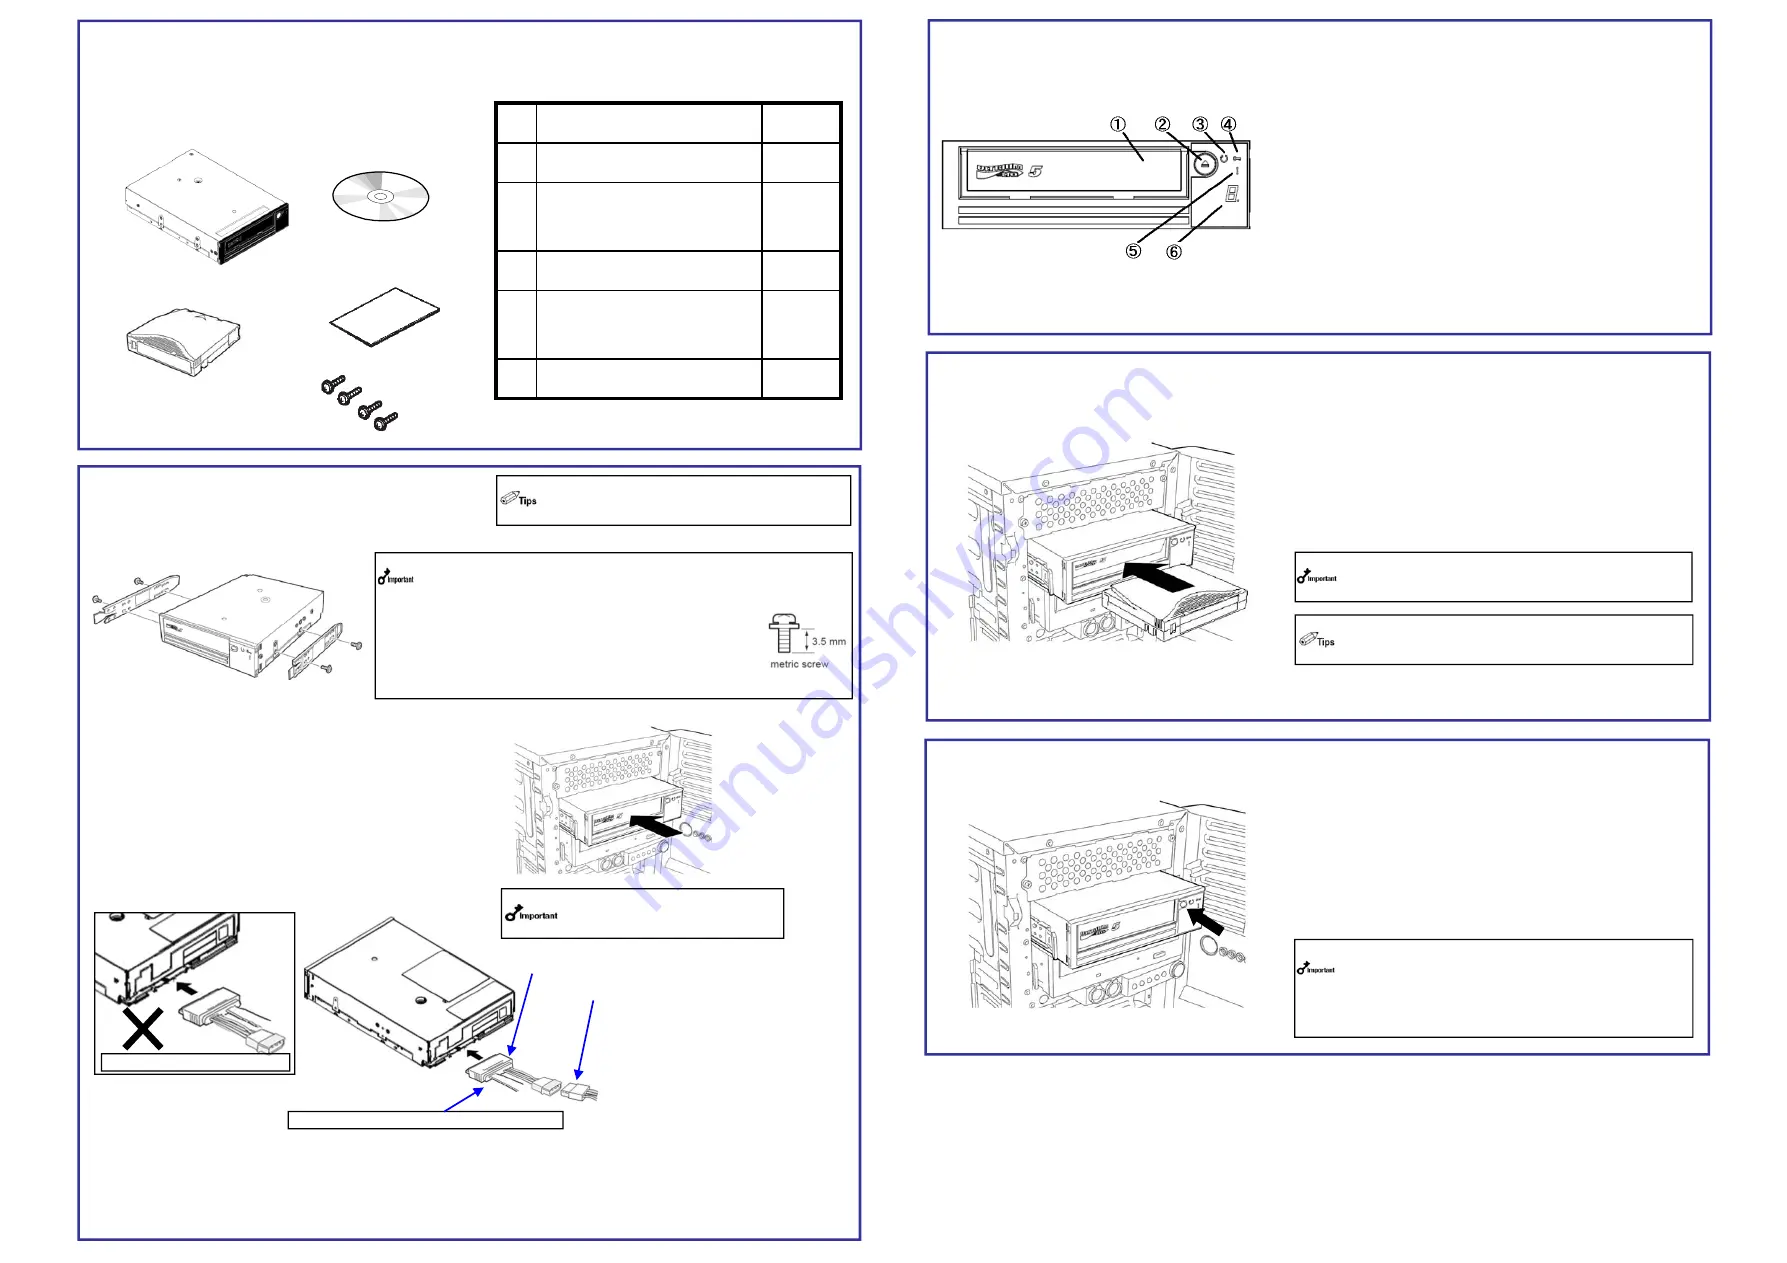
5. Ejecting the Data Cartridge
(1) Confirm that the power for the Internal LTO is on.
(2) Press the eject button. The drive rewinds the tape and
partially ejects the cartridge.
The eject cycle will take a few minute.
(3) After the cartridge partially ejects, grasp the cartridge
and remove it.
3. Mounting on the Server
The procedure for installing the drive in a server is as follows.
(1) Mount the latching rail as shown in the figure below.
Secure the upper holes of the latching rail with screws.
(2) Install the Internal LTO nto the server.
1. Verify the packed contents
Parts name
Qty.
1
N8151-128 Internal LTO
1
2
CD
(User’s Guide/Driver)
1
3
Cleaning cartridge
1
4
Startup Guide
(this manual )
1
5
Screws
4
Verify the packed contents with the part list given below and ensure that all the components
and parts are present. Also, check that each item is undamaged. If a component or part is
missing or damaged, contact your dealer.
1
2
3
4
5
Some servers require the rails to be used. For
details on how to install the rails, refer to the
server's operating manual.
Please use the correct latching rails which are attached with the
system.
Use the screws attached to the Internal LTO for latching rails.
The attached screws are metric
screws (4.0 mm length, 3.5 mm under its washer).
Using a longer screw than them may cause
damage to the Internal LTO internally and malfunction
may occur. Please adjust to move this product forward
by about 3mm hen mounting on Express5800/140Rf-4.
(3) Connect the SAS cable and DC cable to the
drive as shown in the figure below.
DC power cable from the system
is connected to the DC connector
from the SAS cable.
(4) After connecting the SAS cable, bundle the cables so that it does not interfere with the other devices or fan.
(5) Attach the cover to the server. Plug the power cable to the outlet.
(6) Turn on the server.
SAS Cable
DC power cable
3. PART NAME AND FUNCTION
①
Cartridge insert
Slot in which the cartridge is inserted.
②
EJECT button
Press this button when ejecting a cartridge.
③
Ready LED (green)
The LED provides information about the state of
the drive with light.
④
Encrypt LED (white)
The Encrypt LED provides information about the state of
the encryption with light.
⑤
Error LED (amber)
The Error LED provides information about the state of
the error with light.
⑥
Single Character Display
Display that shows the drive status by single character.
4. Setting the Data Cartridge
(1) Ensure the drive LED goes on
(2) Confirm that the Write Protect Switch is
correctly set.
(3) Insert the data cartridge into the data cartridge
slot slowly. When the cartridge is inserted at the
middle, it is automatically installed into the right position.
Do not change the position for the write protect switch
during the drive is installed into the drive. It may cause
the error if the position is changed with installation.
When the data cartridge is need to be re-installed at the
eject position, once the cartridge is removed from the
drive, then, once again, re-installation will be done
If the cartridge eject command is issued by the backup
software, the Internal LTO rewinds the tape, but does
not eject a cartridge. In this case, make sure that the
LTO is ready to eject a cartridge (the status LED blinks
twice and repeats that cycle). Then, press the Eject
button to eject a cartridge.
Check the direction of the SAS cable.
Do not connect with reverse.
The contents of this document may be changed without notice.
© NEC Corporation 2015 No copying or modifying without permission of NEC Corporation.
Printed on recycled paper.


