

N8120-102
Desk/LCD Mount Kit
Installation and Handling Guide
856-122303-102-00
First Edition, October 2007
Preface
Congratulations for your purchase of our product.
N8120-102 Desk/LCD Mount kit is used for installation of
US110.
Before installing or removing the product, read thoroughly
this guide and the User's Guide of the US110. Keep this
guide in a safe place for future use.
Safety Precautions
Follow instructions given in this guide for proper operations
and safe use of the product.
See also "Notes on Safety" described in the "US110 User's
Guide" that comes with your US110 before installing the product.
Be sure to unplug the power cord of the US110 before starting
installation.
Observe instructions given in this guide and the "US110 User's
Guide" to use the US110 safely. Failure to follow these
instructions may cause a fire, personal injury, or property
damage.
<Safety Indication>
WARNING
Indicates the presence of a hazard that may result
in death or serious personal injury.
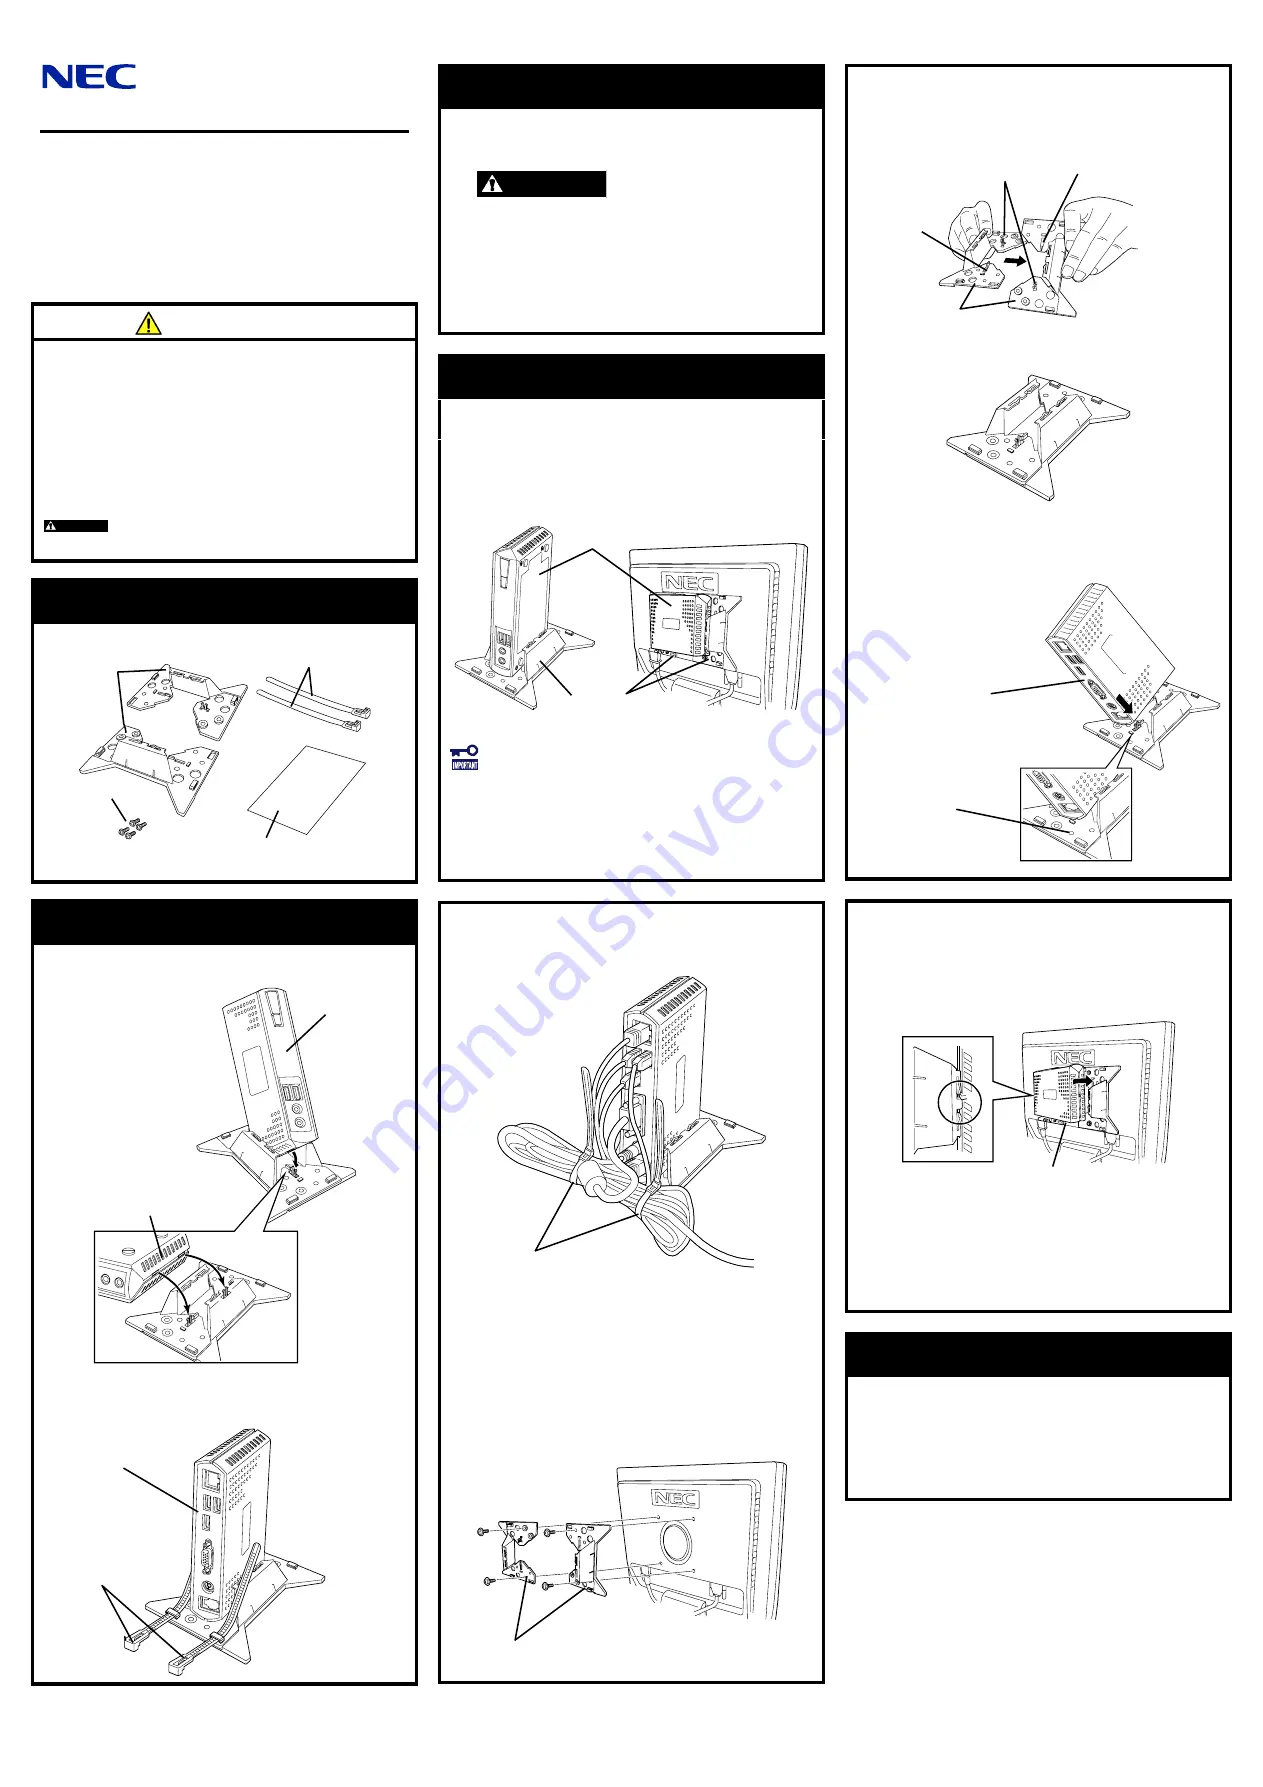
Step 1 Checking Components
The shipping carton contains the following components.
Installation and Handling Guide
*1 Each of two Desk/LCD Mount kits has the same shape.
Step 3 Installation (Cont'd)
Then, insert another projection into another hole on the
US110, and fix the US110 to the bracket.
3.
Attach the two tie wraps for securing cables to the
bracket.
Step 2 Before Starting Installation
1.
Quit all the application programs and shutdown the
system.
2.
Power off the US110, and unplug the power cord.
WARNING
Be sure to power of the US110 and unplug the power
cord. If the US110 is off-powered but its power cord is
plugged to a power source, touching an internal
component may cause an electric shock.
Do not disconnect the power cord while your hands are
wet. Doing so may cause an electric shock.
3.
Disconnect all the cables from the US110.
Step 3 Installation
The US110 can be installed using the Desk/LCD Mount kit in
the following two ways:
– Place the US110 vertically on the desk by using the
Desk/LCD Mount kit as stabilizers.
– Install the US110 to the rear of the LCD unit by using the
Desk/LCD Mount kit as brackets.
< When used as stabilizers> <When used as brackets>
If you want to install the US110 in the desired position
of the LCD unit, it is recommended to use N8120-103
LCD mount adjuster option additionally.
If you want to place the US110 on the desk, see "Using
US110 on Desktop" described later.
If you want to install the US110 to the rear of LCD unit, see
"Installing US110 to the LCD Unit" described later.
4.
Secure cables to be connected to the US110 with tie
wraps.
Secure cables as shown in the figure below.
Installing US110 to the LCD Unit
1.
Secure the two brackets to the rear of the LCD unit with
screws.
As shown in the figure below, secure the two brackets to
the rear of LCD unit with two screws for each.
Using US110 on Desktop
1.
Assemble two brackets.
As shown in the figure below, cross the two brackets.
Align the projection on either bracket with the hole on the
other bracket.
The two brackets must be assembled as shown in the
figure below.
2.
Fix the US110 to the assembled bracket.
Align the rear face of US110 with the marking for
mounting on the bracket, then insert a projection of the
bracket into the hole on the US110.
2.
Fix the US110 to the bracket.
Place the US110 so that its rear panel faces downward,
as shown in the figure below. Engage the hook of the
bracket with cavity at either side of the US110, then
engage another hook with the cavity at another side.
Push the US110 until it is fixed.
Rear face of US110
3.
Attach the two tie wraps for securing cables to the
bracket.
Pass the tie wraps through the lower holes of the bracket
so that they can secure the cables to be connected to
the connectors of the US110.
4.
Secure cables to be connected to the US110 with tie
wraps.
Removal Procedures
1.
Quit all the application programs and shutdown the
system.
2.
Power off the US110, and unplug the power cord.
3.
Disconnect all the cables from the US110.
Remove the tie wraps and disconnect all the cables.
4.
Remove the US110 from the bracket.
Transfer to Third Party
When you transfer or sell this product to a third party, include
all the attachments including this guide.
Disposal
Dispose of the product according to all national laws and
regulations.
NEC Corporation 2007
No part of this manual may be reproduced in any form without the
prior written permission of NEC Corporation.
US110
Brackets
Projection
Hole
Hole
Brackets
Rear face of
US110
Marking for
mounting
Tie wraps (2 pcs.)
Desk/LCD
Mount kit
(2 pcs.)*1
Screws (4 pcs.)
Bottom of US110
Rear face of
US110
Tie wraps
Front face of
US110
Brackets
Tie wraps


