background image

E–25

PC Card Files

File Name

Size

Date

@.
@..
12345678.txt
12345678.bmp
12345678.htm

<DIR>
<DIR>

1234567890
1234567890
1234567890

1999/06/01 HH:MM
1999/06/01 HH:MM
1999/06/17 HH:MM
1999/06/17 HH:MM
1999/06/17 HH:MM

Execute

Exit

Sort

Name (abc..)

All (*. *)

File Group

Free Space

Path c : /
Info.

5 Files

Help
Contents

Source Information

Projector Information

PC Card Files

Displays a list of all the files stored in the PC card so that you can
select a file you want to display. You can also sort files by file name
or date, or display the file.
Although a list of all the files in the PC card is displayed, you can
view files in text, idx, HTML, JPEG and BMP format only.
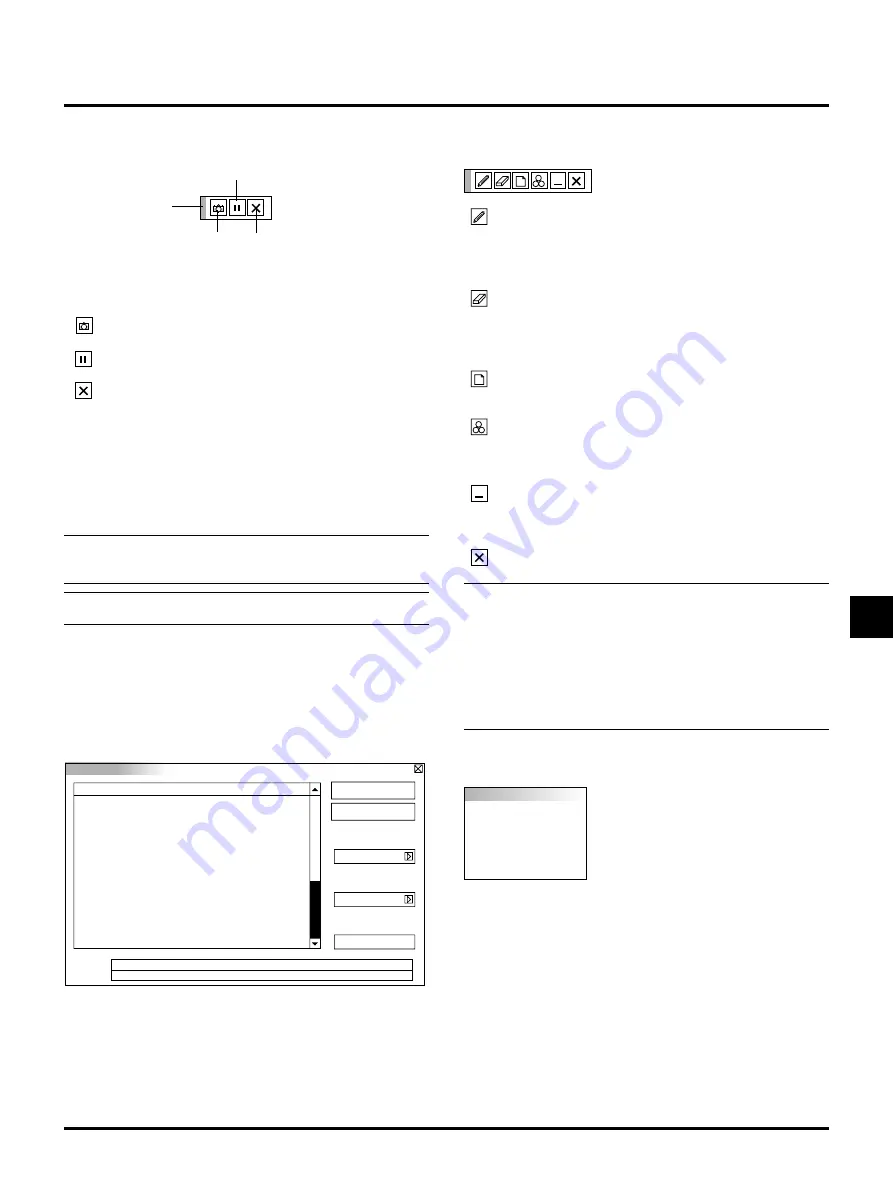
Capture Exit

Freeze

Drag

Drag: Drags to move the tool bar. (for USB mouse operation

only)

Get:

Captures an image and save it as a JPEG file in a PC
card.

Freeze: Freezes and unfreezes images.

Exit:

Exits the Capture function.

Unless a PC card is inserted into the PC Card Access slot of the pro-
jector, "No Card" is displayed. This means that the Capture feature is
not available.
The "Card Error" display means that the free space of the PC card is
insufficient for saving images. Make more space available on the card
by erasing unwanted images with your PC. The number of images
that can be captured depends on the size of the PC card.

NOTE: Be sure not to turn off the power or remove the PC card
while capturing an image. Doing so could cause a loss of the data in
the PC card or damage to the card itself.

NOTE: Captured images with higher resolution than the projector's
native resolution cannot be displayed correctly.

Selecting “Execute” displays the file you selected.

ChalkBoard (available only when using with USB mouse)

Provides the tool bar for producing freehand drawings.

Pen:

Left-click and drag to draw. Right-click to display the
pen palette containing four lines of different thickness
from which you can select a line you prefer by left-
clicking.

Erase: Left-click and drag to erase part of a drawing. Right-

click to display the eraser palette containing four eraser
of different thickness from which you can select an
eraser you prefer by left-clicking.

Clear: Clears the drawing completely from the ChalkBoard

screen.

Color: Selects a color. Left-click to display the color palette

from which you can select a color you prefer by left-
clicking.

View: Hides the tool bar by left-clicking. Right-clicking any-

where on the screen displays the ChalkBoard tool bar
again.

Exit:

Clears the complete drawing and exits the ChalkBoard.

NOTE:
* The ChalkBoard feature is available only when a USB mouse is used. Free-

hand drawings cannot be saved or captured.

* The main menu is not available while you display the ChalkBoard screen.
* The Capture and the Source Display function are not available on

ChalkBoard screen.

* Switching slides clears a drawing completely.
* Selecting BMP and JPEG files automatically switches to the PC Card

Viewer source.

Help

Contents

Provides an online help about how to use
the menus. An undelined link means that
you can move to an adjustment item di-
rectly. Selecting the underlined link and
pressing ENTER moves to the corre-
sponding adjustment item.

Source Information

Displays the status of the current signal.
This dialog box has three pages.

Projector Information

Displays the lamp usage hours.

The tool bar includes the following buttons:

Summary of Contents for MultiSync MT840E

Page 1: ...MultiSync MT840E MT1040E MT1045E LCD Projector User s Manual English...

Page 2: ...NE BY QUALIFIED NEC SERVICE PERSONNEL DOC Compliance Notice This Class A digital apparatus meets all requirements of the Canadian Interference Causing Equipment Regula tions 3 GSGV Acoustic Noise Info...

Page 3: ...to operate on a power supply of 100 120 or 200 240 V 50 60 Hz AC Ensure that your power supply fits this requirement before attempting to use your projector 2 Handle the power cable carefully and avoi...

Page 4: ...om falling into your projector Do not attempt to re trieve any objects that might fall into your projector Do not insert any metal objects such as a wire or screwdriver into your projector If somethin...

Page 5: ...r E 22 Source Display E 22 Setup E 23 Orientation E 23 Background E 23 Signal Select E 23 Auto Start E 23 Power Management E 23 Power Off Confirmation E 23 Mouse Settings E 23 Keystone Save E 23 Fan H...

Page 6: ...point on the screen with the pointer and enlarge the selected area Supports most IBM VGA SVGA XGA 2 SXGA with Ad vanced AccuBlend 3 Macintosh component signal YCbCr YPbPr or any other RGB signals with...

Page 7: ...T O A D J U S T Remote Sensor One Touch Tilt Button Rear Features Controls USB Mouse Terminal Focus Lens Adjustable Tilt Foot AC Input Connect the supplied power cable s three pin plug here Air Filte...

Page 8: ...adjustments to the last condition while you are in the adjustment or setting menu 7 Status Indicator When this is lit red continually it s warning you that the projection lamp has exceeded 2000 hours...

Page 9: ...er image to an external monitor from the RGB input source 10 RGB Audio Input Connector This is where you connect RGB audio output from a computer or another RGB source RGB Input Connector Mini D Sub 1...

Page 10: ...adjust position This pad selects the submenu you want to adjust After you make your on screen menu selection use this pad to adjust the level up or down 5 Cancel Right Click Button Press this button t...

Page 11: ...that you are in the Projector mode 14 Laser Button Press and hold this button to activate the laser pointer When lit you can use the laser to draw your audience s attention to a red dot that you can p...

Page 12: ...adjustment for the front of the projector Selecting a Location The further your projector is from the screen or wall the larger the image The minimum size the image can be is approximately 30 0 76 m...

Page 13: ...355 2 Throwing Angle U Wide degree 10 4 10 3 10 1 10 1 10 0 10 0 10 0 10 0 10 0 9 9 9 9 Tele degree 8 6 8 5 8 4 8 4 8 4 8 3 8 3 8 3 8 3 8 3 8 3 V inch 18 0 24 36 48 60 72 90 108 120 144 180 mm 457 2 6...

Page 14: ...your pro jector so heat can dissipate Do not cover the vents on the side or the front of the projector If your projector is mounted on the ceiling and your image is upside down use the Menu and Selec...

Page 15: ...n on the projector and the computer 4 If the projector goes blank after a period of inactivity it may be caused by a screen saver installed on the computer you ve con nected to the projector Connectin...

Page 16: ...Y Cb Cr outputs use common RCA cables not provided to connect a composite VIDEO output of the DVD player to the Video Input of the pro jector 3 Turn on the projector and the DVD player NOTE Refer to...

Page 17: ...e during this time Using the Menus NOTE The on screen menu may not be displayed correctly while interlaced motion video image is projected 1 Press the Menu button on the remote control or projector ca...

Page 18: ...ent Power Off Confirmation Mouse Button Mouse Sensitivity Clear Lamp Hour Meter Keystone Save Fan High Speed Mode Remote Sensor S Video Mode Select PC Card Viewer Options Capture Options Source Name I...

Page 19: ...ton Click to close the window with saving changes USB mouse only Highlight Indicates the selected menu or item Solid triangle Indicates further choices are available A highlighted triangle indicates t...

Page 20: ...automatically or manually depending on the setting on PC CardViewer Options of the menu This allows you to stopAuto Play while you are play ing back and to resume playing from the selected slide or fo...

Page 21: ...when you are in the Native mode the image is displayed full screen using the Advanced AccuBlend feature Color Temperature This feature adjusts the color temperature using the slide bar Move the slide...

Page 22: ...ff Low Medium High Color Matrix Select Color Matrix SDTV HDTV Select Color Matrix Cb Cr B Y R Y Pb Pr First select an appropriate color matrix to fit your component signal for HDTV or SDTV Then select...

Page 23: ...S Video sepa rately first select the radio button and then select the video stan dard from the pull down menu This must be done for Video and S Video respectively Page2 Auto Start Turns the projector...

Page 24: ...n the projector the slides will automatically start to play back from any given slide Capture Options available for JPEG only You have three options for JPEG compression quality High qual ity Normal a...

Page 25: ...correctly Selecting Execute displays the file you selected ChalkBoard available only when using with USB mouse Provides the tool bar for producing freehand drawings Pen Left click and drag to draw Rig...

Page 26: ...lists of slides and editing Automatic slide conversion of files created with Microsoft PowerPoint 95 and 97 Microsoft Windows and PowerPoint are registered trademarks of Microsoft Corporation Inserti...

Page 27: ...C Card Viewer slides In this manual it is referred to as the PC Card Viewer software PC CARD VIEWER PPT CONVERTER 3 0 This is an application that converts files created with Microsoft PowerPoint 95 or...

Page 28: ...ous slide or folder Or this lets you play slides back in reverse Next Advances to the next slide or folder Or this lets you play slides back Play Play Stop Plays back automatically or manually de pend...

Page 29: ...s retained When you return back to the PC Card Viewer you will get the slide that has been retained SOURCE AUTO ADJ COMPUTER PROJECTOR POWER PJ S A OFF ON NOTE The PC card editing operation cannot be...

Page 30: ...es stored on the PC card select Edit index from the PC Card Viewer software s File menu and move the index you want to display to within 12 indexes from the top of the folder index For details on inde...

Page 31: ...Deleting Captured Images Using the Delete button on the tool bar for PC Card Viewer can de lete captured images To delete captured images 1 Select PC Card Viewer 2 Use button to select the Capture fol...

Page 32: ...of image format The standard Windows Bit Map format used for MS DOS Windows compatible comput ers A type of image format JPEG is the abbreviation of Joint Photographic Experts Group JPEG compression...

Page 33: ...1 M ENU ENTER S E L E C T P O W S T A T U S S O U R C E 2 2 Loosen the two screws securing the lamp housing until the screw driver goes into a freewheeling condition The three screws are not removabl...

Page 34: ...wer and unplug the projector before re placing the filter Only clean the outside of the filter cover with a vacuum cleaner Do not attempt to operate the projector without a filter cover Your projector...

Page 35: ...ojector has overheated or the lamp usage exceeds 2100 hours 1600 hours MT1045 If there is insufficient ventilation around the projector or if the room where you re presenting is particu larly warm mov...

Page 36: ...Card Viewer software etc to change the image size to 10242768 dots MT840 8002600 dots In addition the displayable image size differs according to the resolution of the projector Use the PC Card Viewe...

Page 37: ...illion colors simultaneously Horizontal Resolution 550 TV lines NTSC PAL NTSC4 43 YCbCr 350 TV lines SECAM RGB MT840 800 dots horizontal 600 dots vertical MT1040 MT1045 1024 dots horizontal 768 dots v...

Page 38: ...N OFF SOURCE AUTO ADJUST AC IN USB 1 5 0 06 281 11 06 73 5 2 89 121 4 76 4 0 16 6 6 0 26 364 14 33 Lens center 39 5 1 56 Lens center PC CONTROL REMOTE CONTROL INPUT MOUSE OUTPUT S VIDEO VIDEO AUDIO RG...

Page 39: ...OFF SOURCE AUTO ADJUST AC IN USB PC CARD 1 5 0 06 281 11 06 73 5 2 89 121 4 76 4 0 16 7 5 0 3 39 5 1 56 376 14 9 PC CONTROL REMOTE CONTROL INPUT MOUSE OUTPUT S VIDEO VIDEO AUDIO RGB INPUT AUDIO MONITO...

Page 40: ...Cr 2 Green or Sync on Green Y 3 Blue Cb 4 Ground 5 Ground 6 Red Ground Cr Ground 7 Green Ground Y Ground 8 Blue Ground Cb Ground 9 No Connection 10 Sync Signal Ground 11 Ground 12 Bi directional DATA...

Page 41: ...832 2 624 74 55 49 725 57 283 Y VESA 1024 2 768 43 Interlaced 35 5 44 9 Y VESA 1024 2 768 60 48 363 65 Y VESA 1024 2 768 70 07 57 476 75 Y IBM 1024 2 768 72 03 58 131 79 Y MAC 1024 2 768 74 93 60 241...

Page 42: ...H POWER OFF 02H 01H 00H 00H 00H 03H INPUT SELECT RGB 02H 03H 00H 00H 02H 01H 01H 09H INPUT SELECT VIDEO 02H 03H 00H 00H 02H 01H 06H 0EH INPUT SELECT S VIDEO 02H 03H 00H 00H 02H 01H 0BH 13H INPUT SELEC...

Reviews: