background image

English

English-3

Figure 1

Figure 2

Contents

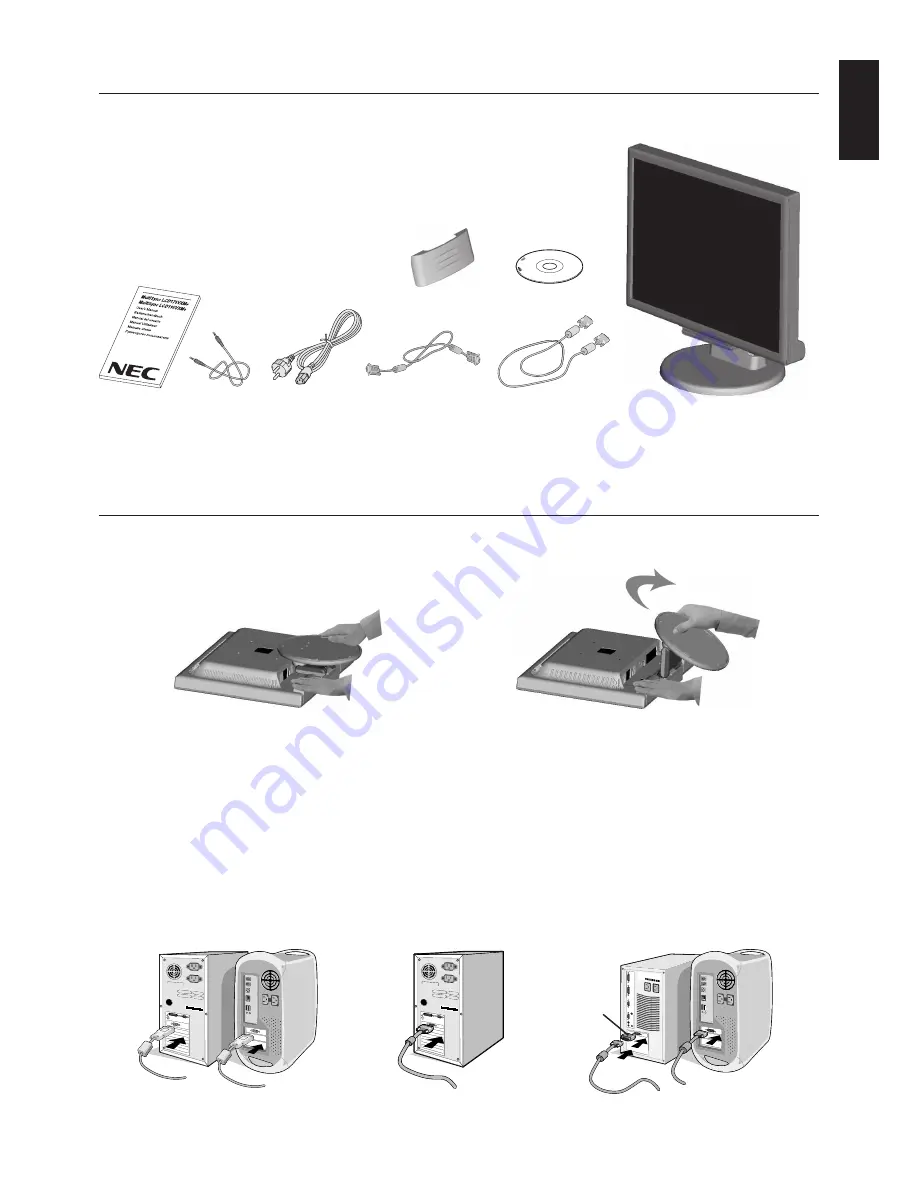
Your new NEC MultiSync LCD monitor box* should contain the following:

MultiSync LCD monitor with tilt base

Audio Cable

Power Cord

Video Signal Cable (15-pin mini D-SUB male to 15-pin mini D-SUB male)

Video Signal Cable (DVI-D to DVI-D) (LC only)

User’s Manual

CD-ROM

Cable management cover

*

Remember to save your original box and packing material to transport or ship the monitor.

Quick Start

To pull the stand, follow these instructions:

1. Place monitor face down on a non-abrasive surface (

Figure 1

).

2. Pull the stand holding the monitor with the other hand until the stand clicks (

Figure 2

).

NOTE:

Handle with care when pulling the stand.

User’s Manual

Audio Cable

Power Cord

15-pin mini D-SUB

male to 15-pin mini

D-SUB male

DVI-D to DVI-D

(LC only)

MultiSync LCD monitor

CD-ROM

Cable management

cover

Figure A.1

Figure A.3

Macintosh
Cable Adapter
(not included)

Figure A.2

NOTE:

Reverse this procedure if you need to re-pack the monitor.

To attach the MultiSync LCD monitor to your system, follow these instructions:

1. Turn off the power to your computer.

2.

For the PC or MAC with DVI digital output:

 Connect the DVI-D signal cable to the connector of the display card in your

system (

Figure A.1

). Tighten all screws.

For the PC with Analog output:

 Connect the 15-pin mini D-SUB signal cable to the connector of the display card in your

system (

Figure A.2

). Tighten all screws.

For the Mac: 

Connect the MultiSync Macintosh cable adapter (not included) to the computer. Attach the 15-pin mini

D-SUB signal cable to the MultiSync Macintosh cable adapter


(

Figure A.3

). Tighten all screws.

NOTE:

Some Macintosh systems do not require a Macintosh cable adapter.

Summary of Contents for MultiSync LCD195VXM+

Page 1: ...MultiSync LCD175VXM MultiSync LCD195VXM User s Manual...

Page 2: ...represent EPA endorsement of any product or service ErgoDesign is a registered trademark of NEC Display Solutions Ltd in Austria Benelux Denmark France Germany Italy Norway Spain Sweden U K IBM PC XT...

Page 3: ...ul interference to radio communications However there is no guarantee that interference will not occur in a particular installation If this equipment does cause harmful interference to radio or televi...

Page 4: ...o 15 pin mini D SUB male DVI D to DVI D LCD195VXM only MultiSync LCD monitor CD ROM Cable management cover Figure A 1 Figure A 3 Macintosh Cable Adapter not included Figure A 2 NOTE Reverse this proce...

Page 5: ...A 4 NOTE Please confirm that the tabs are completely secure 4 Connect all cables to the appropriate connector on the back of the monitor Figure B 1 Connect the Headphone not included to the appropriat...

Page 6: ...SCREWS M4 MAX depth LCD175VXM 7 0mm LCD195VXM 8 5mm If use other screw check depth of hole Weight of LCD assembly 3 8 kg LCD175VXM MAX 5 0 kg LCD195VXM MAX Specifications Remove Monitor Stand for Moun...

Page 7: ...goes to left Cursor goes to right At OSD showing Adjustment stage Go to Icon selection stage Adjust value decrease or Cursor for adjust goes to left Adjust value increase or Cursor for adjust goes to...

Page 8: ...presets 9300 7500 sRGB USER NATIVE select the desired colour setting The sRGB and NATIVE colour presets are standard and cannot be changed COLOUR RED Increase or decreases Red The change will appear o...

Page 9: ...or MONITOR INFO Indicates the model and serial numbers of your monitor OSM Warning OSM Warning menus disappear with SELECT button NO SIGNAL This function gives a warning when there is no signal presen...

Page 10: ...ure humid dusty or oily areas Do not cover vent on monitor Immediately unplug your monitor from the wall outlet and refer servicing to qualified service personnel under the following conditions When t...

Page 11: ...patterns on the monitor for long periods of time to avoid image persistence after image effects Get regular eye checkups Ergonomics To realize the maximum ergonomics benefits we recommend the followin...

Page 12: ...8 1 60 Hz to 75 Hz 1152 x 864 1 70 Hz to 75 Hz 1152 x 870 1 75 Hz 1280 x 960 1 60 Hz to 75 Hz Recommended resolution is 60 Hz for 1280 x 1024 60 Hz to 75 Hz optimal display performance Active Display...

Page 13: ...8 1 60 Hz to 75 Hz 1152 x 864 1 70 Hz 1152 x 870 1 75 Hz 1280 x 960 1 60 Hz to 75 Hz Recommended resolution is 60 Hz for 1280 x 1024 60 Hz to 75 Hz optimal display performance Active Display Area Hori...

Page 14: ...nd compliance with MPRII and TCO guidelines for lower emissions Plug and Play The Microsoft solution with the Windows operating system facilitates setup and installation by allowing the monitor to sen...

Page 15: ...e turned off for one hour to erase the image As with all personal display devices NEC DISPLAY SOLUTIONS recommends displaying moving images and using a moving screen saver at regular intervals wheneve...

Page 16: ...rgy Energy saving mode after a certain time beneficial both for the user and the environment Electrical safety Emissions Electromagnetic fields Noise emissions Ecology The product must be prepared for...

Page 17: ...ng This monitor features an advanced energy saving capability When a VESA Display Power Management Signalling DPMS Standard signal is sent to the monitor the Energy Saving mode is activated The monito...

Reviews: