background image

English-6

Quick Start

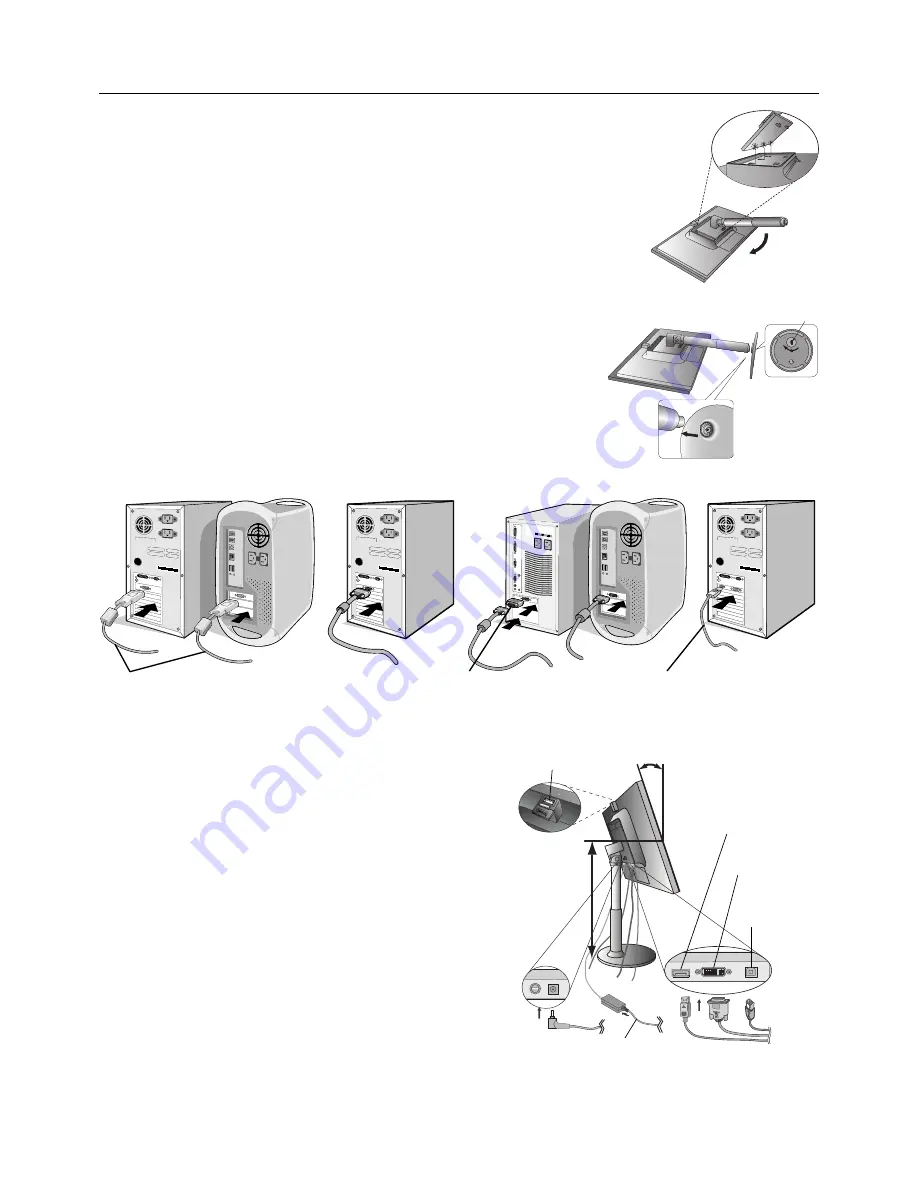
To attach the Base to the LCD stand:

1. Place monitor face down on a non-abrasive surface (

Figure 1

).

NOTE:

Handle with care when placing monitor face down to avoid damaging the front control keys.

2. Put the upper hooks of the stand in the slot of the monitor then push stand into monitor in direction

of the arrow as shown in 

Figure 1 

and confirm that the stand is locked.

NOTE:

Handle with care when pulling the stand.

3. Attach the base stand to stand and turn the connecting screw at the bottom of the base

stand fully so that it is completely fixed (

Figure 2

).

NOTE:

Reverse this procedure if you need to re-pack the monitor.

To attach the MultiSync LCD monitor to your computer system, follow these instructions:

1. Turn off the power to your computer.

2.

For PC or MAC with DVI digital output:

 Connect the DVI signal cable to the

connector of the display card in your system (

Figure A.1

). Tighten all screws.

For PC with Analog output:

 Connect the 15-pin mini D-SUB to DVI-A signal cable

to the connector of the display card in your system (

Figure A.2

). Tighten all screws.

For MAC:

 Connect the Macintosh cable adapter to the computer, then attach the

15-pin mini D-SUB to DVI-A signal cable to the Macintosh cable adapter (

Figure A.3

).

Tighten all screws.

For PC with DisplayPort output: 

Connect the DisplayPort cable to the connector of the

display card in your system (

Figure A.4

).

NOTE:

Some Macintosh systems do not require a Macintosh cable adapter.

3. Place hands on each side of the monitor to tilt the LCD panel

30-degree angle and lift up to the highest position (

Figure B.1

).

4. Connect all cables to the appropriate connectors on the back of

the monitor, plug the captive power cord into the AC adapter
(

Figure B.1

). When using the USB cable, connect the B type

connector to the USB upstream port on the right back side
of the monitor and the A type connector to the downstream
port on the computer (

Figure B.1a

). If you can use the

cord from the USB device, use the downstream ports on
the back-Top side of the monitor.

5. Place AC adapter holder and cable holder onto the stand (

Figure B.2

).

6. Position the Video Signal Cable and AC adapter between the holes

on the cable holder, as indicated in 

Figure B.2

/

Figure B.3

.

Position the AC adapter between the holes on the AC adapter
holder, as indicated in 

Figure B.2

.

Figure A.1

Figure A.3

Macintosh
Cable Adapter
(not included)

Figure A.2

DVI signal cable

Figure A.4

DisplayPort cable
(not included)

Figure 1

Figure 2

Screws

Figure B.1

Power Cord

USB upstream
port

Highest stand position

30˚ Tilt

DVI

DisplayPort

USB downstream port

Summary of Contents for MultiSync EX231Wp

Page 1: ...MultiSync EX231W MultiSync EX231Wp User s Manual...

Page 2: ...ts English 5 Quick Start English 6 Controls English 10 Specifications EX231W English 16 Specifications EX231Wp English 17 Features English 18 Troubleshooting English 19 Using the Auto Brightness funct...

Page 3: ...QUALIFIED SERVICE PERSONNEL Declaration of the Manufacturer We hereby certify that the colour monitor MultiSync EX231W L230NW MultiSync EX231Wp L230UH are in compliance with Council Directive 2006 95...

Page 4: ...ected Consult your dealer or an experienced radio TV technician for help If necessary the user should contact the dealer or an experienced radio television technician for additional suggestions The us...

Page 5: ...wall outlet and refer servicing to qualified service personnel under the following conditions When the power supply cord or plug is damaged When AC adapter is damaged If liquid has been spilled or obj...

Page 6: ...ence after image effects Get regular eye checkups Ergonomics To realize the maximum ergonomics benefits we recommend the following Adjust the Brightness until the background raster disappears Do not p...

Page 7: ...Signal Cable DVI D to DVI D USB Cable Setup Manual CD ROM includes complete User s Manual in PDF format Power Cord 1 Setup Manual 15 pin mini D SUB male to DVI A DVI D to DVI D Remember to save your...

Page 8: ...ignal cable to the Macintosh cable adapter Figure A 3 Tighten all screws For PC with DisplayPort output Connect the DisplayPort cable to the connector of the display card in your system Figure A 4 NOT...

Page 9: ...onent 3 When removing the DisplayPort cable hold down the top button to release the lock 7 Connect the power cord to the power outlet Figure C 1 NOTE Please refer to Caution section of this manual for...

Page 10: ...6 The monitor is now ready for mounting in an alternate manner 7 Connect the cables to the back of the monitor Screen Rotation Before rotating the screen must be raised to the highest level to avoid r...

Page 11: ...NOTE 1 The LCD monitor should only be used with an approved arm e g GS mark To meet the safety requirements the monitor must be mounted to an arm which ensures the necessary stability under considerat...

Page 12: ...RAST No OSD condition Resets the highlighted control menu to the factory setting Switches the ECO MODE Activates Auto Adjust function if touched for 3 seconds No OSD condition and Analog input only Bu...

Page 13: ...ch to FULL MENU See page 11 for detailed information HUMAN SENSOR Shows current human sensing setting See page 12 for more details This function is adjusted threshold by FULL MENU CARBON SAVINGS Displ...

Page 14: ...de automatically when the input signal is lost SENSOR Monitor enters power saving mode automatically when the amount of surrounding light goes below the level determined by you The level can be adjust...

Page 15: ...INE Improves focus clarity and image stability by increasing or decreasing this setting INPUT RESOLUTION Selects resolution s priority of input signal to one of the following pairs 1360 x 768 or 1280...

Page 16: ...vidual settings can be reset by touching the ECO RESET Key Menu Tools LANGUAGE OSD control menus are available in eight languages OSD TURN OFF The OSD control menu will stay on as long as it is in use...

Page 17: ...from US dollar icon by using the Left or Right key 4 Select Currency Convert Setting by using the Up or Down slide key 5 Adjust Currency Convert Setting by using the Right or Left slide key This initi...

Page 18: ...nded 1920 x 1080 60 Hz resolution for optimal display performance Active Landscape Horiz 509 2 mm 20 0 inches Display Area Vert 286 4 mm 11 3 inches Portrait Horiz 286 4 mm 11 3 inches Vert 509 2 mm 2...

Page 19: ...ommended 1920 x 1080 60 Hz resolution for optimal display performance Active Landscape Horiz 509 8 mm 20 1 inches Display Area Vert 286 7 mm 11 3 inches Portrait Horiz 286 7 mm 11 3 inches Vert 509 8...

Page 20: ...IPM Intelligent Power Manager System Provides innovative power saving methods that allow the monitor to shift to a lower power consumption level when on but not in use saving two thirds of your monit...

Page 21: ...r signal clock or resolution is too high Choose one of the supported modes OSD warning OUT OF RANGE is displayed on a blank screen Signal frequency is out of range Choose one of the supported modes Im...

Page 22: ...l Figure 2 2 Set the DARK level This is the level of brightness that the monitor will go down to when the ambient light level is low Make sure the room is at its darkest when setting this level Then u...

Page 23: ...standards at an impartial laboratory Electric and magnetic fields emissions as low as normal household background levels Low acoustic noise emissions Some of the Environmental features of the TCO Cert...

Page 24: ...www necdisplay com in USA Energy Saving This monitor features an advanced energy saving capability When a VESA Display Power Management Signalling DPMS Standard signal is sent to the monitor the Ener...

Reviews: