background image

English-4

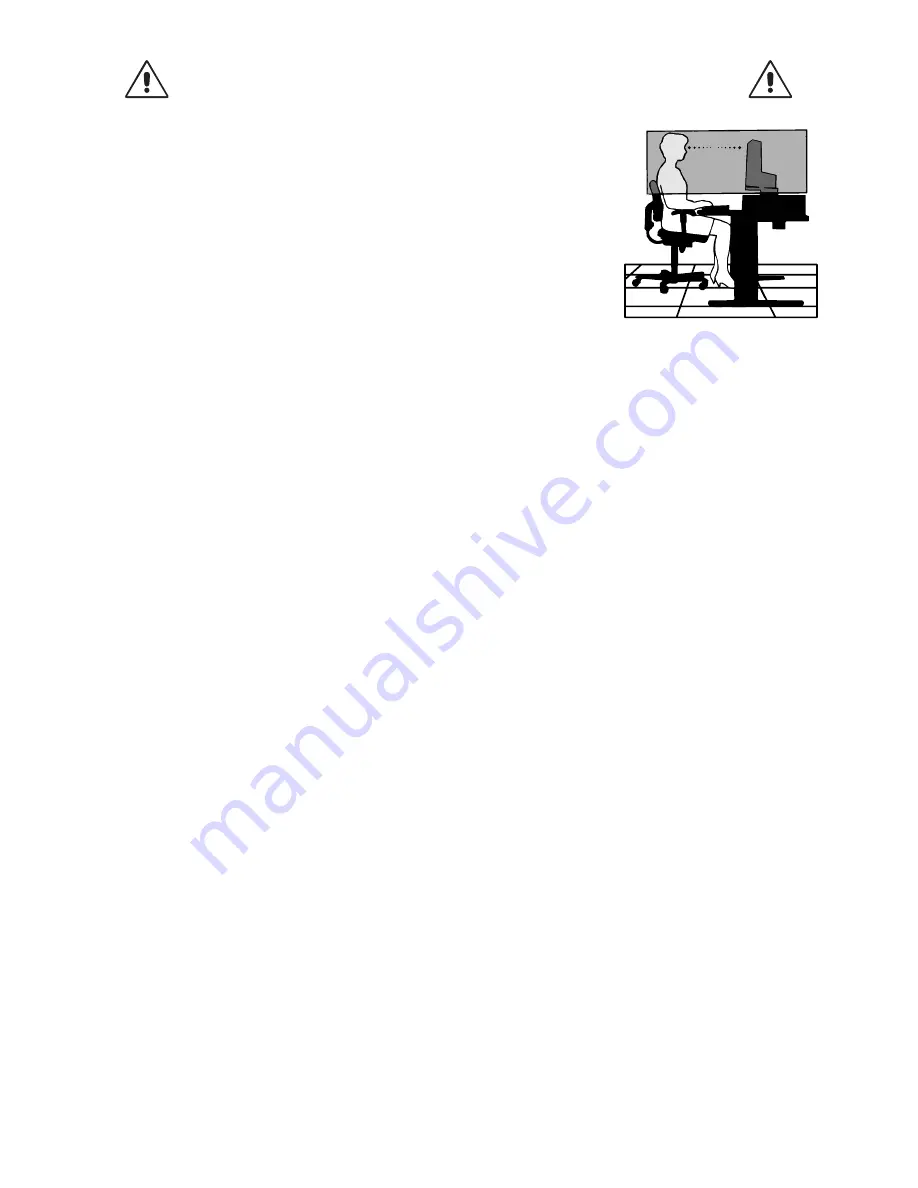
CORRECT PLACEMENT AND ADJUSTMENT OF THE MONITOR CAN

REDUCE EYE, SHOULDER AND NECK FATIGUE. CHECK THE

FOLLOWING WHEN YOU POSITION THE MONITOR:

• 

For optimum performance, allow 20 minutes for the display to warm up.

• 

Adjust the monitor height so that the top of the screen is at or slightly below eye level. 
Your eyes should look slightly downward when viewing the middle of the screen.

• 

Position your monitor no closer than 40 cm (15.75 inches) and no further away than 
70 cm (27.56 inches) from your eyes. The optimal distance is 50 cm (19.69 inches).

• 

Rest your eyes periodically by focusing on an object at least 20 feet away. Blink often.

• 

Position the monitor at a 90° angle to windows and other light sources to minimize glare 
and refl ections. Adjust the monitor tilt so that ceiling lights do not refl ect on your screen.

• 

If refl ected light makes it hard for you to see your screen, use an anti-glare fi lter.

• 

Clean the LCD monitor surface with a lint-free, non-abrasive cloth. Avoid using any 
cleaning solution or glass cleaner!

• 

Adjust the monitor’s brightness and contrast controls to enhance readability.

• 

Use a document holder placed close to the screen.

• 

Position whatever you are looking at most of the time (the screen or reference material) directly in front of you to minimize 
turning your head while you are typing.

• 

Avoid displaying fi xed patterns on the monitor for long periods of time to avoid image persistence (after-image effects).

• 

Get regular eye checkups.

Ergonomics

To realize the maximum ergonomics benefi ts, we recommend the following:

• 

To avoid eye fatigue, adjust the brightness to a moderate setting. Place a sheet of white paper next to the LCD screen for 
luminance reference.

• 

Do not position the Contrast control to its maximum setting.

• 

Use the preset Size and Position controls with standard signals.

• 

Use the preset Color Setting.

• 

Use non-interlaced signals with a vertical refresh rate of 60 Hz.

• 

Do not use primary color blue on a dark background, as it is diffi cult to see and may produce eye fatigue due to insuffi cient 
contrast.

Cleaning the LCD Panel

• 

When the LCD is dusty, please gently wipe with a soft cloth.

• 

Please do not rub the LCD panel with hard or coarse material.

• 

Please do not apply pressure to the LCD surface.

• 

Please do not use OA cleaner as it will cause deterioration or discoloration on the LCD surface.

Cleaning the Cabinet

• 

Unplug the power supply

• 

Gently wipe the cabinet with a soft cloth

• 

To clean the cabinet, dampen the cloth with a neutral detergent and water, wipe the cabinet and follow with a dry cloth.

NOTE: 

Many plastics are used on the surface of the cabinet. DO NOT clean with benzene, thinner, alkaline detergent, 
alcoholic system detergent, glass cleaner, wax, polish cleaner, soap powder, or insecticide. Do not touch rubber or 
vinyl to the cabinet for a long time. These types of fl uids and fabrics can cause the paint to deteriorate, crack or peel.

For more detailed information on setting up a healthy work environment, write to the American National Standard for Human 
Factors Engineering of Computer Workstations - ANSI/HFES 100-2007 - The Human Factors Society, Inc. P.O. Box 1369, Santa 
Monica, California 90406.

Summary of Contents for MultiSync EA275UHD

Page 1: ...Desktop Monitor MultiSync EA275UHD User s Manual ...

Page 2: ... 11 Specifications English 18 Features English 19 Troubleshooting English 20 Using the Zoom Function English 22 Using the Auto Brightness function English 24 ControlSync English 25 DisplayPort HDMI compatibility for 3840 x 2160 resolution English 26 TCO Certified Edge Displays 2 0 English 27 Manufacturer s Recycling and Energy Information English 28 ...

Page 3: ...wer supply cord that matches the power supply voltage of the AC power outlet being used NOTE This product can only be serviced in the country where it was purchased Windows is a registered trademark of Microsoft Corporation NEC is a registered trademark of NEC Corporation ErgoDesign is a registered trademark of NEC Display Solutions Ltd in Austria Benelux Denmark France Germany Italy Norway Spain ...

Page 4: ...he user is encouraged to try to correct the interference by one or more of the following measures Reorient or relocate the receiving antenna Increase the separation between the equipment and receiver Connect the equipment into an outlet on a circuit different from that to which the receiver is connected Consult your dealer or an experienced radio TV technician for help If necessary the user should...

Page 5: ...your monitor from the wall outlet and move to a safe location then refer servicing to qualified service personnel under the following conditions If the monitor is used in this condition the monitor may cause fall fire and electric shock If the monitor stand has been cracked or peeled If the monitor has been wobbled If the monitor has an unusual odor When the power supply cord or plug is damaged If...

Page 6: ...cs To realize the maximum ergonomics benefits we recommend the following To avoid eye fatigue adjust the brightness to a moderate setting Place a sheet of white paper next to the LCD screen for luminance reference Do not position the Contrast control to its maximum setting Use the preset Size and Position controls with standard signals Use the preset Color Setting Use non interlaced signals with a...

Page 7: ...p Manual USB 3 0 Cable ControlSync Cable Remember to save your original box and packing material to transport or ship the monitor 1 The type and number of power cords included will depend on the where the LCD monitor is to be shipped When more than one power cord is included please use the power cord that matches the AC voltage of the power outlet and has been approved by and complies with the saf...

Page 8: ...Adapter not included not included NOTE 1 Please use a High Speed HDMI cable with HDMI logo 2 When removing the DisplayPort cable hold down the top button to release the lock 3 Please use a DisplayPort Certified DisplayPort cable 3 Place hands on each side of the monitor to tilt the LCD panel 30 degree angle and lift up to the highest position 4 Connect all cables to the appropriate connectors Figu...

Page 9: ...4 Audio Cable 2 3 ControlSync Cables USB Cables Power Cord DisplayPort Cable HDMI Cable 2 DVI Cable 2 4 Audio Cable 2 3 ControlSync Cables USB Cables 2 Cable not included 3 ø 3 5 stereo mini plug 4 Dual Link 7 Connect one end of the power cord to the AC inlet on the back of the monitor and the other end to the power outlet NOTE Please refer to Caution section of this manual for proper selection of...

Page 10: ... be raised to the highest level and tilt to avoid knocking the screen on the desk or pinching your fingers To raise the screen place a hand on each side of the monitor and lift up to the highest position Figure RL 1 To rotate screen place a hand on each side of the monitor screen and turn clockwise from landscape to portrait or counter clockwise from portrait to landscape Figure R 1 Figure R 1 Til...

Page 11: ...and lift up to the highest position 3 Place monitor face down on a non abrasive surface Figure S 1 NOTE Handle with care when the monitor is facing down 4 Remove 2 bottom screws first Move stand left and right to remove bottom 2 screws Figure S 2 S 3 5 Remove 2 top screws NOTE In order to avoid stand drop when removing screws please support stand with your hand 6 Remove the stand Figure S 4 7 The ...

Page 12: ... be used with an approved arm e g GS mark NOTE Tighten all screws recommended Fasten Force 98 137N cm Figure F 1 Weight of LCD assembly 6 2 kg 100 mm 100 mm Thickness of Bracket Arm 2 0 3 2 mm Additional VESA Holes for Lower Monitor Head Position Additional 4 VESA holes are provided for those users needing a lower monitor head position than that is available from the monitor stand in shipping conf...

Page 13: ...he monitor on and off 4 INPUT SELECT Enters the OSD menu Enters OSD sub menus Changes the input source when not in the OSD menu 5 MENU EXIT Accesses OSD menu Exits the OSD sub menu Exits OSD menu 6 LEFT RIGHT Navigates to the left or right through the OSD menu You can adjust the BRIGHTNESS directly while the OSD menu is off 1 7 UP DOWN Navigates up or down through the OSD menu You can adjust the V...

Page 14: ...he white display area The environmental brightness sensor ambient light sensor has no function 3 AMBIENT CONTENT Automatically adjusts the brightness to the optimal setting based on the white display area and the brightness level of the environment detected by the ambient light sensor NOTE This function is disabled when DV MODE is set to DYNAMIC This function is disabled when Color Control System ...

Page 15: ...AMING Setting that boosts whole tones best suited for games that use vivid colorful images PHOTO Setting that optimizes contrast best suited for still images DYNAMIC Setting that adjusts the brightness by detecting the screen s black areas and optimizes it NOTE This function is disabled when Color Control System is set to DICOM SIM SCREEN LEFT RIGHT Controls horizontal image position within the di...

Page 16: ... or decrease will be shown by the bars NATIVE Original color presented by the LCD panel that is unadjustable sRGB sRGB mode dramatically improves the color fidelity in the desktop environment by a single standard RGB color space With this color supported environment the operator could easily and confidently communicate color without further color management overhead in most common situations DICOM...

Page 17: ...ant to delay the turn off time by 60 minutes Touch any OSD key to delay the power down time POWER SAVE TIMER POWER SAVE TIMER allows the monitor to turn off automatically after continuing power saving mode for 2 hours LED BRIGHTNESS You can adjust the blue LED brightness DDC CI This function allows the DDC CI function ON or OFF USB POWER Selects a power relation of USB AUTO Power is supplied to US...

Page 18: ...ars touch RESET current settings are stored To restore settings Hold MENU for 3 seconds or more while the OSD menu is off ECO Information CARBON SAVINGS Displays the estimated carbon savings information in kg CARBON USAGE Displays the estimated carbon usages information in kg This is the arithmetic estimation not actual measurement value COST SAVINGS Displays the electricity cost savings in balanc...

Page 19: ...g menus disappear when EXIT is selected NO SIGNAL This function gives a warning when there is no horizontal or vertical sync After power is turned on or when there is a change of input signal the No Signal window will appear OUT OF RANGE This function gives a recommendation of the optimized resolution and refresh rate After the power is turned on or there is a change of input signal or if the vide...

Page 20: ...ision 3 0 Upstream 1 USB 2 0 Downstream 1 USB 3 0 Downstream 2 Maximum 0 5 A per port for USB 2 0 Maximum 0 9 A per port for USB 3 0 AUDIO AUDIO Input STEREO Mini Jack DisplayPort Connector HDMI Connector Analog Audio Digital Audio Digital Audio Stereo L R 500mV rms 20 Kohm PCM 2ch 32 44 1 48 kHz 16 20 24bit PCM 2ch 32 44 1 48 kHz 16 20 24bit Headphone Output STEREO Mini Jack Headphone Impedance 3...

Page 21: ...rd party mounting arm or bracket sRGB Color Control A new optimized color management standard which allows for color matching on computer displays and other peripherals The sRGB which is based on the calibrated color space allows for optimal color representation and backward compatibility with other common color standards Adjustable stand with pivot capability Adds flexibility to your viewing pref...

Page 22: ... For example if an image was on the monitor for one hour and a residual image remains the monitor should be turned off for one hour to erase the image NOTE As with all personal display devices NEC DISPLAY SOLUTIONS recommends using a moving screen saver at regular intervals whenever the screen is idle or turning off the monitor when not in use Message OUT OF RANGE is displayed screen is either bla...

Page 23: ...ted the speakers will not emit any sound Brightness variations over time Change Auto Brightness to OFF and adjust brightness NOTE When Auto Brightness is set to ON the monitor automatically adjusts brightness based on the environment When the brightness of surrounding environment changes the monitor will also change USB Hub does not operate Check to make sure the USB cable is properly connected Re...

Page 24: ...solution via H RESOLUTION or V RESOLUTION see page 13 Vertical expansion Horizontal expansion 3 The image position can be moved from the center to left or right by selecting LEFT RIGHT and upward or downward by selecting UP DOWN see page 13 Move to left or right Move upward or downward NOTE When showing 2 screens the input resolution of the main adjustable image is prioritized A The right image is...

Page 25: ...e the split images use the following procedures to reduce the black area and enlarge the split images 1 In case A a priority image is set to be on the right side The size of the black area can be reduced by adjusting the resolution see page 14 2 Move the priority image to the left side NOTE This function is only available when MULTI PICTURE is set to LEFT or RIGHT and PICTURE PATTERN is set to AUT...

Page 26: ...l Figure 2 Figure 1 Figure 2 2 Set the DARK level This is the level of brightness that the monitor will go down to when the ambient lighting level is low Make sure the room is at its darkest when setting this level Then use the front Keys to move the cursor up to the BRIGHTNESS setting Choose the desired brightness level Figure 3 Figure 3 When the Auto Brightness function is enabled the Brightness...

Page 27: ...ART TIME Yes HUMAN SENSING Yes HUMAN SENSOR SETTING Yes HUMAN SENSOR START TIME Yes DV MODE Yes SCREEN LEFT RIGHT No DOWN UP No H RESOLUTION No V RESOLUTION No VIDEO LEVEL No OVER SCAN No EXPANSION Yes UNIFORMITY No SHARPNESS No UHD UPSCALING No COLOR Color Control System Yes R G B color gain No TOOLS VOLUME Yes SOUND INPUT No VIDEO DETECT No MULTI PICTURE No PICTURE PATTERN No RESPONSE IMPROVE No...

Page 28: ...ith 3840 x 2160 30 Hz Maximum resolution HBR2 Factory setting DisplayPort 1 2 setting with 3840 x 2160 60 Hz Maximum resolution HF VSDB ON Factory setting HDMI signal with 3840 x 2160 60Hz Maximum resolution OFF HDMI signal with 3840 x 2160 30Hz Maximum resolution BIT RATE setting is available when DP VER is selected 1 2 5 Press MENU to close the OSD menu 6 Turn on the computer NOTE Please disconn...

Page 29: ... the number of different plastics used Product Lifetime Product Take Back Minimum one year product warranty Minimum three year availability of spare parts Product take back Packaging Limits on hazardous substances in product packaging Packaging prepared for recycling Ergonomic User centered design Visual ergonomics in products with a display Adjustability for user comfort displays headsets Acousti...

Page 30: ...ngle Energy Saving mode Mode Power consumption LED colour Maximum Operation 71 W Blue Normal Operation at TCO testing 39 W Default setting USB Audio sleeping Blue Energy Saving Mode 0 37 W Amber Off Mode 0 35 W Unlit For additional information visit http www necdisplay com in USA http www nec display solutions com in Europe http www nec display com global index html Global For Energy Saving inform...

Reviews: