background image

English-8

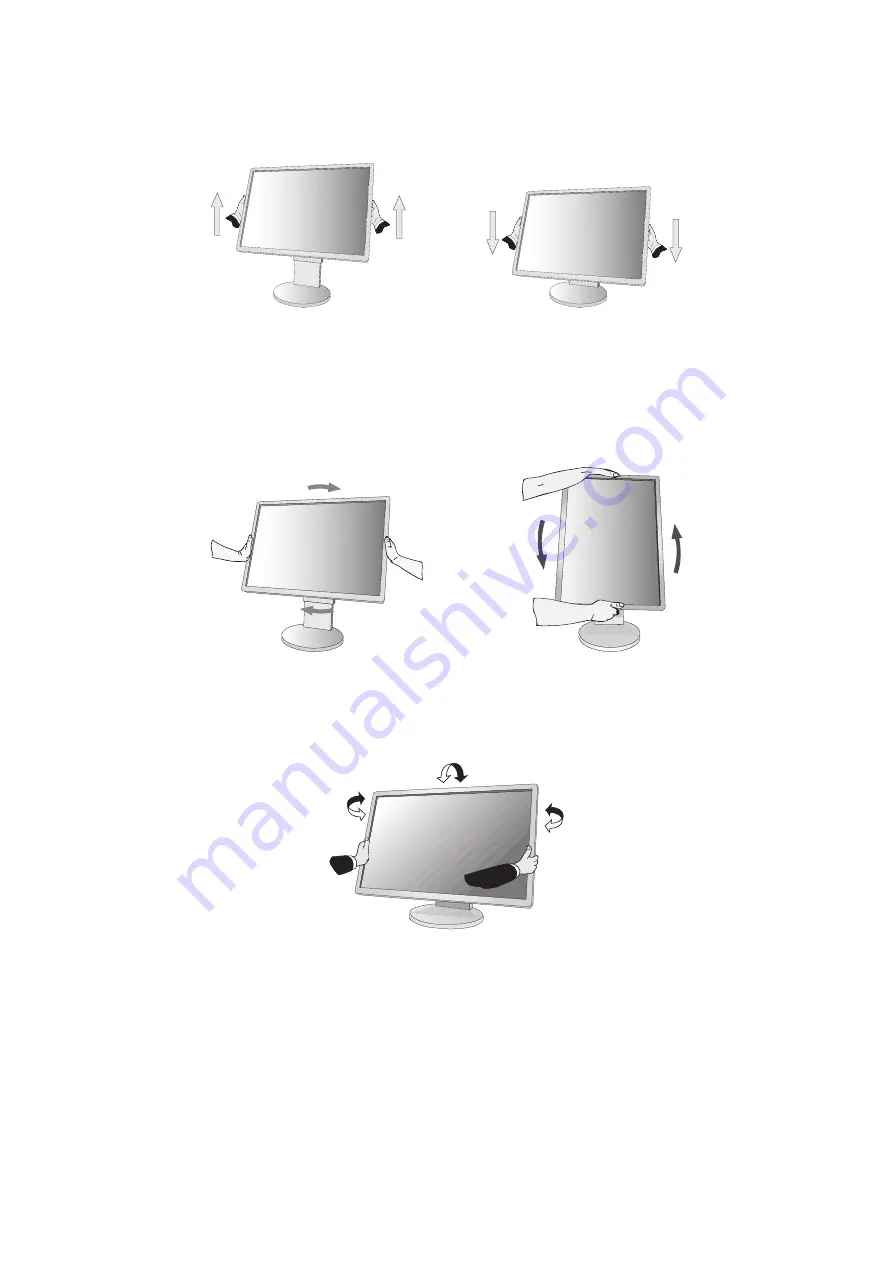
Raise and Lower Monitor Screen

The monitor may be raised or lowered in either portrait or landscape mode.
To raise or lower screen, place a hand on each side of the monitor and lift or lower to the desired height (

Figure RL.1

).

NOTE: 

Handle with care when raising or lowering the monitor screen.

Figure RL.1

Screen Rotation

Before rotating, disconnect power cord and all cables, then the screen must be raised to the highest level and tilt to avoid 
knocking the screen on the desk or pinching your fi ngers.
To raise the screen, place a hand on each side of the monitor and lift up to the highest position (

Figure RL.1

).

To rotate screen, place a hand on each side of the monitor screen and turn clockwise from landscape to portrait or counter-
clockwise from portrait to landscape (

Figure R.1

).

Figure R.1

Tilt and Swivel

Grasp the top and bottom sides of the monitor screen with your hands and adjust the tilt and swivel as desired (

Figure TS.1

).

Figure TS.1

NOTE: 

Handle with care when tilting the monitor screen.

Summary of Contents for MultiSync EA234WMi

Page 1: ...Desktop Monitor MultiSync EA224WMi MultiSync EA234WMi User s Manual Please find your model name in the label on the backside of monitor ...

Page 2: ...ning the LCD Panel English 4 Cleaning the Cabinet English 4 Contents English 5 Quick Start English 6 Controls English 11 Specifications EA224WMi English 17 Specifications EA234WMi English 18 Features English 19 Troubleshooting English 20 Using the Auto Brightness function English 22 ControlSync English 23 Manufacturer s Recycling and Energy Information English 24 ...

Page 3: ...OTE This product can only be serviced in the country where it was purchased To see a list of our TCO certified monitors and their TCO Certification in English only visit our website at http www nec display com global about legal_regulation TCO_mn index html Windows is a registered trademark of Microsoft Corporation NEC is a registered trademark of NEC Corporation ErgoDesign is a registered tradema...

Page 4: ...terference by one or more of the following measures Reorient or relocate the receiving antenna Increase the separation between the equipment and receiver Connect the equipment into an outlet on a circuit different from that to which the receiver is connected Consult your dealer or an experienced radio TV technician for help If necessary the user should contact the dealer or an experienced radio te...

Page 5: ...ur monitor from the wall outlet and move to a safe location then refer servicing to qualified service personnel under the following conditions If the monitor is used in this condition the monitor may cause fall fire and electric shock If the monitor stand has been cracked or peeled If the monitor has been wobbled If the monitor has an unusual odor When the power supply cord or plug is damaged If l...

Page 6: ...cs To realize the maximum ergonomics benefits we recommend the following To avoid eye fatigue adjust the brightness to a moderate setting Place a sheet of white paper next to the LCD screen for luminance reference Do not position the Contrast control to its maximum setting Use the preset Size and Position controls with standard signals Use the preset Color Setting Use non interlaced signals with a...

Page 7: ...ROM 2 Power Cord 1 Setup Manual USB Cable ControlSync Cable Remember to save your original box and packing material to transport or ship the monitor 1 The type and number of power cords included will depend on the where the LCD monitor is to be shipped When more than one power cord is included please use the power cord that matches the AC voltage of the power outlet and has been approved by and co...

Page 8: ... cable NOTE 1 Please use a DisplayPort cable with DisplayPort logo 2 When removing the DisplayPort cable hold down the top button to release the lock 3 Place hands on each side of the monitor to tilt the LCD panel 30 degree angle and lift up to the highest position 4 Connect all cables to the appropriate connectors Figure C 1 When using the USB cable connect the B type connector to the USB upstrea...

Page 9: ...nc Cables USB Cables 7 Connect one end of the power cord to the AC inlet on the back of the monitor and the other end to the power outlet NOTE Please refer to Caution section of this manual for proper selection of AC power cord 8 Turn on the computer then turn on the monitor by pressing the power sign on the front bezel Figure E 1 9 No Touch Auto Adjust automatically adjusts the monitor to optimal...

Page 10: ... be raised to the highest level and tilt to avoid knocking the screen on the desk or pinching your fingers To raise the screen place a hand on each side of the monitor and lift up to the highest position Figure RL 1 To rotate screen place a hand on each side of the monitor screen and turn clockwise from landscape to portrait or counter clockwise from portrait to landscape Figure R 1 Figure R 1 Til...

Page 11: ...Place monitor face down on a non abrasive surface Figure S 1 NOTE Handle with care when the monitor is facing down Figure S 1 4 Remove 2 bottom screws first Move stand left and right to remove bottom 2 screws Figure S 2 S 3 5 Remove 2 top screws NOTE In order to avoid stand drop when removing screws please support stand with your hand 6 Remove the stand Figure S 4 7 The monitor is now ready for mo...

Page 12: ...LCD monitor should only be used with an approved arm e g TUEV GS mark Weight of LCD assembly 3 7 kg EA224WMi 4 0 kg EA234WMi 100 mm 100 mm Thickness of Bracket Arm 2 0 3 2 mm Figure F 1 12 mm Spring washer Flat washer Additional VESA Holes for Lower Monitor Head Position Additional 4 VESA holes are provided for those users needing a lower monitor head position than that is available from the monit...

Page 13: ...s the OSD back to factory settings in the OSD control menu Switches among ECO MODE settings Activates Auto Adjust function if helded for 3 seconds while the OSD menu is off Analog input only When HOT KEY function is OFF this function is disabled ECO TOOLS BRIGHTNESS Adjusts the overall image and background screen brightness If ECO MODE is set to 1 or 2 a bar for CARBON FOOTPRINT will appear CONTRA...

Page 14: ...the wait time to enter into to a lower power consumption level when the ambient light sensor detects dark condition HUMAN SENSING The human sensor on the front side of the monitor detects the movement of a person by using the HUMAN SENSING function The HUMAN SENSING has three settings OFF No HUMAN SENSING 1 LIGHT After it is detected that there is no person after a period of time the monitor shift...

Page 15: ...ed the result would look like the left drawing The image should be homogeneous When FINE value is wrong When FINE value is correct INPUT RESOLUTION Selects one of the following pair of resolutions as the input signal priority 1360 x 768 or 1280 x 768 or 1024 x 768 vertical resolution 768 1600 x 900 or 1280 x 960 horizontal frequency 60kHz vertical frequency 60Hz 1680 x 1050 or 1400 x 1050 vertical...

Page 16: ...urned on EXPANSION MODE Sets the zoom method FULL The image is expanded to full screen regardless of the resolution ASPECT The image is expanded without changing the aspect ratio RESPONSE IMPROVE Turns the Response Improve function on or off Response Improve may reduce blurring that occurs in some moving images OFF TIMER Monitor will automatically power down when you have selected a pre determined...

Page 17: ...rs touch RESET current settings are stored To restore settings Hold MENU for 3 seconds or more while the OSD menu is off ECO Information CARBON SAVINGS Displays the estimated carbon savings information in kg CARBON USAGE Displays the estimated carbon usages information in kg This is the arithmetic estimation not actual measurement value COST SAVINGS Displays the electricity cost savings in balance...

Page 18: ...nus disappear when EXIT is selected NO SIGNAL This function gives a warning when there is no horizontal or vertical sync After power is turned on or when there is a change of input signal the No Signal window will appear OUT OF RANGE This function gives a recommendation of the optimized resolution and refresh rate After the power is turned on or there is a change of input signal or if the video si...

Page 19: ...6 1 mm 18 7 inches 267 8 mm 10 5 inches 267 8 mm 10 5 inches 476 1 mm 18 7 inches USB Hub I F Port Load Current USB Specification Revision 2 0 Upstream 1 Downstream 4 Maximum 0 5A per port AUDIO AUDIO Input STEREO Mini Jack DisplayPort Connector HDMI Connector Analog Audio Digital Audio Digital Audio Stereo L R 500mV rms 20 Kohm PCM 2ch 32 44 1 48 kHz 16 20 24bit PCM 2ch 32 44 1 48 kHz 16 20 24bit...

Page 20: ...mm 20 0 inches 286 4 mm 11 3 inches 286 4 mm 11 3 inches 509 2 mm 20 0 inches USB Hub I F Port Load Current USB Specification Revision 2 0 Upstream 1 Downstream 4 Maximum 0 5A per port AUDIO AUDIO Input STEREO Mini Jack DisplayPort Connector HDMI Connector Analog Audio Digital Audio Digital Audio Stereo L R 500mV rms 20 Kohm PCM 2ch 32 44 1 48 kHz 16 20 24bit PCM 2ch 32 44 1 48 kHz 16 20 24bit Hea...

Page 21: ...common color standards Adjustable stand with pivot capability Adds flexibility to your viewing preferences USB 2 0 hub adds excitement to your computing by connecting you to digital cameras scanners and more Human Sensor Shifts to a lower power consumption level when a person leaves the monitor saving your monitor energy costs NaViSet Software offers an expanded and intuitive graphical interface a...

Page 22: ... intervals whenever the screen is idle or turning off the monitor when not in use Message OUT OF RANGE is displayed screen is either blank or shows rough images only Image is displayed only roughly pixels are missing and OSD warning OUT OF RANGE is displayed Either signal clock or resolution is too high Choose one of the supported modes OSD warning OUT OF RANGE is displayed on a blank screen Signa...

Page 23: ...IGHTNESS is set to ON the monitor automatically adjusts brightness based on the environment When the brightness of surrounding environment changes the monitor will also change When DV MODE is set to DYNAMIC the monitor automatically adjusts brightness USB Hub does not operate Check to make sure the USB cord is properly connected Refer to your USB devise User s Manual Human sensor does not work If ...

Page 24: ...2 2 Set the DARK level This is the level of brightness that the monitor will go down to when the ambient light level is low Make sure the room is at its darkest when setting this level Then use the front Keys to move the cursor up to the BRIGHTNESS setting Choose the desired brightness level Figure 3 Figure 3 When the AUTO BRIGHTNESS function is enabled the Brightness level of the screen changes a...

Page 25: ...F MODE SENSOR SETTING Yes OFF MODE START TIME Yes HUMAN SENSING Yes HUMAN SENSOR SETTING Yes HUMAN SENSOR START TIME Yes DV MODE Yes SCREEN AUTO ADJUST No AUTO CONTRAST No LEFT RIGHT No DOWN UP No H SIZE No FINE No INPUT RESOLUTION No COLOR Color preset Yes R G B color gain No TOOLS VOLUME Yes SOUND INPUT No VIDEO LEVEL No TOOLS continuation OVER SCAN No VIDEO DETECT No EXPANSION MODE Yes RESPONSE...

Page 26: ...ters a single Energy Saving mode Mode Power consumption LED colour Maximum Operation 40 W EA224WMi 39 W EA234WMi Blue Normal Operation 15 W Default setting USB Audio sleeping Blue Energy Saving Mode 0 29 W Amber Off Mode 0 2 W Unlit For additional information visit http www necdisplay com in USA http www nec display solutions com in Europe http www nec display com global index html Global For Ener...

Reviews: