background image

English-6

Quick Start

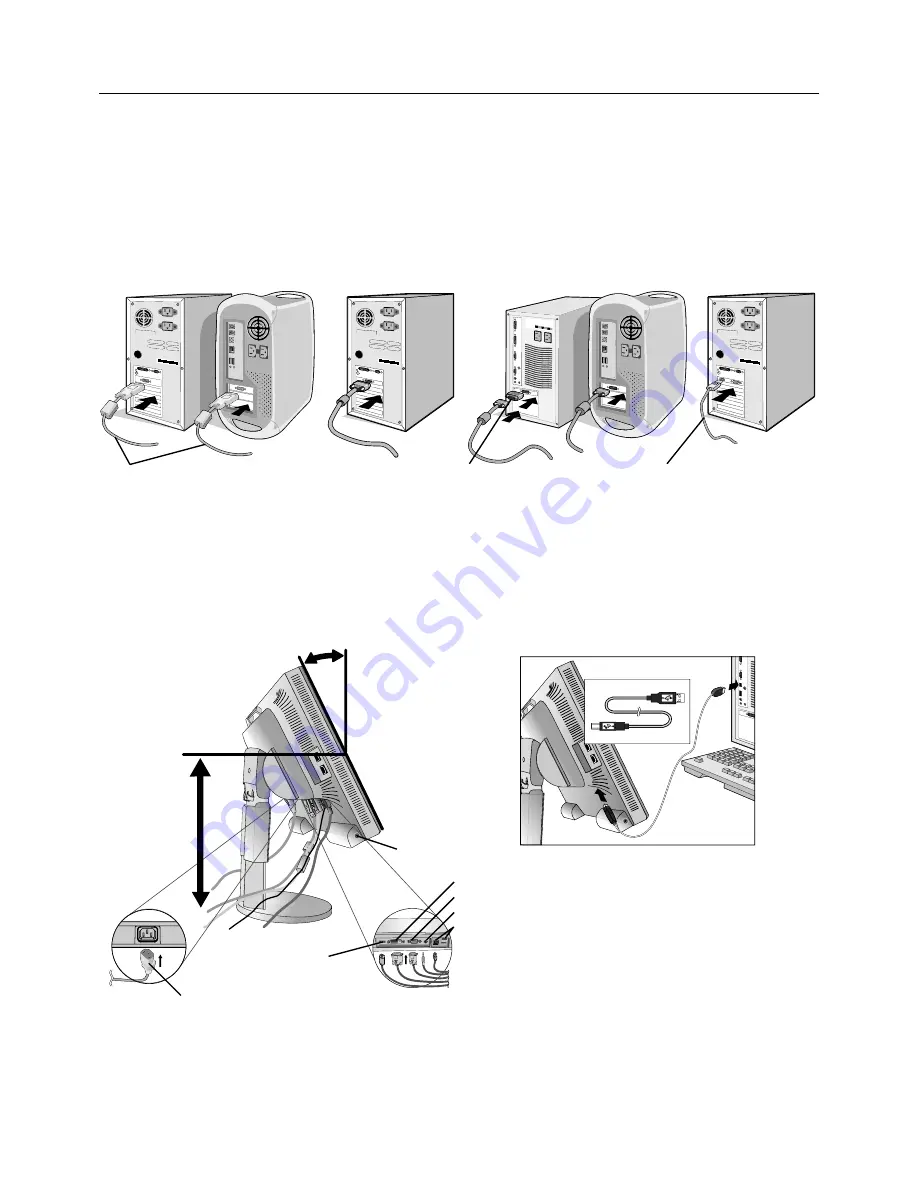
To attach the MultiSync LCD monitor to your computer system, follow these instructions:

1. Turn off the power to your computer.

2.

For PC or MAC with DVI digital output:

 Connect the DVI signal cable to the connector of the display card in your system

(

Figure A.1

). Tighten all screws.

For PC with Analog output:

 Connect the 15-pin mini D-SUB signal cable to the connector of the display card in your

system (

Figure A.2

). Tighten all screws.

For MAC:

 Connect the Macintosh cable adapter to the computer, then attach the 15-pin mini D-SUB signal cable to the

Macintosh cable adapter (

Figure B.1

). Tighten all screws.

For PC with DisplayPort output: 

Connect the DisplayPort cable to the connector of the display card in your system

(

Figure B.2

).

Figure A.1

Figure B.1

Macintosh
Cable Adapter
(not included)

Figure A.2

DVI signal cable

Figure C.1a

A Type

B Type

A Type

B Type

NOTE:

Some Macintosh systems do not require a Macintosh cable adapter.

3. Place hands on each side of the monitor to tilt the LCD panel 30-degree angle and lift up to the highest position

(

Figure C.1

).

4. Connect all cables to the appropriate connectors (

Figure C.1

). Connect the Headphone (not included) to the appropriate

connector at the left side of the monitor (

Figure C.1

). When using the USB cable, connect the B type connector to the

USB upstream port on the right back side of the monitor and the A type connector to the downstream port on the computer
(

Figure C.1a

). If you can use the cord from the USB device, use one of the downstream ports on the side of the monitor.

Highest

Stand

Position

30˚ Tilt

Figure C.1

Power Cord

DVI

Headphone

D-Sub
Audio Input
USB

DisplayPort

NOTE:

1. Please use a DisplayPort cable with a DisplayPort logo.
2. The DisplayPort connector does not supply power to the connected component.
3. When removing the DisplayPort cable, hold down the top button to release the lock.

Figure B.2

DisplayPort cable
(not included)

Summary of Contents for MultiSync EA232WMI

Page 1: ...MultiSync EA232WMi User s Manual...

Page 2: ...use English 3 Contents English 5 Quick Start English 6 Controls English 11 Specifications English 15 Features English 16 Troubleshooting English 17 Using the Auto Brightness function English 18 TCO Di...

Page 3: ...ICING TO QUALIFIED SERVICE PERSONNEL Declaration of the Manufacturer We hereby certify that the colour monitor MultiSync EA232WMi L230U1 is in compliance with Council Directive 2006 95 EC EN 60950 1 C...

Page 4: ...dio TV technician for help If necessary the user should contact the dealer or an experienced radio television technician for additional suggestions The user may find the following booklet prepared by...

Page 5: ...service personnel under the following conditions When the power supply cord or plug is damaged If liquid has been spilled or objects have fallen into the monitor If the monitor has been exposed to ra...

Page 6: ...image persistence after image effects Get regular eye checkups Ergonomics To realize the maximum ergonomics benefits we recommend the following Adjust the Brightness until the background raster disapp...

Page 7: ...SUB male to 15 pin mini D SUB male Video Signal Cable DVI D to DVI D USB Cable Audio Cable Setup Manual Power Cord Type of power cord included will depend on the where the LCD monitor is to be shippe...

Page 8: ...B Type A Type B Type NOTE Some Macintosh systems do not require a Macintosh cable adapter 3 Place hands on each side of the monitor to tilt the LCD panel 30 degree angle and lift up to the highest pos...

Page 9: ...re C 3 6 Make sure all cables are resting flat against the stand Figure C 2 Figure C 3 Please check Tilt Rise and Lower monitor screen and screen rotation when you manage cables Power Cord USB Cable A...

Page 10: ...o the Controls section of this User s Manual for a full description of these OSD controls NOTE If you have any problems please refer to the Troubleshooting section of this User s Manual Figure E 1 Pow...

Page 11: ...oving screws please support stand with your hand Screen Rotation Before rotating the screen must be raised to the highest level to avoid running into the desk or pinching your fingers To raise the scr...

Page 12: ...ed with an approved arm e g GS mark To meet the safety requirements the monitor must be mounted to an arm which ensures the necessary stability under consideration of the weight of the monitor 3 The m...

Page 13: ...follows To access OSD menu press any of the control buttons MENU Left Right Down Up To change signal input press the SELECT button To change ECO MODE press the RESET ECO MODE button NOTE OSD must be c...

Page 14: ...osition Horizontal Size and Fine settings Image Controls Analog input only LEFT RIGHT Controls Horizontal Image Position within the display area of the LCD DOWN UP Controls Vertical Image Position wit...

Page 15: ...ld like the OSD control image to appear vertically on your screen OSD TURN OFF The OSD control menu will stay on as long as it is in use In the OSD Turn Off submenu you can select how long the monitor...

Page 16: ...the Left or Right key 4 Select Currency Convert Setting by using the Up or Down slide key 5 Adjust Currency Convert Setting by using the Right or Left slide key This initial Euro setting is Germany of...

Page 17: ...10 mm 20 0 inches USB Hub I P USB Specification Revision 2 0 Port Upstream 1 Downstream 4 Load Current Maximum 0 5A per port AUDIO AUDIO Input STEREO Mini Jack Analog Audio Stereo L R 500mV rms 20 Koh...

Page 18: ...crosoft solution with the Windows operating system facilitates setup and installation by allowing the monitor to send its capabilities such as screen size and resolutions supported directly to your co...

Page 19: ...warning OUT OF RANGE is displayed Either signal clock or resolution is too high Choose one of the supported modes OSD warning OUT OF RANGE is displayed on a blank screen Signal frequency is out of ran...

Page 20: ...l Figure 2 2 Set the DARK level This is the level of brightness that the monitor will go down to when the ambient light level is low Make sure the room is at its darkest when setting this level Then u...

Page 21: ...standards at an impartial laboratory Electric and magnetic fields emissions as low as normal household background levels Low acoustic noise emissions Some of the Environmental features of the TCO Cert...

Page 22: ...m in Japan or http www necdisplay com in USA Energy Saving This monitor features an advanced energy saving capability When a VESA Display Power Management Signalling DPMS Standard signal is sent to th...

Reviews: