background image

E-23

OFF

ON

VIDEO S-VIDEO

RGB

POWER

PJ

SELECT

E

M NU

TE

R

N

E

NC

E

A

C

L

AUTO ADJ.

POWER

POWER

ON/STAND BY

POWER

STATUS

POWER

ON

/

STAND BY

SOUR

CE

3. OPERATION

E

NTER

CA

NC

EL

SELECT

AU

TO

 AD

JU

ST

WE

R

ON

/

STA

ND

 BY

SO

UR

CE

AC  IN

VIDEO

S-V

IDEO

RGB

AUDIO

PC CO

NTR

OL

1

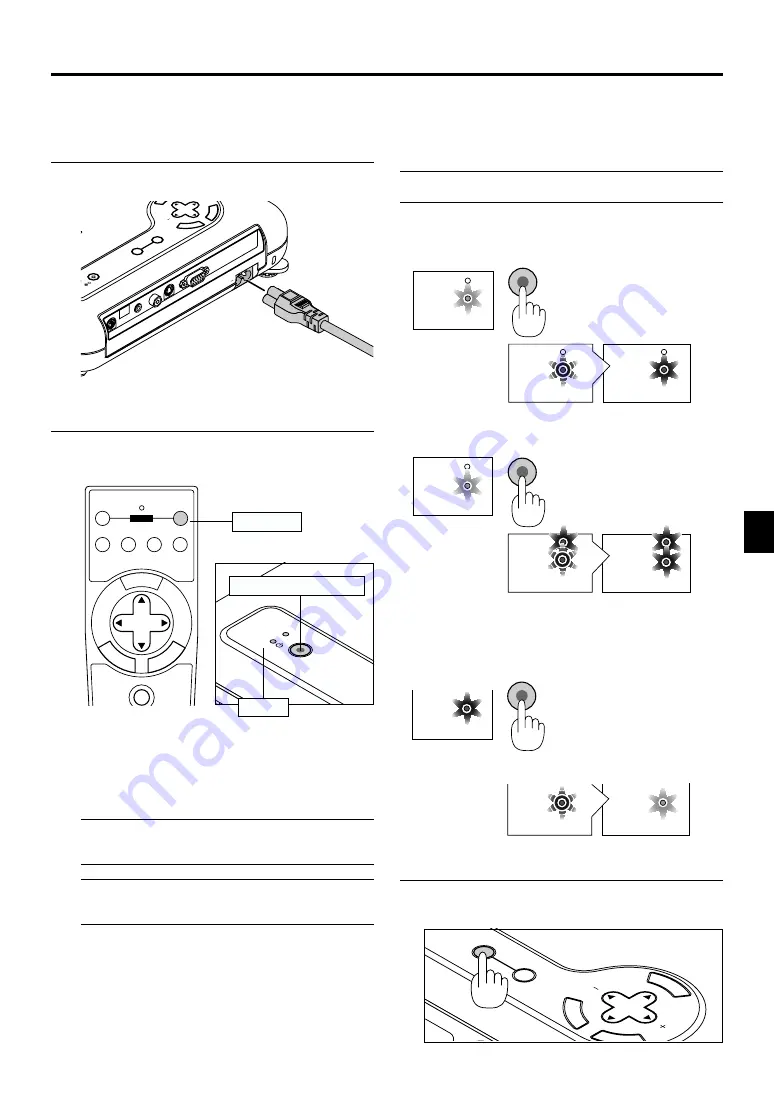
Connect the supplied power cable to the projector.

2

Turn on and off the Projector.

3

Connecting the Power Cable and Turn
on the Projector

POWER ON/STAND BY button

Indicator

To turn on the projector:

Only after you press the Power "ON/STAND BY" button
on the projector cabinet or the "POWER ON" button on
the remote control will the power indicator turn to green
and the projector become ready to use.

NOTE: 

To turn the projector on by plugging in the power cable,

use the menu and enable the “Auto Start” feature. (See page E-
34.)

NOTE: 

Immediately after turning on the projector, screen flicker

may occur. This is not a fault. Wait 3 to 5 minutes until the lamp
lighting is stabilized.

Power button

To turn off the projector:

First press the Power "ON/STAND BY" button on the projector
cabinet or the "POWER OFF" button on the remote control for
a minimum of two seconds. The power indicator will glow or-
ange. After the projector turns off, the cooling fans keep oper-
ating for 90 seconds.

NOTE: 

Do not disconnect the power cable during this time. Then, un-

plug the power cable. The power indicator will go out.

Status of indicator light: turn on

M

EN

U

E

NT

E

R

CANCEL

SELECT

AUTO

 ADJUST

SOURCE

Select the Computer or Video Source

Adjust a Projected Image.

Plug the supplied power cable in the wall outlet. The pro-
jector will go into its standby mode and the power indica-
tor will glow orange.

Before you turn on your projector, ensure that the computer or
video source is turned on and that your lens cap is removed.

POWER

STATUS

POWER

STATUS

ON/STAND BY

POWER

STATUS

Normal mode:

stand by

steady orange light

flashing green light
for one minute

steady green light

Eco mode:

POWER

STATUS

POWER

STATUS

ON/STAND BY

POWER

STATUS

stand by

steady orange light

flashing green light
for one minute
(Normal mode)

steady green light
(Eco mode)

Status of indicator light: turn off

ON

cooling down

stand by

steady green light

change to flashing
green light

steady orange light

press a minimum of
two seconds

Summary of Contents for LT75Z - MultiSync SVGA DLP Projector

Page 1: ...Micro Portable Projector LT75Z User s Manual English Deutsch Fran ais Italiano Espa ol Svenska...

Page 2: ...Anfangseinstellungen Setup einschlie lich der Einstellungen der Benutzersteuerungen Diese Kosten sind vom H ndler zu tragen von dem das Produkt erworben wurde 6 Bezahlung von Transportkosten GARANZIA...

Page 3: ...stration Card PLACE CORRECT POSTAGE HERE ATTN CUSTOMER SERVICE SUPPORT NEC TECHNOLOGIES INC VISUAL SYSTEMS DIVISION 1250 N ARLINGTON HEIGHTS RD ITASCA IL 60143 1248 NEC Technologies Projectors USA and...

Page 4: ...or the ultimate in hassle free service NEC pays for the round trip shipping When time matters most and overnight replacement is not fast enough InstaCare Xpress S SM available for a nominal fee provid...

Page 5: ...er from whom you purchased the product 2 Whenever warranty service is required the original dated invoice or a copy must be presented as proof of warranty coverage In order to obtain warranty service...

Page 6: ...y interference received including interference that may cause undesired operation U S Responsible Party Address Tel No NEC Technologies Inc 1250 N Arlington Heights Road Itasca Illinois 60143 630 467...

Page 7: ...Micro Portable Projector LT75Z User s Manual English Deutsch Fran ais Italiano Espa ol Svenska...

Page 8: ...Class B digital apparatus meets all requirements of the Canadian Interference Causing Equipment Regulations 3 GSGV Acoustic Noise Information Ordinance The sound pressure level is less than 70 dB A ac...

Page 9: ...s d Please consult your dealer for more information Power Supply 1 The projector is designed to operate on a power supply of 100 120 or 200 240 V 50 60 Hz AC Ensure that your power supply fits this re...

Page 10: ...e between your projector and a wall 2 Prevent foreign objects such as paper clips and bits of pa per from falling into your projector Do not attempt to retrieve any objects that might fall into your p...

Page 11: ...Menu Tree E 27 Menu Elements E 28 Menu Descriptions Functions E 29 Source Select E 29 RGB Video S Video Picture E 29 Brightness Contrast Color Hue Sharpness Volume E 29 Image Options E 29 Keystone E...

Page 12: ...hnology an extremely accurate im age compression technology offers a crisp image with UXGA 1600 1200 resolution 2 Supports most IBM VGA SVGA XGA 2 SXGA 2 UXGA 2 Macintosh component signal YCbCr YPbPr...

Page 13: ...E C T A U T O A D J U S T S T A T U S P O W E R O N S T A N D B Y S O U R C E Q u i c k C o n n e c t G u i d e U s e r s M a n u a l NEC LT75Z Projector Lens cap Soft carrying case Remote control Bat...

Page 14: ...s Front Side Features Zoom Ring Lens Cap Remote Sensor Adjustable Tilt Foot Button Ventilation inlet Lens Focus Ring Adjustable Tilt Foot Attaching the lens cap to the bottom with the supplied string...

Page 15: ...t remove the spacer and rotate the rear foot to the desired height Rear Foot Rotate to fine adjust horizontally position Terminals Ventilation inlet Bottom Lamp cover Lamp cover screw Ventilation inle...

Page 16: ...dicator When this indicator is green the projector is on when the indi cator is orange it is in standby mode 4 Source Button Use this button to select a video source such as a PC VCR or DVD player Eac...

Page 17: ...document camera here to project video 4 S Video Input Mini DIN 4 Pin Here is where you connect the S Video input from an external source like a VCR NOTE S Video provides more vivid color and higher r...

Page 18: ...ouse When you are in the Projector mode which is indicated by lighting the PJ button Use these buttons to select the menu of the item you wish to adjust Use these buttons to change the level of a sele...

Page 19: ...e control carefully If the remote control gets wet wipe it dry immediately Avoid excessive heat and humidity If you will not be using the remote control for a long time remove the batteries Note on Re...

Page 20: ...ange your computer settings When connecting using the USB terminal For PC the mouse receiver can only be used with a Windows 98 Windows ME or Windows 2000 operating system NOTE Wait at least 5 seconds...

Page 21: ...ely press the PJ button to return to the Computer mode not lit Computer mode OFF ON VIDEO S VIDEO RGB POWER PJ MAGNIFY VOLUME HELP SELECT E M NU TER N E NCE A C L AUTO ADJ FREEZE PIC MUTE Works as a m...

Page 22: ...can be is approximately 30 0 8 m measured diagonally when the projector is roughly 4 feet 1 3m from the wall or screen The largest the image can be is 200 5 1 m when the projector is about 30 feet 9 2...

Page 23: ...rt Screen Bottom Screen Center D B Lens Center Throw Distance C NOTE Distances may vary 5 D Vertical distance between lens center and top of screen bottom of screen for desktop Throw angle Screen Cent...

Page 24: ...re turning on the power to the notebook PC In most cases signal cannot be output from RGB output unless the notebook PC is turned on after connecting with the projector NOTE If the screen goes blank w...

Page 25: ...osh use a commercially available pin adapter to connect to your Mac s video port Pin adapter for Macintosh not supplied NOTE The new Macintosh computer such as G3 will have the 15 pin HD connector The...

Page 26: ...e to connect your monitor to the RGB Monitor Output Mini D Sub 15 pin connector on your projector For a DVD player without component video Y Cb Cr outputs use common RCA cables not provided to connect...

Page 27: ...nect one end of your RCA cable to the video output connector on the back of your VCR or laser disc player connect the other end to the Video input on your projector Use an audio cable not supplied to...

Page 28: ...asic menu will be displayed in the language you have selected To close the menu press the Cancel button After this has been done you can proceed to the advanced menu operation If you want you can sele...

Page 29: ...D BY button on the projector cabinet or the POWER OFF button on the remote control for a minimum of two seconds The power indicator will glow or ange After the projector turns off the cooling fans kee...

Page 30: ...O S VID EO RGB AUD IO PC CON TRO L Use the Focus ring to obtain the best focus Place your projector on a flat level surface and Ensure that the projector is square to the screen M ENU ENTER C A N C E...

Page 31: ...N T E R CANCEL S E L E C T A U T O A D J U S T S O U R C E VIDEO S VIDEO RGB AU DIO PC CONTR OL AC IN up down Adjusting the Image Using Auto Adjust The Auto Adjust function automatically optimizes the...

Page 32: ...menu for the item you want to adjust or set 3 Press the button or the Enter button on the remote con trol or the projector cabinet to select a submenu or item 4 Adjust the level or turn the selected...

Page 33: ...Cinema Position Top Center Bottom Background Blue Black Logo Signal Select RGB Auto RGB Component Signal Select Video Auto NTSC3 58 NTSC4 43 PAL PAL M PAL N PAL60 SECAM Auto Adjust On Off Auto Start O...

Page 34: ...r item Solid triangle Indicates further choices are available A highlighted triangle indicates the item is active Tab Indicates a group of features in a dialog box Selecting on any tab brings its page...

Page 35: ...e intensity of the image according to the incom ing signal Color Increases or decreases the color saturation level not valid for RGB Hue Varies the color level from green to blue The red level is used...

Page 36: ...e When 4 3 is selected from the source i e DVD player the following selections will display NOTE You can select three image positions for Cinema Top center and bottom See page E 33 for setting Cinema...

Page 37: ...te the Advanced AccuBlend feature Auto Turns on the Advanced AccuBlend feature The pro jector automatically reduces or enlarges the current image to fit the full screen Native Turns off the Advanced A...

Page 38: ...E If no adjustments are performed within 3 seconds the Vol ume bar will disappear Off You can increase or decrease the sound volume without having to use the volume bar Color Management Gamma Correcti...

Page 39: ...selected on earlier models the image is displayed with black borders on the top and bottom You can select the vertical position among three options Top Image position is at the top with a black border...

Page 40: ...eo or S Video sources Power Off Confirmation This option determines whether a confirmation dialog for turning off the projector will appear or not NOTE When the confirmation message is displayed you m...

Page 41: ...p button on the remote control for ten seconds to reset the lamp clock back to zero Do this only after replacing the lamp Lock Are you sure Yes No Setup Page1 Page2 Page3 Page4 Default Source Select C...

Page 42: ...ass may cause injury If this happens contact your NEC dealer for lamp replacement To replace the lamp 1 Loosen the lamp cover screw until the screwdriver goes into a freewheeling condition and remove...

Page 43: ...ri zontally or both Remote control does not work Status indicator is lit or blinking Cross color in RGB mode Check that the power cable is plugged in and that the power button on the projector cabinet...

Page 44: ...lines SECAM RGB 800 dots horizontal 600 dots vertical Power Requirement 100 120 200 240V AC 50 60 Hz Input Current 2 1A 100 120V AC 1 0A 200 240V AC Mechanical Dimensions 9 6 W x 2 1 H x 7 7 D 243mm...

Page 45: ...R C A N C E L SELECT AUTO ADJUST STATUS POWER ON STAND BY SOURCE AC IN VIDEO S VIDEO RGB AUDIO PC CONTROL Cabinet Dimensions 238 9 4 196 7 7 53 2 1 8 0 31 Lens center Lens center Unit mm inch 243 9 6...

Page 46: ...Red Cr 2 Green or Sync on Green Y 3 Blue Cb 4 Ground 5 Ground 6 Red Ground Cr Ground 7 Green Ground Y Ground 8 Blue Ground Cb Ground 9 No Connection 10 Sync Signal Ground 11 12 Bi directional DATA SDA...

Page 47: ...35 16 56 25 36 VESA 800 600 37 879 60 32 40 VESA 800 600 48 077 72 19 50 VESA 800 600 46 88 75 49 5 VESA 800 600 53 674 85 06 56 25 MAC 832 624 49 725 74 55 57 283 VESA 1024 768 35 5 43 Interlaced 44...

Page 48: ...0H 00H 00H 00H 12H PICTURE MUTE OFF 02H 11H 00H 00H 00H 13H SOUND MUTE ON 02H 12H 00H 00H 00H 14H SOUND MUTE OFF 02H 13H 00H 00H 00H 15H NOTE Contact your local dealer for a full list of PC Control Co...

Page 49: ...Printed in Japan 7N8P0691...

Reviews: