background image

83

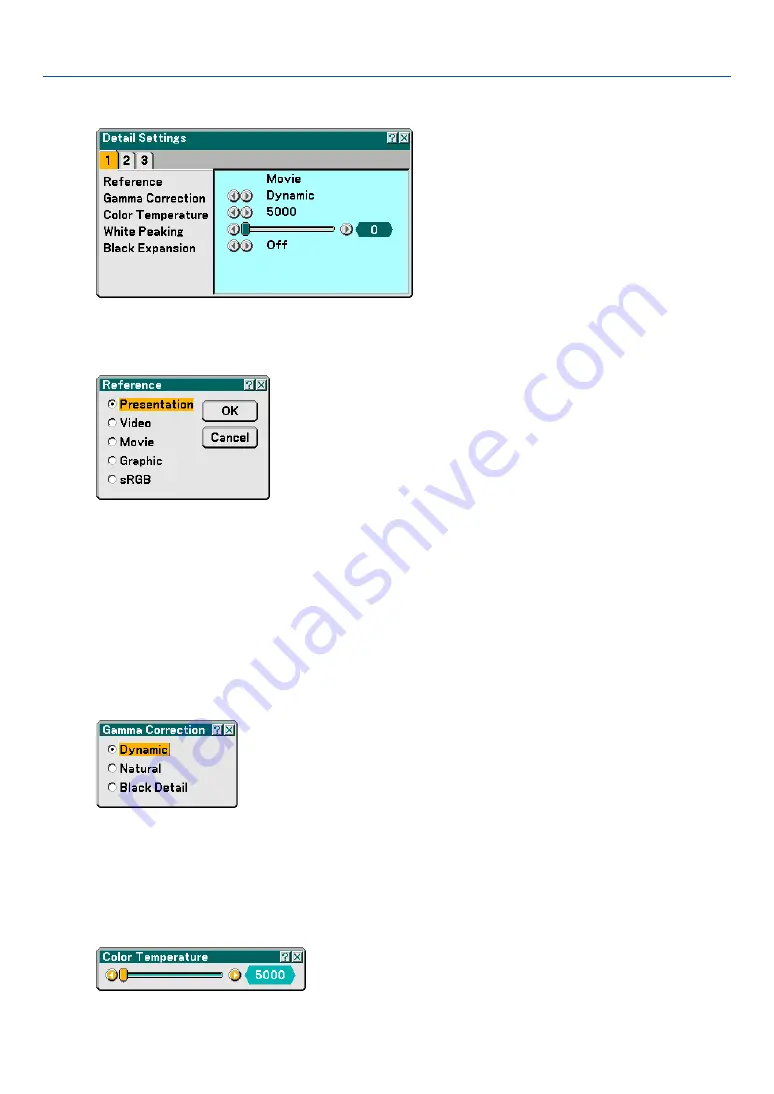
[Detail Settings]

This will provide you with three pages of menus that provide more detailed settings.

[Page1]

Selecting Reference Setting [Reference]
This feature allows you to use color correction or gamma values as reference data to optimize for various types of
images. You can select one of the following five settings.

Presentation ...... Recommended for making a presentation using a PowerPoint file.

Video ................. Recommended for regular picture such as TV program.

Movie ................ Recommended for movies.

Graphic .............. Recommended for graphics.

sRGB ................. Standard color values.

Selecting Gamma Correction Mode [Gamma Correction]

Each mode is recommended for:

Dynamic ............ Creates a high-contrast picture.

Natural ............... Natural reproduction of the picture.

Black Detail ........ Emphasizes detail in dark areas of the picture.

Adjusting Color Temperature [Color Temperature]

This feature adjusts the color temperature using the slide bar. The range is between 5000K and 9300K.

6. Using On-Screen Menu

Summary of Contents for LT265 - INSTALLTION GUIDE

Page 1: ...Portable Projector LT265 LT245 User s Manual ...

Page 2: ...d The information should be read carefully to avoid problems WARNING TO PREVENT FIRE OR SHOCK DO NOT EXPOSE THIS UNIT TO RAIN OR MOISTURE DO NOT USE THIS UNIT S PLUG WITH AN EXTENSION CORD OR IN AN OUTLET UNLESS ALLTHE PRONGS CAN BE FULLY INSERTED DO NOT OPEN THE CABINET THERE ARE HIGH VOLTAGE COMPONENTS INSIDE ALL SERVICING MUST BE DONE BY QUALIFIED NEC SERVICE PERSONNEL DOC Compliance Notice for...

Page 3: ...he receiver is connected Consult the dealer or an experienced radio TV technician for help For UK only In UK a BS approved power cable with moulded plug has a Black five Amps fuse installed for use with this equipment If a power cable is not supplied with this equipment please contact your supplier Important Safeguards These safety instructions are to ensure the long life of your projector and to ...

Page 4: ... requirement before attempting to use your projector 8 Handle the power cable carefully and avoid excessive bending A damaged cord can cause electric shock or fire 9 If the projector is not to be used for an extended period of time disconnect the plug from the power outlet 10 Do not touch the power plug during a thunderstorm Doing so can cause electrical shock or fire 11 Do not handle the power pl...

Page 5: ...lamp after the lamp has reached the end of its usable life the lamp bulb may shatter and pieces of glass may be scattered in the lamp case Do not touch them as the pieces of glass may cause injury If this happens contact your NEC dealer for lamp replacement Allow a minimum of 90 seconds to elapse after turning off the projector Then turn off the main power switch disconnect the power cable and all...

Page 6: ...rnal Monitor 19 Connecting Your DVD Player with Component Output 20 Connecting Your VCR or Laser Disc Player 21 Connecting to a Network 22 Inserting and Removing a PC Card 24 Connecting the Supplied Power Cable 26 3 Projecting an Image Basic Operation 27 Turning on the Projector 28 Selecting a Source 30 Adjusting the Picture Size and Position 31 Correcting Keystone Distortion 33 Optimizing an RGB ...

Page 7: ...erating the Viewer Function from the Projector playback 64 쐋 Changing Background Logo 70 6 Using On Screen Menu 71 Using the Menus 72 Menu tree 73 Menu Elements 75 Menu Descriptions Functions Source 76 쐄 Menu Descriptions Functions Adjust 79 쐂 Menu Descriptions Functions Setup 90 쐆 Menu Descriptions Functions Information 112 쐊 Menu Descriptions Functions Reset 116 7 Maintenance 117 Cleaning the Ca...

Page 8: ...to the Projector 3 Part Names of the Projector 5 Carrying the Projector 5 Top Features 7 Terminal Panel Features 8 Part Names of the Remote Control 10 Battery Installation 12 Operating Range for Wireless Remote Control 12 Remote Control Precautions 12 ...

Page 9: ...d e N E C S o f t w a r e U t i l i t y I n s t a l l a t i o n G u i d e I m p o r t a n t I n f o r m a t i o n Projector Lens cap 24FT9351 Soft case 24BS7114 Remote control 7N900491 Batteries AAA 2 Remote mouse receiver 7N900561 Power cable 7N080204 US 7N080003 EU RGB VGA signal cable 7N520032 CD ROM User s manual and User Supportware 2 For North America only Registration card Limited warranty ...

Page 10: ...PC card interfaces provide for computer free presentations Enhanced smart security settings for password protection cabinet control panel lock menu lock and PC card protection key to help prevent unauthorized access adjustments and theft deterrence High resolution display up to UXGA compatible XGA native resolution Variable audio out control of external amplified speakers via the projector remote ...

Page 11: ... of the manual you ll find an overview If the section doesn t apply you can skip it IBM is a trademark or registered trademark of International Business Machines Corporation Mac Macintosh and PowerBook are trademarks of Apple Computer Inc registered in the U S and other countries Windows Windows 98 Windows Me Windows XP or Windows 2000 are trademarks or registered trademarks of Microsoft Corporati...

Page 12: ...Adjustable Tilt Foot Lever See page 31 This security slot supports the MicroSaver Security System MicroSaver is a registered trademark of Kensington Microware Inc The logo is trademarked and owned by Kensington Microware Inc Carrying the Projector Always carry your projector by the handle Ensure that the power cable and any other cables connecting to video sources are disconnected before moving th...

Page 13: ...Switch When you plug the supplied power cable into an active wall outlet and turn on the Main Power switch the POWER indicator turns orange and the projector is in standby mode See page 28 Remote Sensor See page 12 PC Card Slot Rear Foot Ventilation outlet Lamp cover screw Rear Foot Rotate to make the projector level See page 31 PC Card Eject Button Lamp cover See page 119 ...

Page 14: ...the input source will change as follows Computer1 Computer2 Video S Video Viewer Computer1 If no input signal is present the input will be skipped 5 AUTO ADJUST Button Use this button to adjust an RGB source for an opti mal picture See page 35 6 PC CARD Access Indicator Lights while accessing a PC card 7 ENTER Button Executes your menu selection and activates items selected from the menu 8 EXIT Bu...

Page 15: ...ound level of the internal speaker When audio equipment is connected the projec tor speaker is disabled This jack cannot be used as a headphone jack 6 S VIDEO IN Connector Mini DIN 4 Pin Here is where you connect the S Video input from an external source like a VCR NOTE S Video provides more vivid color and higher resolution than the traditional composite video format 7 VIDEO IN Connector RCA Conn...

Page 16: ...rd partially 13 PC CARD Slot Insert a PC memory card or NEC optional wireless LAN card here Terminal Panel Features PC CARD R AUDIO IN L VIDEO IN COMPUTER 1 IN COMPUTER 2 IN MONITOR OUT AUDIO IN AUDIO OUT USB LAN S VIDEO IN PC CONTROL 12 7 8 6 1 2 4 11 10 9 3 5 13 ...

Page 17: ...st the image size The image can be magnified about the center of the screen up to 400 See page 40 6 LASER Button Press and hold this button to activate the laser pointer When lit you can use the laser to draw your audience s attention to a red dot that you can place on any ob ject 7 POINTER Button Press this button to display the projector pointer You can move your pointer icon to the area you wan...

Page 18: ...n to select COMPUTER 2 input 19 AUTO ADJ Button Use this button to adjust an RGB source COMPUTER 1 or 2 for an optimal picture See page 35 20 LAN Button Press this button to select the LAN Local Area Net work connection 21 PIC MUTE Button This button turns off the image and sound for a short period of time Press again to restore the image and sound See page 39 22 VOLUME Buttons Press to increase t...

Page 19: ...le of the remote sensor on the projector cabinet The projector will not respond if there are objects between the remote control and the sensor or if strong light falls on the sensor Weak batteries will also prevent the remote control from properly operating the projector Remote Control Precautions Handle the remote control carefully If the remote control gets wet wipe it dry immediately Avoid exce...

Page 20: ... 17 Enabling the computer s external display 17 Connecting Your PC or Macintosh Computer 17 To connect SCART output RGB 18 Connecting an External Monitor 19 Connecting Your DVD Player with Component Output 20 Connecting Your VCR or Laser Disc Player 21 Connecting to a Network 22 Inserting and Removing a PC Card 24 Connecting the Supplied Power Cable 26 ...

Page 21: ... projector When moving the projector or when it is not in use cover the lens with the lens cap To the wall outlet 3 2 1 D i s t a n c e Screen size Unit cm inch Screen size Lens center 609 6 W 457 2 H 240 W 180 H 487 7 W 365 8 H 192 W 144 H 406 4 W 304 8 H 160 W 120 H 365 8 W 274 3 H 144 W 108 H 304 8 W 228 6 H 120 W 90 H 243 8 W 182 9 H 96 W 72 H 203 2 W 152 4 H 80 W 60 H 162 6 W 121 9 H 64 W 48 ...

Page 22: ...60 1067 1280 1601 1921 2134 2241 2562 2786 2882 3202 3736 4270 4804 5337 mm 762 1016 1524 1702 1829 2032 2134 2286 2540 3048 3810 4572 5080 5334 6096 6629 6858 7620 8890 10160 11430 12700 mm 610 813 1219 1361 1463 1626 1707 1829 2032 2438 3048 3658 4064 4267 4877 5304 5486 6096 7112 8128 9144 10160 inch 30 40 60 67 72 80 84 90 100 120 150 180 200 210 240 261 270 300 350 400 450 500 α Wide Tele deg...

Page 23: ...be used at temperatures between 41 F 5 C and 95 F 35 C Do not expose the projector to moisture dust or smoke This will harm the screen image Ensure that you have adequate ventilation around your projector so heat can dissipate Do not cover the vents on the side or the front of the projector Reflecting the Image Using a mirror to reflect your projector s image enables you to enjoy a much larger ima...

Page 24: ... not supplied to connect to your Mac s video port IBM VGA or Compatibles Notebook type or Macintosh Notebook type Connecting your PC or Macintosh computer to your projector will enable you to project your computer s screen image for an impressive presentation To connect to a PC or Macintosh simply 1 Turn off the power to your projector and computer 2 Use the supplied RGB VGA signal cable to connec...

Page 25: ...MPUTER 1 IN COMPUTER 2 IN MONITOR OUT AUDIO IN USB LAN COMPUTER 1 IN Before connections An exclusive SCART adapter ADP SC1 and a commercially available SCART cable are re quired for this connection NOTE Audio signal is not available for this connection 1 Turn off the power to the projector and your video equipment 2 Use the NEC ADP SC1 SCART adapter and a commercially available SCART cable to conn...

Page 26: ...the MONITOR OUT Mini D Sub 15 pin connector on your projector 3 Connect the supplied power cable See page 26 4 Turn on the projector monitor and the computer NOTE The MONITOR OUT connector outputs an RGB signal during Standby mode When the projector is in the standby mode the image may not be correctly displayed while the cooling fans are running immediately after turning on or off the power Outpu...

Page 27: ...VD player to the COMPUTER IN connector on the projector For a DVD player without component video Y Cb Cr output use an S Video cable not provided to connect an S Video output of the DVD player to the Video Input of the projector 3 Connect the supplied power cable See page 26 4 Turn on the projector and DVD player A component signal will be automatically displayed If not from the menu select Setup ...

Page 28: ...er disc player or document camera 2 Connect one end of an RCA cable to the video output or one end of an S Video cable to the S Video output connector on the back of your VCR or laser disc player connect the other end to the appropriate video input on your projector Connect one end of a pair RCA cables not supplied to the audio output on the back of your VCR or laser disc player connect the other ...

Page 29: ...the supplied User Supportware 2 CD ROM Picture transmission feature With the wired or wireless LAN connection you can send images and slides from a personal computer to the projector which then can be projected on the screen The following two methods are available Using Image Express Utility 2 0 from the supplied User Supportware 2 CD ROM Using Ulead Photo Explore 8 0 from the supplied User Suppor...

Page 30: ...ype Infrastructure C Example of wireless LAN connection Network Type Mode 802 11 Ad Hoc To enable direct communication i e peer to peer between personal computers and projectors you need to select the 802 11 Ad Hoc mode From the menu select Setup Installation LAN Mode PC Card Advanced Network Type 802 11 Ad Hoc The 802 11 Ad hoc mode complies with IEEE802 11 standard When in Ad Hoc mode only 802 1...

Page 31: ...ot be inserted backwards or upside down Attempting to force it into the slot in the wrong direction may break the internal pin and damage the card slot Refer to the PC card s operating instructions for the proper direction of insertion Back up your PC card s data in case it will need to be restored To prevent electrostatic discharge damage to the wireless LAN card wear an anti static wrist strap I...

Page 32: ... support NTFS formatted flash memory card or USB memory device Be sure to use a flash memory card or USB memory device formatted with the FAT32 FAT16 or FAT file system To format your flash memory card or USB memory device in your computer refer to the document or help file that comes with your Windows operating systems ...

Page 33: ... sure that the prongs are fully inserted into both the AC IN and the wall outlet To wall outlet CAUTION Do not unplug the power cable from the wall outlet under any one of the following circumstances Doing so can cause damage to the projector or PC card While the projector s lamp is lighted While the cooling fans are running The cooling fans continue to work for 90 seconds after the projector is t...

Page 34: ...ector 28 쐇 Selecting a Source 30 쐋 Adjusting the Picture Size and Position 31 쐏 Correcting Keystone Distortion 33 쐄 Optimizing an RGB Image Automatically 35 쐂 Turning Up or Down Volume 35 쐆 Using the Laser Pointer 36 쐊 Turning off the Projector 37 쐎 After Use 37 ...

Page 35: ...is feature register a keyword See Security in Setup on page 48 for more details 1 To turn on the main power to the projector press the Main Power switch to the on position I The POWER indicator will light orange See the Power Indicator section on page 123 for more details 2 Press the POWER ON STAND BY button on the projector cabinet or POWER ON button on the remote control for a minimum of 2 secon...

Page 36: ...s happens the projector will not turn on If the internal temperature of the projector is too high the projector detects abnormal high temperature In this condition the projector will not turn on to protect the internal system If this happens wait for the projector s internal components to cool down When the lamp reaches its end of usable life the projector will not turn on If this happens replace ...

Page 37: ...puter1 Computer2 Video S Video Viewer Computer1 If no input signal is present the input will be skipped When the input source you wish to project is displayed release the button VOLUME 3D REFORM PIC MUTE FREEZE R CLICK PICTURE SLIDE AUTO ADJ ASPECT HELP VIEWER LAN COMPUTER S VIDEO VIDEO 1 2 PC CARD SOURCE AUTO ADJUST 3D REFORM LAMP STATUS POWER ON STAND BY ENTER EXIT MENU SELECT Selecting from Sou...

Page 38: ...sting the height of a projected image or changing projection angle will run the Auto Keystone correction function to quickly correct the vertical distortion The Keystone screen will be displayed For operating the Keystone screen see Correcting Key stone Distortion on page 33 NOTE Your Keystone correction data can be reset by pressing and holding the 3D REFORM button for a minimum of 2 seconds The ...

Page 39: ...32 3 Projecting an Image Basic Operation Zoom Use the ZOOM lever to finely adjust the image size on the screen Focus Use the FOCUS ring to obtain the best focus ...

Page 40: ...t or right side of the screen with the left or right side of the projected image Use the shorter side of the projected image as the base In the right example use the left side as the base NOTE When Manual is selected in Keystone from the menu project an image adjusting projector position so that the screen is smaller than the area of the projected image See page 90 for selecting Manual in Keystone...

Page 41: ... last use If the projection angle is the same as in the last use the previous correction setting values are retained in the memory To use the previous correction setting values after changing projection angle select Manual in Keystone from the menu See page 90 To reset the 3D Reform correction setting values press and hold the 3D REFORM button for a minimum of 2 seconds Each time the 3D REFORM but...

Page 42: ...to reduce video noise dot interference or cross talk this is evident when part of your image appears to be shimmer ing This function adjusts the clock frequencies that eliminate the horizontal banding in the image This function also adjusts the clock phase to reduce video noise dot interference or cross talk This adjustment may be necessary when you connect your computer for the first time NOTE So...

Page 43: ...tivate the laser pointer L A S E R To disable the laser pointer set the function switch to Off Decide whether to enable or disable the laser then set the switch as necessary using the tip of a thin ball point pen On this model the other selector switch is not used ON OFF On Enabled the laser lights when the LASER button is pressed Factory default Off Disabled the laser does not light even when the...

Page 44: ...e main power under any one of the following circumstances Doing so can cause damage to the projector or PC card While the projector lamp is lighted While the cooling fans are running The cooling fans continue to work for 90 seconds after the projector is turned off While the PC CARD Access Indicator lights Doing so can damage your PC memory card 쐎 After Use Preparation Make sure that the main powe...

Page 45: ...rizontal and Vertical Keystone Distortion Cornerstone 43 쐎 Making Freehand Drawings on a Projected Image ChalkBoard 46 쐅 Storing Images Displayed on the Projector on the PC card or USB Memory Capture 47 쐈 Preventing Unauthorized Use of the Projector 48 쐉 Using a USB Memory Device or USB Memory Card Reader 53 씈 Operation Using an HTTP Browser 54 씉 Using the Projector to Operate a Computer Connected...

Page 46: ... the FREEZE button to freeze a picture Press again to resume motion NOTE Pressing the MENU button will display the Capture menu that allows you to capture a freezed image See page 47 for more information 쐋 Using the Pointer Press the Pointer button to display the pointer Use the Select button to move the pointer You can use one of nine pointers to draw your audience s attention to the portion of a...

Page 47: ...ed and the magnify icon will be displayed To magnify the selected area use the SELECT 왖왔왗왘 button to move the magnify icon and press the MAGNIFY button POINTER LASER MAGNIFY PAGE OFF POWER ON E N T E R MENU E X I T UP DOWN POINTER LASER MAGNIFY PAGE OFF POWER ON E N T E R MENU E X I T R CLICK UP DOWN 쐄 Getting Integrated Help You get the contents about Help in English German and Japanese Display H...

Page 48: ... select a menu item and click with the left mouse button to make adjustments and settings Using the middle button on the mouse The projector supports the middle button on your mouse With the middle button you can do the following You can use a scroll bar in the menu or the help You can click the middle button to display or hide the Chalkboard toolbar Example Click or press and hold the left mouse ...

Page 49: ...98 Me XP or Windows 2000 operating system NOTE In Windows XP if the mouse cursor will not move correctly do the following Clear the Enhance pointer precision check box underneath the mouse speed slider in the Mouse Properties dialog box Pointer Options tab NOTE Wait at least 5 seconds after disconnecting the mouse receiver before reconnecting it and vice versa The computer may not identify the mou...

Page 50: ...s Current adjusments for Keystone or Cornerstone will be cleared 2 Project an image so that the screen is smaller than the area of the raster 3 Pick up any one of the corners and align the corner of the image with a corner of the screen The drawing shows the upper right corner 4 Press the 3D REFORM button on the remote control twice The Cornerstone adjustment screen is displayed Screen 5 Use the S...

Page 51: ...correction setting values press and hold the 3D REFORM button for a minimum of 2 seconds NOTE During 3D Reform adjustment Aspect Ratio and Screen may not be available Should this happen first reset the 3D Reform data and then do each setting Second repeat the 3D Reform adjustment Changing Aspect Ratio and or Screen setting can limit 3D Reform in its adjustable range Screen 9 Use the SELECT 왖왔왗왘 bu...

Page 52: ...inimum of 2 seconds to reset the current correction data The Cornerstone function becomes available Turning on the projector will reset the previous correction setting values and correct distortion anew if the projection angle is changed from the last use If the projection angle is the same as in the last use the previous correction setting values are retained in the memory To use the previous cor...

Page 53: ... the color palette from which you can select a color you prefer by left clicking Capture Left click to capture a drawing on the ChalkBoard screen and save it to your PC card inserted into the PC card slot of the projector Eraser Left click and drag to erase part of a drawing Left click or right click the eraser icon to display the eraser palette containing four erasers of different thickness from ...

Page 54: ... port of the projector Insert the PC card so that the end with the insertion direction arrow on the top goes in first Press the eject button to eject the card 1 Project the image you wish to store on the projector 2 Press the FREEZE button on the remote contorol 3 Press the MENU button to display the Capture menu Capture Captures an image and save it as a JPEG file in a PC card or USB memory Drive...

Page 55: ...being used by unauthorized individuals Assigning a Keyword for the first time 1 Press the MENU button The menu will be displayed 2 Press the SELECT 왘 button to highlight the Setup submenu and press the ENTER button The page tab Basic will be highlighted 3 Press the SELECT 왘 button twice to highlight the page tab Security ...

Page 56: ...SELECT 왔 button four times to highlight Security 5 Press the ENTER button to display the Security screen 6 Press the ENTER 왔 button once to highlight the Keyword entry box and press the ENTER button The Software keyboard will be displayed ...

Page 57: ...entry box 7 3 For 3 and 4 use the same procedure as step 7 2 The asterisk 쏄쏄쏄쏄 will be displayed in the Keyword entry box 7 4 Press the SELECT 왔 button to highlight OK and press the ENTER button The Software keyboard will disappear 8 Press the SELECT 왖 button once to highlight Disable and press the SELECT 왗 button to highlight Enable 9 Press the SELECT 왔 button to highlight OK and press the ENTER ...

Page 58: ... indicator lights orange The projector is in standby condition 4 Press and hold the POWER ON STANDBY button for a minimum of two seconds The projector will turn on The Projector is locked Enter your keyword message will be displayed at the bottom of the screen 5 Press the MENU button The Keyword entry screen will be displayed 6 Press the ENTER button The Software keyboard will be displayed 7 Use t...

Page 59: ...s the ENTER button The Keyword entry screen will be displayed 5 Press the ENTER button The Software keyboard will be displayed 6 Use the same procedures as steps 1 to 7 described in the Assigning a Keyword for the first time section to enter 1234 Each time one number is entered an 쏄 asterisk will appear Keyword appears as asterisks so the real keyword is hidden 7 After entering your keyword highli...

Page 60: ...e and a USB memory card reader when connecting a USB mouse to the projector Do not do the following while the USB memory device or USB memory card reader s access indicator is lit or flashing while data is being accessed Doing so can damage your USB memory device or USB memory card reader in the reader Back up your data in case it will need to be restored Pulling out the USB memory device or USB m...

Page 61: ...nections and set up the projector and confirm that it is complete before engaging in browser opera tions See Setting LAN Mode on page 99 Operation with a browser that uses a proxy server may not be possible depending on the type of proxy server and the setting method Although the type of proxy server will be a factor it is possible that items that have actually been set will not be displayed depen...

Page 62: ...en display functions All Off Cancels the muting of each of the video audio and on screen display functions Picture Controls the video adjustment of the projector Brightness 왖 Increases the brightness adjustment value Brightness 왔 Decreases the brightness adjustment value Contrast 왖 Increases the contrast adjustment value Contrast 왔 Decreases the contrast adjustment value Color 왖 Increases the colo...

Page 63: ...hes to the Viewer LAN Switches to a LAN signal Projector Status This displays the condition of the projector Remaining Lamp Time Displays the remaining life of the lamp as a percentage Lamp Hour Meter Displays how many hours the lamp has been used Projector Usage Displays how many hours the projector has been used Error Status Displays the status of errors occurring within the projector Refresh Up...

Page 64: ...need for taking the computer from the office to the meeting room Meeting room Office Disclaimer You can use the Desktop Control Utility 1 0 to operate a computer located in a separate room from the projector over a network This means there might be potential security risks that you may be exposed to which could cause damage by unauthorized access or illegal use We recommend you take some measures ...

Page 65: ...1 0 The Startup password window appears Window at the first startup Window after entering your startup password 5 Input the startup password and click OK The Current password input window appears NOTE The Current password will be changed each time you start Desktop Control Utility 1 0 6 Make a note of the password 7 Click OK Desktop Control Utility 1 0 starts Go to the room where the projector is ...

Page 66: ...USB mouse The menu appears 4 Click Source then click LAN The help message is displayed The message is displayed only when a password for Desktop Control Utility 1 0 is not assigned 5 Follow the message to press the MENU button on the projector cabinet or the remote control The connections bar appears at the bottom left of the screen 6 Click the password input icon 7 Click Entry The password input ...

Page 67: ... which you want to connect then click OK The desktop of the connected computer appears NOTE Once the desktop appears the menu will no longer appear when the USB mouse is clicked To display the menu while the desktop is displayed press the button on the projector itself or on the remote control Operations on the projector Operating the desktop A USB mouse connected to the projector can be used to o...

Page 68: ... while the desktop is displayed The additional operations bar appears at the bottom left of the screen 2 Select the disconnect icon and press the ENTER button The connections bar appears at the bottom left of the screen To reconnect the communication click the PC search icon and repeat steps 12 and 13 in the previous page NOTE Disconnection is possible by clicking the projector icon and then Disco...

Page 69: ...62 5 Using the Viewer Making the Most out of the Viewer Function 63 Operating the Viewer Function from the Projector playback 64 쐋 Changing Background Logo 70 ...

Page 70: ...resentation materials using the Ulead Photo Explore 8 0 see the supplied NEC Software Utility Installation Guide or On line help in Ulead Photo Explorer 8 0 1 Both PNG and GIF format support non interlaced images only 2 Index file is a file created using the Ulead Photo Explore 8 0 contained on the supplied NEC User Supportware 2 CD ROM See the supplied NEC Software Utility Installation Guide for ...

Page 71: ...the MENU button to display the Viewer menu The Viewer menu will appear when you press the MENU button on the remote control or the projector cabinet The Viewer menu includes the following commands Play Plays back automatically or manually depending on the setting in Options This allows you to move on to the next slide when Manual Play is selected in the Play Mode Stop This allows you to stop Auto ...

Page 72: ... slide number number of displayable slides in a folder file name creation date month day year creation time hour minute file size Number of files Indicates number of displayable slides in the selected folder The maximum number of images recognized as slides within one directory is about 1000 Thumbnail file name Indicates thumbnails and names contained in a folder Cursor Indicates the selected slid...

Page 73: ...mp 0002 jpg 3 Fichiers Slot 1 _CAP_ _RESTORE RECYCLED 1 3 0000 jpg 60KB sélection ENTER dossier EXIT 0000 jpg 0001 jpg 0002 jpg 3 Fichiers Slot 1 _CAP_ _RESTORE RECYCLED 1 3 0000 jpg 60KB sélection ENTER dossier EXIT Off On Sort Rearranges the slides or thumbnails by name extension date or size NOTE This setting is not available for the following folders The __CAP__ folder for captured images Fold...

Page 74: ...rom a VCR etc it is possible to switch from a Viewer slide to the video picture then back to the Viewer slide simply by using the Viewer button NOTE Even if you switch the current Viewer source to another source the current slide is retained When you return back to the Viewer you will get the slide that has been retained Viewing Digital Images Digital images can be played with the Viewer if the fo...

Page 75: ... 1 3 0000 jpg 60KB sélection ENTER dossier EXIT 3 Use the 왔 button to select Thumbnails and then press the ENTER button The Thumbnail screen will be displayed NOTE To change highlight from the Thumbnails screen pane on the right to a directory tree pane on the left press the EXIT button To return highlight to the Thumbnails screen press the ENTER button 4 Use the 왖왔왗왘 buttons to select an image yo...

Page 76: ...g 3 Fichiers Slot 1 __CAP__ _RESTORE RECYCLED 1 3 0000 jpg 60KB sélection ENTER dossier EXIT 3 Press the MENU button to display the Viewer menu 4 Use the 왔 button to select Delete and then press the ENTER button 5 Use the 왗 button to select Yes and then press the ENTER button This completes deleting NOTE The vacant __CAP__ folder stays even after you delete all the captured images A confirmation m...

Page 77: ...P_ _RESTORE RECYCLED 1 3 0000 jpg 60KB sélection ENTER dossier EXIT 3 Use the 왔 button to select Thumbnails and then press the ENTER button The Thumbnail screen will be displayed NOTE To change highlight from the Thumbnails screen right window to a directory tree left window press the EXIT button To return highlight to the Thumbnails screen press the ENTER button 4 Use 왖왔왗왘 button to select a file...

Page 78: ...e Menus 72 Menu tree 73 Menu Elements 75 Menu Descriptions Functions Source 76 Menu Descriptions Functions Adjust 79 Menu Descriptions Functions Setup 90 Menu Descriptions Functions Information 112 Menu Descriptions Functions Reset 116 ...

Page 79: ...uttons on the remote control or the projector cabinet to select the tab you want NOTE You can select a tab only when the tab color is orange 5 Press the ENTER button on the remote control or the projector cabinet to display the submenu window 6 Adjust the level or turn the selected item on or off by using the SELECT 왖왔왗왘 buttons on the remote control or the projector cabinet Changes are stored unt...

Page 80: ...tions Clock Phase Horizontal Position Vertical Position Blanking Top Bottom Left Right Resolution Auto Native Overscan 0 5 10 Video Noise Reduction Off Low Medium High Color Matrix HDTV SDTV 3D Y C Separation Off On Vertical Enhancer Off 1 2 3 I P Converter Deinterlace Auto Still Interlace Setup Basic Keystone Auto Manual Cornerstone Lamp mode Normal Eco Menu Mode Basic Menu Advanced Menu Language...

Page 81: ...N PAL60 SECAM S Video Auto NTSC3 58 NTSC4 43 PAL PAL M PAL N PAL60 SECAM OUT Terminal Last Computer1 Computer2 Tools ChalkBoard Off Timer Off 0 30 1 00 2 00 4 00 8 00 12 00 16 00 Mouse Mouse Pointer Pointer 1 to 9 Button Right Hand Left Hand Sensitivity Fast Medium Slow Pointer Pointer 1 to 9 Information Usage Time Remaining Lamp Time Lamp Hour Meter Projector Usage Source Page1 Input Terminal Sig...

Page 82: ...ront Radio button Use this round button to select an option in a dialog box Check box Place a checkmark in the square box to turn the option On Slide bar Indicates settings or the direction of adjustment OK button Press to confirm your setting You will return to the previous menu Cancel button Press to cancel your setting You will return to the previous menu Close button Click to close the window ...

Page 83: ...er disc player NOTE A frame may freeze for a brief period of time when a video is played back in fast forward or fast rewind with a Video or S Video source Viewer This feature enables you to make presentations using a PC card that contains captured images and slides created with the exclusive Photo Explore 8 0 for NEC contained on the CD ROM See the supplied NEC Software Utility Installation Guide...

Page 84: ...your remote control or the projector cabinet to select any number and press the ENTER button on the remote control or the projector cabinet to display the Entry Edit Com mand screen 3 Use the SELECT 왗 or 왘 button to select Store and press the ENTER button Using the Entry List Making any adjustments to the current picture will automatically register its adjustments to the Entry List The regis tered...

Page 85: ...ted After executing Lock the changes cannot be saved Skip Set so that the selected signal will be skipped during auto search When complete select OK and press ENTER To exit without storing the setting select Cancel Select Source Name and press ENTER to display the Source Name Edit window You can change source name on this window Press 왔 to display the software keyboard which you can enter alphanum...

Page 86: ...ic Brightness Adjusts the brightness level or the back raster intensity Contrast Adjusts the intensity of the image according to the incoming signal Color Increases or decreases the color saturation level not valid for RGB 6 Using On Screen Menu ...

Page 87: ... RGB Sharpness Controls the detail of the image for Video Not valid for RGB Using the Wall Color Correction Wall Color This function allows for quick adaptive color correction in applications where the screen material is not white The following eight options are available OFF Blackboard Light yellow Light green Light blue Sky blue Light rose Pink 6 Using On Screen Menu ...

Page 88: ... true aspect 4 3 Fill Stretched to display in 16 9 aspect ratio NOTE You can adjust image position vertically for a source with black borders on top and bottom See page 98 for setting image position Copyright Please note that using this projector for the purpose of commercial gain or the attraction of public attention in a venue such as a coffee shop or hotel and employing compression or expansion...

Page 89: ...e The setting values on page will be reset Are you sure will be displayed Select Yes and press the ENTER button To return without storing settings select No and press the ENTER button Picture Management Preset This option allows you to adjust neutral tint for yellow cyan or magenta There are 5 factory presets optimized for various types of images you can set user adjustable settings 6 Using On Scr...

Page 90: ...ation using a PowerPoint file Video Recommended for regular picture such as TV program Movie Recommended for movies Graphic Recommended for graphics sRGB Standard color values Selecting Gamma Correction Mode Gamma Correction Each mode is recommended for Dynamic Creates a high contrast picture Natural Natural reproduction of the picture Black Detail Emphasizes detail in dark areas of the picture Ad...

Page 91: ...izes blacks that appear more like shades of gray to provide a true black and white image The On is the factory preset NOTE This feature is not available for Scart 480p 576p HDTV and RGB signals Page 2 Adjusting White Balance White Balance This allows you to adjust the white balance Brightness for each color RGB is used to adjust the black level of the screen Contrast for each color RGB to adjust t...

Page 92: ...available on the computer signal only If you do not get a better picture even when you set Signal Select to Component in Setup set this to Component Selecting Video Filter Level Video Filter not available for Video Viewer and LAN This function reduces video noise Off The filter is removed Less The low pass filter is applied partially More The low pass filter is applied fully 6 Using On Screen Menu...

Page 93: ... computer for the first time Phase Use this item to adjust the clock phase or to reduce video noise dot interference or cross talk This is evident when part of your image appears to be shimmering Use Phase only after the Clock is complete Adjusting Horizontal Vertical Position Horizontal Vertical Position Adjusts the image location horizontally and vertically Masking Unwanted Area Blanking This fe...

Page 94: ...ccuBlend feature The projector displays the current image in its true resolution See Auto Adjust on page 107 for turning on or off the Auto Adjust feature NOTE When Resolution is set to Native Overscan 3D Reform Aspect Ratio and Screen are not available While you are displaying an image with the projector s native resolution or higher Resolution is not available Selecting Overscan Percentage Overs...

Page 95: ...etter the image quality by way of higher video bandwidth Selecting Color Matrix Color Matrix not available for COMPUTER1 2 Viewer and LAN available for TV standard inputs Select an appropriate color matrix for your input signal either HDTV or SDTV Turning On Off 3 Dimension Separation 3DY C Separation This function turns on or off the 3 dimensional separation feature NOTE This feature is available...

Page 96: ...erlace and Deinterlace Deinterlace Auto The projector automatically determines a still or moving image to display a clear picture If selecting Deinterlace Auto causes excess jitter or artifacts select Interlace Deinterlace Still Select when a still image is displayed When this option is selected for a moving image jitter or artifacts can be seen Interlace Select when a moving image is displayed Th...

Page 97: ...stone setting menu Auto This feature allows the projector to detect its tilt and correct vertical distortion automatically Manual You can correct vertical distortion manually from the menu Changes will be saved even when you turn off the projector Adjust You can display the Keystone screen See page 33 for more details NOTE When Cornerstone is selected Adjust is not available 6 Using On Screen Menu...

Page 98: ...p to 4000 hours by using the Eco mode Selecting Eco mode decreases fan noise compared to in Normal mode Normal Mode This is the default setting 100 Brightness Eco Mode Select this mode to increase the lamp life 80 Brightness Selecting Menu Mode Menu Mode This feature allows you to select two menu modes Basic Menu and Advanced Menu Basic Menu This is the basic menu that contains minimum essentials ...

Page 99: ... 2 Video and No Input to be displayed in the top right corner of the screen Message This option turns on and off messages Even though selecting Off the following message will appear The lamp has reached the end of its usable life Please replace the lamp Press the EXIT button and the message will disappear Projector is locked When unlocking the projector security the message will disappear 6 Using ...

Page 100: ...ressed within 15 seconds Auto 45 sec The menu will automatically be turned off in 45 seconds if no buttons are pressed within 45 seconds Selecting a Color or Logo for Background Background Use this feature to display a blue black screen or logo when no signal is available The default background is blue You can change the logo screen using the Viewer feature See pages 70 Security Disabling the Cabi...

Page 101: ...utton The Enter the Password screen will be displayed Make sure that is highlighted and then press the ENTER button The Software keyboard appears Use the Software keyboard to type a password and then highlight OK on the Enter the Password screen and press the ENTER button The Confirm Password screen will be displayed 2 Type the same password again Highlight OK on the Enter the Password screen and ...

Page 102: ...n you use the Security function Up to 10 characters can be used The Security function is available only when your keyword is entered Use Protect key Check this box to lock your projector when using a PC card To use a keyword without a PC card do not check this box Drive Switches between PC Card slot and USB port type A Read Reads data from a PC card Register Registers data from the PC card The Sec...

Page 103: ...splay a message to the effect that the projector is security pro tected 2 Press the MENU button The Release Code input screen will be displayed 3 Enter your keyword in the Release Code input screen You can view the projected image NOTE Do not forget your keyword However if you forget your keyword NEC or your dealer will provide you with your Release Code See more information at the end of this sec...

Page 104: ...projector will be turned on and display a message to the effect that the projector is security pro tected 2 Press the MENU button The Release Code input screen will be displayed as well as your Request Code 24 alphanumeric characters 3 Enter your Release Code in the Release Code Input screen The projector will turn on If the projector is turned on by entering the Release Code your Security will be...

Page 105: ...81 Position This feature allows you to adjust the vertical position of the image when 16 9 has been selected for the screen type When 16 9 has been selected there is black area above and below the image You can adjust the vertical position of the image in these areas You can adjust the vertical position between top and bottom NOTE This option is available only when 16 9 is selected in Screen Type ...

Page 106: ...ofiles list for your LAN settings Two settings can be stored in memory for each the LAN port and the wireless LAN card respectively 3 On the Built in tab or the PC Card tab turn on or off DHCP specify IP address Subnet Mask Gateway and DNS Configuration Select OK and press the ENTER button See page 100 or 101 To recall the settings from memory After selecting the Built in tab or the PC Card tab se...

Page 107: ...e projector Select Profile 1 or Profile 2 and then do settings for DHCP and the other options After doing this select OK and press the ENTER button This will store your settings in memory DHCP Enabling this option automatically assigns an IP address to the projector from your DHCP server Disabling this option allows you to register the IP address or subnet mask number obtained from your network ad...

Page 108: ...ained from your network administrator IP Address Set your IP address Press to display the software keyboard and type in 12 numeric characters Subnet Mask Set your subnet mask number Press to display the software keyboard and type in 12 numeric characters Gateway Set the default gateway of the network connected to the projector Press to display the software keyboard and type in 12 numeric character...

Page 109: ...oc in Mode Commu nication can be done only with equipment whose SSID matches SSID for your wireless LAN Up to 32 alphanu meric characters can be used NOTE To disable SSID select a space null or ANY All caps Mode Select communication method when using wireless LAN Infrastructure Select this option when communicating with one or more equipment connected to the wireless or wired LAN network via an ac...

Page 110: ...same as communication devices such as PC or access point in your wireless network When you use WEP your image transmission speed will slow down Key Select Selects one key from the four keys below when selecting 64bit 128bit or 152bit in WEP Key1 4 Enter encryption key when selecting 64bit 128bit or 152bit in WEP Up to 5 characters can be set in 64 bit up to 13 characters in 128 bit and up to 16 ch...

Page 111: ...ct one key and press the ENTER button 3 After finishing entering the WEP key use the SELECT 왖왔왗왘 button to select OK and press the ENTER button The software keyboard will disappear Domain Host Name Type in a hostname Up to 60 alphanumeric characters can be used Domain Name Type in domain name of the network connected to the projector Up to 60 alphanumeric characters can be used 6 Using On Screen M...

Page 112: ...yboard in Appendix for more details SMTP Server Name Type in the SMTP server name to be connected to the projector Up to 60 alphanumeric characters can be used Recipient s Address 1 to 3 Type in your recipient s address Up to 60 alphanumeric and symbols characters can be used Test Mail Send a test mail to check if your settings are correct NOTE If you entered an incorrect address in a test you may...

Page 113: ...special characters SP Inserts a space BS Deletes one character backward Returns to the previous Advances to the next OK Executes the selection Cancel Cancels the selection Selecting Communication Speed Communication Speed This feature sets the baud rate of the PC Control port Mini DIN 8 Pin It supports data rates from 4800 to 38400 bps The default is 38400 bps Select the appropriate baud rate for ...

Page 114: ...rmally select this option Fine Select this option if fine adjustment is needed It takes more time to switch to the source than when Normal is selected Enabling Auto Start Auto Start Turns the projector on automatically when the power cable is inserted into an active power outlet and the main power switch is turned on This eliminates the need to always use the Power button on the remote control or ...

Page 115: ...ntinue to use the projector for consecutive days Selecting Default Source Default Source Select You can set the projector to default to any one of its inputs each time the projector is turned on Last Sets the projector to default to the previous or last active input each time the projector is turned on Auto Searches for an active source in order of Computer1 Computer2 Video S Video Viewer LAN Comp...

Page 116: ...eo and S Video This feature enables you to select video standards manually Normally select Auto Select the video standard from the pulldown menu This must be done for Video and S Video separately Setting MONITOR OUT Connector OUT Terminal This option allows you to determine which RGB or component source is output from the MONITOR OUT connector during Standby mode Last The signal from the last COMP...

Page 117: ...om which you can select a color you prefer by left clicking Capture Left click to capture a drawing on the ChalkBoard screen and save it to your PC card inserted into the PC card slot of the projector Eraser Left click and drag to erase part of a drawing Left click or right click the eraser icon to display the eraser palette containing four eraser of different thickness from which you can select a...

Page 118: ...e Pointer Button and Sensitivity Mouse This option lets you to change your USB mouse settings The mouse settings feature is available for USB mouse only Choose the settings you want Mouse Pointer Pointer 1 9 Mouse Button Right Hand or Left Hand Mouse Sensitivity Fast Medium or Slow Selecting Projecting Pointer Icon Pointer This enables you to select from nine different Pointer icons for the POINTE...

Page 119: ...ttings and LAN settings This dialog box has seven pages The information included are as follows Usage Time Remaining Lamp Time Lamp Hour Meter H Projector Usage H NOTE The progress indicator shows the percentage of remaining lamp life The value informs you of the amount of lamp and projector usage respectively 6 Using On Screen Menu ...

Page 120: ...113 Source Page1 Input Terminal Signal Type Video Type Source Name Entry No Source Page2 Horizontal Frequency Vertical Frequency Sync Type Sync Polarity Interlace 6 Using On Screen Menu ...

Page 121: ...d MAC Address Indicates the MAC address of the LAN port RJ 45 LAN PC Card This page shows information on settings for the optional wireless LAN card IP Address Indicates the IP address of the projector when the optional wireless LAN card is used Subnet Mask Indicates the subnet mask of the projector when the optional wireless LAN card is used Gateway Indicates the gateway of the network connected ...

Page 122: ...d Hoc is selected for your communication method WEP Indicates your selected datalength encryption On or Off Channel Indicates the channel you selected in the Site Survey The channel must match for all wireless devices communicating on your wireless LAN Signal Level Indicates receiving condition of radio signal level while you are using a wireless LAN connection Only when PC Card is used Version Fi...

Page 123: ...age All Data Including Entry List Reset all the adjustments and settings for all the signals to the factory preset except Language Background Cabinet Button Lock Password Menu Password Logo Security LAN Mode Projector Name Commnication Remaining Lamp Time Lamp Hour Meter and Projector Usage Also deletes all the signals in the Entry List and returns to the factory preset NOTE Locked signals in Entr...

Page 124: ...117 7 Maintenance Cleaning the Cabinet 118 쐇 Cleaning the Lens 118 쐋 Replacing the Lamp 119 ...

Page 125: ...lens paper to clean the lens and be careful not to scratch the lens Lens Protector The lens barrel has threads on the outside for mounting a commercially available step up ring φ77mm φ82mm and lens protector φ82mm to protect the lens from dirt dust scratches and damage Note that both a lens protector and the supplied lens cap cannot be used at the same time CAUTION Use only transparent lens protec...

Page 126: ...s on the lamp housing Keep finger prints off the glass surface on the lamp housing Leaving finger prints in the glass surface might cause an unwanted shadow and poor picture quality The projector will turn off and go into stand by mode after 2100 hours up to 4100 hours Eco mode of service If this happens be sure to replace the lamp If you continue to use the lamp after 2000 hours up to 4000 hours ...

Page 127: ...this case to prevent the risk of electrical shock Do not attempt to circumvent this interlock 4 Insert a new lamp housing until the lamp housing is plugged into the socket CAUTION Do not use a lamp other than the NEC replacement lamp LT60LPK 5 Secure it in place with the two screws Be sure to tighten the screws ...

Page 128: ...ter to clear the Remaining Lamp Time and the Lamp Hour Meter NOTE When the lamp exceeds 2100 hours up to 4100 hours in Eco mode of service the projector cannot turn on and the menu is not displayed If this happens press the HELP button on the remote control for a minimum of 10 seconds while in standby mode When the lamp time clock is reset to zero the LAMP indicator goes out ...

Page 129: ...ions 126 Cabinet Dimensions 128 Pin Assignments of D Sub COMPUTER 1 2 Input Connector 129 Compatible Input Signal List 130 PC Control Codes and Cable Connection 131 Using Software Keyboard 132 Troubleshooting Check List 133 쐎 TravelCare Guide 135 ...

Page 130: ...ec Off Normal Lamp cover error Temperature error Power error Fan error Lamp error Re firing the lamp Network conflict Cabinet button is locked Replace the lamp cover correctly Page 121 The projector is overheated Move the projector to a cooler location Power unit will not work correctly Fans will not work correctly Lamp fails to light Wait a full minute and then turn on again The projector is re f...

Page 131: ...ed on after connecting with the projector If the screen goes blank while using your remote control it may be the result of the computer s screen saver or power management software If you accidentally hit the POWER button on the remote control wait 90 seconds and then press the POWER button again to resume See also the next page Check if an appropriate color is selected in Wall Color If so select a...

Page 132: ...s happen deactivate the notebook PC s LCD screen when the projector display is in use Each notebook PC has a different way of deactivate reactivate the local LCD screens as described in the previous step Refer to your computer s documentation for detailed information Image displayed is incorrect when using a Macintosh When using a Macintosh with the projector set the DIPswitch of the Mac adapter n...

Page 133: ...1 Stereo Mini Audio 1 L R RCA Audio 1 PC Control Mini DIN 8p Outputs 1 RGB Mini D Sub 15p 1 Stereo Mini Audio USB Port 1 A Type LAN Port RJ 45 Video Compatibility NTSC NTSC4 43 PAL PAL 60 PAL N PAL M SECAM 1080i 720p 576p 576i 480p 480i w optional cable Scan Rate Horizontal 15 kHz to 100 kHz RGB 24 kHz or over Vertical 48 Hz to 120 Hz Video Bandwidth RGB 100 MHz 3dB Pixel Clock Freq Less than 135 ...

Page 134: ...F 10 to 50 C 20 to 80 humidity non condensing Regulations UL Approved UL 60950 CSA 60950 Meets DOC Canada Class B requirements Meets FCC Class B requirements Meets AS NZS CISPR 22 Class B Meets EMC Directive EN55022 EN55024 EN61000 3 2 EN61000 3 3 Meets Low Voltage Directive EN60950 TÜV GS Approved For additional information visit US http www necvisualsystems com Europe http www neceurope com Glob...

Page 135: ...T 260 10 24 57 2 24 275 10 83 LT265 313 12 32 LT245 315 12 4 123 4 84 107 4 2 83 3 27 92 3 6 PC CARD R AUDIO IN L VIDEO IN COMPUTER 1 IN COMPUTER 2 IN MONITOR OUT AUDIO IN AUDIO OUT USB LAN S VIDEO IN PC CONTROL 8 Appendix Cabinet Dimensions Lens center Lens center Unit mm inch ...

Page 136: ...tor only 5 1 4 2 3 10 11 12 13 14 15 6 9 7 8 8 Appendix Pin No RGB Signal Analog YCbCr Signal 1 Red Cr 2 Green or Sync on Green Y 3 Blue Cb 4 Ground 5 Ground 6 Red Ground Cr Ground 7 Green Ground Y Ground 8 Blue Ground Cb Ground 9 No Connection 10 Sync Signal Ground 11 Ground 12 Bi directional DATA SDA 13 Horizontal Sync or Composite Sync 14 Vertical Sync 15 Data Clock ...

Page 137: ...0 350 39 44 87 85 35 5 IBM 720 400 39 44 87 85 35 5 VESA 800 600 35 16 56 25 36 VESA 800 600 37 879 60 32 40 VESA 800 600 48 077 72 19 50 VESA 800 600 46 88 75 49 5 VESA 800 600 53 674 85 06 56 25 MAC 832 624 49 725 74 55 57 283 VESA 1024 768 35 5 43 Interlaced 44 9 VESA 1024 768 48 363 60 65 VESA 1024 768 56 476 70 07 75 MAC 1024 768 60 241 74 93 80 VESA 1024 768 60 023 75 03 78 75 VESA 1024 768 ...

Page 138: ...H 00H 02H 01H 1FH 27H PICTURE MUTE ON 02H 10H 00H 00H 00H 12H PICTURE MUTE OFF 02H 11H 00H 00H 00H 13H SOUND MUTE ON 02H 12H 00H 00H 00H 14H SOUND MUTE OFF 02H 13H 00H 00H 00H 15H ON SCREEN MUTE ON 02H 14H 00H 00H 00H 16H ON SCREEN MUTE OFF 02H 15H 00H 00H 00H 17H ASPECT RATIO 4 3 Screen 4 3 03H 10H 00H 00H 05H 18H 00H 00H 00H 00H 30H Letterbox 03H 10H 00H 00H 05H 18H 00H 00H 01H 00H 31H Widescree...

Page 139: ...s 왘 Advances to the next OK Executes the selection Cancel Cancels the selection NOTE You can drag the Software keyboard on the screen by clicking and holding any part on the keyboard except buttons NOTE1 Pins 2 3 5 6 and 8 are used inside the projector NOTE 2 For long cable runs it is recommended to set communication speed within projector menus to 9600 bps PC Control Connector DIN 8P 1 2 5 4 3 6 ...

Page 140: ...ed off only models with the Power Management function Sleep Timer is turned off only models with the Sleep Timer function Video and Audio Image is too dark Remains unchanged even though you adjust the brightness and or the contrast Image is distorted Image appears to be trapezoidal unchanged even though you carry out the Keystone or 3D Reform adjustment Parts of the image are lost Still unchanged ...

Page 141: ...umber Length inch m Distribution amplifier Model number Switcher Model number Adapter Model number Projector PC DVD player Installation environment Screen size inch Screen type 䡺 White matte 䡺 Beads 䡺 Polarization 䡺 Wide angle 䡺 High contrast Throw distance feet inch m Orientation 䡺 Ceiling mount 䡺 Desktop Power outlet connection 䡺 Connected directly to wall outlet 䡺 Connected to power cord extend...

Page 142: ...odel name serial number and name of the store of purchase are not indicated on the warranty or have been altered 2 Problems or damage caused by dropping or shocks during ship ment or movement by the customer or by improper handling by the customers 3 Problems or damage caused by improper usage or unwarrant able alterations or repairs by the customer 4 Problems or damage caused by fire salt damage ...

Page 143: ... Hong Kong Ltd Address 11th Floor Tower B New Mandarin Plaza 14 Science Museum Road Tsim Sha Tsui East Kowloon Hong Kong Telephone 852 2369 0335 Fax Line 852 2795 6618 Email Address esmond_au nechk nec com hk WEB Address http www nec com hk Regions Covered Hong Kong NEC Taiwan Ltd Address 7F No 167 SEC 2 Nan King East Road Taipei Taiwan R O C Telephone 886 2 8500 1734 Fax Line 886 2 8500 1420 Emai...

Page 144: ...eriod I also confirm following information is correct Regards Application Sheet for TravelCare Service Program P 1 Country product purchased User s Company Name User s Company Address Phone No Fax No User s Name User s Address Phone No Fax No Local Contact office Local Contact office Address Phone No Fax No User s Model Name Date of Purchase Serial No on cabinet Problem of units per User Required ...

Page 145: ...llection problem Enduser is required to fill in Application Sheet Enduser needs to confirm the availability of the Service to NEC Au thorized Service Stations 3 Loan Only For this service NEC Authorized Service Station supplies the cus tomer with a loan unit for US 200 up to 12 days Customer keeps the inoperable unit and when customer returns home customer arranges to have the projector serviced i...

Page 146: ...roduct consult the dealer from whom you purchased the product 2 Whenever warranty service is required the original dated invoice or a copy must be presented as proof of warranty coverage In order to obtain warranty service you may be required to describe and demonstrate the problem to your dealer or to NEC Solutions 3 All products returned to NEC Solutions for service MUST have prior approval To r...

Page 147: ... Class B Peripheral LT265 LT245 We hereby declare that the equipment specified above conforms to the technical standards as specified in the FCC Rules This device complies with Part 15 of FCC Rules Operation is subject to the following two conditions 1 This device may not cause harmful interference and 2 this device must accept any interference received including interference that may cause undesi...

Page 148: ...UT function is not available during Power saving mode Control through the PC Control connector and LAN mode is not available during Power saving mode For PC control and LAN mode of the projector it is recommended to leave the projector in the Normal mode Normal mode Power indicator Orange light Status indicator Green light Power saving mode Power indicator Orange light Status indicator Off See bac...

Page 149: ...c On 2 5 sec Off Normal Lamp cover error Temperature error Power error Fan error Lamp error Re firing the lamp Network conflict Cabinet button is locked Replace the lamp cover correctly The projector is overheated Move the projector to a cooler location Power unit will not work correctly Fans will not work correctly Lamp fails to light Wait a full minute and then turn on again The projector is re ...

Reviews: