background image

42

MAINTENANCE

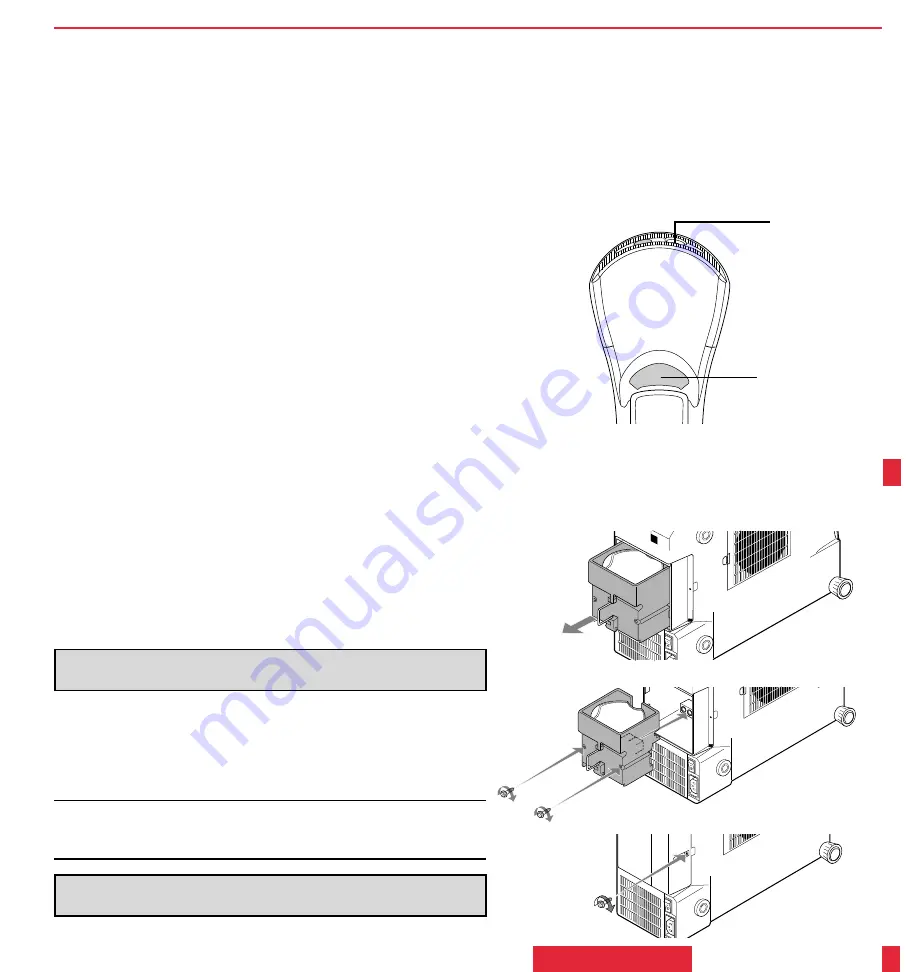
3. Remove the two screws securing the lamp case. (There is an interlock on

this case to prevent the risk of electrical shock. Do not attempt to
circumvent this interlock.)

4. Use the lamp case handle to remove the assembly.

5. Install a new lamp case assembly and secure it in place with the two

screws.

CAUTION:

 Do not use lamps other than the NEC optional lamp.

Order by your projection's model number.

6. Reattach the lamp cover and reinstall the single screw.

7. After you install a new lamp, select the Lamp Usage icon and press and

hold the “Power On” button on the remote control for ten seconds to
reset the lamp time clock to zero.

NOTE: When you replace the lamp, it is also wise to replace the filter. The
filter comes in the same package with your replacement lamp. Contact your
NEC dealer for replacement lamps. Order by your projector’s model number.

CAUTION:

 Do not put the LCD projector on end except for lamp and/

or air filter replacement.

Step 4

Step 5

Step 6

If you want to use your remote control with the cable, connect one end of the cable to
the jack on the remote control and the other end to the Terminal Panel.

1. Mouse Button Works as a mouse for your projected computer image. This button

is also used to adjust position, zoom and focus.

2. Position Button When you’re in the 2X or 4X mode, hold this button down and

adjust the picture position up and down or left and right with the mouse pad.

3. Zoom Button Hold this button down and adjust the picture size (zoom in or out)

with the mouse pad.

4. Focus Button Hold this button down and adjust the focus with the mouse pad.

5. 2X/4X Button Pressing this button will enable you to toggle between a standard

image, a double-sized (2X) image and a quadrupled image (4X).

6. RGB Button Press to select an RGB video source from a computer or document

camera.

7. S-Video Button Press to select an S-Video source from a VCR.

8. Video Button Press to select an NTSC, PAL, SECAM or M-NTSC compatible

video source from a VCR or laser disc player.

9. Freeze Button This button will freeze a picture.

10. Menu ButtonUse this button to call up the menu of icons to adjust and set the image.

11. Select ButtonMake your on-screen menu selections for adjusting and setting the

image with this button.  (See page 35.)

21

Left click button*

Remote Jack

Insert the supplied
remote cable here.

Summary of Contents for LCDMT600

Page 1: ...Part No 78406832 Printed in Japan NEC Multimedia Theatre NEC Multimedia Theatre LCD Projector User s Manual NEC Technologies Inc 1250 N Arlington Heights Road Suite 500 Itasca Illinois 60143 1248 R 600 ...

Page 2: ...um error Err 03 Command not acceptable Busy Err 04 Parameter error CAUTION TO PREVENT SHOCK DO NOT OPEN THE CABI NET NO USER SERVICEABLE PARTS INSIDE REFER SERVICING TO QUALIFIED NEC SERVICE PERSONNEL This symbol warns the user that uninsulated voltage within the unit may be sufficient to cause electrical shock Therefore it is dangerous to make any kind of contact with any part inside of the unit ...

Page 3: ...tions may cause harmful interference to radio communications 2 WARNING TO PREVENT FIRE OR SHOCK DO NOT EXPOSE THIS UNIT TO RAIN OR MOISTURE DO NOT USE THIS UNIT S GROUNDED PLUG WITH AN EXTENSION CORD OR IN AN OUTLET UNLESS ALL THREE PRONGS CAN BE FULLY INSERTED DO NOT OPEN THE CABINET THERE ARE HIGH VOLTAGE COMPONENTS INSIDE ALL SER VICING MUST BE DONE BY QUALIFIED NEC SERVICE PERSONNEL Command Co...

Page 4: ...t in the Radio Interference Regulations of the Canadian Department of Communications Important Safeguards These safety instructions are to ensure the long life of your LCD projector and to prevent fire and shock Please read them carefully and heed all warnings Installation 1 For the best results use the LCD projector in a darkened room 2 Place the LCD projector on a flat level surface and in a dry...

Page 5: ...r before cleaning 2 Clean the cabinet periodically with a damp cloth If heavily soiled use a mild detergent Never use strong detergents or solvents such as alcohol or thinner 3 Use a blower or lens paper to clean the lens and be careful not to scratch or mar the lens 4 Clean the air filter with a vacuum cleaner after every 100 hours of operation a Do not use water or any other liquid to clean the ...

Page 6: ...ENTION RISQUED ELECTROCUTIONNEP ASOUVRIR ATTENTION AFIN DE REDUIRE LES RISQUES D ELECTROCUTION NE PAS ENLEVER LE COUVERCLE AUCUN DES ELE MENTS INTERNES NE DOIT ETRE REPARE PAR L UTILISATEUR LAISSER A UN PERSONNEL QUALIFIE LE SOIN DE REPARER CET APPAREIL Ce symbole a pour but de prévenir l utilisateur de la présence d une tension dangereuse non isolée se trouvant à l intérieur de l appareil Elle es...

Page 7: ...SQUES D INCENDIE OU D ELECTROCUTION NE PAS EXPOSER CET APPAREIL A LAPLUIE OUA L HUMIDITE AUSSI NE PAS UTILISER LA FICHE POLARISEE AVEC UN PROLONGATEUR OU UNE AUTRE PRISE DE COURANT SAUF SI CES LAMES PEUVENT ETRE INSEREES A FOND NE PAS OUVRIR LE COFFRET DES COMPOSANTES HAUTE TENSION SE TROUVENTA L INTERIEUR LAISSER A UN PERSONNEL QUALIFIE LE SOIN DE REPARER CET APPAREIL DOC avis de conformation Cet...

Page 8: ...t solide pour supporter le poids du projecteur à écran à cristaux liquides LCD et il doit être installé selon les codes de construction locaux b Le projecteur à écran à cristaux liquides LCD doit être installé par un personnel qualifié I N T R O D U C T I O N 7 Alimentation 1 Le projecteur à écran à cristaux liquides LCD est conçu pour fonctionner à 110 120 220 240VCA 50 60Hz S assurer que la tens...

Page 9: ... sont pas obstrués Laisser un espace d au moins 10 cm quatre pouces entre le projecteur à écran à cristaux liquides LCD et les murs 2 Eviter que des objets étrangers des agrafes des clous et du papier par exemple pénètrent à l intérieur du projecteur à écran à cristaux liquides LCD Ne pas essayer de récupérer ces objets soi même ou ne pas insérer des objets métalliques des fils et des tourne vis p...

Page 10: ...er WHAT IS COVERED AND WHAT IS NOT COVERED Except as specified below this warranty covers all defects in material or workmanship in this product The following are not covered by the war ranty 1 Any product which is not distributed in the U S A Canada and Mexico by NECTECH or which is not purchased in the U S A Canada and Mexico from an authorized NECTECH dealer If you are uncertain as to whether a...

Page 11: ...NCONVENIENCE LOSS OF USE OFTHE PRODUCT LOSS OFTIME COMMERCIAL LOSS OR 2 ANY OTHER DAMAGES WHETHER INCIDENTAL CONSE QUENTIAL OR OTHERWISE SOME STATES DO NOT ALLOW LIMITATIONS ON HOW LONGAN IMPLIED WARRANTYLASTS AND OR DO NOTALLOW THE EXCLUSION OR LIMITATION OF INCIDENTAL OR CONSEQUENTIALDAMAGES SOTHEABOVE LIMITATIONS AND EXCLUSIONS MAY NOT APPLY TO YOU HOW STATE LAW RELATES TO THE WARRANTY This war...

Page 12: ... Your NEC Service Representative Call 1 800 836 0655 52 TROUBLESHOOTING 1 Introduction Introduction To The MultiSync MT600 LCD Projector 13 How Do You Get Started 13 What s In The Box 15 Getting To Know Your MultiSync MT600 LCD Projector 16 Front Features 16 Rear Features 16 Top Features 17 Terminal Panel Features 18 Remote Control Features 20 2 Installation Setting Up Your MultiSync MT600 LCD Pro...

Page 13: ...hese Items Does not turn on Check that the cord is plugged in and that the power switch on the back panel is on Ensure that the air filter and filter panel are installed correctly See page 43 Check the status light to see if the projector has overheated No picture Use the menu icons to select your source Video S Video or RGB See page 36 Ensure your cables are connected properly Use icons to adjust...

Page 14: ...ter desktop or notebook VCR document camera or even a laser disc player You can use the projector on a tabletop or cart you can perma nently mount it on a ceiling or you can use MultiSync MT600 LCD Projector to project images from behind the screen The remote control can be used wirelessly or with a cable and you can even use the remote control with the IR receiver to operate the I N T R O D U C T...

Page 15: ...om across the room with the IR receiver module You can control your MultiSync MT600 LCD Projector with a PC The contemporary cabinet design is compact easy to carry and complements any office board room or auditorium Installing the MultiSync MT600 LCD Projector on the ceiling must be done by authorized NEC technicians Consult your NEC dealer for more information This section helps you resolve prob...

Page 16: ...e manual you ll find an overview If the section doesn t apply you can skip it What s In The Box Make sure your box contains everything listed If any pieces are missing contact your dealer Please save the original box and packing materials if you ever need to ship your MultiSync MT600 LCD Projector NEC MultiSync MT600 LCD Projector Remote ControlAnd Cable IR Receiver And Cable PC Macintosh MultiCab...

Page 17: ...ans les endroits trés poussiéreux Si le filtre est sale ou bouché votre projectuer peut surchauffer NOTE Nettoyer votre filtre après 100 heures d usage Pour nettoyer le filtre à air 1 Fermer le contact de courant du projecteur à écran à cristaux liquides LCD et attendre que le ventilateur arrête Fermer le contact de courant principal et débrancher le câble électrique 2 Enlever le panneau du filtre...

Page 18: ...se this button to select the menu icon of the item you wish to adjust If the icons don t appear after you press the Menu button hold down the Select button while using the focus button to adjust the image up or down until the icons do appear 4 Zoom Focus Buttons a Use these buttons to increase or decrease the level of a selected menu item An on screen gauge will appear to show you how the level is...

Page 19: ...deo format provides more vivid color and higher resolution than the traditional composite video format 18 Push here to open the terminal panel INTRODUCTION REMPLACER L AMPOULE Apriès un fonctionnement de 2000 heures ou plus un signal lumineux s affichera dans le coffret de l appareil Me me si l ampoule demeure fonctionnelle ATTENTION NE PAS TOUCHERAL AMPOULE immédiatement après usage Celle ci sera...

Page 20: ...ideo equipment or audio system It also serves as the mono audio input for S Video input 5 Right ChannelAudio Input Jack This is your right channel audio input for stereo sound 6 Video Input Connect a VCR or laser disk player here to project the video 7 RGB Input Through Put Connectors Attach either end of the MultiCable to computer or document camera and then attach the other end to either of thes...

Page 21: ...es You can use your remote control with the cable or wirelessly to operate your MultiSync MT600 LCD Projector With the IR receiver connected to your computer you can also use the projector s remote control to operate your computer s mouse wirelessly too See page 27 to connect the IR receiver to your computer 20 INTRODUCTION 43 Cleaning Or Replacing The Filter The air filter sponge keeps the inside...

Page 22: ...e cable to the jack on the remote control and the other end to the Terminal Panel 1 Mouse Button Works as a mouse for your projected computer image This button is also used to adjust position zoom and focus 2 Position Button When you re in the 2X or 4X mode hold this button down and adjust the picture position up and down or left and right with the mouse pad 3 Zoom Button Hold this button down and...

Page 23: ...t be using the remote control for a long time remove the batteries Do not mix new and old or different types of batteries 2 3 4 5 1 0 A C Right click button B D E 6 7 8 9 LED Flashes when any button operation is made INTRODUCTION 22 41 This section describes the simple maintenance procedures you should follow to replace the lamp clean or replace the filter and replace the batteries in the remote c...

Page 24: ...escribes how to set up your MultiSync MT600 LCD projector and how to connect video and audio sources Setting Up Your MultiSync MT600 LCD Projector Your MultiSync MT600 LCD Projector is simple to set up and use But before you get started you must first 1 Determine the image size 2 Set up a screen or select a non glossy white wall onto which you can project your image Carrying The LCD ProjectorAlway...

Page 25: ...9 6 0 26 25 8 0 32 81 10 0 Projection distance WIDE TELE 2 39 37 12 0 ft m Projection Distance and Image Size Diagonal Image Size inch INSTALLATION 39 Maintenance Icons Picture Adjustment Use this icon with the Fine Picture Adjustment to fine tune the computer image or to remove any vertical banding that might appear This function adjusts the clock frequencies that eliminate banding in the image P...

Page 26: ...480 display area OPERATION 25 WARNING Only use your LCD projector on a solid level surface If the projector falls to the ground you can be injured and the projector severely damaged Do not use the LCD projector where temperatures vary greatly The projector must be used at temperatures between 32 F 0 C and 104 F 40 C Do not expose the LCD projector to moisture dust or smoke This will harm the scree...

Page 27: ...on You can use your MultiSync MT to project an image from the rear onto a transparent screen The distance the projector must be from the screen is the same as if you were projecting the image from the front Contact your NEC dealer if you need a transparent screen If you re projecting the image from the rear and your image is inverted use the Menu and Select buttons on your remote control or projec...

Page 28: ...isc Player To mini D Sub 15 pin or D Sub 15 pin connector on the LCD Projector IR Receiver Document Camera IBM VGA or Compatibles Wiring Diagram NOTE The two D Sub 15 pin connectors here can be used to either input or output video to or from a PC or Macintosh computer Either connector can be used for input or output however they cannot both be used for input simultaneously It can damage your compu...

Page 29: ... the remote control or projector cabinet to display the icon bar 2 Press the Menu button again to move to the next menu or press the Select button to highlight the menu icon for the item you want to adjust When an icon is highlighted the name of the item appears on the right side of the icon menu bar 3 Adjust the level or turn the selected item on or off by using the or buttons on the remote contr...

Page 30: ... to connect to your computer s video port use the smaller 15 pin connector on the 34 3 AdjustThe Image SizeHold down the Zoom button on the remote control while pressing the left or ride side of the mouse pad to make the image larger or smaller You can also adjust the image size by holding down the Menu button on the projector cabinet and pressing the or button 4 Focus Hold down the Focus button o...

Page 31: ...r press the Menu button on the cabinet and use the icons to select your video source Video S Video or RGB O P E R A T I O N 3 30 cable to connect to the projector You can also use your own video cable if you wish For a PC cable use the smaller 15 pin connector on the projector For a Macintosh cable use the larger 15 pin connector on the projector 4 Turn on the LCD projector and the computer NOTE R...

Page 32: ... and connect the receiver to your mouse port INSTALLATION 31 Connecting Your VCR Or Laser Disc Player You use a common coaxial cable and RCAaudio cables not provided to connect your VCR or laser disc player to your MultiSync MT600 LCD Projector To make these connections simply 1 Turn off the power to your LCD projector and VCR or laser disc player 2 Connect one end of your coaxial video cable to t...

Reviews: