background image

4

Quick Start

To attach the MultiSync

®

 LCD monitor to your system, follow these instructions:

1. Turn off the power to your computer.
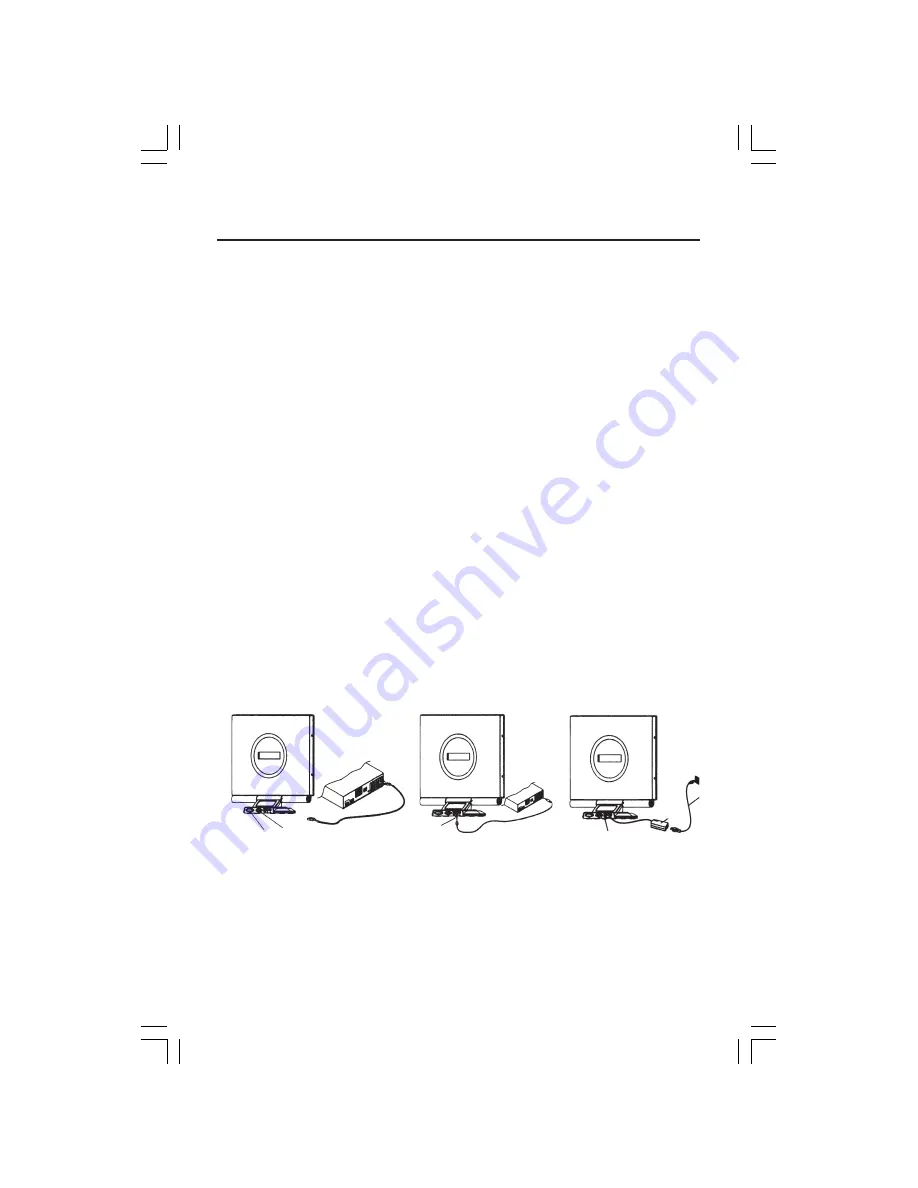
2. For the PC or MAC with DVI digital output: Connect the DVI signal cable (not included)

to the connector of the display card in your system 

(Figure A)

. Tighten all screws.

For the PC with Analog output: Connect the 15-pin mini D-SUB signal cable to the
connector of the display card in your system.  Tighten all screws.
For the MAC: Connect the MultiSync Macintosh cable adapter to the computer, then
attach the 15-pin mini D-SUB signal cable to the MultiSync Macintosh cable adapter.
Tighten all screws.

NOTE: To obtain the MultiSync Macintosh cable adapter or DVI-D cable, call NEC-

Mitsubishi Electronics Display of America, Inc. at (800) 632-4662.

4. Connect the 15-pin mini D-SUB of the video signal cable or DVI signal cable (not

included) to the appropriate connector on the back of the monitor (Figure A).

5. Connect the audio cable to “AUDIO INPUT” on the back of the monitor and the other

end to the “Audio out” terminal of the computer (Figure B).

6. Plug the captive power cord into the AC adapter and power cord into a wall socket

(Figure C).

NOTE:

If you use this monitor at AC125-240V, please refer to Recommended Use section
of this manual for proper selection of power cord.

NOTE:

For download information on the Windows

®

 95/98/Me/2000/XP INF file for your monitor,

refer to the 

References

 section of this User’s Manual.

NOTE:

If you have any problems, please refer to the 

Troubleshooting

 section of this User’s Manual.

Figure A

VGA

DVI

Audio Jack

Power Jack

AC Adapter

Outlet

Figure B

Figure C

LCD35Seriesmanual071904.p65

7/19/04, 7:24 AM

4

Summary of Contents for LCD35SERIES

Page 1: ...MultiSync LCD1735NXM LCD1935NXM 35SeriesCover 5 6 04 1 47 PM 1 ...

Page 2: ... 8 Specifications 10 Troubleshooting 12 References 13 Limited Warranty 14 Avertissement 15 Caractéristiques et avantages 16 Contenu 17 Mise en marche rapide 18 Commandes 20 Usage recommandé 22 Fiche Tecnique 24 Dépannage 26 Références 27 Garantie limitée 28 35SeriesCover 5 6 04 1 47 PM 2 ...

Page 3: ...a Class B digital device pursuant to part 15 of the FCC Rules These limits are designed to provide reasonable protection against harmful interference in a residential installation This equipment generates uses and can radiate radio frequency energy and if not installed and used in accordance with the instructions may cause harmful interference to radio communications However there is no guarantee ...

Page 4: ... motion images in high speed games and video applications VESA wall arm mounting capabilities allow you to free up even more desktop space and gain more aesthetic appeal Space saving sound bar enhances your multimedia applications with stereo sound External headphone jack allows for private listening Thin frame two tone cabinet design including blue light power indicator not only frees up valuable...

Page 5: ... Video Signal Cable User s Manual Your new NEC MultiSync LCD monitor box should contain the following LCD1735NXM or LCD1935NXM Power Cord Video Signal Cable User s Manual Audio Cable AC Adapter Contents Audio Cable AC Adapter MultiSync LCD1735NXM LCD1935NXM LCD35Seriesmanual071904 p65 7 19 04 7 24 AM 3 ...

Page 6: ...cs Display of America Inc at 800 632 4662 4 Connect the 15 pin mini D SUB of the video signal cable or DVI signal cable not included to the appropriate connector on the back of the monitor Figure A 5 Connect the audio cable to AUDIO INPUT on the back of the monitor and the other end to the Audio out terminal of the computer Figure B 6 Plug the captive power cord into the AC adapter and power cord ...

Page 7: ...ng function you need to push the screen backward and it will hold at about 15 degree Then apply a little bit more force to fold until it is parallel to the base Figure M 1 From the bottom of the base there are 4 screw holes for your VESA mounting device Figure M 2 The rear of this LCD display has four integrated 4 mm 0 7 pitches threaded nuts as well as four 5 mm access holes in the plastic coveri...

Page 8: ...or is in Power Saving Mode LED is off power is OFF 3 Function Select Buttons Press either or control button to activate the On Screen Manager OSM menu selection 4 External Headphone Jack The monitor speakers will be disabled when using an external headphone or external speakers 5 Stereo Speakers PC Audio Stereo output On Screen Manager Menu To access OSM main menu simply press the Function Select ...

Page 9: ...e CIE coordinate color temperature to 9300K 7500 CIE coordinated Color Temperature of 7500K Sets the CIE coordinate color temperature to 7500K 6500 CIE coordinated Color Temperature of 6500K Sets the CIE coordinate color temperature to 6500K User Three colors Red Green Blue can be adjusted from the OSD menu Sets the settings to a by user defined CIE Temperature OSD H Position This function moves t...

Page 10: ...plug your monitor from the wall outlet and refer servicing to qualified service personnel under the following conditions When the power supply cord or plug is damaged If liquid has been spilled or objects have fallen into the monitor If the monitor has been exposed to rain or water If the monitor has been dropped or the cabinet damaged If the monitor does not operate normally by following operatin...

Page 11: ...g solution or glass cleaner Adjust the monitor s brightness and contrast controls to enhance readability Use a document holder placed close to the screen Position whatever you are looking at most of the time the screen or reference material directly in front of you to minimize turning your head while you are typing Avoid displaying fixed patterns on the monitor for long periods of time to avoid im...

Page 12: ...Hz 1280 x 1024 60 Hz to 75 Hz Active Display Area Horizontal 337 9 mm 13 3 inches Vertical 270 3 mm 10 6 inches Speakers Practical Audio Output 1 0W 1 0W Power Supply 100 240 V 50 60 Hz Current Rating 1A Dimensions 337 6 mm W x 379 7 mm H x 175 mm D 14 9 inches W x 14 9 inches H x 6 9 inches D Weight 10 4 lbs 4 7 kg Environmental Considerations Operating Temperature 5 C to 35 C 41 F to 95 F Humidi...

Page 13: ...75 Hz 1280 x 1024 60 Hz to 75 Hz Active Display Area Horizontal 376 0 mm 14 8 inches Vertical 301 0 mm 11 9 inches Speakers Practical Audio Output 1 0W 1 0W Power Supply 100 240 V 50 60 Hz Current Rating 1 5A Dimensions 422 2 mm W x 423 2 mm H x 195 mm D 16 6 inches W x 16 7 inches H x 7 7 inches D Weight 13 2 lbs 6 0 kg Environmental Considerations Operating Temperature 5 C to 35 C 41 F to 95 F H...

Page 14: ...es NEC Mitsubishi Electronics Display recommends using a moving screen saver at regular intervals whenever the screen is idle or turning off the monitor when not in use Image is unstable unfocused or swimming is apparent Signal cable should be completely attached to the computer Use the OSM Image Adjust controls to focus and adjust display by increasing or decreasing the fine total When the displa...

Page 15: ...ustomer Service Technical Support Email http www necmitsubishi com css techform htm Sales and Product Information Sales Information Line 888 NEC MITS 888 632 6487 Canadian Customers 866 771 0266 Ext 4037 Government Sales 800 284 6320 Government Sales email gov necmitsubishi com Electronic Channels World Wide Web http www necmitsubishi com Product Registration http www necmitsubishi com productregi...

Page 16: ...obtained by calling 1 800 632 4662 The Product shall not have been previously altered repaired or serviced by anyone other than a service facility authorized by NMD A to render such service the serial number of the product shall not have been altered or removed In order to be covered by this warranty the Product shall not have been subjected to displaying of fixed images for long periods of time r...

Page 17: ... alimentation fourni ou équivalent pour assurer la conformité FCC 2 Veuillez utiliser le câble de signal vidéo blindé fourni 3 Veuillez utiliser l adaptateur CA fourni L utilisation d autres câbles et adaptateurs peut provoquer des interférences avec la réception radio et télévision 2 Cet appareil a été testé et s avère conforme avec les spécifications d équipements de Classe B section 15 de la ré...

Page 18: ...s fluides plein écran pour les jeux à haute vitesse et les applications vidéo Les capacités de fixation VESA mur bras vous permettent de libérer davantage d espace sur le bureau et d améliorer l esthétique La barre acoustique à encombrement réduit améliore vos applications multimédia avec le son stéréo La prise d écouteur externe permet une écoute privée Le design en armoire deux tons à mince enca...

Page 19: ...utilisateur Un cache câbles Câble d audio Adaptateur CA Ne pas oublier de conserver la boîte et le matériel d emballage d origine pour transporter ou expédier le moniteur Contenu Cordon d alimentation Câble pour le signal vidéo Manuel de l utilisateur Câble d audio Adaptateur CA MultiSync LCD1735NXM LCD1935NXM LCD35Seriesmanual071904 p65 7 19 04 7 24 AM 17 ...

Page 20: ...nics Display of America Inc au 800 632 4662 4 Connectez le mini D SUB à 15 broches du câble de signal vidéo et du câble de signal DVI non inclus au connecteur approprié à l arrière du moniteur Figure A 5 Branchez le câble d audio aux AUDIO INPUT à l arrière du moniteur et l autre extrémité à la prise de sortie audio fichesur l ordinateur Figure B 6 Branchez le cordon d alimentation captif dans l e...

Page 21: ...onction de montage VESA vous devez pousser l écran vers l arrière et il tiendra à environ 15 degrés Ensuite appliquez un peu plus de force pour le plier jusqu à ce qu il soit parallèle à la base À partir de la partie inférieure de la base vous trouverez 4 trous de vis pour votre dispositif de montage VESA figure M 2 L arrière de cet écran LCD est doté de quatre écrous filetés à 0 7 pas intégrés de...

Page 22: ...de Économie d énergie La lumière de la DEL est éteinte l appareil est HORS tension 3 Boutons Fonction Sélection Appuyez sur le bouton ou pour activer la sélection de menu OSM 4 Prise d écouteur externe Les haut parleurs du moniteur seront désactivés lorsque vous utilisez un écouteur ou des haut parleurs externes 5 Haut parleurs stéréo Sortie stéréo audio du PC Menu Gestionnaire à l écran OSM Pour ...

Page 23: ...le la température de couleur coordonnée CIE de 9 300K 7500 Température de couleur coordonnées CIE de 7 500K Règle la température de couleur coordonnée CIE de 7 500K 6500 Température de couleur coordonnées CIE de 6 500K Règle la température de couleur coordonnée CIE de 6 500K Utilisateur Trois couleurs rouge vert bleu peuvent être ajustées à partir du menu OSD Règle les paramètres à une température...

Page 24: ...r de la prise murale et confier la réparation à du personnel technique qualifié dans les cas suivants Lorsque le cordon d alimentation ou la fiche est endommagé e Si du liquide a été renversé ou des objets sont tombés à l intérieur du moniteur Si le moniteur a été exposé à la pluie ou à de l eau Si le moniteur est tombé ou le boîtier est endommagé Si le moniteur ne fonctionne pas normalement en su...

Page 25: ...abrasive ou un produit nettoyant pour vitres pour éliminer au maximum la poussière Régler les commandes de luminosité et de contraste du moniteur pour améliorer la lisibilité Utiliser un support de document placé près de l écran Positionner ce que l on regarde le plus souvent l écran ou les documents de référence directement devant soi pour réduire au maximum les mouvements de la tête lorsque l on...

Page 26: ... 6 pouces Sortie audio pratique des haut parleurs 1 0W 1 0W Source d alimentation 100 240 V 50 60 Hz Courant nominal 1A Dimensions 337 6 mm L x 379 7 mm H x 175 mm P 14 9 inches L x 14 9 inches H x 6 9 inches P Poids 10 4 lbs 4 7 kg Considérations environnementales Température de fonctionnement 5 C à 35 C 41 F à 95 F Humidité 30 à 80 Altitude 0 à 10 000 pieds Température de stockage 10 C à 60 C 14...

Page 27: ... 11 9 pouces Sortie audio pratique des haut parleurs 1 0W 1 0W Source d alimentation 100 240 V 50 60 Hz Courant nominal 1 5A Dimensions 422 2 mm L x 423 2 mm H x 195 mm P 16 6 inches L x 16 7 inches H x 7 7 inches P Poids 13 2 lbs 6 0 kg Considérations environnementales Température de fonctionnement 5 C à 35 C 41 F à 95 F Humidité 30 à 80 Altitude 0 à 10 000 pieds Température de stockage 10 C à 60...

Page 28: ...NOTA Comme pour tous les équipements d affichage personnels NEC Mitsubishi Electronics Display recommande l utilisation d un économiseur d écran mobile à des intervalles réguliers à chaque fois que l écran est en veille ou d éteindre le moniteur lorsqu il n est pas utilisé L image défile ou est instable Le câble vidéo doit être bien connecté à la carte d affichage et à l ordinateur Utilisez les bo...

Page 29: ...ronique du service à la clientèle et de l assistance technique http www necmitsubishi com css techform htm Ventes et information produit Ligne d information sur les ventes 888 NEC MITS 888 632 6487 Clientèle canadienne 866 771 0266 Ext 4037 Ventes au gouvernement 800 284 6320 Adresse électronique du service des ventes au gouvernement gov necmitsubishi com Courrier électronique World Wide Web http ...

Page 30: ...obtenir une autorisation de retour de marchandise en composant le 1 800 632 4662 Le produit ne pourra avoir été enlevé ou modifié réparé ou entretenu au préalable par personne d autre que du personnel technique autorisé par NMD A et le numéro de série du produit ne pourra pas avoir été enlevé Pour être couvert par cette garantie le produit ne pourra pas avoir été soumis à l affichage d une image f...

Page 31: ...tes à modifications sans préavis La reproduction totale ou partielle de ce document sans l accord préalable de NEC Mitsubishi Electronics Display of America est interdite DÉCLARATION DE CONFORMITÉ Cet appareil est conforme à l article 15 du règlement de la FCC L utilisation est soumise à deux conditions 1 Cet appareil ne peut pas occasionner d interférences nuisibles et 2 cet appareil doit accepte...

Page 32: ...t or portions thereof without prior approval of NEC Mitsubishi Electronics Display of America is prohibited DECLARATION OF CONFORMITY This device complies with Part 15 of FCC Rules Operation is subject to the following two conditions 1 This device may not cause harmful interference and 2 this device must accept any interference received including interference that may cause undesired operation U S...

Reviews: