background image

English-11

English

10. Recommended Adjustments

To reduce the risk of the “image persistence”, please adjust the fol-
lowing items based on the application being used.
“SCREEN SAVER” (See page 24), see page ”SIDE BORDER COLOR” 
(See page 24), “DATE & TIME” (See page 27), “SCHEDULE” (See 
page 27)

11. When the monitor is installed in the portrait 
position

•  Remove the stands (feet).
•  Left edge should be the upper edge from front view.

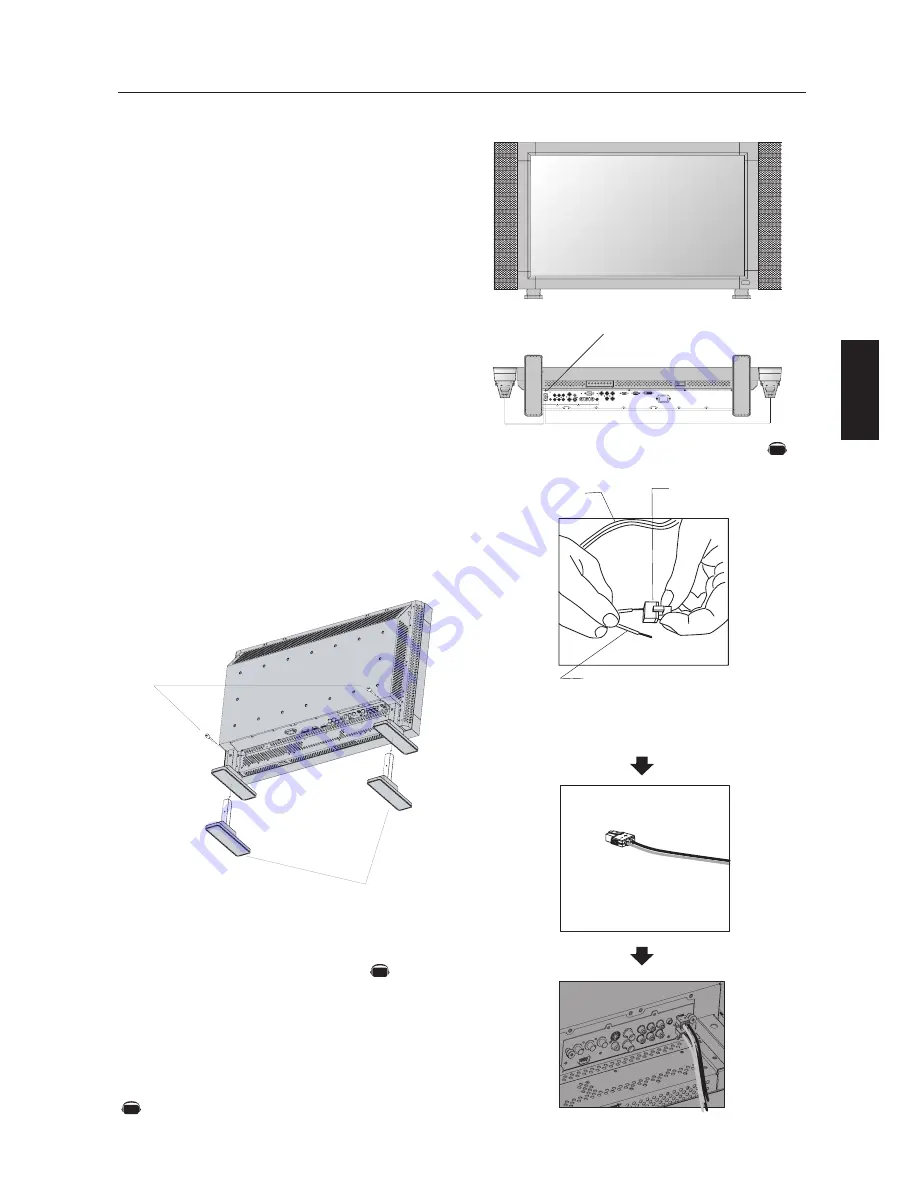
12. Installing and removing stand

How to install stand
1.  Please turn monitor off.
2.  Place stand onto monitor with the long ends of the feet in front 

of the monitor.

3.  After inserting stand in guide block, fasten thumbscrews on both 

sides of the monitor.

How to remove the stand
1.  Spread the protective sheet on a flat surface, such as a desk.
2.  Place monitor on the protective sheet.
3.  Remove thumbscrews with a screwdriver or with your fingers 

and place them in a safe place for reuse.

13. When using external speakers

We recommend using the optional speakers designed for the 
MultiSync LCD3210.
The external speaker terminals of the MultiSync LCD3210 may be 
connected with the speaker plug of a mainframe sound speaker.
It  this  case,  please  exchange  the  lead  connector  of  a  mainframe 
sound speaker for an attached speaker plug.

Setup Procedure 

-continued

Speaker plug

Insert the negative (-) side of a standard speaker 

cable into the negative (-) side of the speaker 

plug.  The negative side of a standard speaker 

cable has a stripe running the length of the cable.  

Insert remaining wire into the positive (+) side of 

the speaker plug.  Hold down on the small lever 

on the speaker plug to insert cable. 

Fixed cable and speaker plug.

Insert the fixed cable and speaker plug to the speaker terminal.

 Standard cable

NOTE: Place stand onto monitor so that the long end of the feet are in the front

•How to use the attached speaker plug

CAUTION: Handle with care when mounting LCD monitor stand and avoid 
pinching your fingers.


Denotes an AV unit function.

       All AV functions are enabled when the AV unit is installed.

AV

AV

AV

Thumbscrews

Stand

Speaker terminal

Summary of Contents for LCD3210-BK - MultiSync - 32" LCD Flat Panel Display

Page 1: ...32 To learn about other special offers register online at www necdisplay com MANUEL UTILISATEUR ...

Page 2: ...lish 14 Connecting to a Computer with a Digital Output English 15 Connecting to a DVD Player English 16 Connecting to a Stereo Amplifier English 17 Basic Operation Power On and Off modes English 18 Power Indicator English 19 When Using Power Management Function English 19 Selecting a Video Source English 19 Picture Size English 19 Picture Mode English 19 OSM Information English 19 OSM On Screen Man...

Page 3: ...he following measures Reorient or relocate the receiving antenna Increase the separation between the equipment and receiver Connect the equipment into an outlet on a circuit different from that to which the receiver is connected Consult your dealer or an experienced radio TV technician for help If necessary the user should contact the dealer or an experienced radio television technician for additi...

Page 4: ...ock hazards or other risks Refer all servicing to qualified service personnel Do not spill any liquids into the cabinet or use your monitor near water Do not insert objects of any kind into the cabinet slots as they may touch dangerous voltage points which can be harmful or fatal or may cause electric shock fire or equipment failure Do not place any heavy objects on the power cord Damage to the cord...

Page 5: ...ble to use with the MultiSync LCD3210 To obtain the optional components and additional information contact Customer Service at 800 632 4662 Macintosh Cable Adapter External Speakers Screw M4 x 8 x 4 Band x 2 CD ROM CD ROM Stand x 2 Thumbscrew for stand M4x27 x 2 Main switch cover x 1 Ferrite Core x 2 Speaker Plug x 1 set Band x 2 Clamper x 3 Ferrite Core x 2 Stand x 2 Thumbscrew for stand x 2 Spea...

Page 6: ...er Product warranty does not cover damage caused by improper installation Failure to follow these recommendations could result in voiding your warranty When using mounting accessories other than NEC compliant and approved they must comply with the VESA compatible mounting method NEC strongly recommends using screws M6 size and 10mm in length If using screws longer than 10mm check the depth of the ...

Page 7: ...ntrol key lock function press both and simultaneously and hold down for three 3 seconds To go back to user mode press both and simultane ously and hold for three 3 seconds POWER button Switches the power on off See page 18 MUTE button Switches the audio mute ON OFF INPUT button Acts as SET button within the OSM menu Selects which signal connected to the display is shown Toggle switches between RGB...

Page 8: ...NAL CONTROL mini D Sub 9 pin RS 232C Input signal from control equipment such as a computer EXTERNAL SPEAKER TERMINAL Outputs the audio signal from the selected audio source AC IN connector Connects with the supplied power cord RGB 1 IN DVI D To input digital RGB signals from a computer This connector does not support analog input RGB 2 IN mini D Sub 15 pin To input analog RGB signals from a perso...

Page 9: ...cture STILL button ON OFF button To turn on off the still picture mode CAPTURE button Update the still picture DISPLAY button To turn on off the Information OSM See page 19 AUTO SETUP button To enter the auto setup menu See page 23 MENU button To turn on off the menu mode UP button Acts as button to move the highlighted area up to select the adjustment with OSM menu Small screen which adjusted PIP...

Page 10: ...thin a distance of about 3 m 10 ft Do not open the remote control other than to install batteries Do not allow water or other liquid to splash onto the remote control If the remote control gets wet wipe it dry immediately Avoid exposure to heat and steam The remote control system may not function when direct sunlight or strong illumination strikes the remote control sensor of the LCD monitor or wh...

Page 11: ...commends the following battery use Place AA size batteries matching the and signs on each battery to the and signs of the battery compartment Do not mix battery brands Do not combine new and old batteries This can shorten battery life or cause liquid leakage of batteries Remove dead batteries immediately to prevent battery acid from leaking into the battery compartment Don t touch exposed bat tery...

Page 12: ...rs We recommend using the optional speakers designed for the MultiSync LCD3210 The external speaker terminals of the MultiSync LCD3210 may be connected with the speaker plug of a mainframe sound speaker It this case please exchange the lead connector of a mainframe sound speaker for an attached speaker plug Setup Procedure continued Speaker plug Insert the negative side of a standard speaker cable...

Page 13: ...Ferrite Core Open the ferrite core and clamp it on the PC Audio cable Close the ferrite core Ferrite Core To AUDIO 1 of monitor To connector of PC 1 2 Attach the Ferrite Core to PC Audio Cable Use of the cable without mounting the ferrite core may result in the occurrence of noise Attach the Ferrite Core to the both ends of PC Audio Cable For PC Audio Cable Ferrite Core Band Band Ferrite Core Conn...

Page 14: ...in The AUDIO IN 1 2 and 3 can be used for audio input For connection select AUDIO 1 2 or 3 from the AUDIO INPUT button Connecting the LCD Monitor to a PC Connections continued Resolution 640 x 480 800 x 600 1024 x 768 1280 x 768 1360 x 768 1280 x 1024 1600 x 1200 31 5Hz 37 9Hz 48 4Hz 48Hz 48Hz 64Hz 75Hz 60Hz 60Hz 60Hz 60Hz 60Hz 60Hz 60Hz Recommended resolution Compressed image Compressed image Rem...

Page 15: ...mputer s video output requirements and any special identification or configuring that may be required The AUDIO IN 1 2 and 3 can be used for audio input For connection select AUDIO 1 2 or 3 from the AUDIO INPUT button Connecting to a Macintosh Computer Connections ontinued To connect the RGB 2 IN connector mini D sub 15 pin on the LCD monitor use the provided RGB signal cable mini D sub 15 pin to mi...

Page 16: ...ut TMDS signals conforming to DVI standards To maintain display quality use a cable recommended by DVI standards The AUDIO IN 1 2 and 3 can be used for audio input For connection select AUDIO 1 2 or 3 from the AUDIO INPUT button AV Denotes an AV unit function All AV functions are enabled when the AV unit is installed AV LCD monitor To audio output To DVI output DVI D connector DVI D connector Equi...

Page 17: ... LCD monitor use a separately available BNC connector cable You will need a BNC to RCA adapter to connect a DVD player with an RCA pin jack to the BNC connector cable not provided The AUDIO IN 2 and 3 both RCA can be used for audio input For connection select AUDIO 2 or AUDIO 3 from the AUDIO INPUT button AV Denotes an AV unit function All AV functions are enabled when the AV unit is installed AV ...

Page 18: ... and the audio input on the amplifier Do not reverse the audio left and right jacks The AUDIO IN used for audio input The AUDIO OUT jack outputs sound from the Audio input device VCR selected by the LCD monitor to the external output device stereo amplifier Connections continued AV Denotes an AV unit function All AV functions are enabled when the AV unit is installed AV LCD monitor VCR or Laser disc...

Page 19: ...Pressing the Main Power Switch NOTE When the Main Power Switch is used to power off the LCD the remote control and the power button will not ac tivate the LCD and both green and red Power indicators turn off Be sure to turn the Main Power Switch to ON before using options 1 or 2 The LCD monitor power indicator will turn green while powered on and will turn red while powered off The monitor can be ...

Page 20: ...format Basic Operation continued Power Indicator Status Power ON Green Power OFF Red Power Standby Red On when SCHEDULE is enabled Green Blinking Power Standby Red Green Power Indicator Diagnosis Detecting failure Red Blinking See trouble shooting of page 33 When Using Power Management Function Selecting a Video Source Picture Size Picture Mode Information OSM RGB1 2 3 DVD HD VIDEO PIP Main RGB2 S...

Page 21: ...s button to increase reduction level Press button to decrease reduction level MAIN MENU PICTURE SCREEN AUDIO PIP CONFIGURATION 1 CONFIGURATION 2 ADVANCED OPTION SEL SET NEXT EXIT RETURN MENU EXIT MENU MAIN MENU PICTURE SCREEN AUDIO PIP CONFIGURATION 1 CONFIGURATION 2 ADVANCED OPTION SEL SET NEXT EXIT RETURN MENU EXIT MENU PICTURE BRIGHTNESS CONTRAST SHARPNESS BLACK LEVEL COLOR CONTROL COLOR TEMPER...

Page 22: ...CREEN INPUT RGB2 3 only INPUT RGB2 3 and DVD HD only INPUT RGB1 2 3 only PICTURE BRIGHTNESS CONTRAST SHARPNESS TINT COLOR BLACK LEVEL NOISE REDUCTION SEL SET NEXT EXIT RETURN MENU EXIT MENU ADJ EXIT RETURN MENU EXIT MENU 32 TINT PICTURE BRIGHTNESS CONTRAST SHARPNESS TINT COLOR BLACK LEVEL NOISE REDUCTION SEL SET NEXT EXIT RETURN MENU EXIT MENU ADJ EXIT RETURN MENU EXIT MENU 32 COLOR PICTURE BRIGHT...

Page 23: ...BASS sound AUDIO Adjusts the balance of stereo sound Press button to move the stereo sound image to the right Sound of the left side will be quieter Press button to move the stereo sound image to the left SCREEN H POSITION V POSITION CLOCK CLOCK PHASE H RESOLUTION V RESOLUTION ZOOM MODE SCREEN RESET SEL SET NEXT EXIT RETURN MENU EXIT MENU ADJ EXIT RETURN MENU EXIT MENU 768 V RESOLUTION SCREEN H PO...

Page 24: ...English 23 English OSM Controls Configuration1 AV AV AV AV AV ...

Page 25: ... is slightly expanded and moved 4 directions UP DOWN RIGHT LEFT periodically time setting is adjustable Movement area is approximately 10mm from original position please locate the important information such as text within 90 area of screen image See note 1 for these functions PIP and STILL will be disabled when MOTION is active COLOR SYSTEM AUTODEUTSCH NTSC PAL SECAM 4 43 NTSC PAL 60 SEL EXIT RET...

Page 26: ...RN OFF TIMER ON 1 HOUR OFF ADJ SEL CONFIGURATION 2 LONG CABLE MANUAL OSM TURN OFF INFORMATION OSM OFF TIMER OSM POSITION INPUT DETECT MONITOR INFORMATION SEL SET NEXT EXIT RETURN MENU EXIT MENU CONFIGURATION 2 LONG CABLE MANUAL OSM TURN OFF INFORMATION OSM OFF TIMER OSM POSITION INPUT DETECT MONITOR INFORMATION SEL SET NEXT EXIT RETURN MENU EXIT MENU EXIT RETURN MENU EXIT MENU MONITOR INFORMATION ...

Page 27: ...MENU EXIT MENU ADVANCED OPTION Sets of the resolution of input signal to one of the following 1024x768 1280x768 and 1360x768 AUTO Determines the resolution automatically 1024x768 Sets the resolution to 1024x768 1280x768 Determines the resolution to 1280x768 1360x768 Determines the resolution to 1360x768 Selects the S Video input port function PRIORITY If cable is connected to the S Video input it ...

Page 28: ...NORMAL The monitor will be controlled normally by wireless remote controller LOCK Disable the monitor control by infra red wireless remote controller Keep pressing DISPLAY button for 5 or more seconds this setting will return to NORMAL See NOTE 2 on page 28 EXIT SET RETURN SET IR CONTROL SEL NORMAL LOCK EXIT RETURN MENU EXIT MENU POWER ON DELAY 3 SEC ADVANCED OPTION IR CONTROL TILE MATRIX HEAT STA...

Page 29: ...ntervals when the LCD Monitor will be activated You can select the time the monitor turns on and turns off the day of week the monitor is activated and which input source the monitor will use for each scheduled activation period A check mark in the box next to the number of the schedule indicates that the selected schedule is in effect To select which schedule to set use the up down arrows to move...

Page 30: ...English 29 English Using the LCD with a Personal Computer PC LCD monitor Connection LCD Monitor PC PC RS 232C Cable RS 232C IN terminal ...

Page 31: ... HEX 21h 22h 5Fh 72h 31h 5Fh 72h 32h 5Fh 72h 33h 5Fh 76h 31h 5Fh 76h 32h 5Fh 76h 33h Operation POWER ON POWER OFF INPUT RGB 1 INPUT RGB 2 INPUT RGB 3 INPUT VIDEO INPUT DVD HD INPUT S VIDEO ASCII _r1 _r2 _r3 _v1 _v2 _v3 Sending commands from the PC etc 30 30 21 0D 0 0 30 30 21 0D 0 0 Status code from LCD monitor Meaning Command for POWER ON Command received Command echo back POWER OFF command shoul...

Page 32: ...1 r2 r3 v1 v2 v3 p1 p2 ex 25 0 ex 25 ex 30 5 ex 31 Function 76 50 76 50 76 49 76 49 76 49 76 49 76 49 76 49 76 4D 76 4D 74 63 78 31 74 63 31 74 63 78 32 74 63 32 Data Receive 31 30 72 31 72 32 72 33 76 31 76 32 76 33 70 31 70 32 2B 20 32 35 2E 30 2B 20 32 35 2B 20 33 30 2E 35 2B 20 33 31 resolution 0 5 C resolution 1 C resolution 0 5 C resolution 1 C NOTE For complete information please see file E...

Page 33: ...XP operating system facilitates setup and installation by allowing the monitor to send its capabilities such as screen size and resolutions supported directly to your computer automatically optimizing display performance Intelligent Power Manager IPM System provides innovative power saving methods saving two thirds of your monitor energy costs Multiple Frequency Technology automatically adjusts mo...

Page 34: ...inking A certain failure might have occurred please contact your nearest authorized necdisplay service facility Display image is not sized properly Use the OSM screen controls to increase or decrease the clock total Check to make sure that a supported mode has been selected on the display card or system being used Please consult display card or system manual to change graphics mode Selected resolu...

Page 35: ...hnical Support www necdisplay com Sales and Product Information Sales Information Line 888 632 6487 Canadian Customers 866 771 0266 Ext 4037 Government Sales 800 284 6320 Government Sales email gov necdisplay com Electronic Channels World Wide Web http www necdisplay com Product Registration http www necdisplay com European Operations http www nec display solutions com Drivers and Downloads http w...

Page 36: ...nd 789 0 W x 510 3 H x 200 D mm with Stand 944 W x 652 H x 312 D mm 34 2 lbs 15 5kg without Stand 36 4 lbs 16 5kg with Stand 46 3 lbs 21 0kg 3 x 200mm x 200mm 8 Holes 2 x 200mm x 200mm 6 Holes UL 60950 1 CSA C22 2 No 60950 1 TUV GS EN60950 1 FCC B DOC B EN55022 A EN55024 EN61000 3 2 EN61000 3 3 CE VESA DPM VESA DDC2B DDC CI 640 x 480 at 60Hz to 85Hz 800 x 600 at 50Hz 60Hz to 85Hz 1024 x 768 at 50H...

Page 37: ...3 J Luminance 4 a m o r h C C 1 2 X T 9 1 X T 7 1 0 X T 2 2 X T 0 1 1 X T 8 1 O X T 3 Shield TX2 TX4 Shield TX1 TX3 Shield TX0 TX5 11 19 4 NC 12 NC 20 NC 5 NC 13 NC 21 NC 6 DDC Serial Clock 14 5 power 22 Shield TXC 7 DDC Serial data 15 Ground 5V 23 C X T 8 NC 16 Hot Plug Detect 24 C X T 1 Analog RGB Input MiniDsub R G B 2 2 EnrtéeS VIDEO V I D E O 3 Digital RGB Input DVI D R G B 1 4 RS 232 input M...

Page 38: ... have prior approval which may be obtained by calling 1 800 632 4662 The Product shall not have been previously altered repaired or serviced by anyone other than a service facility authorized by NEC DISPLAY SOLUTIONS to render such service the serial number of the product shall not have been altered or removed In order to be covered by this warranty the Product shall not have been subjected to dis...

Page 39: ...the color moni tor MultiSync LCD3210 L325RM is in compliance with Council Directive 73 23 EEC EN 60950 1 Council Directive 89 336 EEC EN 55022 EN 61000 3 2 EN 61000 3 3 EN 55024 and marked with NEC Display Solutions Ltd 4 13 23 Shibaura Minato Ku Tokyo 108 0023 Japan ...

Page 40: ...erica Inc To allow for design and specification improvements the information in this document is subject to change at any time without notice Reproduction of this document or portions thereof without prior approval of NEC Display Solutions of America Inc is prohibited DECLARATION OF CONFORMITY This device complies with Part 15 of FCC Rules Operation is subject to the following two conditions 1 This...

Reviews: