background image

7

On Screen Display (OSD)
Selection and Adjustment

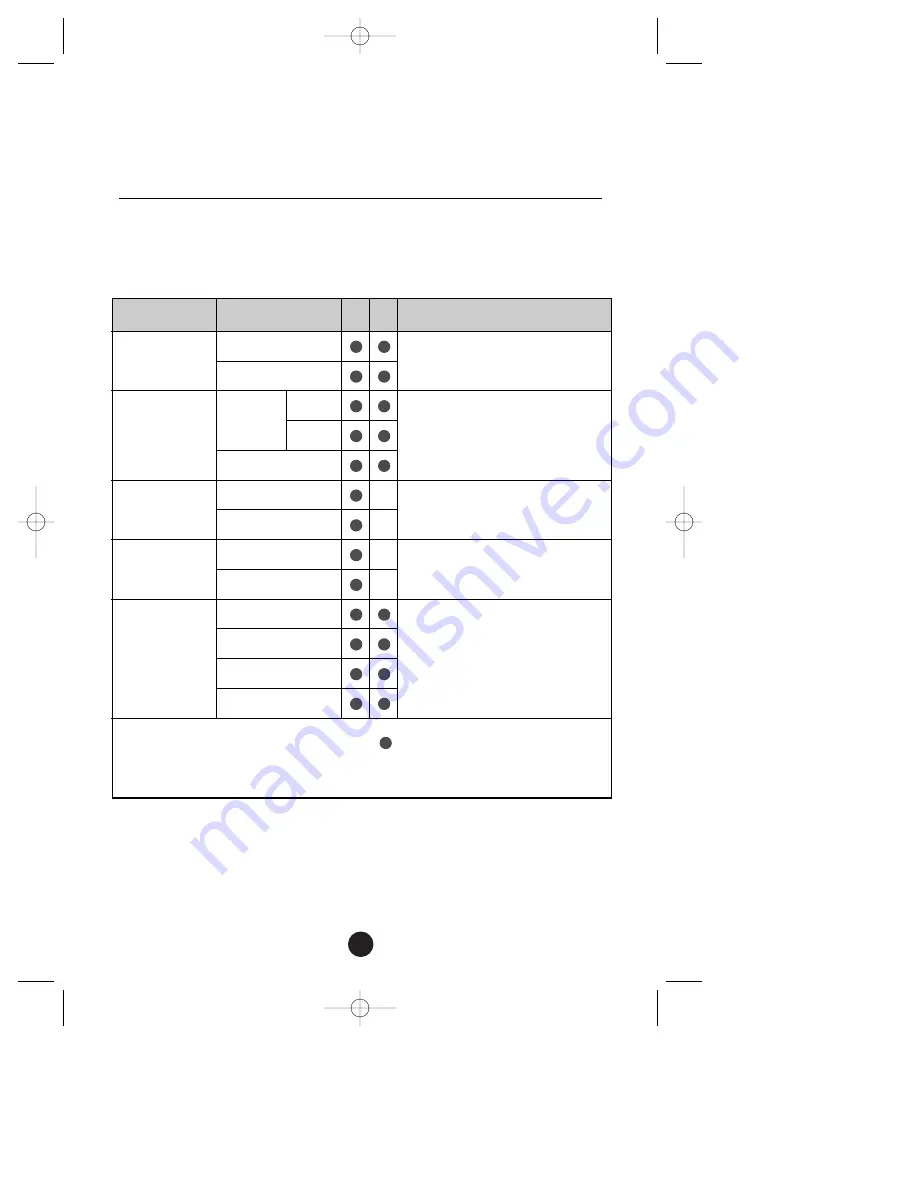
The following table indicates all the On Screen Display control, adjustment, and setting menus.

To adjust the brightness and 
contrast of the screen 

To customize the color of the screen

To adjust the position of the screen

To improve the clarity and 
stability of the screen

To customize the screen status 
for a user's operating environment

: Adjustable

A : Analog Input

D : Digital Input

Main menu

Sub menu

A D

Reference

BRIGHTNESS

CONTRAST

COLOR

POSITION

TRACKING

SETUP

BRIGHTNESS

CONTRAST

PRESET

9300K

6500K

R/G/B (User Color)

V POSITION

H POSITION

CLOCK

PHASE

LANGUAGE

IMAGE SIZE

OSD POSITION

SIGNAL

LCD1855NX061102.qxd  6/11/02  10:43 AM  Page 7

Summary of Contents for LCD1855NX - MultiSync - 18.1" LCD Monitor

Page 1: ...MultiSync LCD1855NX TM LCD1855NX061102 qxd 6 11 02 10 43 AM Page 1 ...

Page 2: ...ubleshooting 10 Recommended Use 12 Specifications 14 References 16 Limited Warranty 17 Avertissement 19 Contenu 20 Connexion du moniteur 21 Fonctions du panneau de commande 22 Réglages du menu à l écran OSD 24 Sélection et réglage de l OSD 25 Résolution des problèmes 28 Usage recommandé 30 Spécifications 32 Références 34 Garantie limitée 35 LCD1855NX061102 qxd 6 11 02 10 43 AM Page 2 ...

Page 3: ...rease the separation between the equipment and receiver Connect the equipment into an outlet on a circuit different from that to which the receiver is connected Consult your dealer or an experienced radio TV technician for help If necessary the user should contact the dealer or an experienced radio television technician for additional suggestions The user may find the following booklet prepared by...

Page 4: ...nc LCD1855NX monitor with tilt swivel stand Power Cord Video Signal Cable D Sub User s Manual MultiSync LCD1855NX TM Remember to save your original box and packing material to transport or ship the monitor Power Cord Video Signal Cable D sub User s Manual LCD1855NX061102 qxd 6 11 02 10 43 AM Page 2 ...

Page 5: ...ure the connection 2 Connect the power cord into a proper power outlet that is easily accessible and close to the display Power Cord Digital signal DVI D Wall outlet PC outlet PC MAC Mac Cable Adapter not included Analog signal D sub Signal Cable not included not included LCD1855NX061102 qxd 6 11 02 10 43 AM Page 3 ...

Page 6: ...cator color changes to amber Use this button to enter a selection in the On Screen Display Use these buttons to choose or adjust items in the On Screen Display Use this button to enter or exit the On Screen Display Use this button to make Dsub or DVI connector active Power Button Power DPMS Indicator AUTO SELECT Button Buttons MENU Button SOURCE Button Control Function 1 2 3 4 5 LCD1855NX061102 qx...

Page 7: ...r active This fea ture is used when two computers are connected to the display The default setting is Dsub CONTROLS LOCKED UNLOCKED MENU and This function allows you to secure the current control settings so that they cannot be inadvertently changed Press and hold the MENU button and button for 3 seconds the message CONTROLS LOCKED appears You can unlock the OSD controls at any time by pushing the...

Page 8: ... using the OSD NOTE Allow the display to stabilize for at least 30 minutes before making image adjustments To make adjustments in the On Screen Display follow these steps 1 Press the MENU Button then the main menu of the OSD appears 2 To access a control use the or Buttons When the icon you want becomes highlighted press the AUTO SELECT Button 3 Use the Buttons to adjust the item to the desired le...

Page 9: ...the position of the screen To improve the clarity and stability of the screen To customize the screen status for a user s operating environment Adjustable A Analog Input D Digital Input Main menu Sub menu A D Reference BRIGHTNESS CONTRAST COLOR POSITION TRACKING SETUP BRIGHTNESS CONTRAST PRESET 9300K 6500K R G B User Color V POSITION H POSITION CLOCK PHASE LANGUAGE IMAGE SIZE OSD POSITION SIGNAL L...

Page 10: ...rightness of the screen Contrast To adjust the contrast of the screen BRIGHTNESS CONTRAST 88 100 To customize the color of the screen OSD Adjust Description 9300K 6500K Select the screen color 9300K Slightly bluish white 6500K Slightly reddish white Set your own color levels PRESET RED GREEN BLUE COLOR PRESET 9300K 6500K RED GREEN BLUE To adjust the position of the screen OSD Adjust Description Ve...

Page 11: ...g environment To choose the language in which the control names are displayed This function displays the image in its original size or enlarged size so as to fit in the full screen of the LCD panel To adjust position of the OSD window on the screen To select DSUB ANALOG or DVI DIGITAL as the active input This feature is used when two computers are connected to the display The display automatically...

Page 12: ...range of the display See the Specifications section of this manual and configure your display again This message appears when the signal cable between your PC and your display is not connected Check the signal cable and try again Is the power cord of the display connected Is the power indicator light on Is the power on and the power indicator green Is the power indicator amber Do you see an INPUT ...

Page 13: ...lts are unsatisfactory decrease the vertical bars or stripes using the CLOCK icon in the on screen display Press the AUTO SELECT button to automatically adjust your display image to the ideal setting If the results are unsatisfactory decrease the horizontal bars using the PHASE icon in the on screen display Display Position is incorrect On the screen background vertical bars or stripes are visible...

Page 14: ... the monitor outdoors The inside of the fluorescent tube located within the LCD monitor contains mercury Please follow the bylaws or rules of your municipality to dispose of the tube properly Immediately unplug your monitor from the wall outlet and refer servicing to qualified service personnel under the following conditions When the power supply cord or plug is damaged If liquid has been spilled ...

Page 15: ...ntrols to enhance readability Use a document holder placed close to the screen Position whatever you are looking at most of the time the screen or reference materi al directly in front of you to minimize turning your head while you are typing Avoid displaying fixed patterns on the monitor for long periods of time to avoid image persistence after image effects Get regular eye checkups Ergonomics To...

Page 16: ...Normal 53W Stand by Suspend 3W Power Off 2W Width 16 0 inches 406 mm Height 16 9 inches 429 mm Depth 8 5 inches 215 mm Net 17 6 lbs 8 0 kg Tilt 5 30 Swivel 340 AC 100 240V 50 60Hz 1 0A Operating Conditions Temperature 5 C to 35 C Humidity 30 to 80 non Condensing Storage Conditions Temperature 10 C to 60 C Humidity 10 to 85 non Condensing UL c UL FCC B Energy Star Display Sync Input Video Input Res...

Page 17: ... 11 MAC 832 x 624 49 72 75 12 VESA 1024 x 768 48 36 60 13 VESA 1024 x 768 56 48 70 14 VESA 1024 x 768 60 02 75 15 VESA 1280 x 1024 63 98 60 16 VESA 1280 x 1024 79 98 75 VESA wall mounting Connected to another object stand type and wall mounted type This monitor accepts a VESA compliant mounting interface pad Kensington Security Slot optional Connected to a locking cable that can be purchased separ...

Page 18: ...n Operations http www nec mitsubishi com Windows 95 98 Me 2000 XPINFFile http support necmitsubishi com software htm FastFacts Information 800 366 0476 INFORMATION DESCRIPTION DOCUMENT Glossary Definition of terms related 900203 to functions features and installation of the NEC monitor More Information Names and addresses of 900204 other groups involved in standards and features of the NEC monitor...

Page 19: ...UST have prior approval which may be obtained by calling 1 800 632 4662 The Product shall not have been previously altered repaired or serviced by anyone other than a service facility authorized by NMD A to render such service the serial number of the product shall not have been altered or removed In order to be covered by this warranty the Product shall not have been subjected to displaying of fi...

Page 20: ...18 Notes LCD1855NX061102 qxd 6 11 02 10 43 AM Page 18 ...

Page 21: ...a distance entre l appareil et le récepteur Connecter l appareil à une prise de courant sur un circuit différent de celui sur lequel le récepteur est connecté Consulter son revendeur ou un technicien radio TV pour obtenir de l aide Si nécessaire l utilisateur doit contacter le revendeur ou un technicien radio TV afin d obtenir des informations supplémentaires L utilisateur peut se procurer le livr...

Page 22: ...ge Cordon d alimentation Câble pour le signal vidéo D Sub Manuel de l utilisateur MultiSync LCD1855NX TM Ne pas oublier de conserver la boîte et le matériel d emballage d origine pour transporter ou expédier le moniteur Cordon d alimentation Câble pour le signal vidéo D sub Manuel de l utilisateur LCD1855NX061102 qxd 6 11 02 10 43 AM Page 20 ...

Page 23: ...onne connexion 2 Branchez le cordon d alimentation dans une prise secteur facilement accessible et proche du moniteur Cordon d alimentation Signal numérique DVI D Type prise secteur Type alimentation par PC PC MAC Adaptateur Macintosh non fourni Signal analogique D sub Câble Vidéo non fourni non fourni LCD1855NX061102 qxd 6 11 02 10 43 AM Page 21 ...

Page 24: ...range Ce bouton permet de saisir et de valider les valeurs choisies dans le menu affiché Ces boutons permettent de sélectionner et de paramétrer les éléments du menu affiché Ce bouton permet de faire apparaître et disparaître l af fichage du menu à l écran Ce bouton permet d activer le connecteur Dsub ou DVI Bouton d alimentation Témoin d alimenta tion DPMS Bouton AUTO SELECT Boutons Bouton MENU S...

Page 25: ...ion est utilisée lorsque deux ordinateurs sont connectés au moniteur L option sélectionnée par défaut est Dsub CONTROLS LOCKED UNLOCKED Contrôles verrouillés déver rouillés MENU et Cette fonction permet de protéger les réglages en cours Appuyez sur les boutons MENU et pendant 3 secondes le message COMMANDES VERROUILLÉES Contrôles verrouillés s affiche Vous pouvez débloquer les contrôles du menu à ...

Page 26: ...QU UE E Avant de procéder au réglage de l image laissez le moniteur se stabiliser pendant une trentaine de minutes Pour effectuer des réglages dans l OSD procédez comme suit 1 Appuyez sur le bouton MENU Le menu principal de l OSD apparaît 2 Pour accéder aux commandes utilisez les boutons ou Lorsque l icône de votre choix apparaît en sur brillance appuyez sur le bouton AUTO SELECT 3 Utilisez les bo...

Page 27: ...ion de la clarté et de la stabilité de l image Personnalisation du statut de l écran en fonction de l environnement de l utilisateur Main menu Sub menu A D Reference LUMINOSITÉ CONTRASTE COULEUR POSITION ALIGNEMENT INSTALLATION LUMINOSITÉ CONTRASTE PRÉRÉG 9300K 6500K R V B couleursutilisateur POSITION V POSITION H HORLOGE PHASE LANGUE TAILLE IMAGE POSITION OSD SIGNAL Réglable A Entrée analogique D...

Page 28: ...ge Définition des niveaux de couleur de votre choix PRÉRÉG ROUGE VERT BLEU Pour régler la position de l écran Position V Positionnement de l image de haut en bas Position H Positionnement de l image de droite à gauche Sélection et réglage de l OSD suite Maintenant que vous connaissez la procédure de sélection et de réglage des éléments à l aide du système OSD voici la liste de tous les icônes ains...

Page 29: ... ra an n e en n f fo on nc ct tiio on n d de e ll e en nv viir ro on nn ne em me en nt t d de e ll u ut tiilliis sa at te eu ur r Choix de la langue d affichage des noms des commandes Cette fonction permet d afficher l image à sa taille d origine ou de l agrandir afin qu elle remplisse l écran LCD Réglage de la position de l OSD à l écran Sélection de l entrée active DSUB analogique DVI numérique ...

Page 30: ...oniteur Ce message apparaît lorsque le câble vidéo reliant votre PC au moniteur est débranché Vérifiez le câble et essayez à nouveau Le cordon d alimentation du moniteur est il branché La diode témoin d alimentation est elle allumée L appareil est il sous tension et la diode témoin d alimen tation est elle verte La diode témoin d alimentation est elle orange L écran affiche t il le message SIGNAL ...

Page 31: ...égler automa tiquement l image de façon idéale Si le résultat ne vous convient pas utilisez l icône HORLOGE dans le menu OSD pour résoudre le problème Appuyez sur le bouton AUTO SELECT pour régler automa tiquement l image de façon idéale Si le résultat ne vous convient pas utilisez l icône PHASE dans le menu OSD pour résoudre le problème L image est mal positionnée Des barres ou des bandes vertica...

Page 32: ...ité de son pays Ne placer aucun objet sur le moniteur et ne pas l utiliser en extérieur L intérieur du tube fluorescent situé dans le moniteur contient du mercure Pour l élimination appropriée observez les règlements en vigueur dans votre région Débrancher immédiatement le moniteur de la prise murale et confier la réparation à du personnel technique qualifié dans les cas suivants Lorsque le cordon...

Page 33: ...mandes de luminosité et de contraste du moniteur pour améliorer la lisibilité Utiliser un support de document placé près de l écran Positionner ce que l on regarde le plus souvent l écran ou les documents de référence directe ment devant soi pour réduire au maximum les mouvements de la tête lorsque l on dactylographie Pour éviter la persistance d images images rémanentes n affichez pas des motifs ...

Page 34: ...Normal 53 W Veille économie 3W Hors tension 2W Largeur 40 6 cm 16 0 pouces Hauteur 42 9 cm 16 9 pouces Profondeur 21 5 cm 8 5 pouces Net 8 0 kg 17 6 livres Horizontale 5 30 Verticale 340 AC 100 240 V 50 60 Hz 1 0 A Conditions de fonctionnement Température 5 C à 35 C Humidité 30 à 80 sans condensation Conditions de stockage Température 10 C à 60 C Humidité 10 à 85 sans condensation UL c UL FCC B En...

Page 35: ... 46 88 75 11 MAC 832 x 624 49 72 75 12 VESA 1024 x 768 48 36 60 13 VESA 1024 x 768 56 48 70 14 VESA 1024 x 768 60 02 75 15 VESA 1280 x 1024 63 98 60 16 VESA 1280 x 1024 79 98 75 Support mural VESA Connecté à un autre objet montage sur socle et montage mural Ce moniteur accepte les supports compatibles VESA Fixation de sécurité Kensington en option Relié à un câble de blocage vendu séparément dans ...

Page 36: ...tp www nec mitsubishi com FichierINFWindows 95 98 Me 2000 XP http support necmitsubishi com software htm Informations FastFactsMC 800 366 0476 INFORMATION DESCRIPTION N DOCUMENT Glossaire Définition des termes en relation 900203 avec les fonctions les caractéristiques et l installation du moniteur NEC Informations complémentaires Noms et adresses d autres 900204 groupes impliqués dans les normes e...

Page 37: ...de retour de marchandise en composant le 1 800 632 4662 Le produit ne pourra avoir été enlevé ou modifié réparé ou entretenu au préalable par personne d autre que du personnel technique autorisé par NMD A et le numéro de série du produit ne pourra pas avoir été enlevé Pour être couvert par cette garantie le produit ne pourra pas avoir été soumis à l affichage d une image fixe pendant de longues pé...

Page 38: ...Notes LCD1855NX061102 qxd 6 11 02 10 43 AM Page 36 ...

Page 39: ... dans ce document sont sujettes à modifications sans préavis La reproduction totale ou par tielle de ce document sans l accord préalable de NEC Mitsubishi Electronics Display of America est interdite DÉCLARATION DE CONFORMITÉ Cet appareil est conforme à l article 15 du règlement de la FCC L utilisation est soumise à deux conditions 1 Cet appareil ne peut pas occasionner d interférences nuisibles e...

Page 40: ...hout notice Reproduction of this document or portions thereof without prior approval of NEC Mitsubishi Electronics Display of America is prohibited DECLARATION OF CONFORMITY This device complies with Part 15 of FCC Rules Operation is subject to the following two conditions 1 This device may not cause harmful interference and 2 this device must accept any interference received including interferenc...

Reviews: