background image

English-17

English

CAUTION

Allow adequate ventilation around the monitor so that
heat can properly dissipate. Do not block ventilated
openings or place the monitor near a radiator or other
heat sources. Do not put anything on top of monitor.

The power cable connector is the primary means of
detaching the system from the power supply. The
monitor should be installed close to a power outlet which
is easily accessible.

Handle with care when transporting. Save packaging for
transporting.

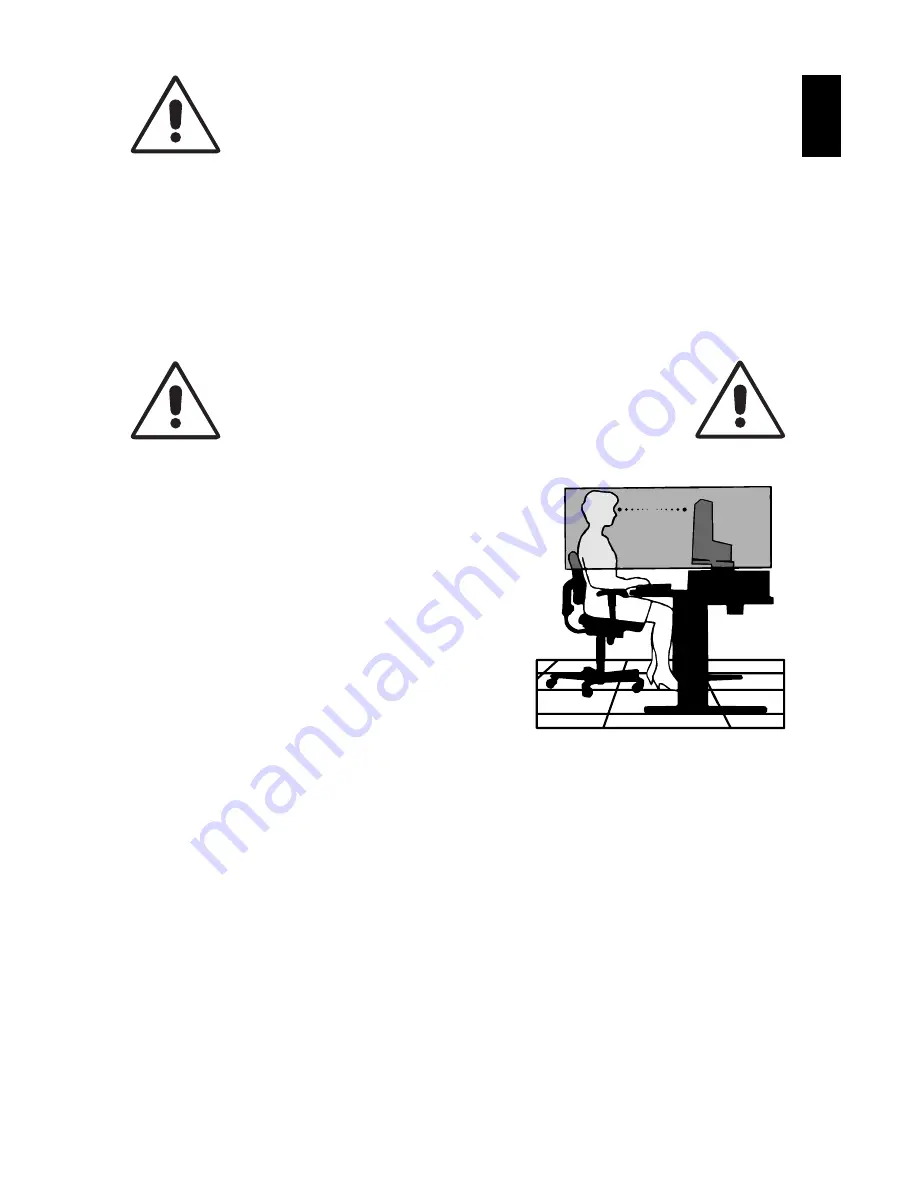
CORRECT PLACEMENT AND ADJUSTMENT OF

THE MONITOR CAN REDUCE EYE, SHOULDER

AND NECK FATIGUE. CHECK THE FOLLOWING

WHEN YOU POSITION THE MONITOR:

For optimum performance, allow
20 minutes for warm-up.

Adjust the monitor height so that the top of
the screen is at or slightly below eye level.
Your eyes should look slightly downward
when viewing the middle of the screen.

Position your monitor no closer than 40 cm
and no further away than 70 cm from your
eyes. The optimal distance is 53 cm.

Rest your eyes periodically by focusing on
an object at least 6 m away. Blink often.

Position the monitor at a 90° angle to windows and other light sources to
minimize glare and reflections. Adjust the monitor tilt so that ceiling lights
do not reflect on your screen.

If reflected light makes it hard for you to see your screen, use an
antiglare filter.

Clean the LCD monitor surface with a lint-free, non-abrasive cloth. Avoid
using any cleaning solution or glass cleaner!

Adjust the monitor’s brightness and contrast controls to enhance
readability.

Use a document holder placed close to the screen.

Position whatever you are looking at most of the time (the screen or
reference material) directly in front of you to minimize turning your head
while you are typing.

Summary of Contents for LA-15R02

Page 1: ...MultiSync LCD1550V User s Manual ...

Page 2: ... source in Europe use the power cord provided with the monitor In the UK a BS approved power cord with a moulded plug has a Black five Amps fuse installed for use with this equipment If a power cord is not supplied with this equipment please contact your supplier When operating the MultiSync LCD1550V with a 220 240V AC power source in Australia use the power cord provided with the monitor For all ...

Page 3: ...compliance with Council Directive 73 23 EEC EN 60950 Council Directive 89 336 EEC EN 55022 EN 61000 3 2 EN 61000 3 3 EN 55024 and marked with NEC Mitsubishi Electric Visual Systems Corp MS Shibaura Bldg 13 23 Shibaura 4 chome Minato Ku Tokyo 108 0023 Japan Power consumption of the monitor is less than 3W when in power saving mode ...

Page 4: ...lations according to CSA C22 2 950 Ce produit porte la marque C UL et se conforme aux règlements de sûrele Canadiens selon CAN CSA C22 2 No 950 FCC Information 1 Use the attached specified cables with the MultiSync LCD1550V colour monitor so as not to interfere with radio and television reception 1 The power supply cord you use must have been approved by and comply with the safety standards of U S...

Page 5: ... to which the receiver is connected Consult your dealer or an experienced radio TV technician for help If necessary the user should contact the dealer or an experienced radio television technician for additional suggestions The user may find the following booklet prepared by the Federal Communications Commission helpful How to Identify and Resolve Radio TV Interference Problems This booklet is ava...

Page 6: ...ync LCD1550V monitor with tilt base Power Cord s Video Signal Cable User s Manual CD ROM includes complete User s Manual in PDF format To see the User s Manual Acrobat Reader 4 0 must be installed on your PC Remember to save your original box and packing material to transport or ship the monitor 1550V ...

Page 7: ...Clip B 5 Connect one end of the power cord to the MultiSync LCD Series monitor and the other end to the power outlet Place the video signal cable and AC power cord under the clips Figure C 1 Replace connector cover and cable cover NOTE Adjust the position of the cable under the clips to avoid damage for cable or monitor NOTE Please refer to Caution section of this manual for proper selection of AC...

Page 8: ...Manual for a full description of these OSM controls NOTE If you have any problems please refer to the Troubleshooting section of this User s Manual Figure B 1 Macintosh Cable Adapter not included Macintosh G3 and G4 do not need a Macintosh cable adapter Figure A 1 ...

Page 9: ...ve Monitor Stand for Mounting To prepare the monitor for alternate mounting purposes 1 Remove the connector cover and cable cover Figure R 1 2 Disconnect all cables 3 Place monitor face down on a non abrasive surface Figure R 2 Vacation Switch Power Button Figure C 1 1550V Figure D 1 Connector cover Cable cover Clip B ...

Page 10: ... the stand and lift off the stand assembly Figure R 2 the monitor is now ready for mounting in an alternate manner 5 Connect the AC cord and signal cable to the back of the monitor Figure R 3 6 Reverse this process to reattach stand NOTE Use only VESA compatible alternative mounting method ...

Page 11: ...screws 4pcs when mounting To meet the safety requirements the monitor must be mounted to an arm which guaranties the necessary stability under consideration of the weight of the monitor The LCD monitor shall only be used with an approved arm e g GS mark Figure R 2 Figure R 3 Non abrasive surface ...

Page 12: ...English 11 English 4 SCREWS M4 MAX depth 8 5 mm If use other screw check depth of hole Weight of LCD assembly 3 2kg MAX Replace screws Tighten all screws 75 mm 75 mm Thickness of bracket arm 2 0 3 2 mm ...

Page 13: ... one of the controls Moves the bar left right to increase or decrease the adjustment Activates Auto Adjust function Enter the sub menu Moves the highlighted area of main menu right to select one of the controls Resets the highlighted control to the factory setting Controls OSM On Screen Manager Controls The OSM controls on the front of the monitor function as follows To access OSM press any of the...

Page 14: ...age stability by increasing or decreasing this setting Colour Control Systems Five colour presets select the desired colour setting Each colour setting is adjusted at the factory R G B Increases or decreases Red Green or Blue colour depending upon which is selected The change in colour will appear on screen and the direction increase or decrease will be shown by the bars Tools OSM POSITION You can...

Page 15: ... down simultaneously To de activate the OSM Lock Out press then and hold down simultaneously RESOLUTION NOTIFIER This optimal resolution is 1024 x 768 If ON is selected a message will appear on the screen after 30 seconds notifying you that the resolution is not at 1024 x 768 FACTORY PRESET Selecting Factory Preset allows you to reset all OSM control settings back to the factory settings The RESET...

Page 16: ...turned on or when there is a change of input signal or the video signal doesn t have proper resolution the Resolution Notifier window will open This function can be disabled in the TOOL menu OUT OF RANGE This function gives a recommendation of the optimized resolution and refresh rate After the power is turned on or there is a change of input signal or the video signal doesn t have proper timing t...

Page 17: ...art stand or table as the monitor may fall causing serious damage to the monitor Do not place any objects onto the monitor and do not use the monitor outdoors The inside of the flourescent tube located within the LCD monitor contains mercury Please follow the bylaws or rules of your municipality to dispose of the tube properly Immediately unplug your monitor from the wall outlet and refer servicin...

Page 18: ...e level Your eyes should look slightly downward when viewing the middle of the screen Position your monitor no closer than 40 cm and no further away than 70 cm from your eyes The optimal distance is 53 cm Rest your eyes periodically by focusing on an object at least 6 m away Blink often Position the monitor at a 90 angle to windows and other light sources to minimize glare and reflections Adjust t...

Page 19: ...To realize the maximum ergonomics benefits we recommend the following Use the preset Size and Position controls with standard signals Use the preset Colour Setting Use non interlaced signals with a vertical refresh rate between 60 75 Hz Do not use primary colour blue on a dark background as it is difficult to see and may produce eye fatigue to insufficient contrast ...

Page 20: ... 1 contrast ratio typical Depends on display card used Automatically Automatically Some systems may not support all modes listed Dependent upon signal timing Specifications Viewing Angle Left Right Up Down 60 45 345 2 mm W x 352 0 mm H x 164 0 mm D 13 6 inches W x 13 9 inches H x 6 5 inches D 5 C to 35 C 30 to 80 0 to 3 050 m 10 C to 60 C 10 to 85 0 to 9 500 m Dimensions Weight Environmental Consi...

Page 21: ...clude OSM controls for quick and easy image adjustments tilt base for preferred angle of vision small footprint and compliance with MPRII and TCO guidelines for lower emissions Plug and Play The Microsoft solution with the Windows 95 98 2000 operating system facilitates setup and installation by allowing the monitor to send its capabilities such as screen size and resolutions supported directly to...

Page 22: ...d Mounting Interface Allows users to connect their MultiSync monitor to any VESA standard 75 mm pitch third party mounting arm or bracket Allows for the monitor to be mounted on a wall or an arm using any third party compliant device ...

Page 23: ... for bent or pushed in pins Power Button does not respond Unplug the power cord of the monitor from the AC outlet to turn off and reset the monitor Check the Vacation Switch on the right hand side of the monitor Image persistence Image persistence is when a ghost of an image remains on the screen even after the monitor has been turned off Unlike CRT monitors LCD monitors image persistence is not p...

Page 24: ...ing OUT OF RANGE is displayed on a blank screen Signal frequency is out of range Choose one of the supported modes LED on monitor is not lit no green or amber colour can be seen Power Switch should be in the ON position and power cord should be connected Make certain the computer is not in a power saving mode touch the keyboard or mouse Display image is not sized properly Use the OSM Image Adjust ...

Page 25: ...electronics equipment to be recycled in a satisfactory way most of these potentially damaging substances sooner or later enter Nature There are also other characteristics of a computer such as energy consumption levels that are important from the viewpoints of both the work Internal and natural external environments Since all methods of conventional electricity generation have a negative effect on...

Page 26: ...l ergonomics and good usability Environmental Requirements Flame retardants Flame retardants are present in printed circuit boards cables wires casings and housings In turn they delay the spread of fire Up to thirty percent of the plastic in a computer casing can consist of flame retardant substances Most flame retardants contain bromine or chloride and these are related to another group of enviro...

Page 27: ... freons CFCs freons are sometimes used for washing printed circuit boards CFCs break down ozone and thereby damage the ozone layer in the stratosphere causing increased reception on Earth of ultraviolet light with consequent increased risks of skin cancer malignant melanoma The relevant TCO 99 requirement Neither CFCs nor HCFCs may be used during the manufacturing and assembly of the product or it...

Reviews: