

The following describes the procedures from opening the carton box to starting
using this product. Be sure to follow these steps.
Instructions
The
“User’s Guide” is contained in EXPRESSBUILDER provided with module
enclosure.
To refer to them, follow the steps below.
(1) Turn on a computer on which the appropriate Windows OS has been installed.
(2) Insert the provided EXPRESSBUILDER DVD in the computer turned on in
step (1).
Below menu is automatically displayed.
(3) Click "Read documents" on the menu.
Step 1
Check the accessories.
Open the carton box, and then make sure you have all the accessories listed below:
ⓦ
Express5800/E120d-M server
×
1
ⓦ
Getting Started (this guide)
×
1
ⓦ
Notes on Use
×
1
ⓦ
CPU heat sink
×
1
Important: See the Packing List for other accessories.
* The User's Guide is stored in EXPRESSBUILDER package. See "User's Guide" for how to read
User's Guide.
Step 2
Install internal optional devices.
Install internal optional devices. (Go to Step 3 if you have not purchased options.)
Note: See
Installing Internal Optional Devices
in the “
User’s Guide
” and the guide provided
with the optional device.
Step 3
Place the product to a proper location.
Determine the location to place this product.
Set up a rack in an appropriate place, and then mount the server in the rack.
Note: Refer to “
Installation and Connection
” in
User’s Guide
.
Requirements for operating environment depends on server model.
Refer to “
Specification
” in
User’s Guide
.
Trademarks
ESMPRO is a registered trademark of NEC Corporation.
Microsoft, Windows, Windows Server, and Windows NT are registered trademarks or trademarks of Microsoft Corporation
in the United States and other countries.
All other product, brand, or trade names used in this publication are the trademarks or registered trademarks of their
respective trademark owners.
This guide uses recycled paper.
© NEC Corporation 2012
This document may not be copied or altered without the permission of NEC Corporation.
Step 4
Connect cables.
Connect the provided cables to this product.
Note: See
Proper Location and Connection
in the “
User’s Guide
”.
Step 5
Turn on the server, and then set up the
OS.
Turn on the server by pressing POWER switch on the front of the server.
Important: If an error message is displayed on the screen or beeps are heard repeatedly
after turning on the server, make a note of the displayed message or the
sound of the beeps, and contact your local maintenance service company.
(1)
After turning on the display, press the POWER switch on the front of the server.
The NEC logo will be displayed on the screen.
(2)
Set up BIOS in accordance with the server configuration and the intended use of
the system.
If an optional uninterruptible power-supply system is connected to the server or
management software is integrated in the server, change the system BIOS settings.
Normally, it is not necessary to change the factory settings.
To change the BIOS settings, press the
F2
key immediately after turning on the
server to start the BIOS setup utility (SETUP).
Note: See
System BIOS Setup
in the “
User’s Guide
”.
(3)
If an OS has not been installed, or if the OS needs to be re-installed, install the OS
by using EXPRESSBUILDER. Insert the EXPRESSBUILDER DVD in the disk drive
of this server, and then restart the server by pressing
Ctrl + Alt + Delete
.
EXPRESSBUILDER starts, and then the boot menu is displayed.
(4)
Select
Os installation
from the boot menu. After a while, the top menu is displayed.
(5)
Select
Setup this computer
from the menu.
(6)
Perform OS setup following the instructions described in the “
Installation Guide”.
See the “
Installation Guide (Windows)”.
Step 6
Install the bundled software.
The following software is bundled with this server. Install the software as needed.
Tips: You can create PC for Management by using a general client computer. (You can also
use this server as PC for Management.)
The above bundled software can be installed by using the autorun menu.
Tips: For how to install software, refer to the documents by clicking "Read documents" on
the Autorun menu.
Follow the procedure below:
(1)
When installing the bundled software in the server, start Windows installed in the
server.
When installing the bundled software in PC for Management, start Windows
installed in the target PC.
(2)
Log on to Windows as a user with administrator privileges.
(3)
Insert EXPRESSBUILDER DVD.
The auto-run function starts, and the following menu is displayed.
(4)
Click
Setup software
on the menu.
(5)
Select the bundled software to install.
(6)
Install the software according to on-screen instructions.
•
Keep proper posture
•
Adjust the angle, brightness, and contrast of the
display to suit your preferences.
Tips for your health and safety
Using a computer extensively may affect different parts of your body. Here are tips you should
follow while working on a computer to minimize strain on your body.
•
Take a break. Light exercise is also recommended.
•
Adjust the angle of keyboard
The environment that satisfies the
following conditions
<Operating>
Ambient temperature:
10˚C to 35˚C/10˚C to 40˚C
Humidity: 20% to 80%
Temperature gradient:
±
10˚C/hour
Air pressure: 749 to 1040 hpa
<Storage>
Ambient temperature:
5˚C to 40˚C
Humidity: 10% to 80%
Temperature gradient:
±
15˚C/hour
Air pressure: 749 to 1040 hpa
Outlet or UPS within
reach of the provided cord
Outlet or UPS equipped
with AC 100V/200V and
parallel bipolar ground
On the flat and robust board
Do not use in the environment where
corrosive gas is generated.
There must be 1 m clearance in
front and behind the unit, 60 cm
on each side, and 40 cm above.
When installing
multiple racks,
be sure to
anchor them
together.
Attach stabilizers.
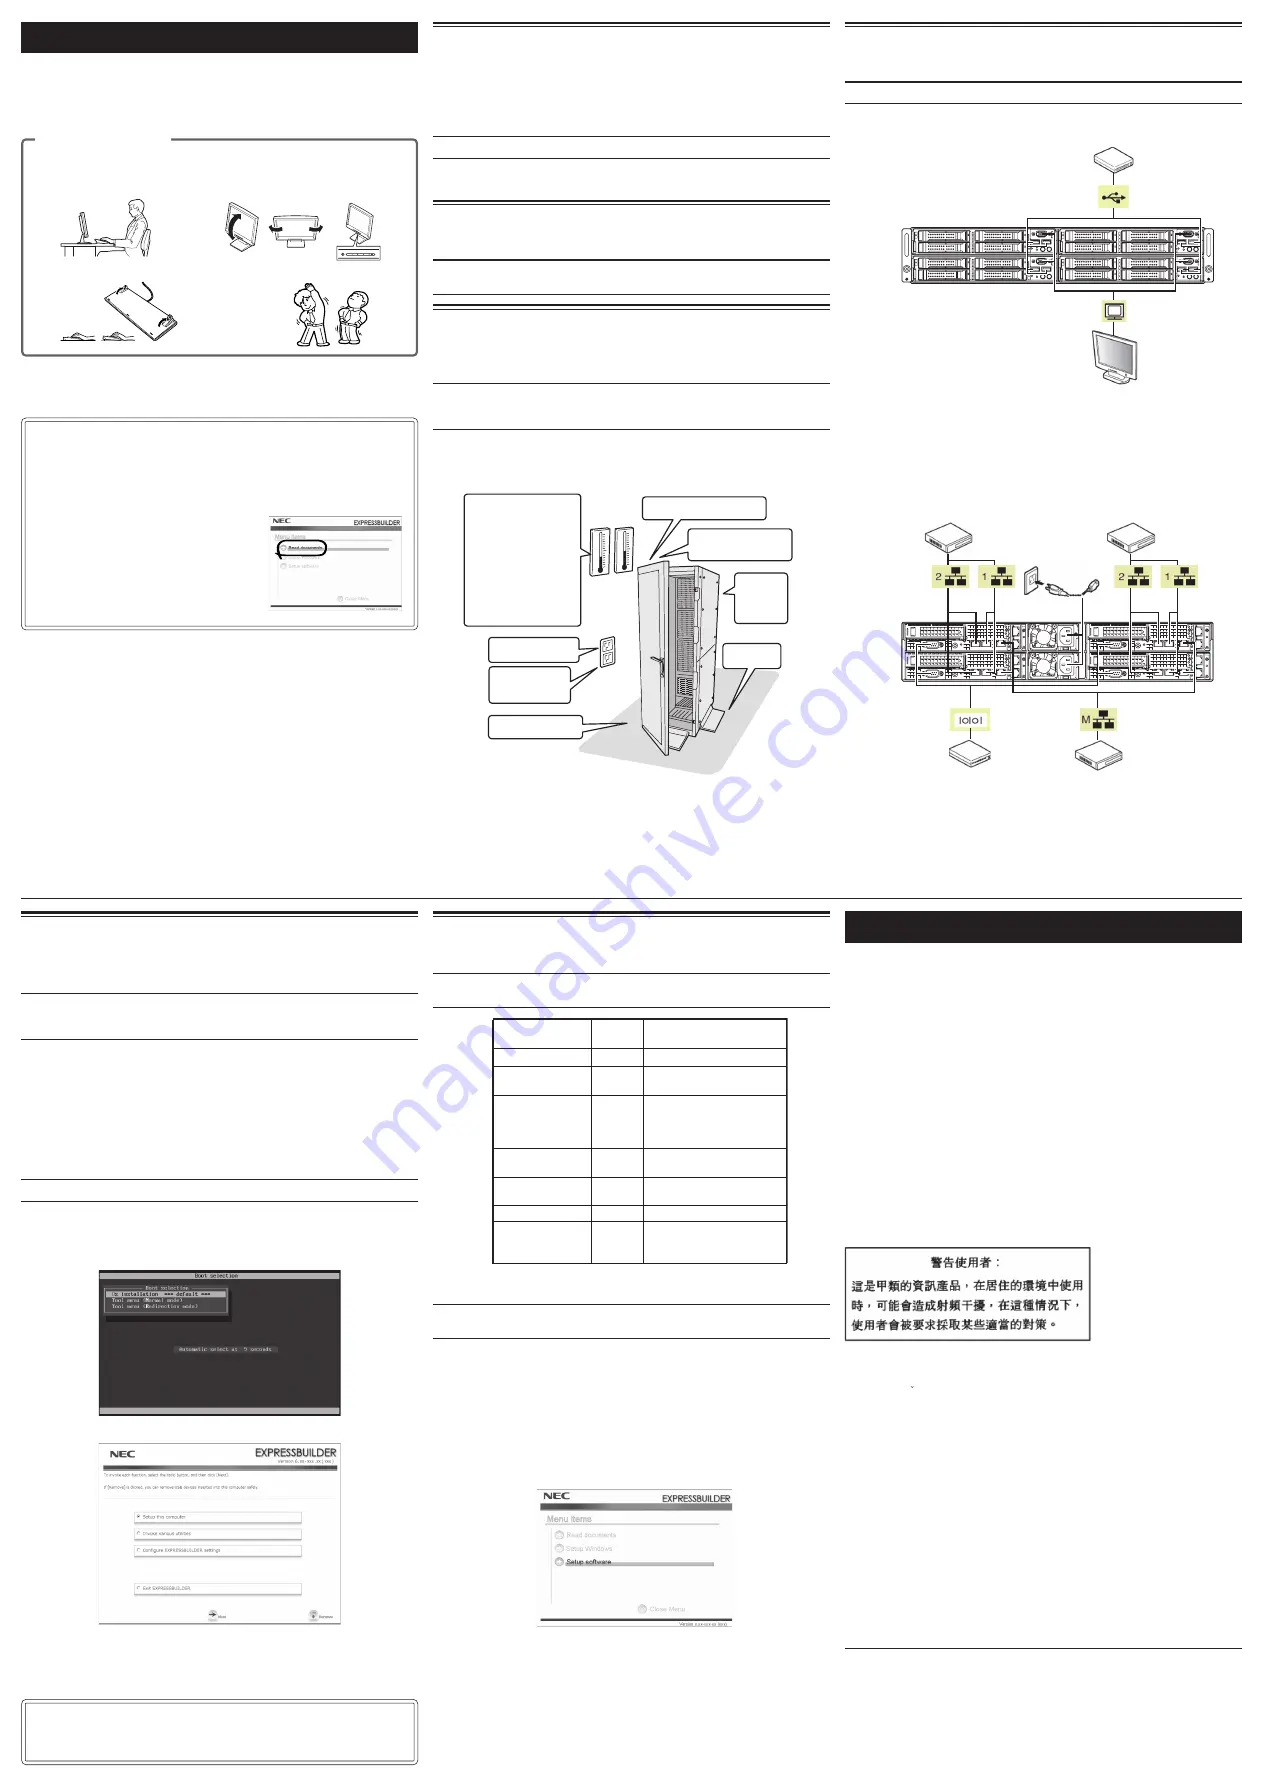
Hub, Switching hub, etc.
Finally, connect the
provided power
cord to an outlet. *1
FRONT
REAR
*1 Connect the power cord to a circuit breaker of up to 15 A.
Regulatory notices
FCC Statement
Note:
This device complies with Part 15 of the FCC Rules. Operation is subject to the
following two conditions : (1) This device may not cause harmful interference, and (2) this
device must accept any interference received, including interference that may cause
undesired operation.
This Class A digital apparatus complies with Canadian ICES-003
Industry Canada Class A Emission Compliance Statement
This Class A digital apparatus complies with Canadian ICES-003.
Avis de conformité à la réglementation d’Industrie Canada
Cet appareil numérique de la classe A est conforme à la norme NMB-003 du Canada.
CE Statement
Warning:
This is a Class A product. In domestic environment this product may cause radio
interference in which case the user may be required to take adequate measures (EN55022).
BSMI Statement
Turkish RoHS information relevant for Turkish market
EEE Yönetmeli
g
ine Uygundur
USB device
Display unit
Device with serial interface
1000BASE-T/
100BASE-TX/
10BASE-T
Regarding the transportation of this server
This server and/or some of the associated optional devices uses lithium metal batteries or
lithium ion batteries. Regulations for air/ocean transportation apply when transporting lithium
batteries. Conform to the regulations if you want to transport this server or optional devices by
air or ship.
100BASE-TX/
10BASE-T
Ports for
data
transmission
1000BASE-T/
100BASE-TX/
10BASE-T
Ports for
data
transmission
Management LAN port
ESMPRO Agent
ESMPRO Agent
Extension
ExpressUpdate
Agent
Universal RAID
Utility (URU)
Product Info
Collection Utility
BMC Configuration
ESMPRO Manager
Monitors the server status.
Remotely controls the server.
Manages and updates the
versions of firmware,
software, and other products
installed in the server.
Manages and monitors the
RAID controller.
Collects information for
maintenance.
Sets up BMC.
Manages the server by
integrating with ESMPRO
Agent or other products.
Server
Server
Server
Server
Server
Server
PC for
Manage-
ment
Name
Where to
Install
Description
Windows Service Packs
When applying a Windows Service Pack to this server, see
Service Pack Support
in the “
Installation Guide (Windows)”.


