background image

Notations Used in This Document 


Express5800/B120f  User's Guide 

Notations Used in This Document 


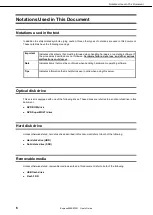
Notations used in the text 

In addition to safety-related symbols urging caution, three other types of notations are used in this document. 
These notations have the following meanings. 


Important 

Indicates critical items that must be followed when handling hardware or operating software. If 
the procedures described are not followed, 

hardware failure, data loss, and other serious 

malfunctions could occur

Note 

Indicates items that must be confirmed when handling hardware or operating software. 

Tips 

Indicates information that is helpful to keep in mind when using this server. 


Optical disk drive 

This server is equipped with one of the following drives. These drives are referred to as 

optical disk drive

 in this 

document. 


DVD-ROM drive


DVD Super MULTI drive


Hard disk drive 

Unless otherwise stated, 

hard disk drive

 described in this document refers to both of the following. 


Hard disk drive (HDD)


Solid state drive (SSD)


Removable media 

Unless otherwise stated, 

removable media

 described in this document refer to both of the following. 


USB flash drive


Flash FDD


Summary of Contents for EXP436A

Page 1: ...01 101 01 October 2014 NEC Corporation 2014 NEC Express Server Express5800 Series Express5800 B120f EXP436A User s Guide Chapter 1 General Description Chapter 2 Preparations Chapter 3 Setup Chapter 4 Appendix ...

Page 2: ...ional options connection of peripheral devices and suitable location for this server Chapter 3 Setup System BIOS configurations and summary of EXPRESSBUILDER Chapter 4 Appendix Specifications and other information Installation Guide Windows Chapter 1 Installing Windows Installation of Windows and drivers and precautions for installation Chapter 2 Installing Bundled Software Installation of bundled...

Page 3: ...sed in this document and on warning labels 14 Safety notes 15 Handling precautions for proper operations 15 Handling precautions for Anti static Measures 17 Handling precautions Power saving feature 18 Chapter 1 General Description 20 1 Introduction 21 2 Accessories 22 3 Features 23 3 1 Overview of Blade Server 25 3 2 About the Monitoring of Chassis Sensors 26 3 3 Firmware and Software Version Man...

Page 4: ... 5 3 Removal 49 1 5 4 Using Memory RAS Feature 49 1 6 Mezzanine Card 57 1 6 1 Notes 58 1 6 2 Installation 58 1 6 3 Removal 59 1 7 Hard Disk Drive HDD Solid State Drive SSD 60 1 7 1 Installation 61 1 7 2 Removal 62 1 7 3 Replacement 63 1 8 Use of Internal Hard Disk Drives in the RAID System 66 1 8 1 Enabling a RAID System 66 1 8 2 Notes on setting up a RAID System 67 1 9 LAN Riser Card 68 1 9 1 Ins...

Page 5: ...Utility SETUP 85 2 1 Overview 85 2 2 Starting and Exiting SETUP Utility 85 2 3 Description on On Screen Items and Key Usage 86 2 4 Cases that Require Configuration 88 3 EXPRESSSCOPE ENGINE 3 89 3 1 Overview 89 3 2 EXPRESSSCOPE ENGINE 3 Network Configuration 89 4 EXPRESSBUILDER 91 4 1 Features of EXPRESSBUILDER 91 4 2 Usage of EXPRESSBUILDER 91 5 Installing Software Components 92 6 Device Identific...

Page 6: ...malfunctions could occur Note Indicates items that must be confirmed when handling hardware or operating software Tips Indicates information that is helpful to keep in mind when using this server Optical disk drive This server is equipped with one of the following drives These drives are referred to as optical disk drive in this document DVD ROM drive DVD Super MULTI drive Hard disk drive Unless o...

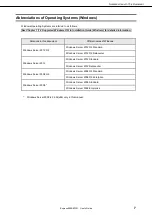
Page 7: ...ation Notations in this document Official names of Windows Windows Server 2012 R2 Windows Server 2012 R2 Standard Windows Server 2012 R2 Datacenter Windows Server 2012 Windows Server 2012 Standard Windows Server 2012 Datacenter Windows Server 2008 R2 Windows Server 2008 R2 Standard Windows Server 2008 R2 Enterprise Windows Server 2008 Windows Server 2008 Standard Windows Server 2008 Enterprise Win...

Page 8: ...Inc of the United States Avago LSI and the LSI Design logo are trademarks or registered trademarks of Avago Technologies in the United States and or other countries Adobe the Adobe logo and Acrobat are trademarks of Adobe Systems Incorporated DLT and DLTtape are trademarks of Quantum Corporation of the United States PCI Express is a trademark of Peripheral Component Interconnect Special Interest G...

Page 9: ...ved from this software without specific prior written permission THIS SOFTWARE IS PROVIDED BY THE COPYRIGHT HOLDERS AND CONTRIBUTORS AS IS AND ANY EXPRESS OR IMPLIED WARRANTIES INCLUDING BUT NOT LIMITED TO THE IMPLIED WARRANTIES OF MERCHANTABILITY AND FITNESS FOR A PARTICULAR PURPOSE ARE DISCLAIMED IN NO EVENT SHALL THE COPYRIGHT OWNER OR CONTRIBUTORS BE LIABLE FOR ANY DIRECT INDIRECT INCIDENTAL S...

Page 10: ... core openssl org 5 Products derived from this software may not be called OpenSSL nor may OpenSSL appear in their names without prior written permission of the OpenSSL Project 6 Redistributions of any form whatsoever must retain the following acknowledgment This product includes software developed by the OpenSSL Project for use in the OpenSSL Toolkit http www openssl org THIS SOFTWARE IS PROVIDED ...

Page 11: ...ollowing disclaimer in the documentation and or other materials provided with the distribution 3 Neither the name s of the above listed copyright holder s nor the names of its contributors may be used to endorse or promote products derived from this software without specific prior written permission THIS SOFTWARE IS PROVIDED BY THE COPYRIGHT HOLDERS AND CONTRIBUTORS AS IS AND ANY EXPRESS OR IMPLIE...

Page 12: ...ument contact your sales representative 5 Regardless of article 4 NEC Corporation assumes no responsibility for effects resulting from your operations 6 The sample values used in this document are not actual values Keep this document for future reference Latest editions This document was created based on the information available at the time of its creation The screen images messages and procedure...

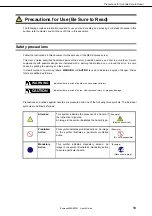
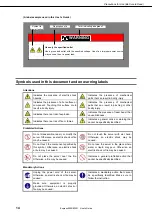
Page 13: ...s WARNING or CAUTION is used to indicate a degree of danger These terms are defined as follows WARNING Indicates there is a risk of death or serious personal injury CAUTION Indicates there is a risk of burns other personal injury or property damage Precautions and notices against hazards are presented with one of the following three symbols The individual symbols are defined as follows Attention T...

Page 14: ...ectric shock or fire may be caused Do not touch the server with wet hand Otherwise an electric shock may be caused Do not touch the component specified by this symbol Otherwise an electric shock or burn may be caused Do not use the server in the place where water or liquid may pour Otherwise an electric shock or fire may be caused Do not place the server near the fire Otherwise a fire may be cause...

Page 15: ...ade should be installed in the Blade Enclosure SIGMABLADE Install or remove CPU blades one by one Hold the portions covered with metal plates when a CPU blade is installed or removed To carry a CPU blade put it into the case in which the CPU blade was contained at the purchase and pack it into the package Check and adjust the system clock before the operation if any of the following conditions is ...

Page 16: ... any of the following operation during POST including similar operations from EM card and external applications Press the POWER switch of the CPU blade Press the RESET switch of the CPU blade Remove the CPU blade from the Blade Enclosure Disconnect the power cord from the power unit of the Blade Enclosure Hard disk drive Confirm the slot to which the hard disk drive is inserted The slot for the ha...

Page 17: ... any kind of metal accessories such as a ring bracelet or wrist watch Handling of components Keep the component in an anti static bag until you install it to the server Hold the component by the edges to avoid touching any terminals or mounting parts Place the component in an anti static bag when storing or moving them Handling of cables When connecting a cable e g LAN cable static electricity may...

Page 18: ...cautions for Use Be Sure to Read Express5800 B120f User s Guide 18 Handling precautions Power saving feature The server does not support power saving features of OS such as Standby Hibernate and Sleep mode ...

Page 19: ...from reflecting bright lights and to make the display contents easy to see Working without adjusting the display to a comfortable angle makes it difficult for you to maintain a proper posture and you will get tired easily Adjust the viewing angle before use Adjust the brightness and contrast of the display Display screens have functions to control brightness and contrast The most suitable brightne...

Page 20: ... features of the server and bundled software and precautions on installation 1 Introduction 2 Accessories Describes your server s accessories 3 Standard Features Describes standard features of the server and system management utilities 4 Names and Functions of Parts Describes the name of each part contained in this server ...

Page 21: ...ssor Intel Xeon processor NEC s latest technology and architectures realize more space saving and reduction of running cost than ever The server is designed with consideration of not only reliability but also expandability which enables you to use it as a network server Read this document before using the server thoroughly to fully understand handling of Express5800 Series Server and appreciate it...

Page 22: ...e PDF format on the EXPRESSBUILDER DVD Install Adobe Reader into your computer to read them Make sure you have all accessories and inspect them If an accessory is missing or damaged contact your sales representative Important The chassis serial number plate and maintenance label is located on the server If the serial number does not match the number on the warranty you may not be guaranteed agains...

Page 23: ... the registered DIMM Forced start up with failed memory Bus parity error detection Temperature detection Error detection Internal voltage monitoring feature BIOS password feature Management Utilities NEC ESMPRO Remote controlling feature EXPRESSSCOPE Engine 3 ExpressUpdate RAID System management utility Universal RAID Utility Expandability Slot for Mezzanine card Large capacity memory of up to 384...

Page 24: ...t in Features Software power off Remote power on feature AC Link feature Self diagnosis Power On Self Test POST Test and Diagnosis T D utility Easy setup EXPRESSBUILDER setup utility SETUP BIOS SETUP utility Maintenance features Off line Tools Memory dump feature using the DUMP switch ...

Page 25: ...h as construction of a power supply and the purchase of the rack for storage may occur With Express5800 BladeSever Series the server function is narrowed to necessity minimum and condensed on one board CPU Blade to realize space saving and intensive server The CPU Blade does not require any wiring or connection of a power supply and a cable Moreover processor DIMM hard disk drive solid state drive...

Page 26: ...monitors can be confirmed by the Information of EM Card state constitution of NEC ESMPRO Manager 3 3 Firmware and Software Version Management Use of NEC ESMPRO Manager and ExpressUpdate Agent allows you to manage versions of firmware and software as well as update them by applying update packages This function automatically updates multiple modules without stopping the system just by specifying th...

Page 27: ...CPU 1 A socket for processor 1 CPU 1 CPU 1 and CPU heat sink are factory installed 4 DIMM socket CPU 1 CPU1_DIMM1 CPU1_DIMM4 from the top 5 DIMM socket CPU 1 CPU1_DIMM6 CPU1_DIMM3 CPU1_DIMM5 CPU1_DIMM2 from the top 6 DIMM socket CPU 2 CPU2_DIMM4 CPU2_DIMM1 from the top 7 DIMM socket CPU 2 CPU2_DIMM2 CPU2_DIMM5 CPU2_DIMM3 CPU2_DIMM6 from the top 8 Mezzanine card slot Type 1 A slot to install mezzan...

Page 28: ...C RESET switch is pressed or command from NEC ESMPRO Manager is received You can use the remote control feature of EXPRESSSCOPE Engine 3 BMC to perform the same operation as using the switch on the server 7 ID BMC RESET switch Press this switch to turn on or off the ID LED Pressing the switch toggles LED ON OFF Hold and press this switch to let it work as BMC RESET switch For BMC RESET switch see ...

Page 29: ...nctions of Parts Express5800 B120f User s Guide 29 Chapter 1 General Description External View With top cover installed 1 Top cover 2 Hard disk drive With top cover removed 1 Air duct 2 Hard disk drive cage 1 2 2 1 1 ...

Page 30: ...section describes SAS hard disk drives as an example 1 Hard disk drive 2 BP connector A connector for connecting with hard disk drive backplane in CPU blade 3 Tray 4 Hard disk drive access LED green amber Goes on green while accessing the hard disk drive Goes on amber if failure occurs on hard disk drive Blinks green and amber alternately or blinks amber while array disks are rebuilt If hard disk ...

Page 31: ...the CPU blade is in successful operation When the STATUS LED is blinking in amber or red it indicates that the system has failed In this case you can view the detailed information on error message on virtual LCD You can use the virtual LCD through the Web browser of EXPRESSSCOPE Engine 3 BMC or NEC ESMPRO Manager The following table lists indications of the STATUS LED descriptions and actions to t...

Page 32: ...etained except for certain factors When the CPU blade is powered on the STATUS LED goes on green normal status 4 3 3 ID LED Pressing the ID switch brings the LED to light and pressing again brings the LED to go off The ID LED is intended to identify a specific CPU blade in the rack in which more than one CPU blade is installed Making this LED being lit can help the maintenance work to identify the...

Page 33: ...r using this server 1 Installing Internal Optional Devices Describes how to install or remove option devices and precautions on handling them You can skip this section if you did not purchase any optional devices 2 Installation and Connection Place the server in a suitable location and connect cables following this section 2 2 ...

Page 34: ...ation make sure to update the system Refer to the Installation Guide for details 1 1 Safety Precautions Be sure to observe the following precautions to install and remove optional devices properly and safely WARNING Be sure to observe the following precautions to use the server safety Failure to observe the precautions may cause death or serious injury For details refer to Safety precautions in Pr...

Page 35: ...r air duct and or front frame removed Do not get your fingers caught when installing components 1 After the shutdown processing for the CPU blade to be removed turn off the power of the CPU blade Refer to Chapter 3 7 Turning off the server 2 Take the CPU blade out from the Blade Enclosure Refer to the User s Guide of the Blade Enclosure 3 Put the CPU blade on an anti static sheet with little dust ...

Page 36: ...essing for the CPU blade to be removed turn off the power of the CPU blade 2 Take the CPU blade out from the Blade Enclosure Refer to the User s Guide of the Blade Enclosure 3 Put the CPU blade on an anti static sheet with little dust 4 Remove the two screws that secure the top cover 5 Firmly hold the top cover move it slightly toward the rear of the CPU blade then lift the cover to remove it from...

Page 37: ...ir duct Take steps below to remove air duct Required when installing CPU and DIMMs 1 While pushing latches on the side of air duct slowly pull the air duct upward to remove it Both of left and right air ducts have same shape Important Make sure the front rear direction of air duct according to markings on top face ...

Page 38: ...rives 2 Remove three screws from the hard disk drive cage 3 Lift the hard disk drive cage and remove it from chassis Since the hard disk drive cage is connected with connector pay attention not to forcedly pull or bent it Important Pay attention not to make the air duct hit any electronic component on the CPU blade Pay attention not to damage internal cables ...

Page 39: ...ithout a component being installed or a cable being disconnected causes the server to malfunction Confirming that no parts such as screws are left in the server Confirm that particularly conductive parts such as screws are not left in the server Turning on the power with a conductive part on the mother board or cable terminal causes the server to malfunction Confirming the cooling effect in the se...

Page 40: ...e metal frame of the server to discharge static electricity from your body before handling the CPU Do not touch the CPU pins by a bare hand or place the CPU directly on the desk For static notes refer to Handling precautions for Anti static Measures Do not operate the system until confirming that the additionally installed CPU is in normal state Make sure to use the CPU authorized by NEC Installin...

Page 41: ...rd disk drive cage 2 Confirm the position of the CPU socket 3 Push down the socket lever once to unlatch it from the hook then slowly open the lever until it stops Release the lever on the side marked as Unlock then release the lever on the other side 4 Lift the CPU socket holder Important You will see the CPU socket contacts Do not touch the socket contacts 5 Remove the socket cover Important Kee...

Page 42: ...Important Be sure to hold the processor only at the edges Pay attention not to touch the bottom of the processor pin section Note the direction of the CPU To prevent the CPU from being inserted into the mating socket incorrectly a pin mark is put on each of the CPU and the socket Check the pin marks to insert the CPU into the socket correctly Insert the processor while aligning the notch on the pr...

Page 43: ...the socket lever to its original position First place the lever on the side marked as Lock then place the lever on the other side 9 Put the heat sink on the CPU Take care not to touch the cool sheet with your hand Important Install the heat sink in correct direction as shown in the figure below Front Rear ...

Page 44: ...moved 12 Install the CPU blade having been removed to the Blade Enclosure according to the User s Guide of the Blade Enclosure 13 If ACPI uni processor PC or ACPI single processor PC is shown in Driver tab under Computer change it to ACPI multi processor PC Reboot the system according to the message and update the system Refer to Installation Guide Perform the following procedure if The system is ...

Page 45: ... it See the second item of Important in below Important Remove the CPU only when it is defected After operation the cool sheet at the bottom of the heat sink may adhere to the CPU To remove the heat sink first turn it left and right to detach it from the CPU If you remove the heat sink with the cool sheet adhering to the CPU the CPU and or the socket may be damaged Put a socket cover on Processor ...

Page 46: ...precautions for Anti static Measures Do not use any DIMM not approved by NEC If an unapproved third party s DIMM is installed in the server not only the DIMM but also the CPU blade may be defected You will be charged by any repair of a malfunction or defect caused by such a device within the warranty period The CPU blade includes 12 DIMM sockets Note Up to 384 GB memory can be added In the standar...

Page 47: ...y If the CPU blade does not have CPU 2 installed DIMM slots CPU2_DIMM1 to CPU2_DIMM6 are unavailable 1 5 2 Installation Install the DIMM on the CPU blade according to the following procedure 1 Installation order in 1 CPU configuration differs from that in 2 CPU configuration 1 CPU configuration Remove the top cover and air duct according to Chapter 2 1 3 1 Removal of top cover and 1 3 2 Removal of...

Page 48: ...rding to Chapter 2 1 3 4 Installation of top cover air duct and hard disk drive cage If Mezzanine Card Type 2 for blade is installed remove it according to Chapter 2 1 6 2 Installation 6 Install the CPU blade having been removed to the Blade Enclosure according to the User s Guide of the Blade Enclosure 7 Make sure that no error message appears on the POST screen If any error messages are displaye...

Page 49: ...nstalled memory 1 5 for Windows Refer to the Installation Guide for more information Note To remove the defective DIMM check the error message appearing in POST or NEC ESMPRO to confirm the CPU blade on which the defective DIMM is installed 1 5 4 Using Memory RAS Feature This server has RAS feature including Standard Memory feature x4 SDDC Memory Mirroring feature Memory Lock Step x8 SDDC and Memo...

Page 50: ... Note Memory Mirroring feature uses channels 2 and 3 DIMMs used in mirror set must be of the same model number Example 2 CPU configuration Tips The operating system only recognizes a half of the total physical capacity CH2 CPU1 Memory Controller CPU1 DIMM4 CH3 CH1 CPU1 DIMM1 CPU1 DIMM2 CPU1 DIMM3 CPU1 DIMM5 CPU1 DIMM6 CH2 CPU2 1 Memory Controller CPU2 DIMM4 CH3 CH1 CPU2 DIMM1 CPU2 DIMM2 CPU2 DIMM3...

Page 51: ...on CPUx_DIMMx Status Installation order depends on CPU configuration See the table below Installation order in 1 CPU configuration Installation order in 2 CPU configuration CPU1 DIMM1 Installation not allowed CPU1 DIMM1 Installation not allowed CPU1 DIMM2 1 CPU1 DIMM2 1 CPU1 DIMM3 1 CPU1 DIMM3 1 CPU1 DIMM4 Installation not allowed CPU1 DIMM4 Installation not allowed CPU1 DIMM5 2 CPU1 DIMM5 3 CPU1 ...

Page 52: ...ing conditions Install two DIMMs in DIMM socket to configure a Lock Step set Both of DIMMs to be used for LockStep set should be of the same model number See Chapter 2 1 System BIOS in Maintenance Guide run SETUP change parameters as shown below save the settings and exit from SETUP Advanced Memory Configuration Memory RAS Mode Change to LockStep After restart run SETUP again and check if Lock Ste...

Page 53: ...3 CPU2 DIMM1 Installation not allowed CPU2 DIMM2 2 CPU2 DIMM3 2 CPU2 DIMM4 Installation not allowed CPU2 DIMM5 4 CPU2 DIMM6 4 Memory Lock Step cannot be configured in the following cases Memory Lock Step between memory channels of different memory controllers CPU Memory Lock Step within the same memory channel Notes on Configuring Lock Step In Memory Lock Step configuration Memory RAS Mode is chan...

Page 54: ...ature install the corresponding additional memory board two DIMMs of same model DIMMs installed in the system must be of the same model number Tips The operating system recognizes the DIMMs as those with capacities less than the actual physical capacities The recognized capacities vary depending on the number of DIMMs and the physical capacity per DIMM The following table shows allowable configura...

Page 55: ...CH3 CH1 CPU1 DIMM1 CPU1 DIMM2 CPU1 DIMM3 CPU1 DIMM5 CPU1 DIMM6 CH2 CPU2 1 Memory Controller CPU2 DIMM4 CH3 CH1 CPU2 DIMM1 CPU2 DIMM2 CPU2 DIMM3 CPU2 DIMM5 CPU2 DIMM6 Spare set 3 Spare set 1 Spare set 5 Spare set 6 Spare set 2 Spare set 4 One of 4 ranks is defined as spare and placed in standby state In Dual Rank configuration 2 DIMMs compose of 4 ranks ...

Page 56: ...Advanced Memory Configuration Memory Information CPUx_DIMMx Status Installation order depends on CPU configuration See the table below Installation order in 1 CPU configuration Installation order in 2 CPU configuration CPU1 DIMM1 1 CPU1 DIMM1 1 CPU1 DIMM2 2 CPU1 DIMM2 3 CPU1 DIMM3 3 CPU1 DIMM3 5 CPU1 DIMM4 1 CPU1 DIMM4 1 CPU1 DIMM5 2 CPU1 DIMM5 3 CPU1 DIMM6 3 CPU1 DIMM6 5 CPU2 DIMM1 2 CPU2 DIMM2 4...

Page 57: ...lectricity from your body before handling the mezzanine card Do not touch the terminals and parts on the mezzanine card by a bare hand and place the cards directly on the desk For static notes refer to Handling precautions for Anti static Measures A combination of boards which can be installed in the Blade Enclosure under certain restrictions Contact your sales representative for details Note Some...

Page 58: ...anine card is MEZ1 and MEZ2 for Type 2 mezzanine card 1000BASE Adapter 4ch N8403 077F can be installed only in the Type 2 mezzanine card slot 1 6 2 Installation Install a mezzanine card in mezzanine card slot in the following procedure Important There are two types of mezzanine card for blade Type 1 and Type 2 The Type 1 mezzanine card can be installed in either of connectors Type 1 and Type 2 The...

Page 59: ...ct according to Chapter 2 1 3 4 Installation of top cover air duct 7 Install the CPU blade having been removed to the Blade Enclosure according to the User s Guide of the Blade Enclosure 8 Turn on the power of the CPU blade Make sure that no error message appears in POST If any error messages are displayed refer to Chapter 3 1 Error Message of POST and Virtual LCD in Maintenance Guide 9 If needed ...

Page 60: ... to Handling precautions for Anti static Measures An optional hard disk drive may contain operating system Be very careful when handling the drive Do not use any hard disk drives not approved by NEC If an unapproved third party s hard disk drive is installed in the CPU blade not only the hard disk drive but also the CPU blade may be defected If hard disk drives of different disk capacities co exis...

Page 61: ...in slot 0 then the second hard disk drive in slot 1 1 Remove the dummy tray from the slot if installed Important Keep the removed dummy tray for future use 2 Release the lock of the lever on the hard disk drive to make the lever opened 3 Hold the hard disk drive so that the lever on the drive faces upward and the BP connector faces the CPU blade Insert the hard disk drive into the slot slowly and ...

Page 62: ... lever A click occurs when the hard disk drive is locked Important Make sure that the lever hook is engaged with the frame 1 7 2 Removal To remove the hard disk drive reverse the installation procedure referring to Chapter 2 1 7 1 Installation Important Be sure to install dummy tray after the hard disk drive is removed If not the CPU blade may fail to work properly ...

Page 63: ...rtition and mirrored volume Replace the hard disk drives in the procedure meeting your system environment based on the figure on the next page To replace a hard disk drive in a RAID system RAID 1 you can use the auto rebuild feature If auto rebuild feature is disabled due to some reason perform manual rebuild using the configuration tool If you are using the RAID controller refer to the manual tha...

Page 64: ...t Delete volumes and partitions carefully Pay attention not to delete volumes and partitions from a normal disk The volume and partition deletion disables the data to be recovered Take the proper action such as data backup if necessary 2 Shutdown the CPU blade system and turn off the power of the CPU blade 3 Remove the hard disk drive 4 Install the hard disk drive 5 Turn on the power of the CPU bl...

Page 65: ...on disables the data to be recovered Take the proper action such as data backup if necessary 3 Shutdown the CPU blade system and turn off the power of the CPU blade 4 Remove the hard disk drive 5 Install a hard disk drive 6 Turn on the power of the CPU blade 7 Delete the removed disk To delete the disk select Program Administrative Tool Computer Management Disk Management from the Start menu Right...

Page 66: ... of each RAID Controller such as available RAID levels or hard disk drives and choose an appropriate RAID Controller Logical Drives except for RAID0 have a smaller usable capacity compared to the total capacity of the hard disk drive in the Logical Drive while disk reliability increases You can set up a RAID system by using the on board RAID controller LSI Embedded MegaRAID To use this RAID system...

Page 67: ...hard disk drives with the same model number If you intend to install the OS to the RAID System the process from RAID configuration to OS installation can be easily completed by using the EXPRESSBUILDER If you wish to install the OS manually use a RAID System Configuration utility WebBIOS or SuperBuild Utility The utility can be run during POST which starts immediately after the server is turned on...

Page 68: ...ctor is factory installed on the CPU blade Important The LAN riser card is extremely sensitive to static electricity Make sure to touch the metal frame of the CPU blade to discharge static electricity from your body before handling the card Do not touch the pins or component of card with bare hand or place the card directly on the desk For static notes refer to Handling precautions for Anti static...

Page 69: ...pendicularly into the connector Inserting the card with being inclined may damage connector pins and or connectors If you have trouble installing the card remove the card once and try again If you apply excessive pressure on LAN riser card the card connector might be damaged 4 Install the components you have removed in earlier steps 5 Install the CPU blade having been removed to the Blade Enclosur...

Page 70: ... factory installed TPM kit connector on CPU blade to install TPM kit Important TPM kit is extremely sensitive to static electricity Be sure to touch the metal frame of the server to discharge static electricity from your body before handling the TPM kit Do not touch the TPM kit terminals or parts with bare hand or place the TPM directly on the desk For static notes refer to Handling precautions fo...

Page 71: ...to the connector Inserting TPM kit with being inclined may damage connector pins and or connectors If you have trouble installing the TPM kit remove the TPM kit once and try again If you apply excessive pressure on TPM kit a TPM kit might be damaged 4 Install the components you removed in earlier steps 5 Install the CPU blade having been removed to the Blade Enclosure according to the User s Guide...

Page 72: ...appropriate to Blade Enclosure and how to install the CPU blade Important The CPU blade is extremely sensitive to static electricity Make sure to touch the metal frame of the CPU blade to discharge static electricity from your body before handling the CPU blade Do not touch the pins leads or circuitry and place the CPU blade directly on the desk For static notes refer to Handling precautions for A...

Page 73: ...MAC address is indicated in the area of LAN riser card as shown in the figure below The MAC address of LAN port is derived by adding the base value in the table below for the address For convenience the added values of in the table below are quoted in decimal number The MAC address is actually used so will be shown in a hexadecimal number please be careful Important If the NPAR feature is not used...

Page 74: ...ations The MAC addresses can be checked by the following procedure Windows Enter ipconfig all for the command prompt or from Run in the Start menu to see the indicated physical address part You may use the remote control feature of EXPRESSSCOPE Engine 3 BMC to check the MAC address ...

Page 75: ...ith a wet hand Do not connect earth lines to any gas tubes CAUTION Be sure to observe the following precautions to use the server safely Failure to observe the precautions may cause burns injury and property damage For details refer to Safety precautions in Precautions for Use Do not plug the power cord in to an improper power source Do not connect the power cord to an outlet that has an illegal n...

Page 76: ...e The serial port connector cannot be directly connected with the leased line Do not connect disconnect the SUV cable or add remove the USB device until the operating system starts running To connect disconnect the SUV cable or add remove the USB device after OS startup follow restrictions of operating system If the device having serial interface is connected first power off the CPU blade and dest...

Page 77: ...osure SIGMABLADE However when using a display unit keyboard and mouse connected to the Blade Enclosure by using the KVM selection feature of the Blade Enclosure do not connect those devices by way of a SUV cable 2 2 2 Connecting with Network The CPU blade is connected with network via the Blade Enclosure Refer to the User s Guide of the Blade Enclosure for details USB Flash FDD Mouse Self powered ...

Page 78: ...closure is connected to a UPS you may need to change the BIOS SETUP of the CPU blade to link with power supply from the UPS Run BIOS SETUP and select Server AC LINK and change parameter appropriately Select Power On for automatic operation via UPS For more information refer to Chapter 2 1 2 4 Server in Maintenance Guide Option slot Computer interface port USB Reset button for overload prevention O...

Page 79: ...ns in this section 3 EXPRESSSCOPE Engine 3 EXPRESSSCOPE Engine 3 provides useful features through the Baseboard Management Controller BMC 4 EXPRESSBUILDER EXPRESSBUILDER helps you to install Windows and maintain the server 5 Installing Software Components You can install Windows and bundled software by following the instructions in Installation Guide Windows 6 Device Identification Describes ID LE...

Page 80: ...LED on CPU blade is lit amber The power on operation within the period of 60 seconds from the supply of AC power to every power unit may not turn on the power of the CPU blade If so turn on the power of the CPU blade by using the POWER switch after making sure that the AC power is supplied to every power unit Note If a power cord on the Blade Enclosure is connected to a power controller including ...

Page 81: ...f Blade Server Express5800 B120f User s Guide 81 Chapter 3 Setup 1 1 Power ON from CPU Blade Press the POWER switch on the panel of the CPU blade the POWER LED on the CPU blade goes on green POWER LED POWER switch ...

Page 82: ...re in the BIOS SETUP Utility 1 3 Power ON from Remote Console The power of the CPU blade can be turned on by using remote control feature of EXPRESSSCOPE Engine 3 BMC 1 4 Operation after Power ON If the CPU blade is connected with a display unit the NEC logo appears on the screen of the display unit after a while from the power on Important Do not power off the server until NEC logo and some messa...

Page 83: ...described later 1 When the server is turned on POST starts running and displays messages indicating initialization of memory and PCI devices After messages are displayed the LOGO appears Note The keyboard becomes available after the logo is displayed The screen may be switched to black nothing is displayed several times while the initialization message is being displayed however it is not the prob...

Page 84: ...sage is displayed that prompts you to start the dedicated utility to configure the card Tips To launch the dedicated utility such as RAID Controller by pressing one or more keyboard keys e g Ctrl H keys first press and hold the modifier key such as Ctrl key then press the character key such as H key If you fail to launch the dedicated utility restart the server and try again from POST Example If a...

Page 85: ...screen The on screen message depends on your environment Press F2 SETUP F3 Internal Flash Memory F4 ROM Utility F12 Network If you press the F2 key SETUP starts upon completion of POST and the Main menu is displayed Tips In Legacy BIOS mode you can also launch SETUP by pressing the F2 key while expanding option ROM If you have set a password a message prompt you to enter password will be displayed...

Page 86: ...t use this key when a menu which has on the left is selected Enter key Press this key to determine the selected parameter Esc key Press this key to cancel pop up menu In sub menu press this key takes you to the previous screen In top menu press this key takes the following window is displayed If you select Yes the SETUP closes without saving the changed parameters Quit without saving Yes No F1 key...

Page 87: ...e currently selected item to the default setting This might be different from the parameters configured before shipment Load Setup Defaults Yes No Note Load Setup Default does not restore the default value in the following submenus in Advanced menu iSCSI Configuration submenu UEFI Driver Configuration submenu F4 key If you press this key the following window appears If you select Yes the parameter...

Page 88: ...Server 2008R2 See Before Starting Setup in Chapter 1 Installing Windows in Installation Guide to determine the boot mode Change the boot order of devices Boot Boot Option Priorities Change the boot priority When you use EXPRESSBUILDER set CD DVD to the highest priority Use remote power on feature via RTC alarm Advanced Advanced Chipset Configuration Wake On RTC Alarm Enabled Enable X2APIC feature ...

Page 89: ...E 3 Network Configuration The network configuration of management LAN of EXPRESSSCOPE Engine 3 is obtained automatically from the Enclosure Manager which has DHCP server function For detailed information on DHCP server of EM card refer to EM Card User s Guide or Blade Enclosure User s Guide By the factory default DHCP is set to Enabled If DHCP is set to Disabled and you want to use the management ...

Page 90: ...nfiguration Network IPv4 Property 5 If Property is selected the following screen is displayed On this screen select Enable when you use DHCP or select Disable and specify IP Address Subnet Mask Default Gateway and DNS Server when you do not use DHCP 6 It will be available for use if you access EXPRESSSCOPE Engine 3 via Web browser of management PC according to the setting ...

Page 91: ...ments including Instruction Manual of the server 4 2 Usage of EXPRESSBUILDER If you want to configure RAID arrays or install Windows run EXPRESSBUILDER by using any of the following EXPRESSBUILDER DVD Insert the DVD into the drive and either turn on the server or restart the server by pressing Ctrl Alt Delete keys EXPRESSBUILDER will start from the DVD If you want to install any bundled software o...

Page 92: ... Software Components Express5800 B120f User s Guide 92 Chapter 3 Setup 5 Installing Software Components Continue to install software components such as OS Refer to the instructions below Installation Guide Windows ...

Page 93: ...ID LED allows you to identify the device subject to maintenance among more than one CPU blade installed in the Blade Enclosure The ID LED on CPU blade can be made lit blue by proper software commands NEC ESMPRO Manager from the management PC on the network or by pressing the ID switch on the CPU blade You may use the remote control feature of EXPRESSSCOPE Engine 3 BMC to perform the same operation...

Page 94: ...ress the POWER switch on the panel of the CPU blade Power off from Remote Console The power of the CPU blade can be turned off by using OS Shutdown in remote control feature of EXPRESSSCOPE Engine 3 BMC The POWER LED on the CPU blade of which power was turned off goes on amber Tips To power off from CPU blade or remote console the OS must be set so that it starts shutdown process when the POWER sw...

Page 95: ...0f User s Guide 95 NEC Express5800 Series Express5800 B120f Appendix 1 Specifications Describes the specifications of this server 2 Interrupt Lines Describes the interrupt lines assigned to this server 3 Glossary 4 4 ...

Page 96: ...AS HDD 2 2 5 inch SATA_HDD 2 2 5 inch SAS_SSD 2 Interface RAID levels SATA 3 6 Gb s RAID 0 1 SAS 6 12 Gb s RAID 0 1 Graphics VRAM Embedded management controller chip 32 MB 16 770 000 colors 640x840 800x600 1 024x768 1 280x1 024 Mezzanine card slot Type 1 2 slots when Mezzanine Card Type 2 is not used Type 2 1 LAN Not pre installed selectable from 1GbE 2ch or 10GbE 2ch Required option External inte...

Page 97: ...2 2 5 inch SATA_HDD 2 2 5 inch SAS_SSD 2 Interface RAID levels SATA 3 6 Gb s RAID 0 1 SAS 6 12 Gb s RAID 0 1 Graphics VRAM Embedded management controller chip 32 MB 16 770 000 colors 640x840 800x600 1 024x768 1 280x1 024 Mezzanine card slot Type 1 2 slots when Mezzanine Card Type 2 is not used Type 2 1 LAN Not pre installed selectable from 1GbE 2ch or 10GbE 2ch Required option External interface S...

Page 98: ...you add optional devices Interrupt lines As factory settings interrupt lines are assigned as follows IRQ Peripheral Device Controller IRQ Peripheral Device Controller 0 System timer 8 Real time clock 1 9 Microsoft ACPI Compliant System 2 Cascade connection 10 PCI 3 COM 2 serial port 11 PCI 4 COM 1 serial port 12 5 PCI 13 Arithmetic operation processor 6 14 Primary IDE 7 15 Secondary IDE ...

Page 99: ...can start EXPRESSBUILDER from it without DVD when pressing F3 key during POST NEC ESMPRO Standard software for the server management This consists of several applications for managing or monitoring NEC ESMPRO Agent Software for monitoring the server This works with NEC ESMPRO Manager and resides as the OS service NEC ESMPRO Agent Extension Software for performing the scheduled operations This work...

Page 100: ... B120f User s Guide October 2014 NEC Corporation 7 1 Shiba 5 Chome Minato Ku Tokyo 108 8001 Japan NEC Corporation 2014 The contents of this manual may not be copied or altered without the prior written permission of NEC Corporation ...

Reviews: