background image

Issue 1.0

2-2

About the D

term

 Cordless DECT

S

ECTION

 2 

I

TEMS

 I

NCLUDED


WITH


THE


D

term

 C

ORDLESS

 DECT

Congratulations on your purchase of the D

term

 Cordless DECT.  This telephone is 

designed and engineered to exacting standards for reliability, long life and 
outstanding performance.  To become familiar with the features of the cordless 
telephone, read this manual thoroughly.

The 

D

term

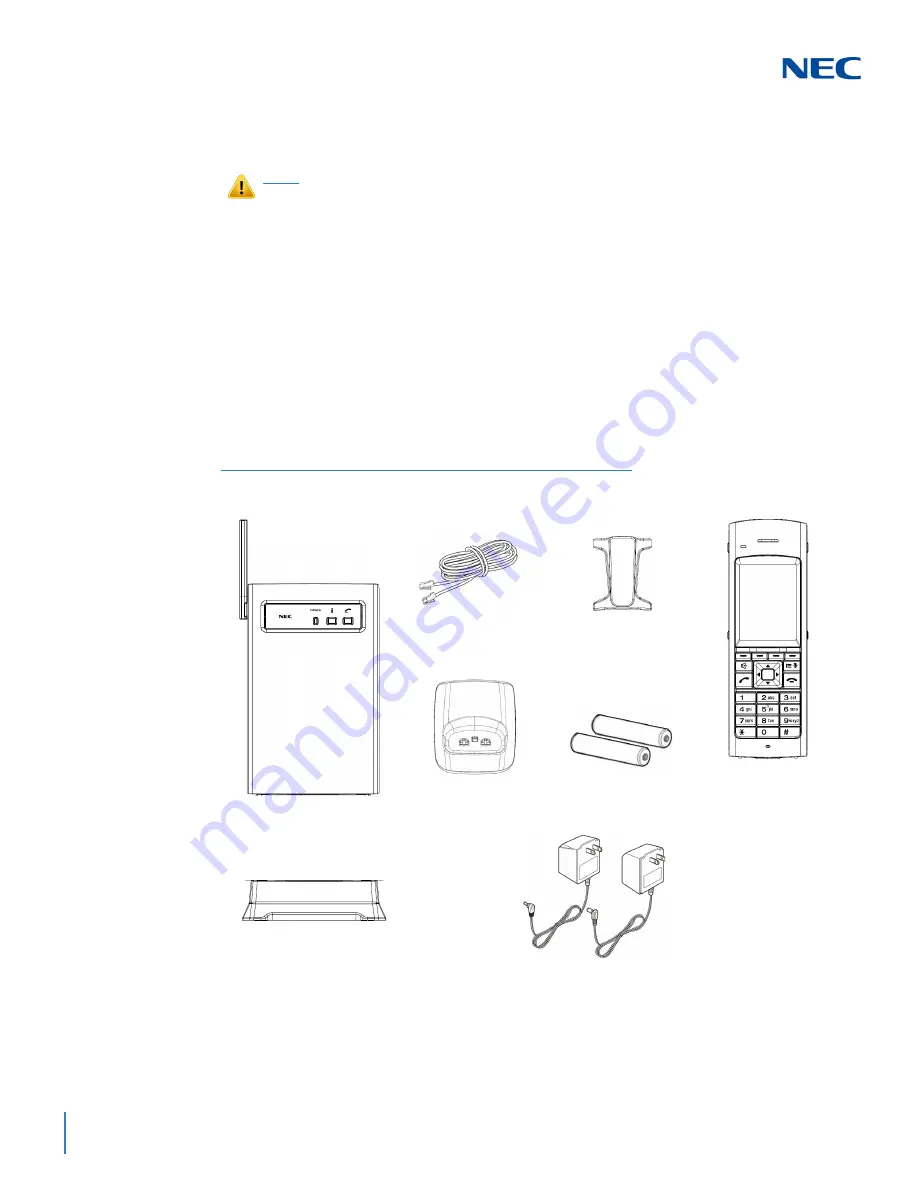
 Cordless DECT includes the following items:   


CAUTION

The Cordless Handset and wired telephone cannot be used at the same 

time.

The Handset and Base Station must have the original ID that is written 

on each unit at the factory.

Figure 2-2  Items Included with the D

term

 Cordless DECT

Base Unit

Telephone Cord

2 AC Adapters

2 Rechargeable Batteries

Belt Clip

Charging Unit

Base Unit Stand

Green Tipped Adapter Plug - used with Charging Unit
Yellow Tipped Adapter Plug - used with Base Unit

Handset

Summary of Contents for Dterm DTZ-8R-1

Page 1: ...Owner s Manual DTZ 8R 1 NDA 31627 ISSUE 1 0 Dterm Cordless DECT ...

Page 2: ......

Page 3: ...s document has been prepared for the use of employees and customers of NEC Corporation of America and may not be reproduced without prior written approval of NEC Corporation of America Dterm is a registered trademark of NEC Corporation Copyright 2017 NEC Corporation of America 3929 W John Carpenter Fwy Irving TX 75063 ...

Page 4: ......

Page 5: ...dset 1 3 2 4 Battery Charging Unit 1 3 Section 3 Battery Safety 1 4 Section 4 Important Safety Instructions 1 4 Section 5 Privacy 1 6 Section 6 Important Electrical Considerations 1 6 6 1 Electrical Safety 1 6 6 2 Range 1 6 6 3 Telephone Line Problems 1 6 6 4 Radio Interference 1 7 6 5 More than One Cordless Telephone 1 7 Chapter 2 About the Dterm Cordless DECT Section 1 Overview 2 1 Section 2 Ite...

Page 6: ... Mounting the Base Directly to the Wall 3 4 Section 6 Attaching and Removing the Belt Clip 3 6 Section 7 Installing the Handset Batteries 3 7 Section 8 Charging Batteries 3 8 8 1 Charging the Handset Batteries 3 8 Section 9 Low Battery Indicator 3 9 9 1 Low Battery 3 9 9 2 Battery Status 3 9 Section 10 Cleaning the Battery Charging Contacts 3 10 Chapter 4 Dterm Handset Base Unit and Charging Unit ...

Page 7: ...ration 6 5 2 1 Switching Between the Wired Phone and Cordless Phone DTZ 8R 1 Handset 6 5 2 2 Making a Call to Another Extension 6 6 2 2 1 Connection Considerations 6 9 2 3 Retrieving a Call to Another Extension 6 10 2 4 Making Call to Outside Line 6 11 2 5 Receiving a Call from an Outside Line Depends on PBX Line 6 13 2 6 Redial Option 6 15 2 7 AutoStandby 6 15 2 8 PBX No Service 6 16 2 9 Out Of R...

Page 8: ... 1 Sounds List Settings 7 11 3 3 2 Sounds Ring Tone Settings 7 11 3 3 3 Sounds Vibrate Settings 7 12 3 3 4 Sounds Out of Range Alert Settings 7 12 3 3 5 Sounds Key Tone Settings 7 13 3 4 Language 7 14 3 4 1 Language Settings 7 14 3 5 Administrator Settings 7 14 3 5 1 Administrator List Settings 7 15 3 5 2 Administrator Registration Settings 7 15 3 5 3 Administrator De registration Settings 7 18 3 ...

Page 9: ...Owner s Manual v Issue 1 0 Section 4 Additional Handset Features 7 26 4 1 Virtual Function Keys 7 26 ...

Page 10: ...vi Table of Contents Issue 1 0 ...

Page 11: ...ting Screws into the Wall for Wall Mounting the Telephone 3 4 Figure 3 4 Attaching the Base Directly to the Wall 3 5 Figure 3 5 Attaching the Belt Clip to the Handset 3 6 Figure 3 6 Removing the Belt Clip 3 6 Figure 3 7 Removing the Battery Cover 3 7 Figure 3 8 Installing the Batteries 3 7 Figure 3 9 Replacing the Battery Cover 3 8 Figure 3 10 Handset Charging LED Indicator 3 8 Figure 3 11 Low Bat...

Page 12: ...viii List of Figures and Tables Issue 1 0 Chapter 5 Optional Equipment Installation Figure 5 1 Optional Accessories and Replacement Parts 5 1 Figure 5 2 Installing the Headset 5 2 ...

Page 13: ...he FCC Rules These limits are designed to provide reasonable protection against harmful interference in a residential installation This equipment generates uses and can radiate radio frequency energy and if not installed and used in accordance with the instructions may cause harmful interference to radio communications However there is no guarantee that interference will not occur in a particular ...

Page 14: ...as Industry Canada CS 03 Part V regarding Hearing Aid Compatibility HAC and Volume Control requirements SECTION 2 SPECIFICATIONS 2 1 General 2 2 Base Unit CAUTION Changes or modifications not expressly approved by the party responsible for compliance could void the user s authority to operate the equipment Audio Process Digital ADPCM Channels 5 Frequency 1 9G 1920 1930 MHz ID 130 000 combinations ...

Page 15: ... QVGA Out of Range Detection Yes Out of Range Alarm Tone Yes On Off Power Requirements AAA Ni MH 1 2V 900mAh re chargeable batteries quantity 2 Soft Keys 4 Receive Transmit Frequency 1920 1930 MHz Ringer Mute Yes Ringer Tone Tones A F Ringer Volume High Low and Vibrate Size 146mm H x 21 2mm D x 48mm W Standby Mode 7 days typical Talk Mode 16 hours typical Vibrating Ringer Yes Volume Control Yes 6 ...

Page 16: ...es Do not dispose of the batteries in a fire they may explode Do not place the batteries in your regular trash Ni MH batteries must be collected recycled or disposed of in an environmentally sound manner Contact your local waste management officials for other information regarding the environmentally sound collection recycling and disposal of the battery contained in this product SECTION 4 IMPORTA...

Page 17: ...rous voltages or other risks Incorrect reassembly can cause electric shock when the appliance is subsequently used Unplug this product from the wall outlet and refer servicing to qualified service personnel under the following conditions If you see smoke coming from the unit or if it smells burned When the power supply cord is damaged or frayed If liquid has been spilled onto the product If the pr...

Page 18: ...ve a maximum range of up to 350 feet depending upon the environment by transmitting and receiving according to the highest specifications set forth by the FCC This telephone has been rated to operate at a maximum distance with the qualification that the range depends upon the environment in which the telephone is used Many factors limit range and it would be impossible to include all of the variab...

Page 19: ...is fully extended It may also be necessary to re locate the base unit In the unlikely event that you consistently hear other voices or distracting transmissions on your telephone you may be receiving radio signals for another cordless telephone or other source of interference Finally it should be noted that some cordless telephones operate at frequencies that may cause interference to nearby TVs o...

Page 20: ...20 feet 6m at any time Radio interference causes interruptions in conversation When this happens your unit is not defective When noise continues move to a different location while you talk You might even need to move the base unit When the situation persists contact the National Technical Assistance Center NTAC ...

Page 21: ...or use in the office environment Optionally an NEC Dterm multiline wired desk phone such as DT400 series can be connected This gives the user the option of using either the cordless handset or the wired desk phone However in this configuration the Cordless Handset and wired phone cannot be used at the same time Figure 2 1 Dterm System Overview PBX or Key Telephone System Base Unit Handset Wired De...

Page 22: ...lephone read this manual thoroughly The Dterm Cordless DECT includes the following items CAUTION The Cordless Handset and wired telephone cannot be used at the same time The Handset and Base Station must have the original ID that is written on each unit at the factory Figure 2 2 Items Included with the Dterm Cordless DECT Base Unit Telephone Cord 2 AC Adapters 2 Rechargeable Batteries Belt Clip Ch...

Page 23: ...ion Single Key Access to Conference Hold Transfer and Redial features Wall Mountable Separate Charging Unit Easy Installation Compact Handset Design Use with an NEC Digital Multiline Telephone On the SV9100 the Dterm Cordless DECT can be used in conjunction with the DTL and DTZ multiline telephones With SV9300 the Dterm Cordless DECT can be used in conjunction with the Dterm DTH DTL and DTZ multil...

Page 24: ...ons available with the handset For a detailed description of the buttons refer to Chapter 4 Dterm Handset Base Unit and Charging Unit Section 1 Handset Controls on page 4 1 Figure 2 3 DTZ 8R 1 Handset Controls and Functions 1 Headset Jack 7 Mute Menu Key 2 Message Display 8 End Call Key 3 Soft Keys used for HOLD CONF TRANSFER REDIAL etc 9 Center Key 4 Handsfree Speaker Key 10 Handset Ringer Volume...

Page 25: ... switch between the Dterm Cordless DECT phone and the wired desk phone by using the Desk Cordless buttons on the unit Figure 2 4 Base Unit Controls and Functions BOTTOM VIEW 4 1 2 3 1 Power LED 4 Modular Jacks 2 Cordless Button 5 Power Jack 3 Desk Button FRONT VIEW 5 1 2 3 ...

Page 26: ...e the Base Key Option setting must be set to On Base Key Option is set to Off by default To enter the Base Key Option setting 1 Press the Mute Menu key followed by 1 2 3 on the numeric keypad 2 Scroll down to the Base Key Option setting and select On 3 With Base Key Option set to On press the Center key The Desk and H S soft keys should be displayed 4 Select Desk for desk phone operation 5 Select ...

Page 27: ...Issue 1 0 Owner s Manual 2 7 4 4 Charging Unit The Charging Unit is used to recharge the batteries in the handset Figure 2 5 Charging Unit ...

Page 28: ...Issue 1 0 2 8 About the Dterm Cordless DECT ...

Page 29: ...tion for a complete discussion of safety precautions SECTION 2 INSTALLATION PRECAUTIONS To ensure optimum performance follow these guidelines Each base unit must be placed at least 20 feet 6m apart Always place the base unit on top of a desk or on higher shelves Avoid locations surrounded by metal surfaces Place the base unit away from any electrical component such as a PC monitor and other teleph...

Page 30: ...her line cord from the Line Out connector to a qualified Dterm multiline telephone Figure 3 1 Connecting Telephone Cords NOTE Do not connect the DTZ 8R 1 line cord directly to PBX station card as the DTZ 8R 1 will not function Connect the line cord to the jack with a single pair connected back to one digital station port Line In To PBX or key system digital station port Line Out Connect to the des...

Page 31: ...the belt clip attached Connect the AC adapter with the green tip to the charging unit and to a suitable AC power source Figure 3 2 Applying Power to the Charging Unit CAUTION Use only the supplied AC adapter for the charging unit WARNING Route the power cord where it will not create a trip hazard or where it could become chafed and create a fire or other electrical hazards Green Tip ...

Page 32: ...adapter can reach Also consider proximity to the PBX key system so that the telephone line cord will not be excessively long Make sure the wall material is capable of supporting the weight of the base unit Use 10 screws with anchoring devices suitable for the wall material where the base unit will be placed To mount the telephone 1 Insert two mounting screws 3 15 16 apart Allow 3 16 between the wa...

Page 33: ...ltiline wired phone is used connect a line cord from the LINE OUT jack on the base unit to the multiline phone 4 Place the base unit on the posts of the wall screws and push down until it is firmly seated 5 Plug the other end of the short telephone cord into the telephone wall jack 6 Plug the AC adapter into a standard 120 VAC wall outlet Figure 3 4 Attaching the Base Directly to the Wall 9 64 in ...

Page 34: ...enient portability 1 Slide the clip into the tab slots Press firmly until it snaps into place The belt clip is designed to fit snugly onto the handset 2 To remove the clip press the retaining clip in toward the belt clip blade and slide the clip up at the same time Figure 3 5 Attaching the Belt Clip to the Handset Figure 3 6 Removing the Belt Clip ...

Page 35: ...es 1 Remove the battery cover by pressing the latch and sliding the cover down and off of the handset 2 Install the two AAA batteries AAA Ni MH 1 2V 900mAh re chargeable batteries observing the polarity orientation Figure 3 7 Removing the Battery Cover CAUTION Batteries must be the same size and type AAA Ni MH 1 2V 900mAh re chargeable batteries Use of other battery types may be hazardous and will...

Page 36: ... the Handset Charging LED indicator lights If the Handset Charging LED does not come on check to see if the AC adapter is plugged in and that the handset is making good contact with the charging contacts on the charging unit Figure 3 9 Replacing the Battery Cover IMPORTANT Charge the batteries without interruption for at least 10 hours NOTE The Handset Charging LED turns blue during and after char...

Page 37: ... Battery Status icon in the LCD changes to battery low The Handset remains in Talk Mode and the battery low alert tone is emitted every 30 seconds In Other Mode Excluding Standby Mode and Talk Mode The Battery Status icon in the LCD changes to battery low 9 2 Battery Status The LCD shows the battery charge status according to the remainder capacity of the battery When you receive the low battery i...

Page 38: ...rtant to clean all charging contacts on the handset and charging unit about once a month Use a pencil eraser or other contact cleaner Do not use liquids or solvents On a Call In Standby Mode What occurs when Battery icon message blinks Handset beeps once every 30 seconds Charge Battery message blinks Action Complete the call as quickly as possible Return the handset to the charger unit Return to c...

Page 39: ... and ringer volume are located on the handset and are used to control various functions Refer to Figure 4 1 Handset Controls for a diagram of the Handset controls and to Table 4 1 Handset Control Functions on page 4 2 for an explanation of the handset controls Figure 4 1 Handset Controls Handset Controls Headset Jack Soft Keys Speaker Key Talk Key Mute Menu Key End Call Key Center Key Up Down Keys...

Page 40: ...he handset to mute a conversation Press this button again to resume the conversation During a conversation this button is used to toggle the microphone function on and off When the conversation ends muting is turned off In Standby mode press the Mute Menu key to display the user menu window Press the Speaker key in Standby mode or during Talk mode to turn on Handsfree Talk mode and talk handsfree ...

Page 41: ...ume softkey in Standby mode then use the Up Down arrow keys to adjust the ringer volume You can choose from four different settings OFF Vibrate Low Medium High The LCD displays the current volume setting for two seconds If Ringer is set to OFF Vibrate it will not vibrate when in the charging cradle Volume During a conversation use the Up Down arrow keys to adjust the handset receiver volume Headse...

Page 42: ... and Charging Unit Figure 4 2 Base Unit Controls and Functions 1 Power LED 4 Stand 2 Cordless Phone Select Button and LED 5 Power Adapter Jack 3 Desk Phone Select Button and LED 6 Modular Jacks 1 4 6 BACK VIEW FRONT VIEW 2 3 5 BOTTOM VIEW ...

Page 43: ...ORIES Optional accessories and replacement parts can be obtained by contacting your NEC representative Figure 5 1 Optional Accessories and Replacement Parts Telephone Cord Adapter for Base Unit AAA Ni MH Rechargeable Batteries Belt Clip Headset Charging Unit and AC Adapter Optional Handset Kit Base Unit Stand ...

Page 44: ...The second handset must be keyed to operate with the base unit To install the headset Open the cover over the headset jack and plug the headset into the receptacle No other settings are needed Operation of the headset is the same as the handset However the user hears through the headset earphone and talks through the headset microphone The handset earphone and microphone mouthpiece are disconnecte...

Page 45: ...Training Mode Entry To enter Training mode Press and hold and at the same time and then press the TALK key The handset emits a confirmation tone and enters Training mode The following message is displayed on the LCD and the F1 LED blinks IMPORTANT The screens in this section are system dependent and may not match your handset ...

Page 46: ...and is sent to the PBX The handset exits Training mode 1 1 5 Training Mode Volume Up Key Change Each Item Setting The up key can change each item setting as illustrated in the following displays e g when the F1 setting is changed the F1 LED blinks The items in the display change in the following sequence F1 F1 TALK F2 F2 TALK F3 F3 TALK F4 F4 TALK F5 F5 TALK F6 F6 TALK F7 F7 TALK F8 F8 TALK OFF HO...

Page 47: ...0 1 press up key F 1 L K 0 2 press up key F 1 L K 0 3 press up key F 1 L K 0 4 press up key F 1 L K 0 5 press up key F 1 L K 0 6 press up key F 1 L K 0 7 press up key F 1 L K 0 8 press up key F 1 L K 0 9 press up key Continued on next page ...

Page 48: ...0 press up key F 1 L K 1 1 press up key F 1 L K 1 2 press up key F 1 L K 1 3 press up key F 1 L K 1 4 press up key F 1 L K 1 5 press up key F 1 L K 1 6 press up key F 1 L N R S P D press up key F 1 R e c a l l press up key Continued on next page ...

Page 49: ... Phone DTZ 8R 1 Handset Press the Base Left key to change to the cordless phone DTZ 8R 1 Handset When the cordless phone is selected there is no message on the LCD Press the Base Right key to change to the wired phone When the wired phone is selected the LCD shows DESK TEL F 1 F N C press up key F 1 A N S press up key F 1 L K 0 1 IMPORTANT The screens in this section are system dependent and may n...

Page 50: ... to another extension 1 Press the TALK key on the handset The handset tries to connect to the base station while the ACQUIRING LINK message blinks on the LCD 2 When connected the handset goes into Talk mode and theTalk icon is turned on and displays the current volume Talk Key Speaker Key ...

Page 51: ...cted to a PBX the handset displays DISCONNECT When the handset cannot connect to the base station an error tone is emitted and Out of Range is displayed for five seconds on the LCD and the handset goes into Standby mode The handset cannot go into Talk mode when the wired phone is selected Talk Speaker D I S C O N N E C T O u t o f R a n g e ...

Page 52: ... 8 Setup and Operation 4 The LCD displays the message indicating the call is taking place 5 When the called party answers the LCD displays a message to indicate the phone is in Talk mode Talk Speaker Talk Speaker ...

Page 53: ...ted to the PBX the handset displays DISCONNECT 2 When the handset does not connect to the base station an error tone is emitted and Out of Range message is displayed for five seconds The handset then goes to standby mode 3 When a desktop wired phone is selected the handset does not go into Talk mode ...

Page 54: ...incoming call 2 If you press either the Talk or dial pad keys 0 9 or pick the handset from the cradle the handset connects to the base station and ACQUIRING LINK displays If the connection is established quickly the message ACQUIRING LINK may not display IMPORTANT Answering a call on the secondary line will differ depending on the system Press the center key and use the down arrow to select the ri...

Page 55: ...ng Call to Outside Line To make an external call 1 Press the Select key on the handset and select F1 The handset establishes an RF connection with the base station The LCD display does not change IMPORTANT Making a call on the secondary line will differ depending on the system Press the center key and use the down arrow to select the desired line Press the center key to hear dial tone and then mak...

Page 56: ...hen the RF connection is established the handset goes into Talk mode and the Talk icon and the volume indicator display The F1 LED also lights When the outside line is not connected with the PBX HANG UP is displayed and you hear a busy tone ...

Page 57: ... dials 1 2 3 the LCD displays the dialed number as they are pressed 2 5 Receiving a Call from an Outside Line Depends on PBX Line To receive a call from an external line 1 When you receive an incoming external call the F1 LED blinks Talk Speaker ...

Page 58: ... the handset connects to the base station and ACQUIRING LINK displays If you press the F1 select key up down select key the handset connects to the base station However ACQUIRING LINK is not displayed 3 When the RF connection is established the handset goes into Talk mode and the Talk icon and the volume indicator display ...

Page 59: ... 4 5 6 talk redial 123 2 7 AutoStandby When the handset is in one of the modes listed below placing the handset on the charger changes it to Standby mode At this time a confirmation tone is emitted Ringer Volume Setting Menu Setting Talk Mode Trying to Connect to the Base Station NOTE An error tone is emitted when redial is empty Dial limit is 32 digits redial stores up to 32 digits in memory Redi...

Page 60: ... key there is know acknowledgment from the PBX The handset goes into Standby mode and the LCD displays ACQUIRING LINK 2 9 Out Of Range When in Standby Mode The handset displays the message Searching when the handset cannot find the base station Out of Range in Standby mode NOTE The handset does not emit a tone when it goes into Standby mode ...

Page 61: ...rror tone and displays the message Out of Range While Talking If the handset cannot receive a signal from the base station in about five seconds it goes to Standby mode and emits an error tone In this case the LCD displays Out of Range If the base cannot receive a signal from the handset in about five seconds it goes to Standby mode Talk Speaker After five seconds returns to searching ...

Page 62: ...ery Status icon in the LCD changes to battery low 2 11 Battery Status The LCD indicates the battery capacity as indicated in the diagram below 2 12 Mute Press the Menu Mute key in Talk mode The Mute icon is on an the sound from the microphone is muted Press Menu Mute again to cancel mute The Mute icon is off Finishing Talk mode also cancels mute 2 13 Handsfree Press the Speaker key in Standby mode...

Page 63: ...handset speaker when the headset is connected 2 15 Volume Setting The following modes have volume settings Talk mode Handsfree Talk mode and headset During each mode you can press the Up or Down keys to increase or decrease the volume As you increase decrease the volume setting the setting is displayed on the LCD from Level 1 to Level 6 After the volume is changed the LCD shows the current volume ...

Page 64: ...f NOTE The handset remains in Ringer Volume Setting mode for two seconds unless keys are pressed You can use the handset to change the ringer volume while in Incoming Call mode The ringer volume does not appear on the display If Ringer Volume is off and the handset is on the charger while in Incoming Call mode it rings Low but does not vibrate If ringer mute is on the handset does not ring nor doe...

Page 65: ...ange setting on off and enable disable key tone Language allows you to select one of three language settings English French or Spanish Administrator Setting allows you to register de register change the pin code and scan the site for information about the handset Function Key Labels allows you to assign a label to the function keys Key Lock locks the keys after elapsed time period Virtual Function...

Page 66: ...g mode for one minute unless a key is pressed When Handset Cancel menu setting is activated or you press the Exit or the End Call key while in Menu Setting mode the handset switches to Standby mode 2 1 Accessing the Main Menu To access the Main menu 1 Press the Menu key while in Standby mode The menu list is displayed on the handset LCD 2 Select the menu items by scrolling up down left or right Pr...

Page 67: ... not match your handset Keys available for listing contacts include To select contacts up down accesses the next contact in the list forward backward left right accesses the next five contacts in the list forward backward Select key When the contact is selected the details associated with the contact are listed To edit contacts Delete key Softkey 1 deletes the contents of the selected contact Edit...

Page 68: ...es the next contact in the list forward backward Back key returns to the List screen To edit contacts Delete key Softkey 1 deletes the contents of the selected contact Edit Add key Softkey 2 edits the contents of the selected contact If the selected contact is empty the softkey indicates Add To dial from the contact list Talk Speaker key dials the selected contact ...

Page 69: ...e If adding a new contact enter the name you wish to assign to the contact If you are editing an existing contact enter the name to access the contact A contact name is a maximum of eight characters Keys available for deleting a a contact include To delete contacts Yes key deletes the contact from the list emits a confirmation tone and returns the display to the previous screen No key Does not del...

Page 70: ...es between numeric and alphabetic keypad 123 allows numeric input abc allows alphabetic input Delete key deletes a character Right Left key moves the cursor to the right or left one character Alphabetic Input Dial keys Dial 1 _ 1 Dial 2 abcABC2 Dial 3 defDEF3 Dial 4 ghiGHI4 Dial 5 jklJKL5 Dial 6 mnoMNO6 Dial 7 pqrsPQRS7 Dial 8 tuvTUV8 Dial 9 wxyzWXYZ9 Dial 0 0 Dial Dial Add Edit New Edit Rename ...

Page 71: ...plays on two lines 16 digits on the first line of the line of the display and the remaining digits on the second line Keys available for editing adding contact members include Back key returns to the previous screen Next key accesses the Number Edit screen Delete key deletes a character Save key saves and stores the contact A confirmation tone is emitted After two seconds the display returns to ei...

Page 72: ...3 2 2 Menu Timeout Settings Keys available for listing settings options include To select settings up down accesses the next setting in the list forward backward Select key displays the selected settings menu option screen Keys available for timeout values include Default 30 seconds To select settings up down accesses the next setting in the list forward backward Select key stores the selected tim...

Page 73: ...0 To select settings up down accesses the next setting in the list forward backward Select key stores the selected timeout value emits a confirmation tone and returns to the previous settings screen Keys available for power save settings include Default On On LCD is in sleep mode the LCD back light is off Off LCD back light is dimly lighted To select settings up down accesses the next setting in t...

Page 74: ... keys 1 Press and hold for two seconds Enable Disable Key Lock Keys available for key lock settings include Default Off On Enable Key Lock function Off Disable Key Lock function To select settings up down accesses the next setting in the list forward backward Select key selects the desired setting and stores the selection A confirmation tone is emitted The previous screen setting list is displayed...

Page 75: ...ttings Keys available for listing sounds settings include To select settings up down accesses the next setting in the list forward backward Select key selects the desired setting and displays the options for the selected setting Keys available for ring tone settings include Default Type A To select settings up down accesses the next setting in the list forward backward Play key plays a sample of t...

Page 76: ... forward backward Select key selects the desired setting and stores the selection A confirmation tone is emitted The previous screen setting list is displayed Keys available for out of range settings include Default On On Out of Range alert is activated Off Out of Range alert is not activated To select settings up down accesses the next setting in the list forward backward Select key selects the d...

Page 77: ...de Default On On Key Tone function is enabled Off Key Tone function is disabled To select settings up down accesses the next setting in the list forward backward Select key selects the desired setting and stores the selection A confirmation tone is emitted The previous screen setting list is displayed ...

Page 78: ...ws you to access and modify the DTZ 8R 1 administrator settings These settings allow the administrator to register de register handsets change pin codes and conduct a site survey to assess the condition of the handsets Use the up down keys to select the menu items Once the settings menu is displayed you can make the appropriate changes using the Select key Keys available for listing language setti...

Page 79: ...il the blue LED blinks three seconds 2 Select Registration from the Administrator Settings menu list 3 Press the Select key The LCD displays the Registration screen 4 Enter the Registration Pin number 5 Press OK to send the pin number to the base station Keys available for listing the administrator settings include up down accesses the next setting in the list forward backward Select key selects t...

Page 80: ...en registering the handset include Cancel key exits registration mode Enter Registration Pin Keys available when registering the handset include Default 1234 Delete key deletes one digit Dial 0 9 key numeric keys to used to enter the pin code OK key sends the registration pin to the base station ...

Page 81: ...andset include After five seconds the handset switches to one of the following modes depending on the success or failure of handset registration If registration is successful the handset switches to Standby mode If the registration fails the handset switches to De register or Standby mode ...

Page 82: ...lect Yes to de register the handset Select handset The handset number is displayed Keys available when de registering the handset include up down accesses the next setting in the list forward backward Select key selects the desired setting and stores the selection Displays the Confirmation screen De register the handset Keys available when de registering the handset include Yes key starts de regis...

Page 83: ...et include If de registration is successful the LCD displays the message indicating the handset is not registered You can register the handset again using the Regist key Regist key starts registration If de registration failed the handset switches to Standby mode after five seconds have elapsed ...

Page 84: ...e Change Pin Code screen 4 Press OK to register the new pin code When this setting is selected the handset starts communicating with the base station to obtain the pin code The base station sends the pin code to the handset and it is displayed on the handset s LCD Keys available when changing the pin code include Delete key deletes one digit Dial 0 9 key numeric keys used to enter the pin code OK ...

Page 85: ...results of the scan are displayed on the handset s LCD Scan for information This screen displays the following information Band the carrier band for the handset Condition Good Fair Poor Clear Slot number of clear slots total number of slots is 12 Number of Base the number of the base station Keys available when requesting a site survey include Scan key begins scanning for clear slots and the numbe...

Page 86: ... number of the base station Keys available when requesting a site survey include Scan key restarts scanning for clear slots and number of base stations Sync key begins Sync Display mode Start Sync Display mode When the Sync key is pressed the Sync Display mode displays the following information Ch the current channel number Slot the current slot number RSSI the current RSSI Receive Signal Strength...

Page 87: ...st Settings This screen allows you to access the function key labels Once you have selected the function key you can assign edit or delete the label There are eight function keys that can be assigned labels Keys available when accessing the key labels include up down accesses the next setting in the list forward backward Select key selects the desired label Delete key deletes the label name On Off...

Page 88: ...ween numeric and alphabetic keypad 123 allows numeric input abc allows alphabetic input Alphabetic Input Dial keys Dial 1 _ 1 Dial 2 abcABC2 Dial 3 defDEF3 Dial 4 ghiGHI4 Dial 5 jklJKL5 Dial 6 mnoMNO6 Dial 7 pqrsPQRS7 Dial 8 tuvTUV8 Dial 9 wxyzWXYZ9 Dial 0 0 Dial Dial Right Left key moves the cursor to the right or left one character only available for alphabetic input Delete key deletes the chara...

Page 89: ...to delete a function key label name This screen is displayed when the Delete key is pressed on the Edit Function Key Label screen To delete the label name Press Yes Keys available when changing the pin code include Yes key deletes the function key label Not key returns to the previous screen ...

Page 90: ...is in Standby mode when receiving an incoming call or while talking To enter Virtual Function Key mode Press the Select Talk or Speaker key IMPORTANT The screens in this section are system dependent and may not match your handset Keys available when switching to Virtual Function Key mode include up down accesses the next setting in the list forward backward Select key Talk key Speaker key sends th...

Page 91: ...hargeable 2 2 5 1 recycling 1 4 safety considerations 1 4 belt clip 2 2 5 1 C Canadian Standards Association 1 1 certification label 1 1 change channel 1 3 channel automatic selection 2 3 channel change 1 3 charger unit 2 7 buttons 2 5 charging handset battery pack 3 8 stand 2 2 unit 1 3 2 3 3 3 charging unit 5 1 cleaning battery contacts 3 10 conference key 4 2 contacts 7 3 delete 7 5 edit add 7 ...

Page 92: ...e control 1 3 weight 1 3 handset features virtual function keys 7 26 handsfree 1 3 talk mode 4 2 volume control 1 3 headset 5 1 installing 5 2 jack 1 3 4 3 volume 2 3 volume control 1 3 hearing aid compatible 1 2 1 3 I indications battery low 3 9 3 10 installation precautions 3 1 installing direct wall mounting 3 4 handset battery pack 3 7 headset 5 2 selecting location 3 1 K keys any key answer 1...

Page 93: ... 1 FCC Part 15 rules 1 1 FCC Part 68 rules 1 2 ringer mute 1 3 tone 1 3 vibrating 1 3 S safety battery 1 4 general instructions 1 4 safety information 1 1 settings brightness 7 9 key lock 7 10 list 7 8 menu timeout 7 8 power save 7 9 single access key 2 3 site location 3 1 soft keys 1 3 sounds key tone 7 13 list 7 11 out of range alert 7 12 ring tone 7 11 vibrate 7 12 specifications base unit 1 2 ...

Page 94: ...dex V virtual function keys 7 26 volume control high 4 3 low 4 3 maximum 4 3 medium 4 3 handset 1 3 handsfree 1 3 headset 1 3 setting 6 19 W wall mounting charging unit 2 3 direct 3 4 wall plate adapter 2 2 ...

Page 95: ......

Page 96: ...Owner s Manual DTZ 8R 1 NEC Corporation of America Issue 1 0 Dterm Cordless DECT ...

Reviews: