background image

Connections

NOTE

: Do not connect or disconnect cables when turning on the monitor’s main power or other 

external equipment’s power as this may result in a loss of image.

NOTE

: Do not use an attenuating (built-in resistor) audio cable. Use an audio cable without a built-in 

resistor. Using an audio cable with a built-in resistor will lower the sound level.

Before making connections:

Turn off the device’s power before connecting it to the monitor.

Refer to the device’s user manual for available connection types and instructions for the device.

We recommend turning off the monitor’s main power before connecting or disconnecting a USB 

storage device or a microSD memory card to avoid data corruption.

For further instructions on connections, please refer to standard user’s manual of the base 

model monitors C751Q, C861Q and C981Q. 

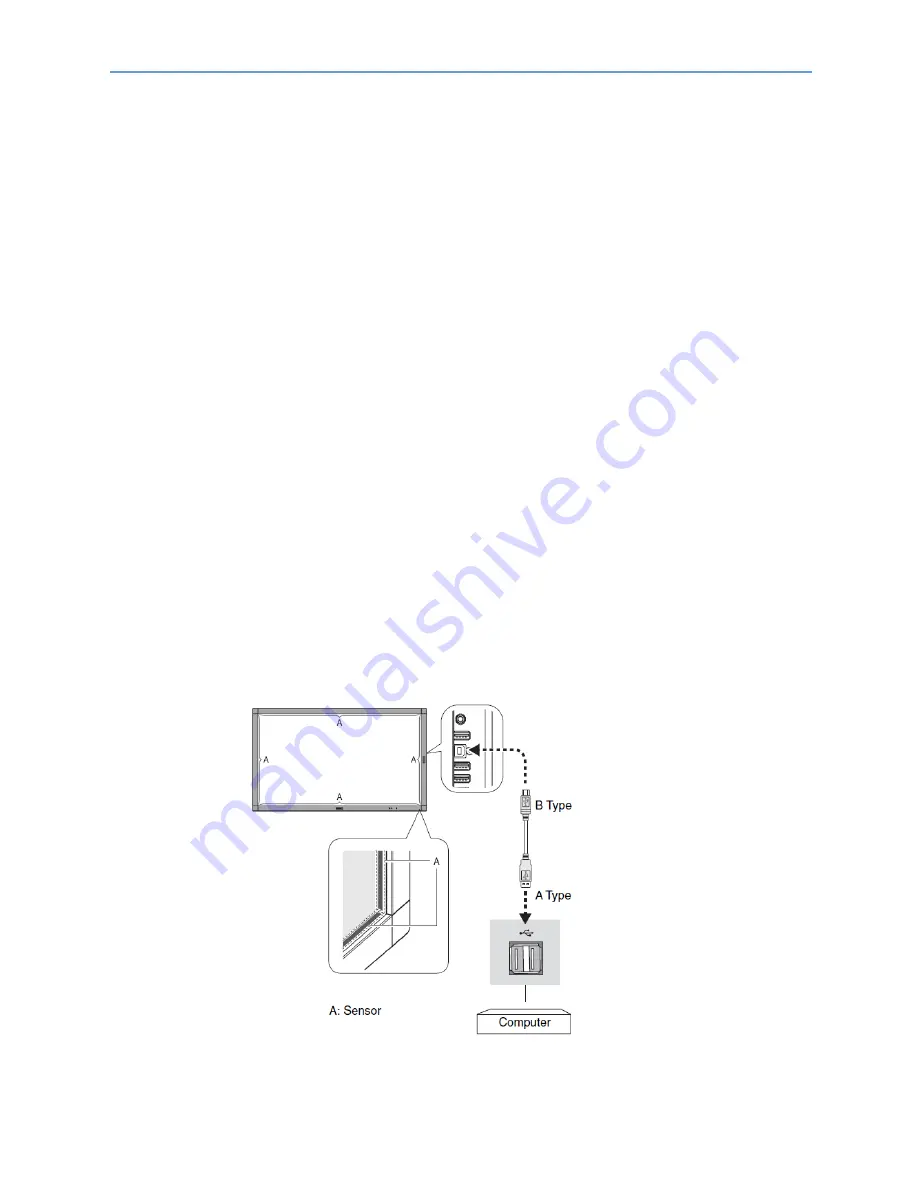
For using Touch Panel

1. Turn off the monitor.

2. Install the equipment.*1

Using slot -in PC (OPS): Connect the OPS slot -in PC into the option board slot. Touch function will 

be activated automatically.

NOTE

: Please refer to the slot 2 type PC’s manual for connection.

NOTE

: When you set option board accessory other than OPS slot-in PC, touch function may not work.

Using external computer: Connect the B type connector to the USB upstream port on the left back 

side of the monitor and the A type connector to the downstream port on the external computer.

3. Turn on the monitor.

*1: Please contact your NEC customer support for more detailed information. Please contact your NEC 

customer support for the setting of the touch panel function in multiple screens. 

Summary of Contents for C SERIES

Page 1: ...anual C Series ShadowSenseTM Touch MultiSync C751Q SST MultiSync C861Q SST MultiSync C981Q SST MONITOR MODEL C751Q SST C861Q SST C981Q SST Please find your model name on the label on rear side of the...

Page 2: ...mation Page 06 Safety Precautions Maintenance Recommended Use Page 07 Shipping Content Page 08 Unpacking Page 09 General Installation Page 10 Connections Page 11 Troubleshooting Page 13 Specifications...

Page 3: ...Q SST models Table Top Stand Option Other than the standard monitor the Cxx1Q SST models do not allow for table top installations as the weight and dimensions of monitor are different from the base mo...

Page 4: ...mes are trademarks or registered trademarks of their respective owners The terms HDMI and HDMI High Definition Multimedia Interface and the HDMI Logo are trademarks or registered trademarks of HDMI Li...

Page 5: ...mes are trademarks or registered trademarks of their respective owners The terms HDMI and HDMI High Definition Multimedia Interface and the HDMI Logo are trademarks or registered trademarks of HDMI Li...

Page 6: ...orresponds to the AC voltage of the power outlet and has been approved by and complies with the safety standards in the country of purchase This equipment is designed to be used with a power cord that...

Page 7: ...glass Plexiglas or water with a small amount of washing up liquid Cleaning the Cabinet Unplug the power supply Gently wipe the cabinet with a soft cloth To clean the cabinet dampen the cloth with a ne...

Page 8: ...300cm MultiSync C861Q SST 1 86 ShadowSenseTM Touch Monitor 2 SST Pen Eraser Kit 3 Remote Control 4 CD ROM User Guides Manuals 5 Addendum to User s Manuals 6 Power Cable 7 DisplayPort Cable 8 2x USB C...

Page 9: ...e are required DO NOT start unless you have enough people available Working with less people may result in injuries and damaged product Lift the carton box upwards Make sure to have one additional per...

Page 10: ...DO NOT block ventilated openings with mounting accessories or other accessories For NEC Qualified Personnel Stability Hazard The device may fall causing serious personal injury or death To prevent in...

Page 11: ...corruption For further instructions on connections please refer to standard user s manual of the base model monitors C751Q C861Q and C981Q For using Touch Panel 1 Turn off the monitor 2 Install the e...

Page 12: ...g slot 2 type PC Select OPTION Using external computer Select the input signal which is supplied by the computer connected to USB connector NOTE Please refer to The touch panel does not respond in Tro...

Page 13: ...ke sure that PC SOURCE is AUTO or EXTERNAL PC and the input signal is set to which supplied by the connected computer Make sure the USB cable is connected properly The touch panel function may not wor...

Page 14: ...d to enable disable various features Click here for the latest version of the NEC Dashboard software tool NEC ShadowSense Dashboard Tool The position of the touch is not accurate In case your are expe...

Page 15: ...the new GUI The SST pen eraser do not work correctly Make sure the WHITEBOARD profile has been selected in the ShadowSense Dashboard software tool The WHITEBOARD profile this configures the device to...

Page 16: ...Specifications C751Q SST...

Page 17: ...Specifications C751Q SST...

Page 18: ...Specifications C751Q SST...

Page 19: ...Specifications C861Q SST...

Page 20: ...Specifications C861Q SST...

Page 21: ...Specifications C861Q SST...

Page 22: ...Specifications C981Q SST...

Page 23: ...Specifications C981Q SST...

Page 24: ...Specifications C981Q SST...

Page 25: ...isposal of the product and country specific information on recycling facilities can be found on our following websites https www nec display solutions com p greenvision en greenvision xhtml in Europe...

Page 26: ...r if applicable follow applicable legislation or agreement you may have The mark on electrical and electronic products may only apply to the current European Union Member States Outside the European U...

Reviews: