background image

English-8

Figure TS.1

Figure S.2

Figure S.1

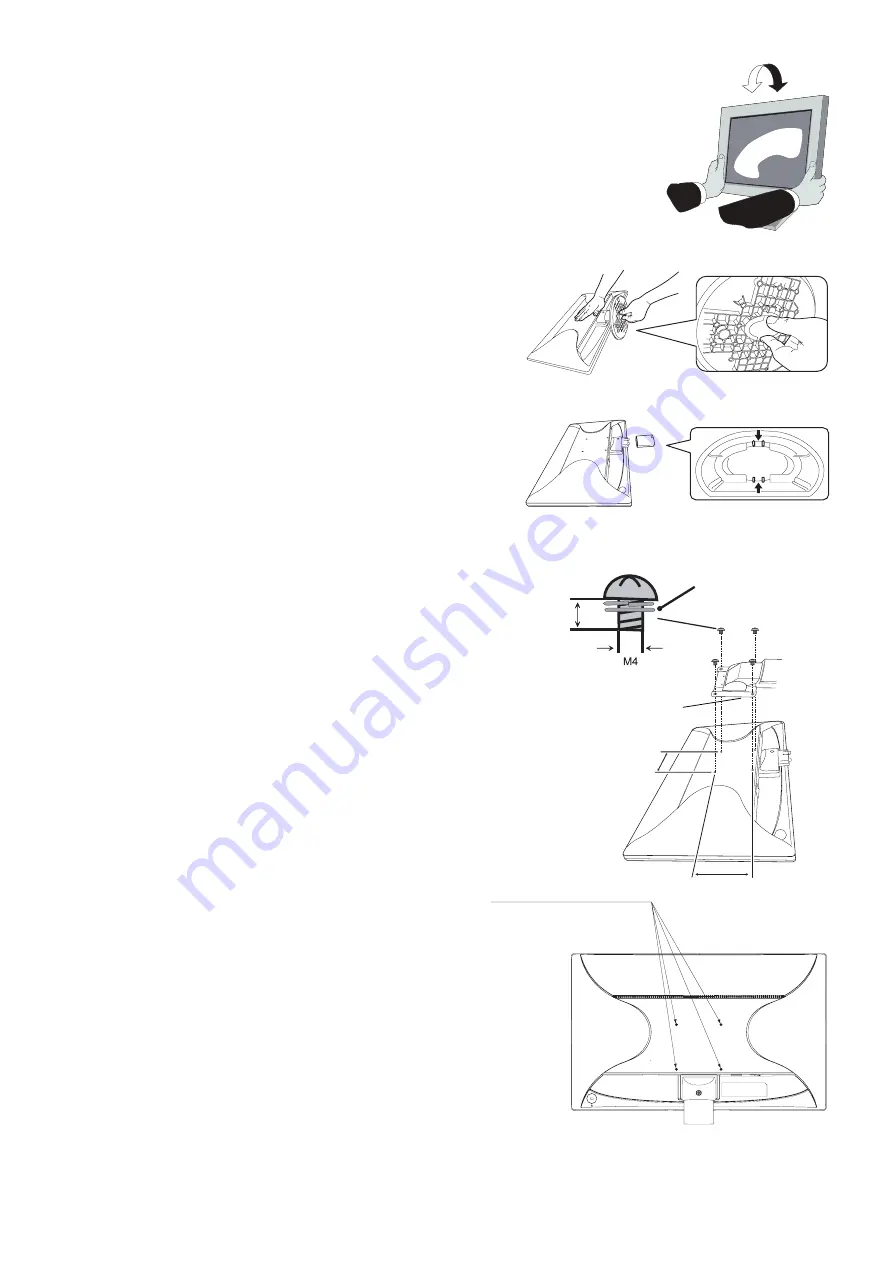
Tilt

Grasp top and bottom sides of the monitor screen with your hands and adjust the tilt as desired 
(Figure TS.1).

NOTE: 

Handle with care when tilting the monitor screen.

Repacking

Remove base stand and stand neck for repacking.

1.  Disconnect all cables.

2.  Place monitor face down on a non-abrasive surface.

3.  Remove base stand. Move up tabs and take off the base stand (Figure S.1).

4.  Remove stand neck. Push down 2 tabs and remove stand neck (Figure S.2).

NOTE: 

Handle with care when removing base stand and stand neck.
If you have diffi culty removing the base stand, please move 
base stand left and right in small motion.

Flexible Arm Installation

This LCD monitor is designed for use with a fl exible arm.

To prepare the monitor for alternate mounting purposes:

• 

Follow the instructions provided by the manufacturer of the display mount.

• 

To meet the safety requirements, the monitor must be mounted to an arm 
that supports the weight of the monitor and be UL-certifi ed. 
See page 12 for details. Remove the base stand before mounting.

Remove Base Stand for Mounting

To prepare the monitor for alternate mounting purposes:

1.  Disconnect all cables.

2.  Place monitor face down on a non-abrasive surface.

3.  Move up tabs and take off the base stand (Figure S.1).

The monitor can now be mounted using an alternate method. 
Reverse process to reattach stand.

NOTE: 

Handle with care when removing monitor stand.
If you have diffi culty removing the base stand, 
please move base stand left and right in small motion.
Do not remove stand neck when you use mounting method.

Mount Flexible arm

This LCD monitor is designed for use with a fl exible arm.

1.  Follow the instructions on how Remove Base Stand for Mounting to remove the base 

stand.

2.  Please use screws (4pcs) as shown in the picture when installing.

Caution:  To meet the safety requirements, the monitor must be 

mounted to an arm which, guaranties the necessary 
stability under consideration of the weight of the monitor.
The LCD monitor shall only be used with an approved arm 
(e.g. GS mark). 

NOTE: 

Tighten all screws. 
(recommended Fasten Force: 98 - 137N•cm)

Weight of LCD assembly: 3.6 kg

4 x 12 mm with lock 

washer and fl at washer

12 mm

100 mm

100 mm

Thickness of Bracket (Arm)

2.0~3.2 mm

4 Screws (M4)
(Max Depth: 10 mm)
If use other screw, 
check depth of hole.

Summary of Contents for AccuSync AS242W

Page 1: ...AccuSync AS242W User s Manual ...

Page 2: ...glish 2 Recommended use English 4 Contents English 6 Quick Start English 7 Controls English 9 Specifications English 12 Features English 13 Troubleshooting English 14 TCO Certified Displays 6 English 15 Manufacturer s Recycling and Energy Information English 16 ...

Page 3: ... ALSO DO NOT USE THIS UNIT S POLARIZED PLUG WITH AN EXTENSION CORD RECEPTACLE OR OTHER OUTLETS UNLESS THE PRONGS CAN BE FULLY INSERTED REFRAIN FROM OPENING THE CABINET AS THERE ARE HIGH VOLTAGE COMPONENTS INSIDE REFER SERVICING TO QUALIFIED SERVICE PERSONNEL CAUTION Please use the power cord provided with this display in accordance with the table below If a power cord is not supplied with this equ...

Page 4: ...and used in accordance with the instructions may cause harmful interference to radio communications However there is no guarantee that interference will not occur in a particular installation If this equipment does cause harmful interference to radio or television reception which can be determined by turning the equipment off and on the user is encouraged to try to correct the interference by one ...

Page 5: ...es The intended primary use of this product is as an Information Technical Equipment in an office or domestic environment The product is intended to be connected to a computer and is not intended for the display of television broadcast signals Windows is a registered trademark of Microsoft Corporation NEC is a registered trademark of NEC Corporation ErgoDesign is a registered trademark of NEC Disp...

Page 6: ... monitor from the wall outlet and move to a safe location then refer servicing to qualified service personnel under the following conditions If the monitor is used in this condition the monitor may cause fall fire and electric shock If the monitor stand has been cracked or peeled If the monitor has been wobbled If the monitor has an unusual odor When the power supply cord or plug is damaged If liq...

Page 7: ...o realize the maximum ergonomics benefits we recommend the following To avoid eye fatigue adjust the brightness to a moderate setting Place a sheet of white paper next to the LCD screen for luminance reference Do not position the Contrast control to its maximum setting Use the preset Size and Position controls with standard signals Use the preset Color Setting Use non interlaced signals with a ver...

Page 8: ...pin Stand Neck Base Stand Power Cord 1 Setup Manual Remember to save your original box and packing material to transport or ship the monitor 1 Type and number of power cords included will depend on the where the LCD monitor is to be shipped When more than one power cord is included please use a power cord that matches the AC voltage of the power outlet and has been approved by and complies with th...

Page 9: ...tosh Cable Adapter not included Figure A 2 3 Connect all cables to the appropriate connectors Figure C 1 NOTE Incorrect cable connections may result in irregular operation damage display quality components of LCD module and or shorten the module s life 4 Connect one end of the power cord to the AC inlet on the back of the monitor and the other end to the power outlet NOTE Please refer to Caution s...

Page 10: ...e mounting Remove Base Stand for Mounting To prepare the monitor for alternate mounting purposes 1 Disconnect all cables 2 Place monitor face down on a non abrasive surface 3 Move up tabs and take off the base stand Figure S 1 The monitor can now be mounted using an alternate method Reverse process to reattach stand NOTE Handle with care when removing monitor stand If you have difficulty removing ...

Page 11: ... Displays OSD menu and selects function icon Moves leftward Moves rightward Function Adjustment Adjusts the function of the selected icon Adjusts down Adjusts up Resets the function 2 OSD structure Main Menu Icon Select Sub Menu Icon Select Press SELECT key Press SELECT key Press or to select an icon Main Menu Adjust Sub Menu Adjust Press SELECT key Press SELECT key Adjust by using or Adjust by us...

Page 12: ... Controls Vertical Image Position within the display area of the LCD H SIZE Analog input only Adjusts the horizontal size by increasing or decreasing this setting FINE Analog input only Improves focus clarity and image stability by increasing or decreasing this setting COLOR CONTROL SYSTEMS Five color presets 9300 7500 sRGB USER NATIVE select the desired color setting COLOR RED Increase or decreas...

Page 13: ...monitor CARBON SAVINGS Displays the estimated carbon saving information in kg The carbon footprint factor in the carbon saving calculation is based on the OECD 2008 Edition The carbon saving information can be reset by pressing the INPUT RESET button CARBON USAGE Displays the estimated carbon usages information in kg This is the arithmetic estimation not actual measurement value MONITOR INFO Indic...

Page 14: ...1 at 60 Hz to 75 Hz 1440 x 900 1 at 60 Hz 1680 x 1050 1 at 60 Hz 1920 x 1080 at 60 Hz NEC DISPLAY SOLUTIONS cites recommended resolution for optimal display performance Active Display Area Landscape Horiz Vert 531 4 mm 20 9 inches 298 9 mm 11 8 inches Power Supply AC 100 240 V 50 60 Hz Current Rating 0 45 0 25 A Dimensions Landscape 571 4 mm W x 400 9 mm H x 211 2 mm D 22 5 inches W x 15 8 inches ...

Page 15: ...to a lower power consumption level when on but not in use saving two thirds of your monitor energy costs reducing emissions and lowering the air conditioning costs of the workplace Multiple Frequency Technology Automatically adjusts monitor to the display card s scanning frequency thus displaying the resolution required FullScan Capability Allows you to use the entire screen area in most resolutio...

Page 16: ...reen is idle or turning off the monitor when not in use Message OUT OF RANGE is displayed screen is either blank or shows rough images only Image is displayed only roughly pixels are missing and OSD warning OUT OF RANGE is displayed Either signal clock or resolution is too high Choose one of the supported modes OSD warning OUT OF RANGE is displayed on a blank screen Signal frequency is out of rang...

Page 17: ...ke Back Minimum one year product warranty Minimum three year availability of spare parts Product takeback Packaging Limits on hazardous substances in product packaging Packaging prepared for recycling Ergonomic User centered design Visual ergonomics in products with a display Adjustability for user comfort displays headsets Acoustic performance protection against sound spikes headsets and fan nois...

Page 18: ...isplay com in Japan or http www necdisplay com in USA Energy Saving This monitor features an advanced energy saving capability When a Display Power Management signal is sent to the monitor the Energy Saving mode is activated The monitor enters a single Energy Saving mode Mode Power consumption LED color Maximum Operation Approx 24 W Blue Normal Operation Approx 19 W Default setting Blue Energy Sav...

Reviews: