Nebula Prizm II User Manual Download Page 8

English

English

12

13

[Projection Mode]

[Front]

: The device is located in front of the 

projection surface.

[Rear]

: The device is located behind the 

projection surface.

[Front Ceiling]

: The device is hanging from 

the ceiling in an upside down position. The 

image is rotated by 180 degrees.

[Rear Ceiling]

: The device is hanging from 

the ceiling in an upside down position 

behind the projection surface. The image 

is rotated by 180 degrees and horizontally 

mirrored.

[Vertical Keystone 

Correction]

Manual vertical keystone correction. The 

default value is 0.

[Horizontal Keystone 

Correction]

Manual horizontal keystone correction. The 

default value is 0.

[Quadrilateral 

Keystone Correction]

Manual quadrilateral keystone correction. 

The default value is 0.

[U Disk Update]

Press 

Enter

 to upgrade the firmware 

version. 

[Restore Factory 

Settings]

Reset all the settings. Press 

Enter

 to 

restore to default settings. 

Using the Nebula Prizm II

1. 

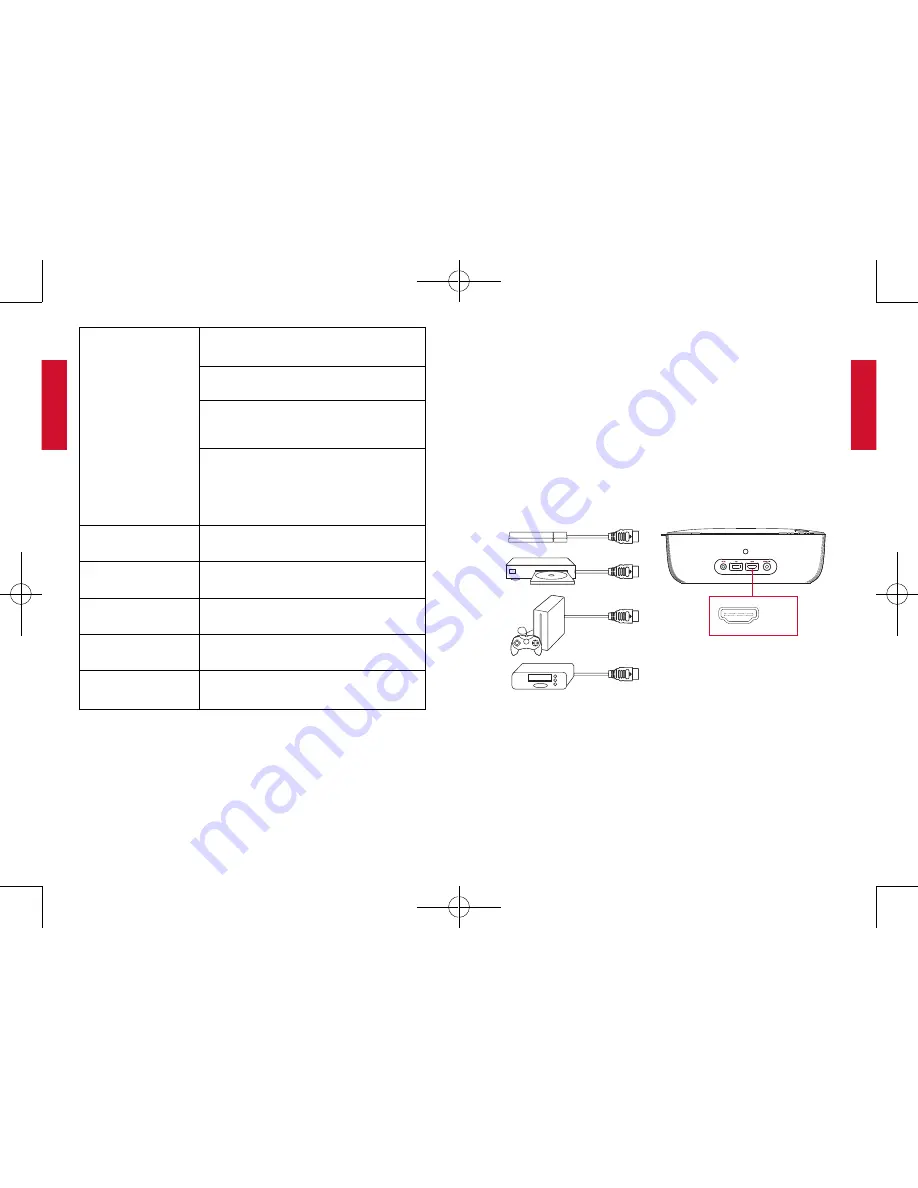
Play from HDMI Playback Devices 

This projector can be connected to various HDMI playback devices 

such as a TV box, TV stick, DVD player, set-top box (STB), gaming 

console or other devices. 
To play from HDMI playback devices:

 Connect this projector to an HDMI playback device with an 

HDMI cable (not included).

 It will automatically start the HDMI playback when connected to 

an HDMI playback device for the first time. 

HDMI

2. 

Play from a USB Drive 

With this projector, you can enjoy music, video, and pictures that 

are stored on a USB drive. 
To play from a USB drive: 

 Insert a USB drive into the USB socket. 

51005001300_D2240_INT_Manual_120X140mm_20181106_V01.indd   12-13

2018\11\8 星期四   15:46:08

Summary of Contents for Prizm II

Page 1: ...d States and other countries Model D2240 For FAQs and more information please visit www SeeNebula com support SeeNebula com 1 800 988 7973 US Mon Fri 9 00 17 00 PT 44 0 1604 936200 UK Mon Fri 6 00 11...

Page 2: ...Control 07 Getting Started 12 Using the Nebula Prizm II 16 Upgrading the Firmware 17 Specifications 18 Troubleshooting 19 Notice 20 Trademarks 21 Warranty English 01 Deutsch 23 Espa ol 43 Fran ais 63...

Page 3: ...ternal components Do not allow children to handle the device without supervision Under the following conditions a layer of moisture can appear inside the device which can lead to malfunctions a if the...

Page 4: ...vicing to qualified service personnel Class II equipment symbol This symbol indicates that the unit has a double insulation system Laser Safety CLASS 1 LASER PRODUCT IEC 60825 1 2014 Complies with IEC...

Page 5: ...l speaker 2 Bottom View 1 2 Flip stand slot Mounting slot Remote Control 2 7 3 4 6 5 1 Power on off Press to confirm a selection or entry Pause resume during play Press to display the keystone correct...

Page 6: ...slot Note You can also install your projector in the following ways from the rear front ceiling and rear ceiling Make sure you select the correct Projection Mode option in this projector s menu settin...

Page 7: ...to open the battery compartment insert new batteries matching the polarity indicated and close the battery compartment 5 Power On Connect this projector to the outlet by using the provided power cord...

Page 8: ...one correction The default value is 0 U Disk Update Press Enter to upgrade the firmware version Restore Factory Settings Reset all the settings Press Enter to restore to default settings Using the Neb...

Page 9: ...play from external devices Use a 3 5mm audio cable or an adapter not provided to connect your headphones or external speakers Connect the other end of the cable to the AUDIO OUT port on this projecto...

Page 10: ...USB devices USB Upgrading the Firmware To upgrade the firmware Download the firmware upgrade software with a USB drive from the Nebula website SeeNebula com Insert the USB drive into this projector s...

Page 11: ...W x H x D 279 x 265 x 97 mm Weight 2420 g Troubleshooting Cannot turn on projector with the remote control Make sure that this projector is connected to the power supply The remote control doesn t wo...

Page 12: ...s uses and can radiate radio frequency energy and if not installed and used in accordance with the instruction manual may cause harmful interference to radio communications However there is no guarant...

Page 13: ...the reason for return isn t quality related the customer must pay for the return shipping 12 Month Warranty for Quality Related Issues Nebula s products are warrantied to be free from material and wo...

Reviews: