background image

24

Cleaning Modes

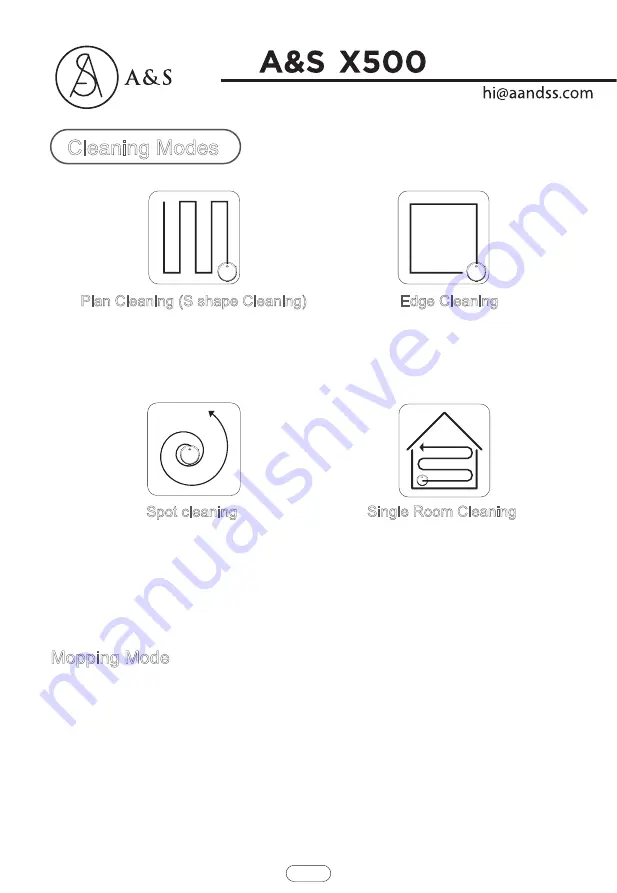
Plan Cleaning (S shape Cleaning)

Edge Cleaning

The robot will perform the smart plan 

cleaning  in S shape according to the room 

environment.

The robot will clean along the 

longest edge of the room.

Single Room Cleaning

Close the door of the single room,press 

this button to enter the Plan Cleaning 

mode with maximum suction.After 

cleaning,it will return to the initial location.

Mopping Mode

The Robot will perform the S shape cleaning with mop according to the room environment.

Please do not move or remote control the robot while it is working,or it will replan the cleaning 

route and repeat cleaning.

There is a normal phenomenon that the robot will perform with a brief pause during working.

Please be patient,as it is thinking and making decisions or discovering where to clean.

Spot cleaning 

The robot will perform the concentrated 

cleaning on a special dirty area. 

(APP controlled only)

Instructions for Use

Summary of Contents for A&S X500

Page 1: ...BY BY Robotic Vacuum Cleaner...

Page 2: ......

Page 3: ...X500 Neatsvor service szhtny cn cnchip net cn BY Welcome...

Page 4: ...Specifications 3 3 Product Characteristics 4 1 Attention 4 2 Remote Controller Instructions 4 3 Operating Instructions 5 1 Side Brush Cleaning and Replacement 5 2 Cleaning of Dust Box and Filter 5 3 M...

Page 5: ...the QR code in Figure 1 to download and install WeBack APP or download and install from other APP stores Figure 1 Open App directly log in if you have a WeBack account if not you can select New User...

Page 6: ...ace Depending on the signal strength of the Wi Fi it may take few seconds or more a If connection successfully enter the Home interface as show in Figure 7 click the device icon to enter Device status...

Page 7: ...Safety Instructions...

Page 8: ...Safety Instructions...

Page 9: ...5 Safety Instructions...

Page 10: ...ut two screws on the battery cover with a screw driver Take out the battery cover Take out the battery and unplug the electric wires to remove the battery 06 How to remove the battery 6 Safety Instruc...

Page 11: ...atteries Excluded Remote controller Power Adapter Cleaning Tool Water Tank Component Side Brush High effecient Filter Mop Accessories of some models may be slightly different and they are subject to t...

Page 12: ...in Body Main Body 1 Bumper 2 Wi Fi Indicator 3 Control Button 1 Universal wheel 2 Electrode slice 3 Side brush 4 Barrery cover 5 Side wheel 6 Rolling brush components 7 Dust box 3 BY Product Component...

Page 13: ...Main Body 1 DC power jack 2 Power switch 3 Dust box release button Dust Box 1 Per filter 2 High efficient filter 3 Filter sponge 4 Dust box 5 Dust box cover Product Components...

Page 14: ...Water Tank Component 1 Tank sealing cap 2 Water tank 3 Mop Charging base 1 Charging indicator 2 DC power jack 3 Charging terminal 10 Product Components...

Page 15: ...3 2 Product Specifications Structure Electronic Accessory Process Parameters 120min Plan Single Room Edge Spot Mopping the the the 14 4 2500mAh 11 75 3 0 kgs Product Components...

Page 16: ...oves the cleaning efficiency and saves 30 of the power It is simple to operate pressing the Control Button to start cleaning Follow the Voice Prompt and let the robot start working for you Dust box ca...

Page 17: ...nces such as tables and chairs in the house neatly the robot will clean up smoothly to give you a clean new home If the robot works at the stairway the edge of the step or the entrance to the narrow a...

Page 18: ......

Page 19: ...Schedule Setting Remote controller instruction 4 2 Plan Cleaning Smart Cleaning Mopping Cleaning controller controller Instructions for Use...

Page 20: ...ing at the pause In the Schedule setting mode or Clock setting mode this button can save all settings Suction Setting button At any cleaning mode press this button to adjust the suction power There ar...

Page 21: ...0 minutes the robot will enter Sleep mode 4 3 Operating Instructions Placement of the Charging Base Place the charging base against the wall Do not place any objects within 3 3 ft to the left right an...

Page 22: ...the robot and plug in the power supply Charge mode A Charge mode B Please keep the power switch turned on before charging the machine Press Return for Auto charging button on the remote controller or...

Page 23: ...after sales service center 02 For the very first operation please let the robot run out of power 03 When the robot is charged the Control button will flash a green lamp in a circular manner 04 lf the...

Page 24: ...sed by the following operations 01 Press the Control button on the robot to pause the robot 02 Press the power on off button on the remote controller to pause the robot Notice After the machine is pau...

Page 25: ...ject water into the water tank When charging please remove the water tank to avoid danger How to fix the microfiber mop Seal the tank sealing cap then fix the microfiber mop to the velcro on the botto...

Page 26: ......

Page 27: ...will be cancelled Once the schedule setting is succeeded the robot will start working at the scheduled time everyday 1 Press the Schedule Setting button to enter the Schedule Setting mode and set the...

Page 28: ...return to the initial location Mopping Mode The Robot will perform the S shape cleaning with mop according to the room environment Please do not move or remote control the robot while it is working or...

Page 29: ......

Page 30: ...Dump all debris form the dust box into the garbage Remove the pre filter Product Maintainance...

Page 31: ...filter cover and remove the high efficient filter and filter sponge It is not recommended to wash the high efficient filter with water Please pat off the debris carefully Wash the dust box and pre fil...

Page 32: ...washed once 3 The maximum service life of the high efficient filter is 3 months 1 Reinstall the pre filter and high efficient filter in the dust box 2 Before installing the filter make sure that the h...

Page 33: ......

Page 34: ...Remove the mop Wash and dry the mop Product Maintainance...

Page 35: ...31 Pour out the rest of water from the water tank Clean the tank and dry it Product Maintainance...

Page 36: ...32 Open the rolling brush components Remove the rolling brush and clean off all debris and hair 5 4 Maintenance of Rolling Brush Components Product Maintainance...

Page 37: ...periodically clean the electrode slice of robot chassis and the sensor window Use a cleaning tool or soft cloth to clean the charging terminal 5 5 Maintenance of Other Components Electrode slice Sens...

Page 38: ...ray is blocked because the infrared emitter on the remotecontroller or the infrared receiver in the robot is contaminated The drive wheel and the ground may slip due to the robot climbing small steps...

Page 39: ...ents Universal Wheel Components Rolling Brush Components Battery Battery Cover Bottom Shell The product is suitable for cleaning house hotel rooms and small offices and provides good cleaning for vari...

Page 40: ......

Reviews: