background image


Instant

Wave


High Speed


Access Point For Small Business


11

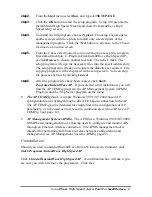
step2.   

From the 

Start

 menu select 

Run

, and type 

A:\SETUP.EXE

step3.   

Click the 

OK

 button to start the setup program.  Setup will prepare the

InstallShield High Speed Wizard and show the InstantWave High
Speed setup screen

step4.   

To install the full program, choose 

Typical

.

  Choosing 

Custom

 opens

another screen with the option to install only selected parts of the
management program.  Click the 

Next

 button to advance to the 

Choose

Destination Location

 screen

step5.   

From the 

Choose Destination Location

 dialog box accept the program

files default location, C:\Program Files\InstantWave High Speed AP\,
or click 

Browse

 to choose another location.  Then click 

Next.

  The

setup program will copy the necessary files into the specified directory.
The setup program will ask you to insert the diskettes as required.  File
copying progress will be displayed in the setup screen.  You can stop
the process anytime by clicking 

Cancel

step6.   

After the program files have been copied, click 

Start/

Programs/InstantWave AP.

  If you selected a full installation, you will

find the AP COMFig program, the AP Management System (APMS)
Program, and the Trap Server program on the menu


The AP COMFig Tool.

  A simple Windows 95/98/NT/2000-based AP

configuration tool working through a direct COM port connection to the AP.
The AP COMFig tool is intended for simple first time configuration of AP
parameters, or to be used as a last resort to communicate with an AP (see AP
COMFig Tool, page  12)


AP Management System (APMS).

  The APMS is a Windows 95/98/NT/2000,

SNMP based management tool, allowing users to configure and monitor APs
through an Ethernet, wireless connection.  The APMS management tool is
intended for performing full-blown wireless network configuration and
management (see AP Management System (APMS), page22)

Uninstallation

Should you wish to uninstall InstantWave from a Windows environment, click

Start/ Programs/InstantWave High Speed AP

.

Click 

Uninstall InstantWave High Speed AP

.  A confirmation box will ask if you

are sure you wish to remove the program(s).  Click 

Yes

.

Summary of Contents for InstantWave

Page 1: ... May 2000 NDC Communications Inc 265 Santa Ana Court Sunnyvale CA 94086 USA Tel 1 408 730 0888 Fax 1 408 730 0889 Technical Support E mail support ndclan com US only Toll Free US only 800 632 1118 Europe and Asia Pacific E mail techsupt ndc com tw NDC World Wide Web www ndclan com ...

Page 2: ... to radio communications However there is no guarantee that interference will not occur in a particular installation If this equipment does cause harmful interference to radio or television reception which can be determined by turning the equipment off and on the user is encouraged to try to correct the interference by one or more of the following measures Ÿ Reorient or relocate the receiving ante...

Page 3: ...URE NETWORK TYPES 4 PLANNING AN INFRASTRUCTURE NETWORK 6 Single AP Installation 6 Multiple APs Installation 6 ROAMING 7 ACCESS POINT PLACEMENT GUIDELINES 8 Placing For Performance 8 Placement Tools 8 MOUNTING THE AP 8 GETTINGSTARTED 9 ACCESS POINT HARDWARE INSTALLATION 9 LED INDICATORS 10 AP MANAGEMENT SOFTWARE INSTALLATION UNINSTALLATION 10 Installation 10 Uninstallation 11 AP COMFIG TOOL 12 USIN...

Page 4: ...N TO THE AP 23 MAKING AN ETHERNET CONNECTION 24 TCP IP Setup 24 THE APMS TOOL 25 ASSIGNING AN IP ADDRESS TO THE AP 25 ASSIGNING A NETWORK ID TO THE AP 25 Network ID 25 Host ID 26 ASSIGNING A SUBNET MASK TO THE AP 26 USING THE APMS TOOL 26 Adding an AP s 27 Create New AP 27 Connecting to an AP 27 MANAGING INSTANTWAVE HIGH SPEED CONFIGURATIONS 28 Config 28 VIEWING INSTANTWAVE HIGH SPEED INFORMATION ...

Page 5: ...InstantWave High Speed Access Point For Small Business v Import Host Table 35 Password 36 TROUBLESHOOTING 37 HOW TO REACH OUR TECHNICAL SUPPORT 38 NDC LIMITED WARRANTY 39 INDEX 43 ...

Page 6: ...RATION GENERAL 13 FIGURE 10 WEP SECURITY 16 FIGURE 11 CONFIGURATION IP 17 FIGURE 12 CONFIGURATION FILTER 18 FIGURE 13 CONFIGURATION ACCESS CONTROL 19 FIGURE 14 NEW ENTRY 19 FIGURE 15 HARDWARE DIAGNOSIS 20 FIGURE 16 APMS TABLE 21 FIGURE 17 IP ADDRESS RESTRICTIONS 26 FIGURE 18 INSTANTWAVE APMS 26 FIGURE 19 APMS WITH CONNECTION MADE 27 FIGURE 20 AP PROPERTIES 28 FIGURE 21 CONFIG AP SETTING 28 FIGURE ...

Page 7: ...InstantWave High Speed Access Point For Small Business vii FIGURE 27 SAVE AP CONFIGURATION 35 FIGURE 28 IMPORT HOST TABLE 35 ...

Page 8: ...siness Packing List The package should contain the following items One Access Point or one NetBlaster One Antenna Three InstantWave High Speed Access Point System Manager Diskettes One AC Power Adapter This User s Guide One Wall fixing Template and Screws ...

Page 9: ...ackets from the wired LAN to the wireless LAN and vice versa The Access Point Management System APMS performs wireless network configuration management and diagnostic functions InstantWave High Speed Family The InstantWave High Speed Access Point is part of a family of easy to use high performance wireless communication products The family products include InstantWave High Speed Access Point NWH66...

Page 10: ...network Roaming The convenience of a mobile PC is the ability to move freely The concept is similar to that of a cellular phone moving from one base station to another InstantWave High Speed offers built in high performance and seamless roaming capabilities Carrier Set InstantWave High Speed products use the unlicensed ISM Industrial Scientific Medical band to communicate through radio waves Diffe...

Page 11: ... default values Your network will have only one Access Point The AP COMFig Tool see page 12 permits AP configuration from a PC via a COM port connection The program enables the user to change the default Access Point IP configuration settings before introducing a new AP to an already established wireless network For System Administrators with advanced networking requirements the AP Management Syst...

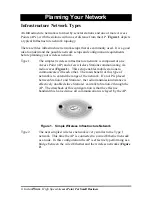
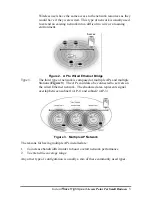
Page 12: ...ireless Stations communicating via radio waves Figure 1 This setup enables mobile stations to communicate with each other The main benefit of this type of network is to extend the range of the network If an AP is placed between Station 1 and Station 2 the radio transmission distance is effectively doubled since Station 1 can talk to Station 2 through the AP The drawback of this configuration is th...

Page 13: ...Type 3 The third type of network is composed of multiple APs and multiple Stations Figure 3 The APs could also be connected to servers on the wired Ethernet network The shadowed area represents signal overlap between subnet1 AP 1 and subnet2 AP 3 Figure 3 Multiple AP Network The reasons for having multiple APs installed are 1 To increase bandwidth in order to boost overall network performance 2 To...

Page 14: ...P network Single AP Installation If you are setting up a simple network with only one AP and a few Stations a Type 1 or Type 2 network configuration as described in Infrastructure Network page 4 the installation can be performed painlessly All you need to do is make sure the AP and all the wireless Stations hold the same configuration Adding a new Station to an existing Infrastructure Network is e...

Page 15: ...e the same Domain name as the APs d It is advisable that APs on different TCP IP subnets be given different Domain names to avoid roaming confusion see AP Setting page 29 Note If you want to move your mobile PC between different APs without terminating the existing networking link you need to enable the roaming function on the Mobile Station The APs that a Mobile Station will roam to must also be ...

Page 16: ...when a nearby microwave oven is in use it may interfere with InstantWave High Speed resulting in performance degradation on the wireless network Placing For Performance For the best performance it is advisable that users follow the guidelines below in placing the product Place the AP as high as possible in as open an area as possible Avoid placing the AP especially the antenna close to metal objec...

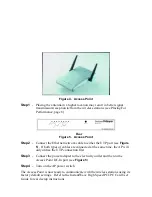
Page 17: ...1 Placing the antenna in a higher location may result in better signal transmission reception to from the wireless stations see Placing For Performance page 8 Figure 5 Access Point Step2 Connect the Ethernet network cable to either the UTP port see Figure 5 If both types of cables are connected at the same time the AP will only utilize the UTP connection first Step3 Connect the power adapter to th...

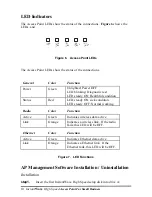
Page 18: ...on Status Red LED steady ON sick condition LED steady OFF Normal working Radio Color Function Active Green Indicates wireless data active Link Orange Indicates a wireless link If the radio fails this LED will be OFF Ethernet Color Function Active Green Indicates Ethernet data active Link Orange Indicates a Ethernet link If the Ethernet fails this LED will be OFF Figure 7 LED Functions AP Managemen...

Page 19: ...ytime by clicking Cancel step6 After the program files have been copied click Start Programs InstantWave AP If you selected a full installation you will find the AP COMFig program the AP Management System APMS Program and the Trap Server program on the menu The AP COMFig Tool A simple Windows 95 98 NT 2000 based AP configuration tool working through a direct COM port connection to the AP The AP CO...

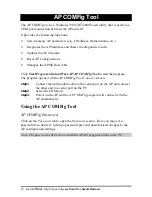
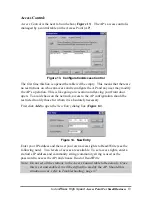
Page 20: ... Programs InstantWave AP AP COMFig Tool to start the program The program opens with the AP COMFig Tool Connect screen step1 Connect the null modem cable to the serial port on the AP and connect the other end to a serial port on the PC step2 Select the COM port step3 Power on the AP and the AP COMFig program will connect with the AP automatically Using the AP COMFig Tool AP COMFig Password Click on...

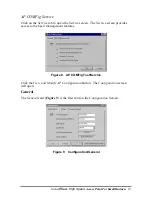
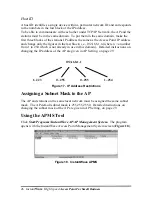
Page 21: ...e Service screen The Service screen provides access to the basic management features Figure 8 AP COMFig Tool Service Click the View and Modify AP Configuration button The Configuration screen will open General The General card Figure 9 is the first card on the Configuration Screen Figure 9 Configuration General ...

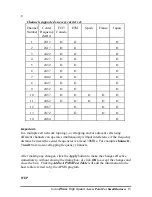
Page 22: ...e same group must use the same Domain Name Regulatory Domains Identify the country where the AP is used see Glossary page 2 Read only Change the Channel You can change the channel number Channels supported on every carrier set as below table AP Firmware Version Read only BSS ID Read only Transmit Rate The transmission rate at which the data packets are transmitted by the AP You can set this to Aut...

Page 23: ...In a multiple cell network topology overlapping and or adjacent cells using different channels can operate simultaneously without interference if the frequency distance between the center frequencies is at least 30MHz For example channel 1 7 and 13 are non overlapping frequency channels After making any changes click the Apply button to make the changes effective immediately without closing the di...

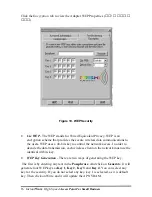
Page 24: ...40 bits key to control the network access In order to decode the data transmission each wireless client on the network must use the identical 40 bits key WEP Key Generation There are two ways of generating the WEP key The first is by entering any text in the Passphrase And click on Generate It will generate four WEP keys as Key 1 Key 2 Key 3 and Key 4 You can select any key for the security If you...

Page 25: ...e the same TCP IP subnet address Figure 11 Configuration IP From the IP tab you may view or modify the Access Point configure its subnet mask or add a default gateway see the note below Note An AP will transfer SNMP respond packets confirmation packets to its APMS PC directly if it is within the same LAN the same subnet mask If a SNMP respond packet from an AP is destined for an APMS PC on another...

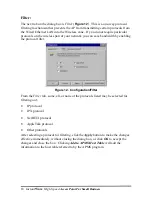
Page 26: ...you can save bandwidth by enabling the protocol filter Figure 12 Configuration Filter From the Filter tab some all or none of the protocols listed may be selected for filtering out IP protocol IPX protocol NetBEUI protocol AppleTalk protocol Other protocols After selecting a protocol for filtering click the Apply button to make the changes effective immediately without closing the dialog box or cl...

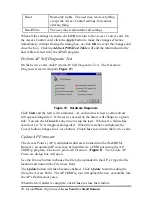
Page 27: ...oid chaos on the network access to the AP configuration should be restricted to only those for whom it is absolutely necessary First click Add to open the New Entry dialog box Figure 14 Figure 14 New Entry Enter your IP address and then set your own access rights to Read Write see the following note Two levels of access are available To set access rights enter a station s IP address and community ...

Page 28: ...e As each item is tested a yellow arrow will appear alongside it If the test is successful the arrow will change to a green tick You can click Cancel at any time to stop the tests Whenever a failure has occurred an X will appear alongside it When the tests have completed the Cancel button changes to a Close button Click Close to return to the Service card Update AP Firmware The Access Point s AP s...

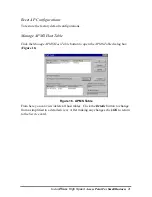
Page 29: ...gurations Manage APMS Host Table Click the Manage APMS Host Table button to open the APMS Table dialog box Figure 16 Figure 16 APMS Table From here you can view delete all host tables Click the Details button to change from a simplified to a detailed view After making any changes click OK to return to the Service card ...

Page 30: ...icular AP What Does the APMS Program do The InstantWave APMS management tool enables users to Give an AP an Alias name Change an AP s IP address or set a subnet mask and community string Set a default gateway should a router exist in the network Set protocol filters to filter out unwanted traffic from the wired to wireless side Set wireless specific parameters Domain name Name to define a wireless...

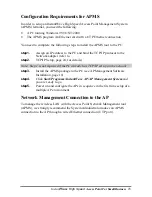
Page 31: ...ork adapter refer to step2 TCP IP Setup page 24 for details Note Step 1 is not required if the PC already has TCP IP set up on the network step3 Install the APMS package to the PC see AP Management Software Installation page 10 step4 Click Start Programs InstantWave AP AP Management System and you are ready to go step5 Power on and configure the APs in sequence in the first time setup of a multipl...

Page 32: ...etwork Component Type dialog box will open The box will show four options Client Adapter Protocol Service step5 Select Protocol and click the Add button The Select Network Protocol dialog box will open step6 Select Microsoft in the left scrolling window then select TCP IP in the right and click OK You will be returned to the Network dialog box step7 On the Network dialog box Configuration card sel...

Page 33: ...e and monitor the APs in the wireless network Before the APMS tool can communicate with an AP the AP needs to have a unique IP address The following sections describe how the APMS terminal is setup to communicate with an AP on a wireless network Assigning an IP Address to the AP Each node on a TCP IP network must have a unique IP address An IP address is usually represented in four blocks separate...

Page 34: ...the figures in the last block i e 192 168 1 n where n a number from 1 to 254 which is not already in use in this domain Detailed instructions on changing the IP address of the AP are given in AP Setting on page 29 Figure 17 IP Address Restrictions Assigning a Subnet Mask to the AP The AP and stations on the same local network must be assigned the same subnet mask The AP default subnet mask is 255 ...

Page 35: ...tions to connect When the information has been entered the OK button will become active Click OK Repeat the process to add more APs To delete an AP icon from the AP icon window first select it in the AP icon window and then press the Delete key Connecting to an AP Once a Host Table has been created a connection can be made by double clicking an AP s icon in the AP icon window Alternatively click A...

Page 36: ... the main screen Go through the procedure again to retry If you cannot connect to the AP by the third attempt check that the AP information has been correctly entered in the Host Table and that the Access Point AP is functioning If you are still experiencing problems turn to Troubleshooting on page 37 Managing InstantWave High Speed Configurations Config If the AP selection is successful the Confi...

Page 37: ... 1 1 and a default subnet mask of 255 255 255 0 If you wish to change the defaults set each AP to its new IP address before introducing it to the open network From the IP tab you may view or modify the Access Point configure its subnet mask or add a default gateway see the note below After making changes click OK to return to the Config sub menu and click the Reset menu item to make the changes ef...

Page 38: ... OK Clicking on Reset is not required If after filtering a protocol your network is not functioning as before it s likely the protocol is required on the network and you should disable the filter for that protocol Access Control Access Control is the next tab on the box Figure 23 The AP s access control is managed by a control table on the Access Point AP Figure 23 AP Setting Access Control The fi...

Page 39: ...PC running APMS see Create New AP page 27and choose Read or Read Write Read Read only rights The user may read everything except the Access Control settings but cannot alter anything Read Write The user may read and alter all settings The Add button will become active Click Add to add the information to the AP Access Control table Click another tab to continue configuration setting or click OK to ...

Page 40: ...bps or Full Auto 1 to 11 Mbps After making any changes click OK and then click the Reset menu item Update AP Firmware The Access Point s AP s embedded software is burned into the flash ROM However an updated AP code can be installed over your LAN via the APMS program Click on Update AP Firmware The Update AP Firmware dialog box will open Use the Browse button to choose the file to be uploaded to t...

Page 41: ... The menu items under View provide read only information and statistics To customize the screen view right click in the main screen to open a context sensitive menu Select your preferred view i e Icons List Details etc Figure 24 View Menu The Status bar at the bottom of the screen shows the connecting status When the bar shows Ready Associated will appear on the bar along with the IP of the associ...

Page 42: ...close the window Wireless Stations Clicking Wireless Stations opens the Connected Wireless Stations window Figure 26 Figure 26 Connected Wireless Stations The Connected Wireless Stations window lists all the currently associated wireless station s Media Access Control MAC addresses When finished viewing click OK to close the window ...

Page 43: ...anagement Protocol SNMP command to get the configuration from the AP and write it into the configuration file Figure 27 Save AP Configuration Opening an AP s Configuration File for Loading s configuration has previously been saved it may be easily viewed using the following procedure Click on the File main menu item From the sub menu click Load AP Configuration A standard Windows Open dialog box w...

Page 44: ...s a Change Password configuration box Enter your new password and then enter it again to confirm Click OK to close the box Once a password is set you will be asked for it each time the APMS program is opened Note The password is shared between the APMS and the COMFig program on the same PC ...

Page 45: ... Load default AP functions they may have been If they have you must also reset the IP address and subnet mask of any stations wishing to connect to that AP so as to put them in the same domain see Assigning an IP Address to the AP page 25 Has this PC s IP address or subnet mask been changed The AP and the station must be in the same domain see Assigning a Network ID to the AP page 25 Does this sta...

Page 46: ...tact NDC Technical Support What you were doing when the error occurred What error messages you saw Whether the problem can be reproduced The serial number of your product The firmware version number and the debug information NDC Technical Support is available via e mail at support ndclan com US only techsupt ndc com tw Europe and Asia Pacific For other information about NDC please visit us at www ...

Page 47: ...ill be either reconditioned or new All replaced products and parts will become the property of NDC Any replaced or repaired product or part has a ninety 90 day warranty or the remainder of the initial warranty period whichever is longer NDC shall not be liable under this warranty if its testing and examination disclose that the alleged defect in the product does not exist or was caused by the purc...

Page 48: ... Authorization items will be returned to the purchaser via AIR MAIL prepaid by NDC If returned by another carrier the purchaser will pay the difference A return freight and handling fee will be charged to the purchaser if NDC determines that there was No Problem Found or that the damage was caused by the user Warning NDC is not responsible for the integrity of any data on storage equipment hard dr...

Page 49: ...ty and no warranty will be considered valied after its expiration date If this product does not function as warranted your sole remedy shall be repair or replacement as provided for above In no case shall NDC be liable for any incidental consequential special or indirect damages resulting from loss of data loss of profits or loss of use even if NDC or an authorized NDC distributor dealer has been ...

Page 50: ... Council Directive on the Approximation of the Laws of the Member States relating to R TTE Directive 99 5 EC For the evaluation regarding the electromagnetic compatibility the following standards were applied EN 300 328 November 1996 A1 July 1997 EN 300 826 November 1997 En 60950 1992 A1 1993 A2 1993 A3 1995 A4 1996 A11 1997 The manufacturer importer is responsible for this declaration Company Nam...

Page 51: ...te Setting 32 Default Gateway Assigning 17 29 Default IP 17 29 Default subnet mask 17 29 Domain Name 2 16 32 Assigning 26 E Extended Service Set ID 16 32 F Filter Protocols 18 30 Flash ROM 20 G General 15 Group ID 2 H Host Table 21 I Information AP 34 IP Address Assigning 25 Assigning 29 IP Default 17 L LEDs 11 M MAC Address 34 Modify AP Configuration 15 N Network Infrastructure 4 Multiple APs 5 N...

Page 52: ... SNMP 22 25 33 Statistics Wireless Station 35 Subnet Mask Assigning 26 Assigning 17 29 System Requirements 1 T TCP IP address 17 29 Troubleshooting 38 U Uninstalling 13 Update AP Firmware 33 Update Firmware 20 V View 33 W Wireless Cell 2 Wireless Stations 34 ...

Reviews: