NCR 7707-K401 Kit Instructions Download Page 13

1-xiii

K401Cover

Installing Panasonic JT-R600 E-Money Terminal

To install the Panasonic JT-R600 E-Money Terminal, follow these steps:

1. Route the cables. For more information, refer to

Routing E-Money Terminal Cables

on

page xi.

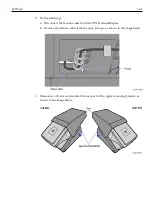
2. Open the terminal cover of the device by removing two (2) screws and connect the

power and data cables to the corresponding ports.

3. Close the terminal cover and secure the E-Money Terminal to the upper mounting

bracket using two (2) screws, as shown in the image below.

Summary of Contents for 7707-K401

Page 1: ...Kit Instructions Panasonic JT R600 E Money Field Upgrade 7707 K401 Issue A...

Page 2: ...s the policy of NCR Corporation NCR to improve products as new technology components software and firmware become available NCR therefore reserves the right to change specifications without prior noti...

Page 3: ...iii Revision Record Issue Date Remarks A Jan 2019 First Issue...

Page 4: ...T R600 E Money Field Upgrade This publication provides procedures for upgrading an NCR SelfServ Checkout 7707 R6 Japan unit with or without an existing E Money Terminal with a Panasonic JT R600 E Mone...

Page 5: ...amp P Loops 007 7022120 M4 Screw 4pcs 009 0006592 M4 Hex Screw 2pcs 009 0007087 M4 Nut 2pcs 795 0253701 E Money Lower Bracket 795 0253901 Panasonic JT R600 E Money Bracket 497 9999619 X XR7 15 in POS...

Page 6: ...remove the existing E Money Terminal For more information refer to Removing Nanaco E Money Terminal on the next page For units with no E Money Terminal remove the blanking plate For more information r...

Page 7: ...Cover Removing Nanaco E Money Terminal To remove the Nanaco E Money Terminal follow these steps 1 Do the following Open the back panel of the Upper Enclosure Using a key unlock and open the Upper Cabi...

Page 8: ...isconnect the Nanaco cable from the 7702 Terminal Display b Remove the Nanaco cable from the open p loops as shown in the image below 3 Remove two 2 screws located at the rear part of the upper mounti...

Page 9: ...e screw securing the E Money Terminal assembly to the Upper Enclosure 5 Slide the terminal assembly backward to disengage the assembly from the unit 6 Route the E Money Terminal cable For more informa...

Page 10: ...s completely detached Note Use the pry tool with caution to avoid scratches on the paint 2 Using a cloth or a cotton rag clean the top surface with isopropyl alcohol to remove any adhesive residue Cau...

Page 11: ...erminal cables in the R6 Japan unit follow these steps 1 Do the following a Route the power cable from the lower cabinet up to the Upper Enclosure through P loops b Route the data cable from the 7702...

Page 12: ...n on the images below Note Ensure that there is enough cable slack to avoid cables from being stretched during installation or removal procedures 3 Install the Panasonic JT R600 E Money Terminal For m...

Page 13: ...ables For more information refer to Routing E Money Terminal Cables on page xi 2 Open the terminal cover of the device by removing two 2 screws and connect the power and data cables to the correspondi...

Page 14: ...iv 4 Secure the upper mount to the lower mounting bracket using four 4 screws 5 Mount hooks of the E Money Terminal assembly to the SelfServ Checkout upper enclosure to lock in place and then secure u...

Reviews: