background image

Input Belt Adapter

26

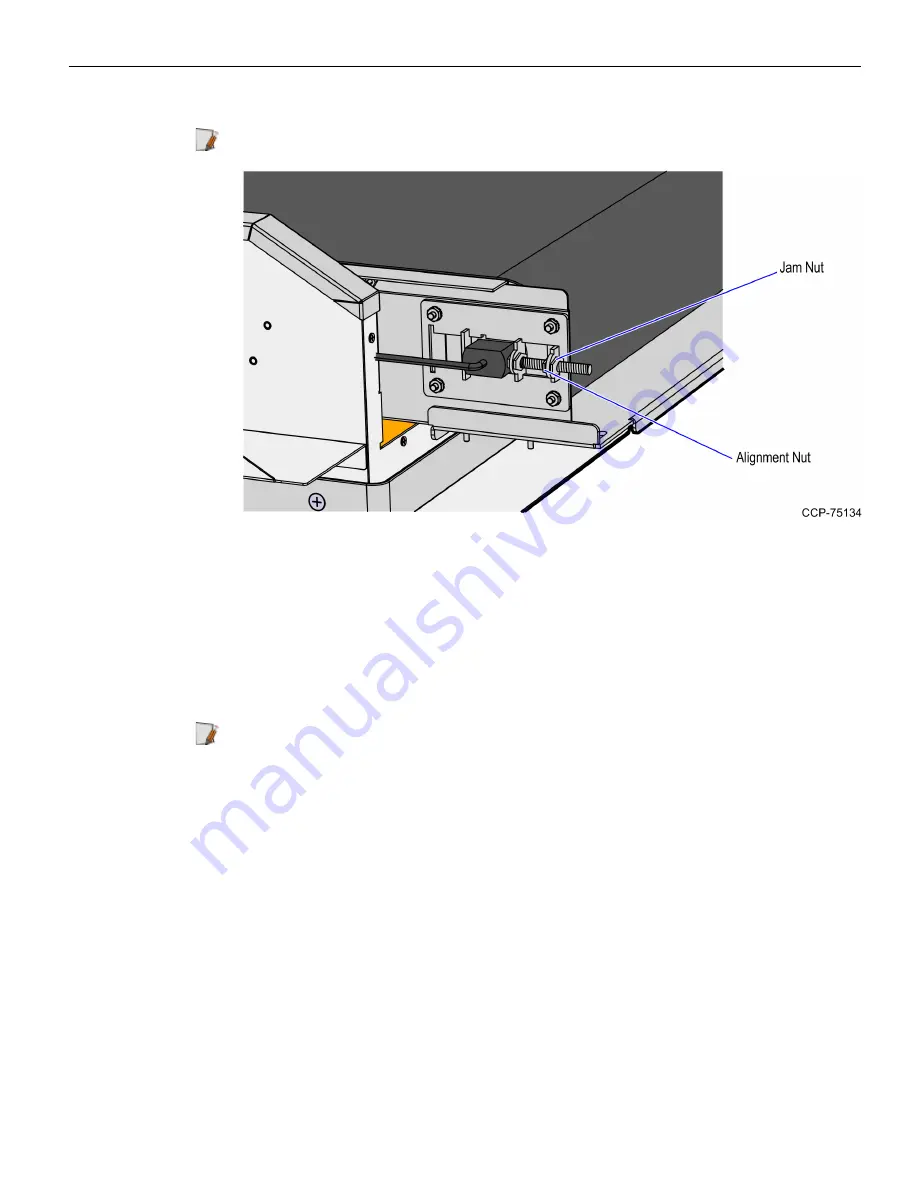
4. On the Adjustment Bracket, loosen the Jam nut.

Note:

The Jam nut is shown on the image below.

5. Using a wrench, adjust the Alignment nut as needed to change belt tracking and

tension. Moving the motor bracket toward the rear will increase the belt’s tension
and cause the belt to track to the opposite side.

6. Run the belt three or four complete lengths to ensure proper tracking. Proper

tracking is obtained when there is an equal amount of space between the belt edge
and the metal rail on both sides of the motor. Only minor adjustments are usually
needed for tracking changes.

Note:

Improper belt tracking will reduce system performance and life span.

7. Tighten the Jam nut to lock the Alignment nut in place and prevent it from moving.

Summary of Contents for 7360-K502

Page 1: ...Kit Instructions Input Belt Adapter 7360 K502 Issue A...

Page 2: ...documentation is permitted under the terms and conditions of an agreement you have with NCR NCR s copyright notice must be included It is the policy of NCR Corporation NCR to improve products as new...

Page 3: ...iii Revision Record Issue Date Remarks A Mar 2022 First Issue...

Page 4: ...d for the 7344 Input Belt assembly that is removed from either an NCR SelNCR SelfServ Checkout 7350 or NCR FastLane SelfServ Checkout 7358 R6L Plus unit and then installed to an NCR FastLane SelfServ...

Page 5: ...M4 4 2 14 pcs 009 0006599 Screw Hex M6 X 12 MC COMB 12 pcs 006 8611464 Washer Flat 1 4 Size 5 16 ID 3 4 OD 1 16 Thk 4 pcs 006 8624713 Washer Flat 1 4 Size 9 32 ID 1 OD 3 pcs 497 0423108 Instructions...

Page 6: ...ration purposes only The steps are the same for a Left Hand unit 1 If necessary remove the cable plate from the side of the core next to scanner bucket and rotate it so that cable access hole is expos...

Page 7: ...nit 1 Do the following a Remove the Conveyor Belt from the Input Belt assembly For more information refer to Removing the Conveyor Belt assembly on page 30 b Remove the Input Belt assembly from either...

Page 8: ...t join the Input Belt assembly to the Input Belt Adapter because the cable access holes do not align 4 Insert the cables from the Input Belt frame through the SelfServ Checkout Cable Plate Note Each o...

Page 9: ...he alignment screws and then slide the assembly down onto the screws 6 Secure the Input Belt assembly to the Core Cabinet using four 4 screws as shown in the image below Ensure that the Input Belt ass...

Page 10: ...elt Cables on page 12 9 Do the following Level the SelfServ Checkout unit if necessary For more information refer to corresponding Installation Guide of the SelfServ Checkout onto which the Input Belt...

Page 11: ...more information refer to Turning On the Input Belt on page 38 b Check the Input Belt Tracking and adjust as needed For more information refer to Adjusting the Input Belt Tracking on page 23 Note Adju...

Page 12: ...put Belt DC Power cable in Right Hand units on page 14 Route the Input Belt AC Power cable to the SelfServ Checkout Power Strip Depending on the unit orientation refer to any of the following procedur...

Page 13: ...to the SelfServ Checkout For more information refer to Installing the Input Belt assembly on page 7 2 Open the SelfServ Checkout Core Cabinet 3 Do the following a From the Side Cable Access hole route...

Page 14: ...Belt to the SelfServ Checkout For more information refer to Installing the Input Belt assembly on page 7 2 Open the SelfServ Checkout Core Cabinet 3 Do the following a From the Side Cable Access hole...

Page 15: ...the Power Strip in a unit with Left hand LH orientation follow these steps 1 Install the Input Belt to the SelfServ Checkout For more information refer to Installing the Input Belt assembly on page 7...

Page 16: ...the Bagwell through the Side Cable Access hole and then fasten the cable on a bridge lance b From the Side Access hole route the cable out of the SelfServ Checkout unit through the Cable Exit hole at...

Page 17: ...follow these steps 1 Install the Input Belt to the SelfServ Checkout For more information refer to Installing the Input Belt assembly on page 7 2 Open the SelfServ Checkout Core Cabinet 3 From the Si...

Page 18: ...the back of the SelfServ Checkout unit route the Input Belt AC Power cable into the Bagwell through the Side Cable Access hole and then fasten the cable on a bridge lance b Connect the Input Belt AC P...

Page 19: ...Left hand LH orientation and into the store s power pole follow these steps 1 Install the Input Belt to the SelfServ Checkout For more information refer to Installing the Input Belt assembly on page 7...

Page 20: ...the Bagwell through the Side Cable Access hole and then fasten the cable on a bridge lance b From the Side Access hole route the cable out of the SelfServ Checkout unit through the Cable Exit hole at...

Page 21: ...orientation and into the store s power pole follow these steps 1 Install the Input Belt to the SelfServ Checkout For more information refer to Installing the Input Belt assembly on page 7 2 Open the S...

Page 22: ...well do the following a Fasten the cable on a bridge lance b Route the cable out of the SelfServ Checkout unit through the Cable Exit hole at the base of the Bagwell as shown in the image below 5 Conn...

Page 23: ...the Input Belt Tracking Turn on and then run the Input Belt to determine if tracking adjustments are needed If tracking adjustments are needed follow these steps 1 Remove four 4 screws securing the Re...

Page 24: ...Input Belt Adapter 24 2 Remove two 2 hex bolts securing the Input Belt assembly to the Scale Pods...

Page 25: ...Grasp the Converyor Belt assembly lift and then slide it forward to disengage the assembly from the PEM studs Note Hold the motor power cable so that it does not pinch c Rest the rear of the Conveyor...

Page 26: ...and cause the belt to track to the opposite side 6 Run the belt three or four complete lengths to ensure proper tracking Proper tracking is obtained when there is an equal amount of space between the...

Page 27: ...he following a Lift and then lower Input Belt assembly into the Input Belt frame to engage with the PEM studs Note Ensure that the motor power cable is not pinched b Slide the Input Belt assembly forw...

Page 28: ...Input Belt Adapter 28 9 Secure the Input Belt assembly to the Scale Pods using two 2 hex bolts 10 Secure the Rear Cover to the Input Belt frame using four 4 screws...

Page 29: ...ntil the foot touches the floor 3 Adjust the Input Belt s left to right level by placing a level left to right on the center of the belt Determine and make the necessary adjustments 4 Adjust the unit...

Page 30: ...R6L Plus unit follow these steps Note This procedure shows theNCR FastLane SelfServ Checkout 7358 R6L Plus for illustration purpose only 1 Turn off the Input Belt For more information refer to Turnin...

Page 31: ...x bolts securing the Input Belt Conveyor assembly to the Scale Pods b Remove the four 4 hex bolts two on each side securing the Conveyor Belt assembly to the Input Belt frame These bolts are located u...

Page 32: ...5 Do the following a Stand at the end of the Input Belt b Grasp the Input Belt assembly lift and then slide it forward to disengage the assembly from the PEM studs Note Hold the motor power cable so t...

Page 33: ...age below Note Ensure not to pinch the motor cable Note It is recommended that you rest the belt assembly on a couple of supports on top of the cabinet to make it easier to service Tip Use a marker an...

Page 34: ...illustration purpose only 1 Remove the Conveyor Belt from the Input Belt assembly For more information refer to Removing the Conveyor Belt assembly on page 30 2 Disconnect the Input Belt cable from t...

Page 35: ...35 Input Belt Adapter NCR FastLane SelfServ Checkout 7358 R6L Plus 3 Remove two 2 screws from inside the Input Belt frame as shown in the image below...

Page 36: ...Input Belt Adapter 36 4 Remove three 3 screws from the Input Belt Mount as shown in the image below Caution Ensure that someone is holding the Input Belt to avoid dropping it...

Page 37: ...Belt Adapter Turning Off the Input Belt Turning off the Input Belt deactivates the motor and the belt cannot detect the presence of an item To turn off the Input Belt verify that the Power Switch is t...

Page 38: ...Adapter 38 Turning On the Input Belt Turning on the Input Belt activates the motor and the belt automatically detects the presence of an item To turn on the Input Belt verify that the Power Switch tu...

Reviews: