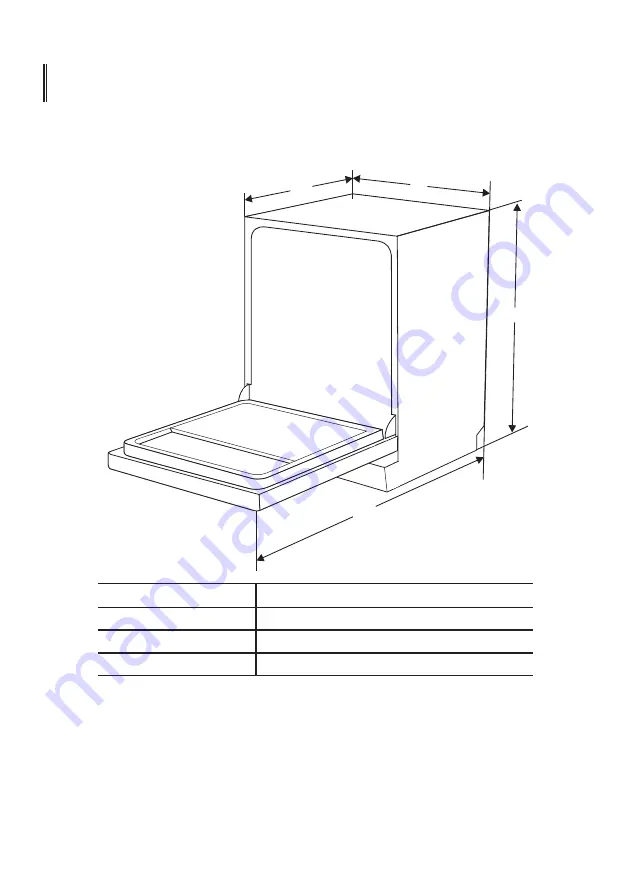
17
W
D1
H
D2
845 mm
8 mm
59600 mm (con la puerta cerrada)1175 mm (con la puerta abierta 90°)
INFORMACIÓN TÉCNICA
WD1D2
Page 1: ...2 2 REV D D 0 1 PANTONE BLACK C 2 3 A5 80 4 LVJCM 60 X W 7635G Nibe s 0 L...
Page 2: ...Manual de instrucciones Modelo Lavavajillas LVJCM 60X LVJCM 60W...
Page 3: ......
Page 4: ...ede solicitar un manual de usuario nuevo al fabricante o al vendedor NDICE USO DEL LAVAVAJILLAS Panel de control Suavizante para el agua Preparaci n e introducci n de la vajilla Funcionamiento del abr...
Page 5: ...el funcionamiento en mayor detalle Instalaci n del lavavajillas Consulte la Secci n 5 INSTRUCCIONES DE INSTALACI N en el APARTADO I Versi n gen rica Retirar la suciedad m s visible de los cubiertos C...
Page 6: ...sta superior o la inferior para ahorrar energ a Pulse el bot n de Media carga para cambiar entre la cesta superior y la cesta inferior Solamente se pude usar con los programas Intensivo Normal ECO Vid...
Page 7: ...os vasos y sartenes ligeramente sucias Vidrio Para tazas y vasos ligeramente sucios 90 min Para cargas con una suciedad normal que deben lavarse r pidamente R pido Un programa de lavado m s corto para...
Page 8: ...l consumo de sal 1 Encendido del aparato 2 Pulse el bot n de Inicio Pausa durante m s de 5 segundos para iniciar el modelo de ajuste del suavizante del agua en los 60 segundos siguientes al encendido...
Page 9: ...leccione un programa con la temperatura m s baja posible Para evitar da os no saque los objetos de vidrio ni los cubiertos del lavavajillas inmediatamente despu s de que finalice el programa Para lava...
Page 10: ...apertura hacia abajo para que el agua no pueda acumularse en el recipiente ni en la base Los platos y cubiertos no deben ir uno dentro de otro ni cubrirse entre s Para evitar da os los vasos no deben...
Page 11: ...if ciles de limpiar en la cesta inferior ollas sartenes tapas fuentes y cuencos como se muestra en la figura a continuaci n Es preferible colocar las fuentes y las tapas en el lateral de las cestas pa...
Page 12: ...para este fin Uso adecuado del detergente Use solamente detergente fabricado expresamente para su uso en lavavajillas Cons rvelo en un lugar fresco y seco No ponga el detergente en polvo en el dispens...
Page 13: ...pa o absorbente para evitar el exceso de espuma durante el pr ximo lavado Gire el indicador del abrillantador hasta un n mero entre el 1 y el 6 Cuanto mayor sea el n mero m s abrillantador se utiliza...
Page 14: ...de mayor tama o A para el ciclo de lavado principal Para cargas m s sucias a ada tambi n algo de detergente en la cavidad m s peque a B para el ciclo de prelavado Cierre la tapa y presione hasta que q...
Page 15: ...l Tiempo de funcionamiento min Energ a kW h Agua l Abrillantador Intensivo Prelavado 50 C Lavado 60 C Aclarado Aclarado Aclarado 70 C Secado 5 25 g 1 unidad 170 1 6 1 5 8 l Normal Prelavado 45 C Lavad...
Page 16: ...y a m xima presi n 4 Cierre la puerta pulse el bot n de Encendido para poner en marcha la m quina 5 Elija un programa la luz de respuesta se encender Pulse el bot n Encendido Pausa y el lavavajillas...
Page 17: ...e detergente Si este fuera el caso siga las instrucciones a continuaci n 1 Pulse el bot n de Encendido Pausa para hacer una pausa en el lavado 2 Espere 5 segundos para abrir la puerta 3 Meta los plato...
Page 18: ...en marcha el lavavajillas Si el lavavajillas no funciona bien el lavavajillas mostrar c digos de error para identificarlos C digos Significado Posibles causas E1 Tiempo de entrada m s largo La llave...
Page 19: ...17 W D1 H D2 845 mm 8 mm 59 600 mm con la puerta cerrada 1175 mm con la puerta abierta 90 INFORMACI N T CNICA H W D1 D2...
Page 20: ...Puede ir integrado S Consumo energ tico 1760 2100 W Tensi n nominal frecuencia 220 240V 50 Hz Presi n de agua presi n del flujo 0 04 1 0 MPa 0 4 10 bar NOTA u A la eficiencia m s alta a D la eficienci...
Page 21: ...f lost or out of date you can receive a new user manual from the manufacturer or responsible vendor PROGRAMMING THE DISHWASHER Wash Cycle Table Starting A Cycle Wash Changing The Program Mid cycle For...
Page 22: ...or detailed operating method 2 Removing the larger residue on the cutlery 3 Loading the baskets 4 Filling the dispenser Selecting a program and running the dishwasher Inside Outside 3 1 Install the di...
Page 23: ...to wash you can choose this function to save energy and water It can only be used with Intensive Normal ECO Glass and 90 min When pressing this button corresponding indicator will be lit Select the a...
Page 24: ...ds such as pots plates glasses and lightly soiled pans Soak To rinse dishes that you plan to wash later that day If the indicator is lit it means the dishwasher is low on dishwasher salt and needs to...
Page 25: ...use button for more than 5 seconds to start the water softener set model within 60 seconds after the appliance was switched on 3 Press the Start Pause button to select the proper set according to your...
Page 26: ...ogram has ended Cutlery with wooden horn china or mother of pearl handles Plastic items that are not heat resistant Older cutlery with glued parts that are not temperature resistant Bonded cutlery ite...
Page 27: ...rving knives must be positioned horizontally in the upper basket Please do not overload your dishwasher This is important for good results and for reasonable consumption of energy NOTE Very small item...
Page 28: ...o not nest together this may cause bad performance For the best washing effect please load the baskets refer to standard loading options on last section of PART Generic Version For the best washing ef...
Page 29: ...is full the indicator will be fully dark The size of the dark dot decreases as the rinse aid diminishes You should never let the rinse aid level be less than 1 4 full As the rinse aid diminishes the...
Page 30: ...the rinse aid into its dispenser whilst avoiding it to overflow Rinse Aid indicator Filling The Rinse Aid Reservoir Adjusting the rinse aid reservoir The rinse aid reservoir has six settings Both the...
Page 31: ...cavity A for the main wash cycle For more heavily soiled wash loads also add some detergent into the smaller cavity B for the pre wash cycle 3 Close the cover and press on it until it locks into plac...
Page 32: ...me min Energy Kwh Water L Description Of Cycle Rinse Aid Detergent Pre Main 13 170 190 30 1 6 0 90 0 75 18 5 11 11 Pre wash 50 Wash 60 Rinse Rinse Rinse 70 Drying Pre wash Wash 45 Rinse 65 Drying Wash...
Page 33: ...ton the dishwasher will start its cycle Changing The Program Mid cycle A wash cycle can only be changed if it has been running for a short time otherwise the detergent may have already been released a...
Page 34: ...the instructions below 1 Press the Start Pause button to pause the washing 2 Wait 5 seconds then open the door 3 Add the forgotten dishes 4 Close the door 5 Press the Start Pause button after 10 seco...
Page 35: ...e Overflow Malfunction of heating element Some element of dishwasher leaks E1 E3 E4 Faucets is not opened or water intake is restricted or water pressure is too low WARNING If overflow occurs turn off...
Page 36: ...TECHNICAL INFORMATION Height H Width W Depth D1 Depth D2 845mm 598mm 600mm with the door closed 1175mm with the door opened 90 W W D1 D1 H H 17 D2 D2...
Page 37: ...A highest efficiency to D lowest efficiency Energy consumption based on 280 standard cleaning cycles using cold water fill and the consumption of the low power modes Actual energy consumption will dep...
Page 38: ......