background image

OK

1

2

3

4

5

6

7

8

9

0

SOURCE

GOTO

ZOOM

MENU

FLIP

VOL –

VOL +

EXIT

Power

Press to power on.

Press twice to power 

.

  Previous / Next  

Press to skip between chapters or tracks.

 Stop

Press to stop playback.

Flip

Press t

display image 180°.

 Play/Pause

Press to play or pause an individual 

chapter or track. 

Arrows/OK

Press to navigate and c

rm selections in 

settings and other menus. 

Menu

Press to access projector settings

Go To/Number Keypad

Press to enter spec

ter or track 

numbers. Use Play button to begin 

playing.

Mute

Press to mute volume.

 Back / Fwd 

Press to search through an individual 

chapter or track.

VOL+ / VOL−

Press to adjust audio level. 

Source

Press to select media source  

(AV, HDMI, MEDIA).

Exit

Press to exit menu.

Zoom

Press to zoom display image in or out.

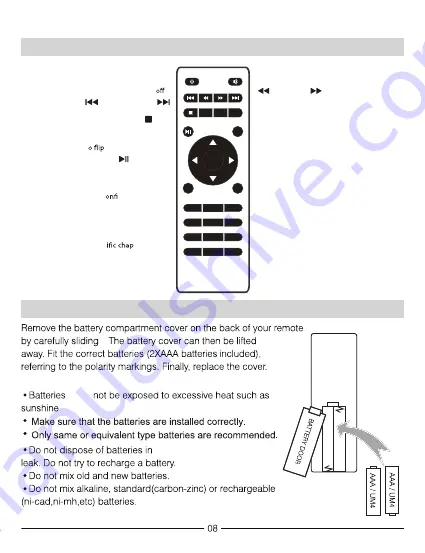
Remote Control 

Install/Remove Batteries from the Remote Control

it.

Please note: 

must

, fire or the like.

fires - they may explode or 

Summary of Contents for NVP-2002

Page 1: ...110 HOME THEATER 480P LCD PROJECTOR NVP 2002 User Manual Please read carefully before using product and keep for future reference ...

Page 2: ...the Remote Control Install Remove Batteries from the Remote Control Input Source Connection Video Device Connection Device Connection Audio Device Connection Card your Fit the Handle to the Projector 17 18 19 20 16 4 ...

Page 3: ...this device attempt to repair this device authorised service authorised service agent should you experience any problems with the product ...

Page 4: ...Fit the Handle to the Projector Remove the tape and fit the handle to the projector using the buttons found on both sides of the unit OK 1 2 3 4 5 6 7 8 9 0 SOURCE GOTO ZOOM MENU FLIP VOL VOL EXIT ...

Page 5: ...he indicator light will turn red The indicator light will turn green twice to turn off the unit Press the Power button Unplug the power adapter Turning On Power button Turning Off Distance Between the Projector and the Screen 24 100 2 ...

Page 6: ...Placing your Projector on the Ceiling on on professional Please note ...

Page 7: ...the image below ...

Page 8: ...7 8 1 Power On Off 2 USB Port 3 HDMI Port 4 IR Window 5 DC IN Plug 6 Micro SD Port 7 AV IN Port 8 Headphone Port ...

Page 9: ...ns in settings and other menus Menu Press to access projector settings Go To Number Keypad Press to enter spec ter or track numbers Use Play button to begin playing Mute Press to mute volume Back Fwd Press to search through an individual chapter or track VOL VOL Press to adjust audio level Source Press to select media source AV HDMI MEDIA Exit Press to exit menu Zoom Press to zoom display image in...

Page 10: ...Input Source has been Connection then select or Picture to ...

Page 11: ...enu on Movie screen 5 During movie playback press the 6 Use the button to select s s e r p n e h t n o c i n a Figure 3 Rotate Zo Zo M Rotate Pause FB FF Next Prev Stop Re PL Info Go i MUTE Pause FB FF Next Prev Stop Re Set A PL Info St Sl Go AB i AS Pause Next Prev Stop Re PL Info i music source then select to confirm function menu Figure 2 button to bring up a special button to confirm button to...

Page 12: ...Please note An HDMI cable is not included HDMI Device Connection with an laptops ...

Page 13: ...AV Video Device Connection projector s an AV cable not included as shown in the images below Audio Device Connection not included Video Cable YELLOW ...

Page 14: ...13 enter the a page Select Dynamic User Custom Mild or Standard Set Picture Mode to User to adjust these settings MENU ...

Page 15: ...14 a page Custom Set Sound Mode to User to adjust these settings enter the MENU Off or On Auto Volume ...

Page 16: ...Panel Flip Rotate 15 a page a language 5 enter the MENU Select 16 9 4 3 Full Zoom1 Zoom2 Panorama Just Scan Reset Model NVP 2002 SN 6710 105 DATE 2021 11 15 SW Ver V7 0 LOGO NAXA PANEL RX024B 480P ...

Page 17: ...Off Time Select turn off time to Off Once Every day Hour and Minutes 3 On Time Select turn on time to Off Once Every day Hour and Minutes 4 Sleep Timer Select sleep timer to Off 10min 20min 30min 60min 90min 120min 5 Auto Sleep Select auto sleep function to Off 1hours 2hours 4hours 8hours ...

Page 18: ...ugged in correctly then press the Power lamp bulb there is an image but no sound the This projector is designed for home entertainment and is not recommended for Power Use clean Point equal to or your support provider your support provider ...

Page 19: ...18 focus clearly visible The projector The brighter the image the louder the sound sharpness ...

Page 20: ... lumens Your viewing environment is the deciding factor on how many lumens your projector needs 19 White light output ANSI 40 Lumens 142 116 99mm 0 52KG Output 3 5mm Earphone 1 Connection Types Image Format Audio Format Video Format Brightness Output card Power Input of Projector Included AC DC Adapter 3 5A 3 5A ...

Reviews: