background image

Systems


Connections


1

.

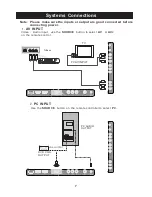
AV


INPUT 


Video

 / 

Audio


input

use


the


SOURCE


button


to select


AV


AV 

2


on


the


remote


control

 .

7

Note

Please  make sure the inputs  or output are


good connected


before 


or

connecting


power.


S-VIDEO

AV

R

L

DVD


TVBack

TV

TV


AV


INPUT

2

.

PC


INPUT


Use


the


SOURCE


button  

to


select


on


the


remote


controller 

PC

  .

VGA


OUTPUT

DVD


VGA


OUTPUT


PC


AUDIO


OUTPUT

VGA


OUTPUT

HDMI1

HDMI2

VGA

RF

VIDEO

L

R

EARPHONE

OUT

USB

Y

Pb

Pr

VIDEO 2

L

R

Y 2

Pb

Pr

COAXIAL

OUT

    PC

AUDIO

HDMI1

HDMI2

VGA

RF

VIDEO

L

R

EARPHONE

OUT

USB

Y

Pb

Pr

VIDEO 2

L

R

Y 2

Pb

Pr

COAXIAL

OUT

    PC

AUDIO

Summary of Contents for NT-1502

Page 1: ...PLEASE READ CAREFULLY BEFORE USE Instruction Manual MODEL NO NT 1502 16 WIDE SCREEN HD LED TV ...

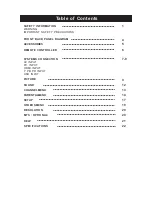
Page 2: ...NS ACCESSORIES SYSTEMS CONNECTION AV INPUT PC INPUT HDMI INPUT Y PB PR INPUT PICTURE SOUND CHANNEL MENU 1 5 7 9 9 12 13 FRONT BACK PANEL DIAGRAM 4 USB INPUT RESOLUTION MTS OPTIONAL 20 20 PARENTAL MENU OTHERS MENU SETUP 14 19 17 REMOTE CONTROLLER 6 HELP 21 22 SPECIFICATIONS ...

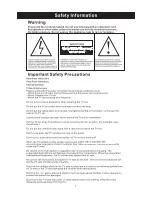
Page 3: ...1 ...

Page 4: ...2 E E E E E ...

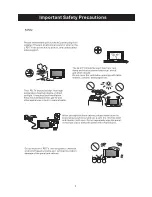
Page 5: ...3 E E E ...

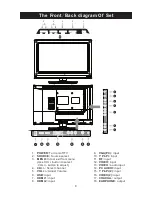
Page 6: ... VOL Adjust Volume 6 USB input 7 HDMI 1 input 8 HDMI 2 input 9 VGA PC input Y Pb Pr input RF input 12 VIDEO input input 16 VIDEO 2 input 17 COAXIAL output 10 11 13 VIDEO audio input 14 PC AUDIO 15 Y Pb Pr 2 input 18 EARPHONE output 1 2 3 4 5 8 7 9 10 11 13 15 16 13 18 6 12 17 HDMI1 HDMI2 VGA RF VIDEO L R EARPHONE OUT USB Y Pb Pr VIDEO 2 L R Y 2 Pb Pr COAXIAL OUT PC AUDIO 14 ...

Page 7: ...sories Remote Control Batteries AAAx 2 Please make sure the following items are included with your LED TV If any items are missing contact your dealer Owner s Instructions Adapter Car charger cable Power Cord ...

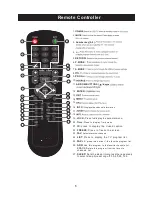
Page 8: ...y the closed caption 22 FREEZE Press to freeze the screen 23 FAV Selects favorite channels 24 LIST Press to display the TV program list 25 FAV press this button the favorite program list 26 ADD ERASE Add this program to the list Delete this program from the favorite favorite channels channels list 27 SLEEP Sets the sleep timer press the repeatedly to select sleep time among off 30 60 90 120 1 2 4 ...

Page 9: ...re or connecting power S VIDEO AV R L DVD TVBack TV TV AV INPUT 2 PC INPUT Use the SOURCE button to select on the remote controller PC VGA OUTPUT DVD VGA OUTPUT PC AUDIO OUTPUT VGA OUTPUT HDMI1 HDMI2 VGA RF VIDEO L R EARPHONE OUT USB Y Pb Pr VIDEO 2 L R Y 2 Pb Pr COAXIAL OUT PC AUDIO HDMI1 HDMI2 VGA RF VIDEO L R EARPHONE OUT USB Y Pb Pr VIDEO 2 L R Y 2 Pb Pr COAXIAL OUT PC AUDIO ...

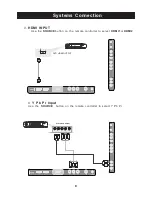
Page 10: ...Input Use the SOURCE button to select Y Pb Pr on the remote controller DVD YPBPR OUTPUT Y PB PR R L DVD DVD HDMI OUTPUT DVD HDMI1 HDMI2 VGA RF VIDEO L R EARPHONE OUT USB Y Pb Pr VIDEO 2 L R Y 2 Pb Pr COAXIAL OUT PC AUDIO HDMI1 HDMI2 VGA RF VIDEO L R EARPHONE OUT USB Y Pb Pr VIDEO 2 L R Y 2 Pb Pr COAXIAL OUT PC AUDIO ...

Page 11: ...uto Channel Search 5 USB INPUT Use the SOURCE button to select USB on the remote controller USB memory USB DateTraver EARPHONE HDMI1 HDMI2 VGA RF VIDEO L R EARPHONE OUT USB Y Pb Pr VIDEO 2 L R Y 2 Pb Pr COAXIAL OUT PC AUDIO TV AV 1 AV 2 YPbPr 1 HDMI 1 VGA Media YPbPr 2 HDMI 2 ...

Page 12: ...10 OSD Menu Operations PARENTAL CONTROL 1 PICTURE Change Setting MENU MENU ...

Page 13: ...11 OSD Menu Operations Change Setting Change Setting Change Setting MENU MENU MENU SABC SABC ...

Page 14: ...12 OSD Menu Operations 2 Sound Menu Other Settings Change Setting Change Setting MENU MENU MENU ...

Page 15: ...13 OSD Menu Operations 3 Channel Menu Change Setting MENU MENU ...

Page 16: ...Parental lock OSD Menu Operations 4 Parental Menu 14 Change Setting MENU MENU US V Chip V CHIP ...

Page 17: ...OSD Menu Operations 15 MENU MENU ...

Page 18: ...OSD Menu Operations 16 MENU MENU MENU ...

Page 19: ...OSD Menu Operations 5 Setup 17 MENU MENU Menu Language English Spanish Portuguese Caption Display ...

Page 20: ...OSD Menu Operations 18 Change Setting Change Setting Week of Day Daylight Saving MENU MENU Daylight Saving Set daylight Saving time ON OFF ...

Page 21: ...OSD Menu Operations 6 Others Menu E 19 MENU ATV Blue Back ...

Page 22: ...0 60 1080i p 50 60 720p MTS Optional Press the MTS button Usually set to stereo to provide the best reproduction but if reception deteriorates or if the service is not Available it will switch to Mono Resolution Vertical frequency Hz 1360x768 60 60 480i 60 480p 50 60 1080i p 50 60 720p Resolution Vertical frequency Hz ...

Page 23: ...21 HELP plug reception after 60 seconds And open the TV again ...

Page 24: ...mensions are approximations Fine digital control NTSC3 58 75 Unbalance 5W x 2 NT 1502 Color active matrix LED display NTSC System ATSC System Antenna 2 69 Cable 1 135 Analog 1 125 Digital 1 135 DC 3V Two AAA size batteries o 0C 40C o IN Put IN Put Adapter requirement MODEL Max 16 AC100 240V 50 60Hz 1366X768 25W DC 12V 3A ...

Page 25: ...USER S MANUAL ...
Reviews: