23
BMW 6 Series 2004-2009
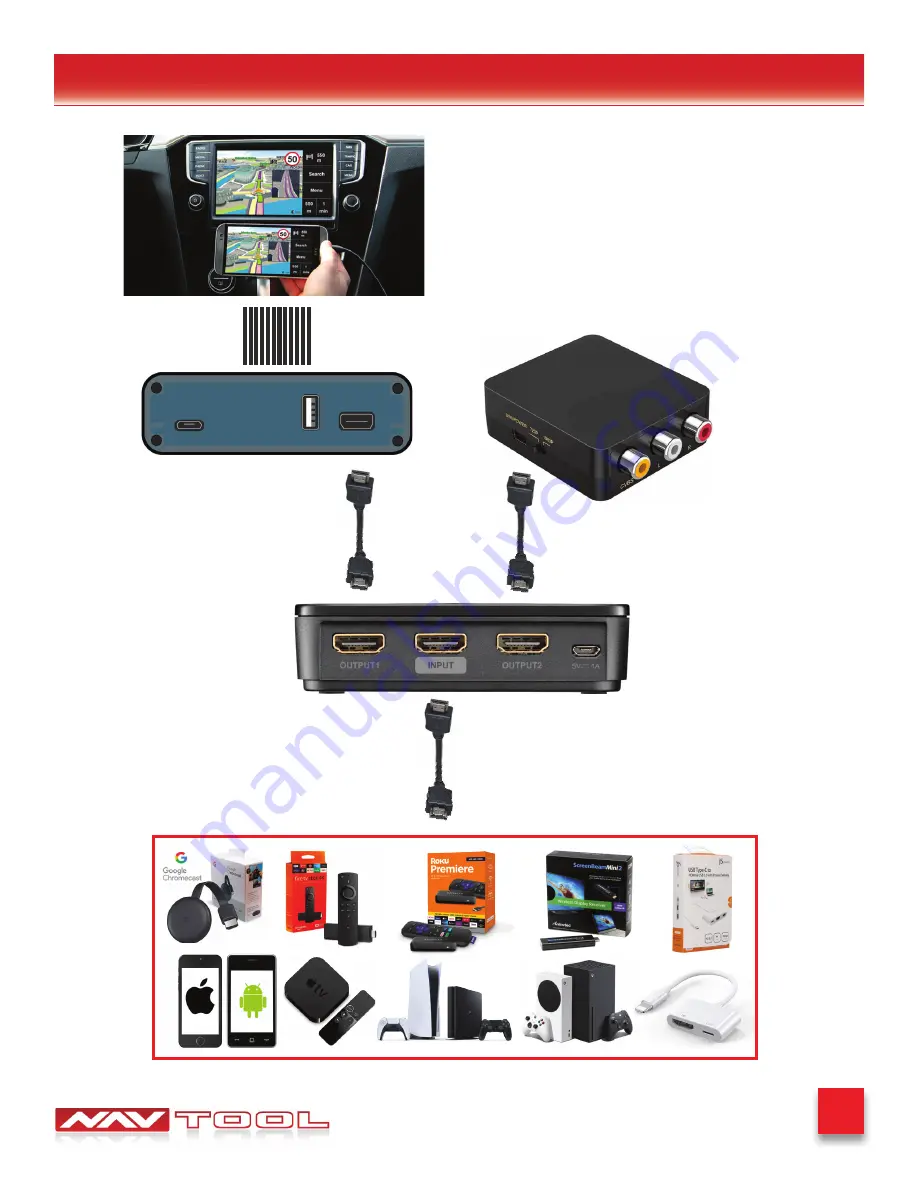
HDMI Sources
1 in 2 Out HDMI Splitter
NavTool Interface
HDMI to AV Adaptor
Car Monitor
How to Connect Rear Screens to Car With AV Input
Page 1: ...anual BMW 6 Series 2004 2009 NOTICE Navtool recommends having this installation performed by a certified technician Logos and trademarks used here in are the properties of their respective owners Interface with HDMI Part NAVTOOL6 0 LB0 HDMI ...
Page 2: ...ld consult a technician who has this knowledge and understanding Failure to follow these instructions carefully and install the interface as described could cause harm to the vehicle or safety systems on the vehicle Interference with specific safety systems could cause damage to persons as well Open the camera app on your smart phone and point your rear camera at the QR Code to scan it Finally tap...
Page 3: ...ent to its intended way of operation may result in property damage personal injury or death Set Parking brake Remove the negative battery cable Protect fenders before starting Using protective blankets to cover front seats interior of the vehicle and center console Always install a fuse 6 12 inches away from NavTool interface 5 amp fuse should be used Always secure NavTool interface with Velcro or...
Page 4: ...e Specific Plug and Play Harness Part NT QUADLOCK V1 NavTool Interface Part NAVTOOL BMWRLY NavTool Interface Harness Part NT WHNT6 Vehicle Specific Plug and Play Harness Part NT BMWDRV NavTool Interconnect Cable Part NT EXT BOX USB Configuration Cable Part NT USB CNG AUX Cable Part NT AUX 35 ...
Page 5: ...s not receiving power If the green LED is not ON the interface will not work and your vehicle radio may also stay OFF HDMI LED Normal operation of the interface must have a green LED ON If the green LED is not ON the interface HDMI is not receiving power If the green LED is not ON the interface HDMI port will not work USB Port for Apple CarPlay and Android Auto This USB port is for hard wire conne...
Page 6: ...RCA video output Your vehicle factory camera will continue to work as before without any changes Right Camera Input Video Input 4 This input is dedicated for an aftermarket right view camera or a video source with an RCA video output Your vehicle factory camera will continue to work as before without any changes Connector for Vehicle Specific Harness This connection is dedicated for connecting veh...
Page 7: ... Input Video Input 3 Right Camera Input Video Input 4 Front Camera Input Video Input 2 Rear Camera Input Video Input 1 Not Used Click Click AUX Input jack installed in your car from the factory Click Click See Page 2 See Page 2 Remove Fiber Optic Cable from the factory plug and insert into the supplied plug and play harness See Page 3 Not Used See Page 8 See Page 9 See Page 8 ...
Page 8: ...and Play Harness Part NT BMWDRV Vehicle Specific Plug and Play Harness Part NT QUADLOCK V1 Car s Factory Harness Back of the Car s Screen Close up view of the Back of the Car s Screen Click NavTool Interface Harness Part NT WHNT6 NavTool Interconnect Cable Part NT EXT BOX C l i c k 2 2 Cable that was previously connected to the back of the car s screen End view of harness NT QUADLOCK V1 ...
Page 9: ...he fiber optic assembly plug Gently pull the fiber optic plug out Image above is the fiber optic assembly removed from the vehicle s factory harness Take the NavTool supplied harness with out the inserted fiber optic assembly Insert the fiber optic plug into the same position on the NavTool supplied harness How to Relocate Fiber Optic Cable Vehicle Factory Harness Vehicle Factory Harness Vehicle F...
Page 10: ...oogle Chrome browser TO CONFIGURE THE INTERFACE GO TO HTTPS CONFIG NAVTOOL COM Connect the interface to the computer using supplied USB Configuration Cable Part NT USB CNG To see a video of the configuration process Scan QR Code or go to https youtu be iES_rW240X0 Remove Vehicle Navigation Radio or Color Screen List of Required Tools 1 Plastic Panel Removal Tool Example of a removal tool is shown ...
Page 11: ... 2 completely with middle of fresh air grille 3 all around the perim eter and remove Step 3 Remove screws 1 Use panel popper tool as pictured Unclip central instrument panel trim 3 at fastening points 2 all round and pull back Unlock and disconnect associated plug connections remove center instrument panel trim 3 STEP 2 Continued Step 4 Remove screws 2 Pull back Car Communication Computer 3 slight...
Page 12: ...ry Harness from the back of the Radio STEP 4 Step 1 Remove the Fiber Optic Cable from the factory plug and insert it into the supplied plug and play harness See page 9 Factory Wire Plug and Play Harness Part NT QUADLOCK V1 Remove Fiber Optic Cable from the factory plug and insert into the supplied plug and play harness ...
Page 13: ... Instructions Step 1 Connect supplied plug and play harness Part NT QUADLOCK V1 into the back of the radio Step 2 Reconnect previously removed radio connectors into the back of the radio Step 1 Connect supplied universal wiring harness Part NT WHNT6 into plug and play harness Part NT QUADLOCK V1 For complete image see Quick Connection Guide on page 7 For complete image see Quick Connection Guide o...
Page 14: ... screen Step 1 Plug in Vehicle Specific Plug and Play Harness Part NT QUADLOCK V1 into the Vehicle Specific Plug and Play Harness Part NT BMWDRV Step 2 Connect the cable previously connected to the back of the vehicle s screen into Vehicle Specific Plug and Play Harness Part NT BMWDRV STEP 8 For complete image see Quick Connection Guide on page 8 For complete image see Quick Connection Guide on pa...
Page 15: ... Step 2 Plug in Vehicle Specific Plug and Play Harness Part NT BMWDRV into NavTool Interface Part NAVTOOL BMWRLY Cable that was previously connected to the back of the vehicle s screen End view of harness NT QUADLOCK V1 Back of the Car s Screen Plug and Play Harness Part NT BMWDRV Click End view of harness Part NT WHNT6 NavTool Interface Part NAVTOOL BMWRLY Plug in ...
Page 16: ... Cable Part NT EXT BOX NavTool Interface Part NAVTOOL6 0 LB0 NBT Installation Instructions STEP 9 Step 1 Plug in NavTool Interconnect Cable Part NT EXT BOX into NavTool Interface Part NAVTOOL BMWRLY Step 2 Plug in NavTool Interconnect Cable Part NT EXT BOX into NavTool Interface Part NAVTOOL6 0 LB0 NBT ...
Page 17: ...hat everything is working you reassemble the vehicle If you are adding side or front cameras install them and plug them into the appropriate camera RCAs If you are installing any HDMI or streaming devices connect them to the HDMI port of the NavTool Back of Car Radio Factory Wire Click Vehicle Specific Plug and Play Harness Part NT QUADLOCK V1 NavTool Supplied Harness Part NT WHNT6 AUX Cable Part ...
Page 18: ...working including CD Satellite Radio AM FM radio audio plays from car speakers and all other radio features Set Radio to AUX Audio Input Pull the joystick back towards the rear seat to select the Entertainment menu Rotate the factory joystick remote to the right and select AUX Press enter on the joystick to set the audio to AUX Audio will not play through car speakers if AUX input is not connected...
Page 19: ...joystick to the right to highlight menu option The menu option is the last icon on the right Then press enter on the joystick remote to enter settings Rotate joystick remote to highlight the settings gear The settings gear is the top icon Then press enter on the joystick remote to enter settings Rotate joystick to highlight Manual Activation Wire as Reverse Trigger 12V Then press enter button on t...
Page 20: ...ont left or right then press enter on the joystick remote to change the option for particular camera input Once the selected option is highlighted rotate joystick to another camera input Once all camera inputs are set rotate joystick to highlight SAVE button then press enter on the joystick remote to save options Step 1 Step 2 Set vehicle in reverse gear to test operation of the factory rear view ...
Page 21: ...s connected or the connected source is not correctly working you will see this message Test AV inputs by selecting them in the menu of the interface or if you are installing any aftermarket cameras To test aftermarket front camera put the car in reverse then into drive Front camera should display on the screen To test aftermarket left and right cameras use left and right turn signals Left and righ...
Page 22: ...2V power source for accessory or constant power Check to see if any other panels that were removed during installation and now being reassembled have all and any electrical connectors reconnected Turn on parking light and check all dashboard lights operation Check all panels for proper fit make sure no gaps in panels are left behind If all steps above are checked off you will save time money and h...
Page 23: ...23 BMW 6 Series 2004 2009 HDMI Sources 1 in 2 Out HDMI Splitter NavTool Interface HDMI to AV Adaptor Car Monitor How to Connect Rear Screens to Car With AV Input ...
Page 24: ...24 BMW 6 Series 2004 2009 HDMI Sources 1 in 2 Out HDMI Splitter NavTool Interface Car Monitor Car HDMI Input How to Connect Rear Screens to Car With HDMI Input ...
Page 25: ... camera will continue to work in reverse If you installed a forward facing camera you could manually select it in the menu or it will automatically display up to 10 miles per hour on the screen This automation will happen when you put the car into drive after reverse gear Aftermarket left and right lane watch cameras will work with respective turn signals while driving or can be selected manually ...
Page 26: ...ent menu Rotate the factory joystick remote to the right and select AUX Press enter on the joystick to set the audio to AUX Audio will not play through car speakers if AUX input is not connected or radio is not set to AUX input Note If your vehicle is not equipped with AUX input there is a way to retrofit your vehicle with AUX contact us for more deatils ...
Page 27: ...e NavTool menu Rotate Right Go right inside NavTool menu Menu Click once to go back when on HDMI or Camera Inputs Press and hold for 3 5 seconds to turn the interface ON when on the car s factory screen Press and hold again for 3 5 seconds to activate NavTool interface Press and hold again for 3 5 seconds to turn the NavTool interface OFF C3 ...