background image


2

2

1


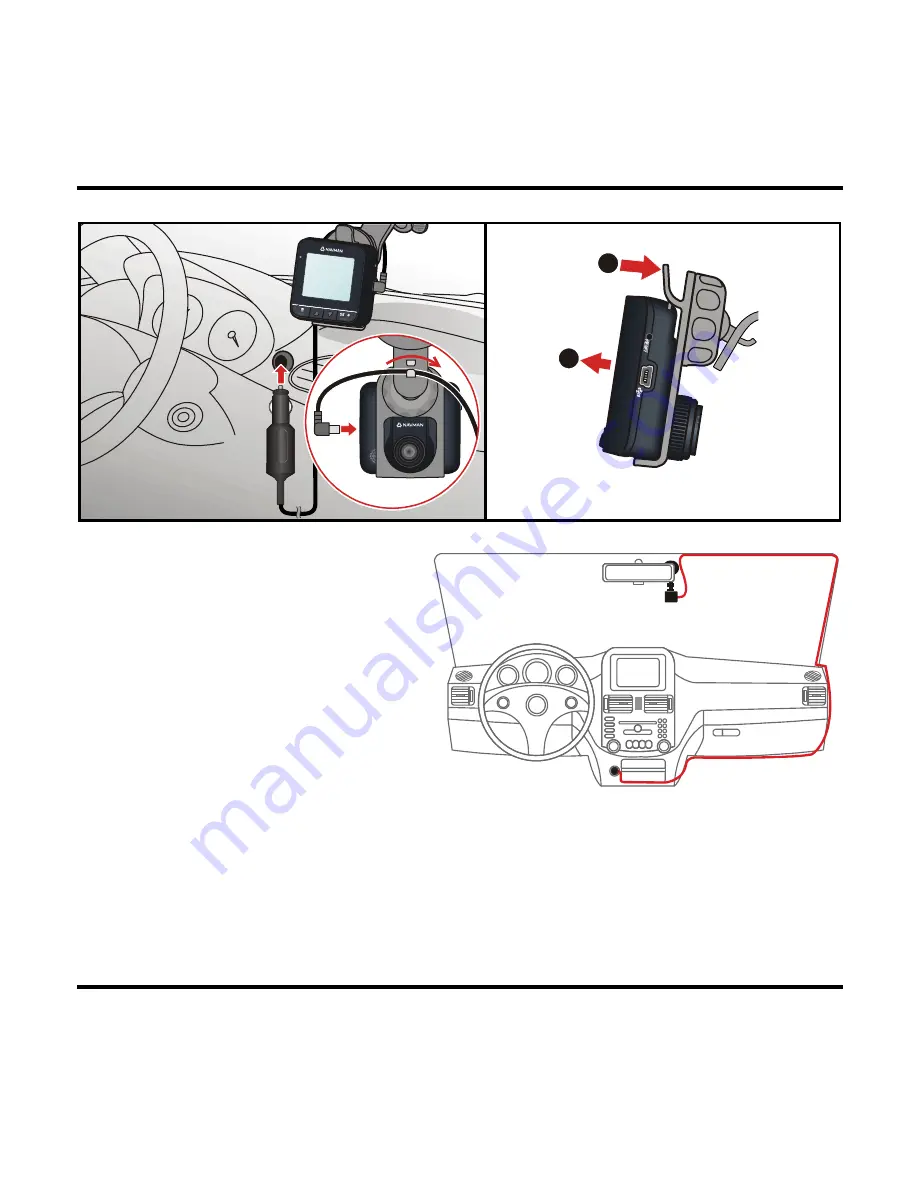
Use cable clips to secure the power 
cord so that it does not interfere 
while driving. To ensure the highest 
quality recordings, you are advised to 
place the recorder near the rear view 
mirror. 


Connecting to an external device 

For a better viewing experience, you can connect the recorder to an external viewing 
device that supports the AV IN feature via an AV cable (not supplied). 

6

Summary of Contents for MiVue 338

Page 1: ... a vehicle 8 Connecting to an external device 9 Operating basics 10 Recording mode 10 Continuous recording 10 G sensor event recording 11 Manual event recording 11 Recording settings 11 Camera mode 12 Camera settings 12 Playback mode 12 Turning off the recorder 12 System SETUP 13 Caring for your device 13 Regulatory information 15 Safety precautions 15 About charging 15 ...

Page 2: ...2 About the charger 15 About the battery 16 ...

Page 3: ...tion to be unstable A window mount is needed when using the recorder in a car Make sure that you place the recorder in an appropriate place so as not to obstruct the driver s view or deployment of airbags Make sure that no object is blocking the camera lens and no reflective material appears near the lens Please keep the lens clean If the car s windscreen is tinted with a coating it may impact the...

Page 4: ... no object is blocking the camera lens and no reflective material appears near the lens Speaker Provides sound alerts OK Record key Stops the current recording Acts as the shutter to takes photos Confirms a menu selection Saves the changes you make in settings Record indicator Glows in red when recording is in progress ...

Page 5: ...screen during recording Moves to the previous item in a list Adjusts the value of a setting option Menu key Locks to save the current recording When recording is not in progress press twice to enter System SETUP Enters the change mode for a setting option Microphone Records sound Charge indicator Indicates the level of battery charge Green battery full or recorder is turned ON Amber battery chargi...

Page 6: ...er press and hold this key to turn ON and OFF the recorder Toggles through Recording Camera and Playback mode Memory card slot Data is recorded to a MicroSD card Note You are advised to use a Class 6 memory card with at least 4GB capacity AV OUT connector Connects to an external device Note This connector 3 5 mm supports the PAL and NTSC interlace formats ...

Page 7: ...rt it into the slot with the label facing the front of your Navman To remove card gently push the top edge of the card inwards to release it and pull it out of the slot Note Navman Technology does not guarantee the product s compatibilities with MicroSD cards from all manufacturers Note Before you start recording please format the MicroSD card to avoid malfunction caused by files not created by Mi...

Page 8: ...e CAUTION Select an appropriate location for mounting the device in a vehicle Never place the device where the driver s field of vision is blocked DO NOT insert or remove the memory card when operating the recorder 2 3 2 3 1 2 3 1 2 4 ...

Page 9: ... To ensure the highest quality recordings you are advised to place the recorder near the rear view mirror Connecting to an external device For a better viewing experience you can connect the recorder to an external viewing device that supports the AV IN feature via an AV cable not supplied 5 6 ...

Page 10: ... vehicle section When you connect the car charger to the cigarette lighter in the car and then start the car s engine the recorder will start continuous recording automatically For continuous recording the recording will be divided into several temporary video clips recording will not stop between video clips Each video clip is 70MB in size and may be about 1 2 minutes long These video clips are t...

Page 11: ...o start and save the recording manually Simply tap lightly on the recorder The G sensor will prompt the recorder to lock and save the recording The locked saved recordings will not be replaced by temporary video clips Recording settings To change Camera settings press the Menu key You can Change the video resolution to 720P high quality or VGA low quality Disable enable date and time stamp on vide...

Page 12: ...te and time stamp on photo taking Playback mode Use the Power key to toggle to the Playback mode You can do the following in Playback mode Play the videos or photos on the MicroSD card Select and delete files to free up more space for recording Adjust the volume during playback Turning off the recorder To turn off the recorder disconnect the car charger from the cigarette lighter The recorder will...

Page 13: ... the video ouput system to NTSC or PAL Set system date and time and the time format Caring for your device Taking good care of your device will ensure trouble free operation and reduce the risk of damage Keep your device away from excessive moisture and extreme temperatures Avoid exposing your device to direct sunlight or strong ultraviolet light for extended periods of time Do not place anything ...

Page 14: ...minor scratches Never clean your device with it powered on Use a soft lint free cloth to wipe the screen and the exterior of your device Do not use paper towels to clean the screen Never attempt to disassemble repair or make any modifications to your device Disassembly modification or any attempt at repair could cause damage to your device and even bodily injury or property damage and will void an...

Page 15: ...environment Never touch the charger when your hands or feet are wet Allow adequate ventilation around the charger when using it to operate the device or charge the battery Do not cover the charger with paper or other objects that will reduce cooling Do not use the charger while it is inside a carrying case Connect the charger to a proper power source The voltage requirements are found on the produ...

Page 16: ...manufacturer The battery must be recycled or disposed of properly Use the battery only in the specified equipment Revision R00 9 2012 Trademarks All brand and product names are trademarks or registered trademarks of their respective companies Disclaimer Specifications and documents are subject to change without notice Navman Technology does not warrant this document is error free Navman Technology...

Reviews: