background image

Navman iCN

      6

5
Setting your destination

Getting a GPS fix

Once you have entered your 
destination, the iCN uses a 
“GPS Fix” to determine your 
current location. Then from the 
maps in its memory, the iCN 
calculates the best way from 
your current location to the 
destination you have entered.

In order for the GPS antenna 
to receive signals, ensure that:
•  The iCN is outside or in a 

vehicle parked outside.

•  The GPS antenna is pointing 

horizontally out, with a clear 
view of the sky.

It may initially take several 
minutes to get a GPS fix. 
Minimise this time by remaining 
stationary in your vehicle until 
the iCN has a fix.

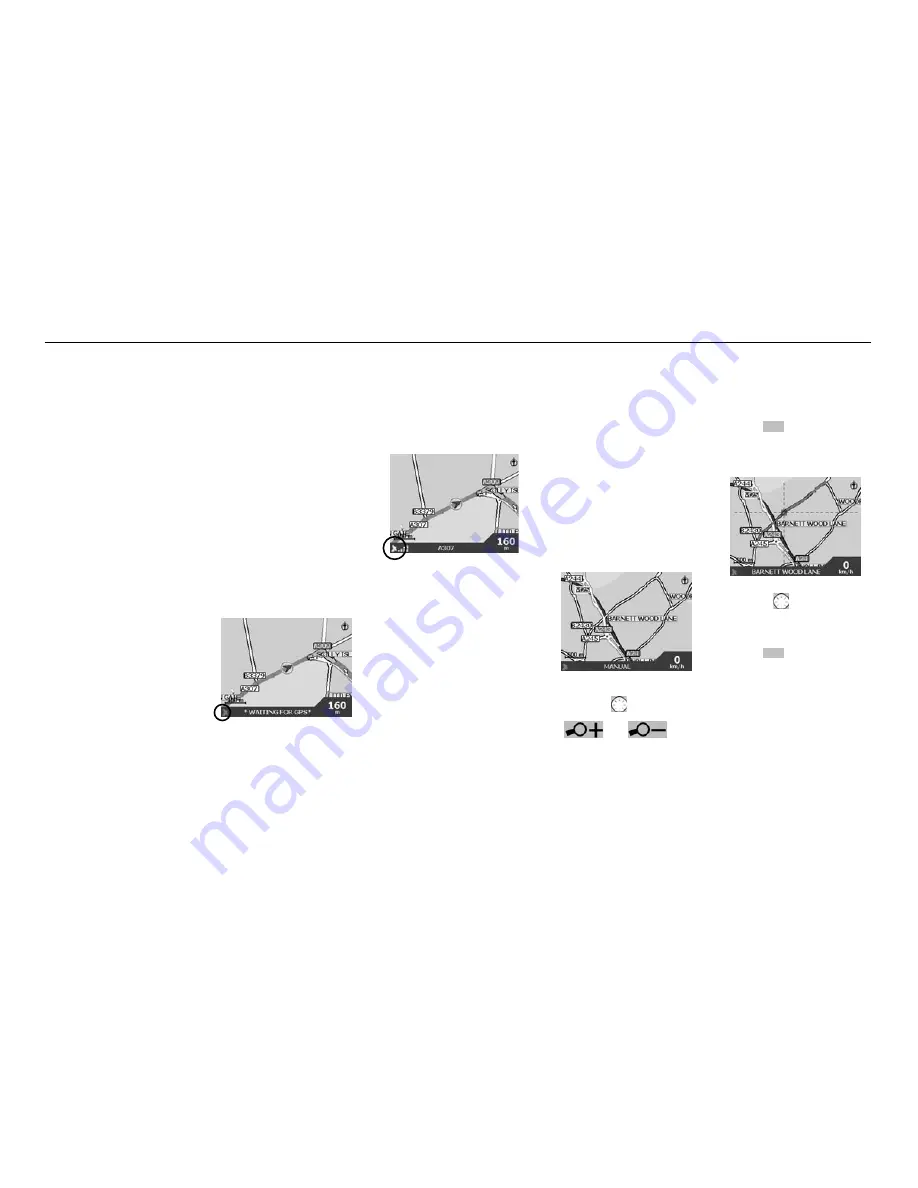
To confirm you have a 
GPS fix


• select 

“Map”

 from the Main 

Menu.

The map screen will show 
your current location, if you 
have a GPS fix. The GPS fix 
is displayed in the lower left 
corner of the screen.

No GPS fix

, the satellite icon is 

red and the strength indicators 
are not displayed.

GPS fix, the satellite icon and 
strength indicators are green.

Setting a destination

There are three main ways 
that you can program your 
destination:
•    Use 

“SHORTCUTS”

 that you 

have previously programmed 
for destinations used on a 
regular basis.

•  Program your destination 

directly on the 

“MAP”

.

•  Set a new 

“DESTINATION”


by entering an address, 
intersection, Point of Interest, 
favourite or recently travelled 
location.

Refer to the User Manual for 
information on programming 
Shortcuts and Favourites.

Directly from the map

You may find it easier to 
program your destination 
directly from the map. The iCN 
will allow you to scroll around 
a map and pick a point on the 
map.
1.  From the Main Menu, select 

“MAP”

. You are now in the 

automatic Map Browser 
screen.

2.  Navigate around the map 

using the 

 button. Zoom 

in and out as required using 

 and 

3.  Press 

OK

 to display 

grid-lines – you are now in 
the manual Map Browser 
screen.

4.  Use the 

 button to 

position the intersection 
of the grid-lines over the 
destination that you require.

5.  Press 

OK

 to select a 

point as your destination. 
The address details are 
displayed.

6.  Select 

“GO”

 to calculate 

the route and display the 
address on the navigation 
screens.

7.  Select 

“SAVE”

 to save the 

destination as a Shortcut or 
Favourite.

English    

Summary of Contents for iCN

Page 1: ...iCN Quick Start Guide NAVMAN English 2 Espa ol 8 Fran ais 14 Deutsch 20 Italiano 26 Nederlands 32 Svenska 38 Dansk 44...

Page 2: ...CAUSE ACCIDENTS DAMAGE OR THAT MAY VIOLATE THE LAW Safety first remember Do not operate your iCN while driving The iCN must be placed in a position where it cannot obstruct the driver s view or inter...

Page 3: ...top to install the smartMAPTM application onto the iCN This is a two step process first download the application then you must register the installation to activate the software this requires an Inter...

Page 4: ...e lever down until it snaps close 4 The ball foot should now be securely fixed on the windshield Slip the locking nut loosely over the ball foot with the flat side facing upwards 5 Snap the socket cli...

Page 5: ...nce Zoom Brightness Change the amount of map that is shown or hold down for longer to adjust the screen brightness 8 way Toggle Scroll up and down through menus and move around the map when selecting...

Page 6: ...ination There are three main ways that you can program your destination Use SHORTCUTS that you have previously programmed for destinations used on a regular basis Program your destination directly on...

Page 7: ...om in and out as required using and Next instruction This view clearly shows the information that you need for the next turn the direction of the turn and the distance to the turn Next four instructio...

Page 8: ...A OS O INCUMPLIR LA LEGISLACI N Recuerde la seguridad es lo primero No accione el navegador iCN mientras conduce El navegador iCN ha de colocarse en una posici n en la que no obstruya la vista del con...

Page 9: ...icaci n smartMAPTM Utilice iCN Desktop para instalar la aplicaci n smartMAP en el navegador iCN Es un proceso de dos pasos primero descargue la aplicaci n luego tiene que registrar la instalaci n para...

Page 10: ...4 Ahora puede fijar con seguridad la peana esf rica al parabrisas Deslice la tuerca de fijaci n suelta sobre la peana esf rica con el lado plano hacia arriba 5 Introduzca a presi n la pinza de sujeci...

Page 11: ...tiempo para ajustar el brillo de la pantalla Mando de 8 direcciones Despl cese arriba y abajo por los men s y por los mapas cuando seleccione el destino Men Encendido P lselo para volver al men princi...

Page 12: ...de fuerza de la se al est n en verde Programaci n de un destino Hay tres formas principales de programar un destino Utilice los ACCESOS DIRECTOS que previamente ha programado para destinos utilizados...

Page 13: ...precise utilizando y Instrucci n siguiente Esta vista muestra claramente la informaci n que necesita para el pr ximo giro el sentido del giro y la distancia hasta el giro Siguientes cuatro instruccio...

Page 14: ...DE CAUSER DES ACCIDENTS DES DOMMAGES OU D ENFREINDRE LA LOI La s curit c est une priorit Ne pas faire fonctionner l iCN quand vous tes au volant du v hicule en marche Vous devez positionner l iCN de...

Page 15: ...ord le t l chargement de l application puis l enregistrement obligatoire de l installation pour activer le logiciel ceci n cessite une connexion Internet Cliquez sur Application iCN du menu principal...

Page 16: ...are brise abaissez la manette jusqu ce qu elle se bloque 4 Le pied sph rique devrait maintenant tre solidement fix au pare brise Faites glisser le contre crou sur le pied sph rique en exposant vers le...

Page 17: ...autre partie de la carte ou appuyez plus longtemps pour r gler la luminosit de l cran Touche multi s lection Faites d filer les menus vers le haut et le bas et d placez vous dans la carte quand vous s...

Page 18: ...vert R glage de la destination Vous pouvez programmer votre destination de trois mani res Servez vous des RACCOURCIS pr c demment programm s dans le cas de destinations que vous utilisez r guli rement...

Page 19: ...e montre clairement l information n cessaire pour arriver la prochaine bifurcation la direction et la distance qui vous s pare de la bifurcation Affichage des quatre instructions suivantes C est l aff...

Page 20: ...N EINSATZ DIESES PRODUKTS WENN DIESER SO ERFOLGT DASS DIE GEFAHR VON UNF LLEN SCH DEN ODER RECHTSVERST SSEN BESTEHT Sicherheit geht vor denken Sie daran Benutzen Sie den iCN nie w hrend Sie ein Fahrze...

Page 21: ...ktop um die smartMAP Anwendung auf dem iCN Dies geschieht in zwei Arbeitsschritten Zuerst laden Sie die Anwendung herunter und dann registrieren Sie die Installation um die Software zu aktivieren dazu...

Page 22: ...l um bis er einrastet 4 Der Gelenkfuss muss jetzt sicher an der Windschutzscheibe befestigt werden Legen Sie die R ndelmutter lose ber den Gelenkfuss so dass ihre flache Seite nach oben zeigt 5 Dr cke...

Page 23: ...l nger gedr ckt halten Richtung Geht die Befehle in Men s durch und navigiert Karten um Fahrtziele auszuw hlen Hauptmen Einschalten Ruft das Hauptmen auf oder schaltet den iCN ein bzw aus wenn Sie die...

Page 24: ...rammieren eines Fahrtziels Sie k nnen Verkn pfungen verwenden die Sie zuvor f r h ufig verwendete Fahrtziele eingerichtet haben Sie k nnen ein Fahrtziel direkt auf der Karte einrichten Sie k nnen ein...

Page 25: ...m Modus werden die Informationen angezeigt die Sie f r die n chste Abbiegung ben tigen die Richtung in der Sie abbiegen m ssen und die Entfernung bis zur Abbiegung N chste vier Abbiegungen Dies ist di...

Page 26: ...rezza innanzitutto Non utilizzare l iCN durante la guida L iCN deve essere montato in una posizione che non ostruisca la visibilit al conducente non interferisca con il funzionamento degli airbag o de...

Page 27: ...tMAP sull iCN L operazione si articola in due fasi lo scaricamento dell applicativo e la successiva registrazione dell installazione per attivare il software tramite connessione a Internet Cliccare su...

Page 28: ...verso il basso fino a quando si blocca in posizione 4 Fissare saldamente il piedino sferico al parabrezza Infilare grossolanamente il dado di bloccaggio sopra il piedino articolato con il lato piatto...

Page 29: ...olare la luminosit dello schermo Pulsante selettivo a 8 funzioni Si preme per visualizzare le opzioni dei menu o i dettagli della carta quando si sceglie la destinazione Menu Accensione Si preme per r...

Page 30: ...indicatore intensit segnale assumono il colore verde Impostazione di una destinazione La programmazione di una destinazione pu essere effettuata in tre modi diversi Utilizzare le SCELTE RAPIDE program...

Page 31: ...ui tasti e Istruzioni successive Questa schermata visualizza le informazioni necessarie per la svolta successiva la direzione della svolta e la distanza che manca per raggiungere la svolta Quattro ist...

Page 32: ...OOR GEBRUIK VAN DIT PRODUCT OP EEN WIJZE DIE ONGEVALLEN OF SCHADE VEROORZAAKT OF DIE IN OVERTREDING IS MET DE WET Veiligheid komt altijd eerst Gebruik uw iCN niet tijdens het rijden Bevestig de iCN op...

Page 33: ...u de applicatie te downloaden en vervolgens moet de installatie worden geregistreerd om de software te activeren hiervoor is een internet verbinding vereist Klik op iCN Application in het hoofdmenu Kl...

Page 34: ...t deze in gesloten positie klikt 4 De kogelvoet moet nu stevig vastzitten op de voorruit Schuif de borgmoer losjes over de kogelvoet met de platte kant naar boven 5 Zet de bevestigingsklem vast op de...

Page 35: ...eid van het scherm te wijzigen 8 wegs knop Hiermee loopt u op en neer door de menu s en verplaatst u de cursor in de kaart wanneer u uw bestemming selecteert Hoofdmenu Inschakelen Indrukken op elk wil...

Page 36: ...stemming op drie manieren programmeren De KORTE ROUTES gebruiken die u reeds eerder hebt ingesteld voor bestemmingen die u regelmatig gebruikt Uw bestemming rechtstreeks op de KAART programmeren Een n...

Page 37: ...nformatie getoond over uw volgende afslag de richting waarin u moet afslaan en de afstand tot de afslag Volgende vier instructies In deze weergave worden de volgende vier afslagen beschreven waarbij d...

Page 38: ...AV DENNA PRODUKT P ETT S TT SOM KAN ORSAKA OLYCKOR SKADOR ELLER SOM KAN VARA ETT LAGBROTT Gl m inte s kerheten f rst Utf r inga kommandon eller programmering p din iCN medan du k r iCN m ste placeras...

Page 39: ...CN Desktop f r att installera programmet smartMAP p iCN Detta r en process i tv steg ladda f rst ner programmet sedan m ste du registrera installationen f r att aktivera programmet det kr vs en intern...

Page 40: ...rka 3 H ll sugkoppen f rsiktigt mot vindrutan och tryck ner handtaget till det l ses 4 Kulledsfoten ska nu sitta s kert fast p vindrutan F r l smuttern l st ver kulledsfoten med den flata sidan upp t...

Page 41: ...u h ller ner den lite l ngre tid 8 v gsknapp Anv nds f r att flytta upp och ner i menyer och f r att flytta dig runt p kartor n r du v ljer din destination Huvudmeny S tt p str mmen Ett snabbt tryck o...

Page 42: ...mning satellitsymbolen och styrkem tarna r gr na St ll in en destination Det finns tre huvudsakliga s tt att programmera din destination Anv nd SHORTCUTS snabbval som du har programmerat tidigare f r...

Page 43: ...ruktion Denna vy visar tydligt den information du beh ver f r att g ra n sta sv ng vilket h ll du ska sv nga t och avst ndet till sv ngen N sta fyra instruktioner Den enklaste av dessa fyra vyer n sta...

Page 44: ...OR BRUG AF DETTE PRODUKT P EN M DE DER KAN MEDF RE ULYKKER SKADER ELLER SOM ER EN OVERTR DELSE AF LOVGIVNINGEN Sikkerhed f rst husk det Betjen ikke iCN under k rslen iCN skal placeres et sted hvor enh...

Page 45: ...on af applikationen smartMAP p iCN Dette er en totrinsproces indl s f rst applikationen Derefter skal du registrere installationen for at aktivere softwaren dette kr ver tilslutning til Internet Klik...

Page 46: ...orruden omhyggeligt 3 Pres sugefoden kraftigt mod forruden og tryk armen ned indtil den l ser 4 Kuglefoden er nu sikkert fastgjort til forruden Skyd l sem trikken l st over kuglefoden s den flade side...

Page 47: ...ts lysstyrke 8 vejs omskifter Rul op og ned gennem menuer og flyt rundt p kortet ved valg af destination Menu T nding af enheden Tryk p knappen for at returnere til hovedmenuen p et vilk rligt tidspun...

Page 48: ...ing af destination Du kan indprogrammere din destination p tre forskellige m der Brug GENVEJE som du tidligere har programmeret til destinationer du regelm ssigt anvender Programmer din destination di...

Page 49: ...n p Zoom ind og ud efter behov vha og N ste instruktion Denne visning viser tydeligt de informationer du har brug for til n ste afvigelse afvigelsens retning og afstanden til afvigelsen N ste fire ins...

Page 50: ...Office Building Gatwick Road Manor Royal Crawley West Sussex RH10 9RZ United Kingdom www navman mobile com support navman mobile com Copyright Navman NZ Limited NAVMAN is a registered trademark of Na...

Reviews: