Version 08.08.2022
HW: 16 (V65)
VL1-TOM
P
a
g
e
9
2.4.
Installation – daughter PCB
Page 1: ...s rear view camera input Product features Video inserter for factory infotainment systems 1 CVBS Rear view camera video input 2 CVBS video inputs for after market devices e g USB Player DVB T2 tuner A...
Page 2: ...Rear view camera setting dip 5 2 Installation 2 1 Place of installation 2 2 Connection schema 2 3 Connection 6pin interface cable 2 4 Installation daughter PCB 2 5 Connection video sources 2 6 Audio...
Page 3: ...of the interface Up to one year after purchase we offer free software updates for our interfaces To receive a free update the interface has to be sent in at own cost Wages for de and reinstallation a...
Page 4: ...or a FM modulator If 2 AV sources shall be connected the CAB FV AUDIO audio cable is optionally available for audio switching Factory rear view camera Automatically switching back from inserted video...
Page 5: ...use the disabled inputs will be skipped while switching through the video interfaces inputs 1 4 1 2 Rear view camera setting dip 5 If set to OFF the interface switches to factory LVDS picture while th...
Page 6: ...tion mode In case the sleep mode does not succeed the disconnection of the battery can be done with a resistor lead If the necessary stabilized power supply for the interface is not taken directly fro...
Page 7: ...Version 08 08 2022 HW 16 V65 VL1 TOM Page 7 2 2 Connection schema...
Page 8: ...of the 6pin interface cable to 12V ACC terminal 15 If desired the white wire of the 6pin interface cable can be used alternatively to the external button to switch the video sources 12V pulse for 2 3...
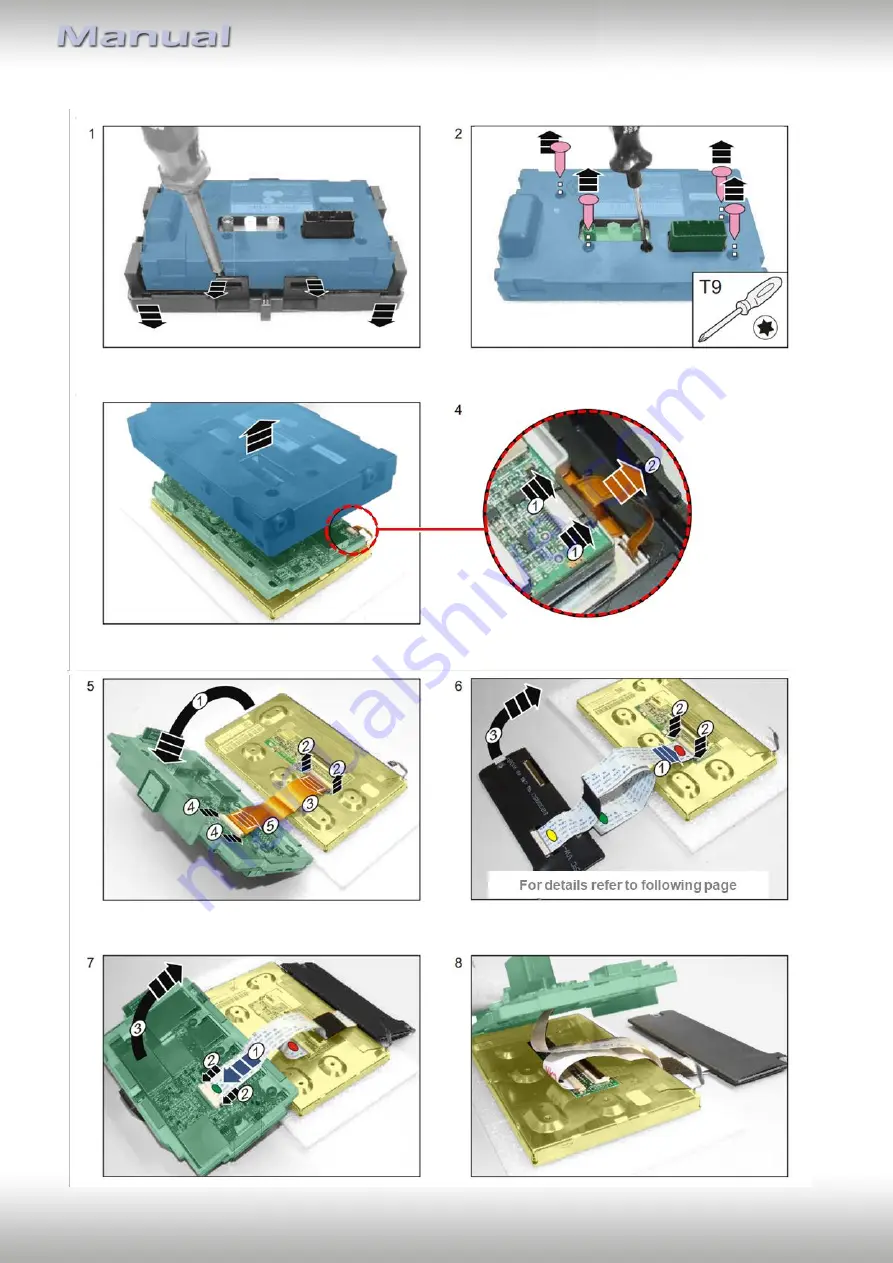
Page 9: ...Version 08 08 2022 HW 16 V65 VL1 TOM Page 9 2 4 Installation daughter PCB...
Page 10: ...Version 08 08 2022 HW 16 V65 VL1 TOM Page 10...
Page 11: ...Version 08 08 2022 HW 16 V65 VL1 TOM Page 11...
Page 12: ...the peripheral devices we recommend a test run to detect a incompatibility of vehicle and interface Due to changes in the production of the vehicle manufacturer there s always a possibility of incompa...
Page 13: ...e shall be connected it is possible to connect the audio output of the AV source directly to the point of audio insertion e g to the factory AUX input Connection of 2 AV sources This interface has an...
Page 14: ...nnect the audio RCA connectors of possibly existing AV sources 1 and 2 to the female RCAs of the audio cable s Audio 1 IN und Audio 2 IN Pin definition 7pin connector Audio pins Definition 1 2 Audio i...
Page 15: ...rence a traditional open relay e g AC RW 1230 with wiring AC RS5 or filter e g AC PNF RVC is required Below schema shows the use of a relay normally open Connect the green switching input cable to the...
Page 16: ...xternal keypad Connect the keypad s female 4pin connector to the video interface s male 4pin connector Note Even if the switching through several video sources by the keypad mightn t be required the i...
Page 17: ...nges during or after the installation Picture settings must be done separately for AV1 and AV2 while the corresponding input is selected and visible on the monitor AV2 and CAM may share the same setti...
Page 18: ...rom Video IN1 to Video IN2 the audio source will be switched too assuming the sources have also been connected to the audio cable 3 1 By white wire of the 6pin cable Alternatively or additionally to t...
Page 19: ...der of LVDS cables is exactly connected according to manual Plugging into head unit does not work when the manual says to plug into monitor and vice versa Wrong monitor settings of video interface Try...
Page 20: ...tton CAN bus interface does not support this function for vehicle Use external keypad or cut white wire of 6pin to 8pin cable and apply 12V impulses for AV switching Pressed too short For video source...