background image


Version 02.10.2017


DT3-xxx appendix B


Pa

ge

15


9.


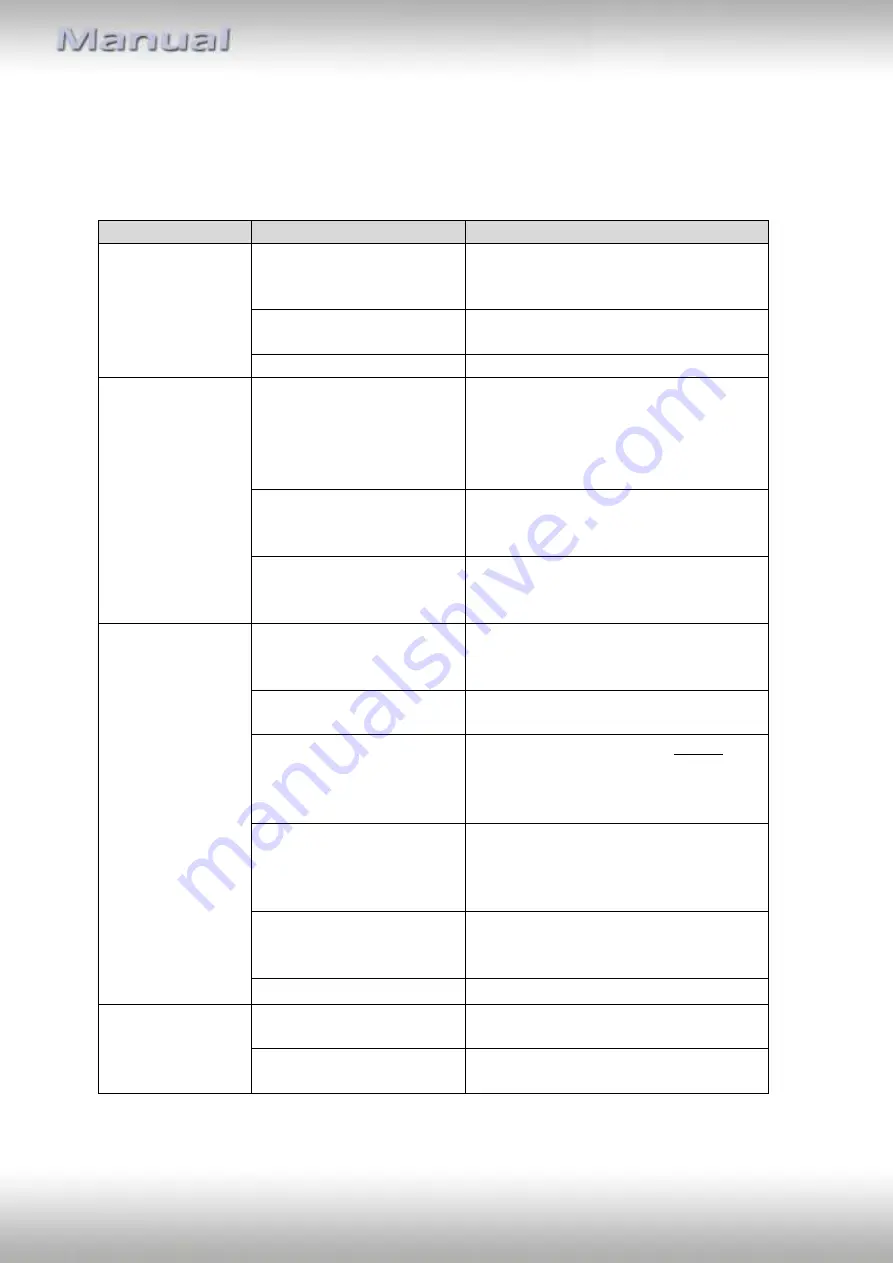
Trouble Shooting Q&A 


Most of the troubleshooting issues can be easily resolved. The most common cases and their 
respective solutions are listed in the table below.  
 

Problem 

Possible Reason 

Solution 

No picture, no 
audio. 

The power connector is 
not properly inserted into 
the unit. 

Check the power wire connection. 

The unit is not switched 
on. 

Press [POWER] button. 

Unit is in stand-by mode. 

Press [POWER] button. 

In DVB-T mode, 
the number of 
DVB-T channels is 
not as much as we 
expected. 

The number of available 
channels is limited. The 
available channels can 
vary depending on the 
area. 

Perform “Auto Search” or “Manual 
Search” to rescan all the channels. 

The signal quality of some 
TV channels is too low. 

Please use active antennas instead of 
passive antennas for better reception 
quality. 

Some TV channels are not 
available. 

Only the locally free broadcasted 
channels can be viewed. They can 
differ depending on the area. 

In DVB-T mode, all 
of the channels 
show “no signal” 
or random mosaic 
tiles appear on 
the display. 

Some TV channels signal 
quality is too low. 

Please use active antennas instead of 
passive antennas for better reception 
quality. 

The antennas are not 
properly connected. 

Please check the connection of the 
antennas. 

An amplified antenna 
doesn’t receive 12V power  

Connect the amp. Antenna before you 
connect power to the system. Take 
care for the menue’s point “Ant.-
Power” 

No DVB-T / DVB-T2 service 
is provided in the area. 

Check your country DVB-T coverage 
map. It is not possible to watch digital 
TV/listen to digital radio in non-
covered areas. 

Incorrect Regional Setting 

Please check whether “Regional 
Setting” is correct, and perform “Auto 
Search” to rescan all of the channels. 


The video is fine 
but there is no 
sound. 

The audio volume is too 
low. 

Press [VOL

] button to raise the 

volume. 

The audio is muted. 

Press [MUTE] button to disable the 
mute function. 

Summary of Contents for DT3 Series

Page 1: ...rt the batteries obeying the polarity 4 Slide the battery cover back into its position on the remote control Remote control description No Button name Function 1 POWER Select the power on or stand by 2 RED BUTTON Subtitle key 3 GREEN BUTTON No function 4 YELLOW BUTTON No function 5 BLUE BUTTON No function 6 SRC No function 7 AUDIO Select second language stereo audio 8 FF Fast Forward 9 HOME Go to ...

Page 2: ...and VOL buttons to highlight the desired mode and then press the OK button to enter the desired mode TV Mode To enter the TV mode Movie Playback Mode To enter the movie playback mode and to watch the movie files Music Playback Mode To enter the audio playback mode and to listen to the music System Settings To configure the device settings Note Press the HOME key to return to the home screen anytim...

Page 3: ...tton to set the highlight item Press the CH CH buttons to scroll up and scroll down the options Select the option by pressing the OK button Exit the setting by pressing the MENU button NOTE The time zone setting will be automatically updated once the Region setting is changed The auto start will find available DVB T2 DVB T channels within the first operation Refer also to chapter AFC Auto Frequenc...

Page 4: ...not over yet The unit will automatically turn off while the recording is finished To stop recording please select the STOP item in timer menu Recorded TV programs can be played back in Movie mode Note A recorded program will be stored in a default folder named PVR The file types will have TSV file extension for TV program The file will be named as Channel Name Recorded Date Recorded Time The maxim...

Page 5: ...ke sure that your USB device is already plugged into the receiver s USB port otherwise this function cannot be used 2 The available video files will appear on the screen Please use the CH and the CH buttons to scroll up and scroll down the files then select the desired file by pressing the OK button Press the EXIT button to return NOTE In this mode the user can only playback video files Music file...

Page 6: ...playing one video file The device will repeat one video file that is currently being played continuously Repeat Dir The device will repeat all of the video files in one directory that is currently being played continuously Aspect Ratio Full Screen The video picture will be displayed in full screen 16 9 4 3LB 4 3PS The video picture will be displayed according to the selected ratio Equalizer Classi...

Page 7: ...on to enter the music function NOTE Make sure that your USB device is already plugged into the receiver s USB port otherwise this function cannot be used 1 The available audio files will appear on the screen Please use the CH and the CH buttons to scroll up and scroll down the files then select the desired file by pressing the OK button NOTE In this mode the user can only playback music files Vide...

Page 8: ...ying mode Off Shuffle The video file will be played according to the music list The next music file will be played randomly Repeat Mode Repeat OFF Repeat One Repeat Dir The device will stop right after playing one movie file The device will continuously repeat the currently played music file The device will continuously repeat all of the music files in the directory Equalizer Classic Dance Jazz Li...

Page 9: ...the item you want to adjust 2 Press the VOL button and use the CH CH to scroll up and down the options 3 Select one option by pressing the OK button or exit the setting by pressing the EXIT MENU button 4 After adjusting press the EXIT MENU button to exit the Country Language menu Display To set up and adjust the image with preference 1 Press the CH CH buttons to highlight the setting that you want...

Page 10: ...ower is set to on it means that the antenna will receive 5V from the tuner to empower the signal We suggest to keep this antenna power on to have a better signal reception Important note If an amplified antenna has not been connected to the tuner before the tuner s 12V power connection the necessary 12V power supply won t succeed To guarantee the necessary phantom power supply either the connectio...

Page 11: ...e database 1 In the TV menu refer also to chapter TV menu choose the point AFS Settings then choose and select with OK 2 Choose Yes to restart the channel search again The previous TV channels will be deleted automatically if this function is executed Version Upgrade To upgrade the software version 1 Insert the USB device containing the software upgrade file into the USB port 2 After entering the ...

Page 12: ...croll up down the channel list to preview the program 3 Press the EXIT MENU button to exit NOTE you can also press the TV List button to enter Channel List while enjoy watching TV Schedule 1 In the Channel List press the VOL button to enter the schedule 2 Press the CH CH buttons to scroll up down the date list to see the program schedule of the corresponding date 3 Press the VOL button to see the ...

Page 13: ...utton to enter the Audio menu 2 Use the VOL VOL buttons to select the stereo left right audio channel Press the OK button to select the required setting 3 Scroll the available language using the CH CH buttons Press the OK button to select the language 4 Press the EXIT MENU key to exit Channel Info To show the information of the current service s system parameters and the signal information 1 Use t...

Page 14: ...he VOL VOL buttons 2 Press the OK button to activate or deactivate it NOTE this function temporarily removes the channel from the program list The user can restore the channels by deactivating the function Channel Movement 1 After entering the channel sorting menu select the MOVE visual button on screen by pressing the VOL VOL buttons 2 Use the CH CH buttons to move the channel up or down in the l...

Page 15: ...tle To active or deactivate the subtitle function 1 Choose the TV Setup option in the TV menu screen using the VOL VOL buttons to highlight the Subtitle option 2 Press the OK button to enter the Subtitle menu 3 Scroll the available language using the CH CH buttons 4 Press the OK button to activate the subtitle language 5 Press the EXIT MENU key to exit Teletext Using the teletext function 1 Use th...

Page 16: ...not available Only the locally free broadcasted channels can be viewed They can differ depending on the area In DVB T mode all of the channels show no signal or random mosaic tiles appear on the display Some TV channels signal quality is too low Please use active antennas instead of passive antennas for better reception quality The antennas are not properly connected Please check the connection of...

Page 17: ...13818 2 SD HD H 264 MPEG 4 AVC ISO IEC 14496 10 SD HD H 265 HEVC S W Feature OSD Language English German French Portuguese Spanish Italian Dutch Finnish Traditional Chinese Thai Indonesia Features DVB T T2 TV Auto Channel Search Multi Language EPG Teletext Subtitle TV Recording Record TV programs on the USB device Media formats supported Media port USB Audio format MP3 WAV ASF option AAC option WM...

Reviews: