background image


USER MANUAL 

NAVC-616GPS 


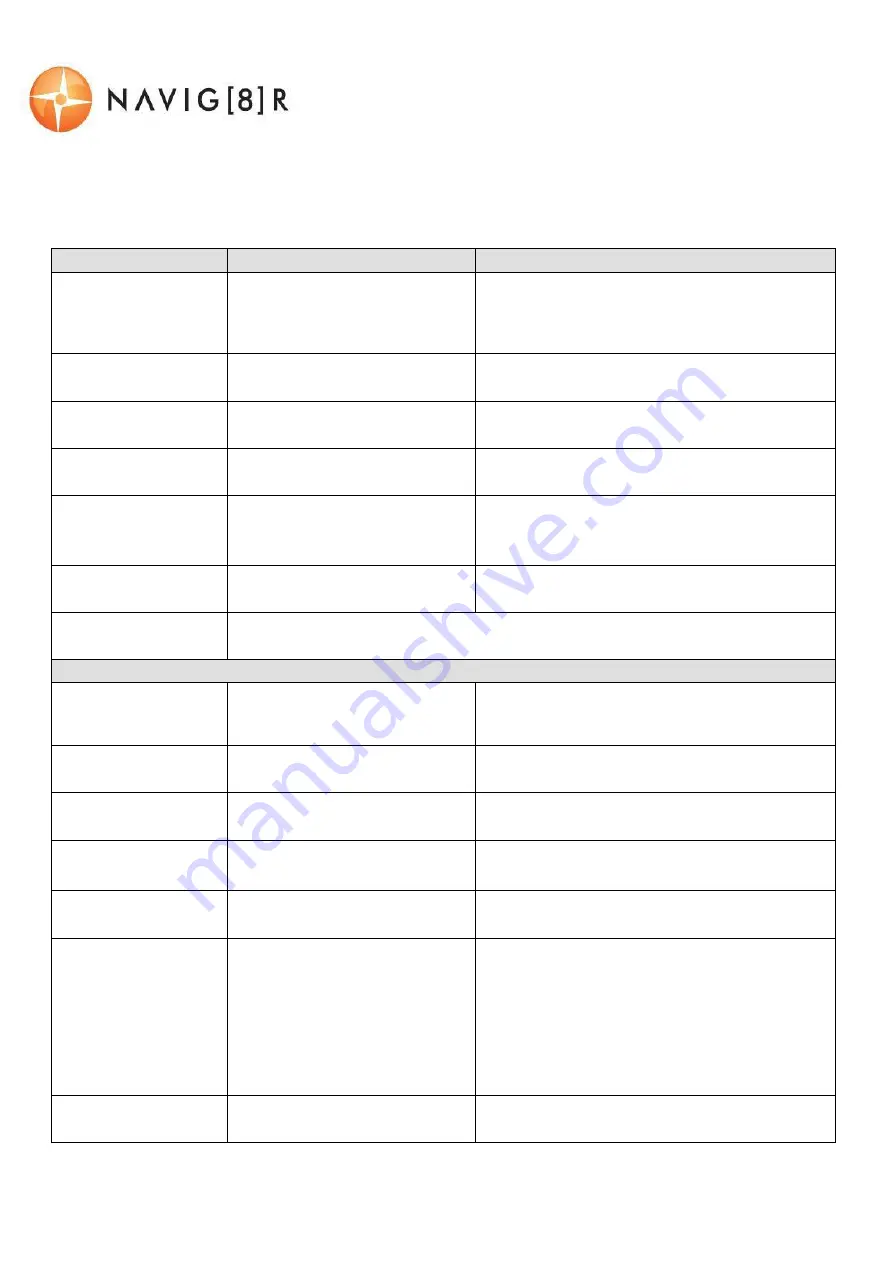
USER SETTINGS


From the main screen, press the MENU


button, then using a combination of the arrow keys and the 

OK


button to confirm your choice, select settings from the following options list: 


Feature


Options


Description


Size 

(Video Resolution)


1080p 30fps 

720p 30fps


Change the resolution of recorded files 

(Note: Higher Resolution files take up more 

storage space)


Time Stamp


Off / Date Only / Date & Time


Select On / Off to add a time-stamp to 

the recorded video


Loop Recording


1 Minute /3 Minutes /5 

Minutes


Select the length of each recorded  file


Audio Record


On /Off


Record the sounds/voices from inside your 

car whilst recording


EV


+0.0, -1/3, -2/3, -1.0, -4/3, -

5/3, -2.0, +2.0, +5/3, +4.3, 

+1.0, +2/3, 

+1/30.7/1.0/1.3/1.7/2.0 

/


Fill light according to different light source 

intensity in different  environment.


Motion Detection


On /Off


When power is connected, begin recording 

when motion is  detected.


Setup (Sub menu) 

[See below table] 

Setup (Sub Menu) 

Date format 

Select the preferred date 

orientation 


Select between YY/MM/DD, 

MM/DD/YY, DD/MM/YY 

Date Input 

Change the date 

Toggle through the fields to change 

Year, Month and Day 

Time Input 

Change the time 

Toggle through the fields to change 

hour, minute and seconds. 

System reset 

Perform a factory reset 

Select between Cancel and Execute 

FW Version 

Display Firmware version 

Used when checking to see if a new 

firmware is released. 

Format 

Format SD card 

Format SD card (Note: Permanently 

erases all data on card. Note: the unit 

cannot be used until formatting is 

complete, which usually takes about 

20seconds depending on the size of 

your card.) 

Beep 

Audible beep on key press 

Turn On or Off key press beeps 

Summary of Contents for NAVC-616GPS

Page 1: ...t cloth to clean the surface of this product The following will damage this product water or moisture ingress exposure to prolonged extreme heat or cold excessive humidity dust or sandy There are no u...

Page 2: ...MEAN 7 OPERATING THE NAVCAM 616GPS FOR THE FIRST TIME 7 POWER ON OFF AUTO ON OFF 7 ABOUT GPS SIGNAL RECEPTION 7 RECORDING FILES AUTO RECORD WHEN TURNED ON 7 PLAYING BACK A RECORDED FILE 8 DELETING A...

Page 3: ...ured and will not cause the device to fall There are no user serviceable parts in this product Un authorized attempts to dismantle or repair this product will void product warranty WHAT S IN THE BOX 1...

Page 4: ...RVIEW 1 Bracket interface 9 LED screen 2 USB interface 10 OK button 3 Speaker 11 Up button 4 LED Lamp 12 Down button 5 TF card slot 13 Emergency record button SOS 6 Power button 14 MODE Button P 7 Men...

Page 5: ...On Off Press and hold to turn On and Off On Off Press and hold to turn On and Off M Mute While recording Setting Recording stopped Setting Setting OK Start Stop recording Take a photo Confirm Page Dow...

Page 6: ...ery status indicator PLAYBACK SCREEN RECORDING STOPPED 1 Menu Settings Press to Toggle thru 2 Timer 3 Video Resolution 4 SD Card logo indicates inserted 5 Charging status Connected to charger 6 File n...

Page 7: ...ABOUT GPS SIGNAL RECEPTION For convenience your NAVCAM 616GPS will automatically connect to GPS satellites when in range Just like all PND Portable Navigation Devices this may take a few minutes espec...

Page 8: ...ten AUTO BUMP FILE RECORD G SENSOR SAVING RECORDING VIDEO FILES Due to the cycle recording nature of this technology older recorded files will be overwritten depending on the chosen resolution setting...

Page 9: ...2 0 Fill light according to different light source intensity in different environment Motion Detection On Off When power is connected begin recording when motion is detected Setup Sub menu See below t...

Page 10: ...etween 1 3 5 mins or turn feature Off Power delay Keep camera on after car is turned off Select between 10 20 30 seconds or turn feature Off G sensor Off High Medium Low Adjust the level of impact req...

Page 11: ...playback 3 Delete File Click to remove an unwanted file 4 Screenshot Click to take a screenshot of the current video 5 Full screen Expand current video playback to the width of your display device 6...

Page 12: ...r settings screen and select speaker Then turn the speaker to OFF Device does not turn o If in vehicle check that the 12V socket is not still powered on when the key is removed as with some European c...

Page 13: ...n ignition turned on off 1 3 5 Minutes File preservation Yes One touch SOS button Auto Bump Record Yes Adjustable sensitivity low medium high Lens Viewing angle 140 degree wide angle Cycle recording t...

Page 14: ...e nature of the fault and refund or replace the product as per their store refund or warranty policy Step 2b If your place of purchase cannot be contacted then you can contact Laser Customer Service w...

Reviews: