background image


ALGO® 5 Newborn Hearing Screener Service Manual 
P/N 000976 Rev.A


 27 


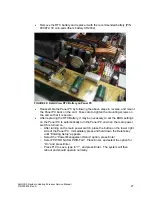
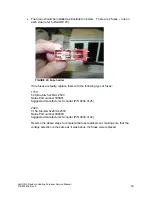
  Remove the RTC battery and replace it with the recommended battery (P/N 

000972, 3V coin-cell Lithium battery CR2032).  


FIGURE 20: Detail View RTC Battery on Panel PC 


  Reassemble the Panel PC by following the above steps in reverse, and mount 

the Panel PC back on the cart.  Take care to tighten the mounting screws on 
the cart so that it is secure. 

  After replacing the RTC Battery, it may be necessary to set the BIOS settings 

on the Panel PC to automatically turn the Panel PC on when the main power 
switch is turned on. 

o

  After turning on the main power switch, press the button on the lower right 

side of the Panel PC.  Immediately press and hold down the Delete key 
until “Entering Setup” appears.   

o

  Select the “Power Management Setup” option, press Enter 

o

  Select “PWR ON After PWR-Fail”.  Press Enter, and select the option for 

“On” and press Enter.  

o

  Press F10 to save, type in “Y”, and press Enter.  The system will then 

reboot and should operate normally. 


Summary of Contents for ALGO 5

Page 1: ...ALGO 5 Newborn Hearing Screener ____________________________________________________________________________________ Service Manual...

Page 2: ...Microsoft are registered trademarks of Microsoft Corporation Natus Medical Incorporated April 2008 This manual may not be reprinted or copied in whole or in part without written consent from Natus Me...

Page 3: ...nt tests 20 2 4 2 1 General 20 2 4 2 2 ATA 5 Cable calibration due Warnings 21 3 Troubleshooting Guide 22 3 1 Troubleshooting the ALGO 5 23 3 2 Troubleshooting the Panel PC 25 3 2 1 Replacing the batt...

Page 4: ...RE 18 View outer shell Panel PC 26 FIGURE 19 Location of Battery on Motherboard Panel PC 26 FIGURE 20 Detail View RTC Battery on Panel PC 27 FIGURE 21 Open the power inlet module 28 FIGURE 22 Access t...

Page 5: ...te skills 1 1 3 Manual conventions Precautionary information is emphasized by being labeled as warning caution or important Other explanatory information is highlighted with the word Note Type of info...

Page 6: ...e not been provided or approved by Natus Medical is expressly prohibited and will void the warranty Misuse of the earphones or the earphone cable that is any use other than that described in this manu...

Page 7: ...onal LAN Isolator optional 1 3 Pictorial introduction to the ALGO 5 This section is meant to acquaint you with various views of the ALGO 5 that you will see in the course of troubleshooting and repair...

Page 8: ...nt Rear View DSP Box Rear View FIGURE 2 ALGO 5 rear view cover removed Preamp Holder Cable management for ATA 5 PCA 5 Cables Barcode Scanner optional Main Switch Power Supply for DSP Box mounted in th...

Page 9: ...ervice Manual P N 000976 Rev A 9 FIGURE 3 DSP Box FIGURE 4 Preamplifier 5 Preamp 5 Power Socket Panel PC Communication cable Status LED Preamp Socket ATA Socket PCA Socket Preamp 5 Cable Connector Hoo...

Page 10: ...reener Service Manual P N 000976 Rev A Red Transducer right ear Blue Transducer left ear Connector FIGURE 5 Acoustic Transducer Assembly ATA 5 FIGURE 6 Patient Cable Assembly PCA 5 Connector Nape Whit...

Page 11: ...er situations that are not covered by this Service Manual contact a Natus Technical Service representative Please have your Natus device model and serial number available when calling Technical Servic...

Page 12: ...pect Preamp 5 cable for damage Inspect power cord for fraying or other damage If the screener is frequently moved to different locations or subjected to heavy use check regularly for external damage E...

Page 13: ...onment e g diluted bleach ammonia or alcohol solutions The surface finish will be permanently damaged by strong chemicals and solvents such as acetone and trichloroethylene Abrasive material such as s...

Page 14: ...uld be checked whenever a shelf is adjusted in height 100 milliohms or less TABLE 1 Ground Integrity 2 3 2 Earth leakage current AC Polarity Line cord Neutral cord IEC 60601 1 UL 60601 1 ANSI NFPA 99...

Page 15: ...Section 2 4 1 If the equipment check option is not available from the main window access the Service Menu from the Preferences panel to acquire rights via the Profile Manager 2 4 1 Equipment Check for...

Page 16: ...board Test DSP board runs a self test and loads firmware o Cable connection Verifies connectivity of ATA 5 and Preamp 5 o Calibration dates Shows calibration date of ATA 5 refer to 2 4 2 2 ATA 5 Cable...

Page 17: ...ener Service Manual P N 000976 Rev A 17 If the DSP Box is not connected to the Panel PC or the DSP Box power cord is disconnected the Initialize Baseboard Test will fail with the following Warning FIG...

Page 18: ...18 ALGO 5 Newborn Hearing Screener Service Manual P N 000976 Rev A If the Preamp 5 is disconnected the Cable Connection Test shows a red icon with error message below FIGURE 11 Preamp 5 disconnected...

Page 19: ...Cable Connection Test shows a red icon with the error message below FIGURE 12 ATA 5 disconnected If the ATA 5 cable is overdue for calibration the Calibration Dates section in FIGURE 12 shows a red ic...

Page 20: ...which device is involved in the testing DSP Box Test DSP Box and Panel PC Cable Connections ATA 5 and Preamp 5 Calibration Date ATA 5 Artifact Test DSP Box and Preamp 5 Acoustic Test ATA 5 Impedance T...

Page 21: ...The Acoustic Transducer requires re calibration on Warning 2 Warning Calibration has expired on Please renew the calibration of the acoustic transducer Disabled Error Calibration of the acoustic trans...

Page 22: ...s familiar with the ALGO 5 as described in Chapter 1 Isolation T ransformer 120 240 V AC AC P age Printer AC DC Label P rinter AC DC P anel PC USB RS232 Keyboard Barcode Scanner AC DC DS PBox PCA AT A...

Page 23: ...at AC DC adapter Verify DC plug is securely attached to Panel PC Blown fuse Check the fuse in the Isolation Transformer Troubleshooting the Isolation Transformer Section 3 3 Damaged cable Perform an...

Page 24: ...et printer or directly to printer laser printer Power LED does not light up Printer defect Replace printer Printer interface cable defective Replace cable Page printer Printer does not respond Printer...

Page 25: ...ed Phillips Screwdriver 2 Unplug all the cables and power cords going to the Panel PC Make note of what ports cables are connected to Remove the Panel PC from the cart and place it with the screen fac...

Page 26: ...M3 x 5 mm Phillips screws Natus P N 800212 that hold the inner shell on including the 2 screws that attach the plate with the connectors and carefully pry it open to expose the motherboard FIGURE 18...

Page 27: ...secure After replacing the RTC Battery it may be necessary to set the BIOS settings on the Panel PC to automatically turn the Panel PC on when the main power switch is turned on o After turning on th...

Page 28: ...wall Locate the power inlet module on the Isolation Transformer Note the orientation of the power inlet module so as to put it back in the same direction Using a flat head screwdriver open the power...

Page 29: ...are faulty replace them with the following type of fuses 115V 6 3A Slo blw 5x20mm 250V Natus Part number 000801 Suggested manufacturer Schurter P N 0034 3125 230V 3 15A Slo blw 5x20mm 250V Natus Part...

Page 30: ...Service Manual P N 000976 Rev A 3 4 Troubleshooting the ATA 5 Run the Acoustic Check as shown below If Acoustic Check shows a failure condition refer to Section 4 3 High Refer Rate and Section 4 4 Hig...

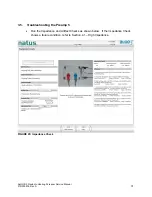
Page 31: ...Service Manual P N 000976 Rev A 31 3 5 Troubleshooting the Preamp 5 Run the Impedance and Artifact Checks as shown below If the Impedance Check shows a failure condition refer to Section 4 1 High Impe...

Page 32: ...32 ALGO 5 Newborn Hearing Screener Service Manual P N 000976 Rev A If the Artifact Check shows a failure condition refer to Section 4 2 High Myogenic FIGURE 26 Artifact Check...

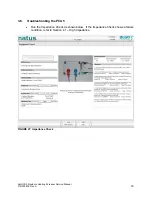
Page 33: ...Screener Service Manual P N 000976 Rev A 33 3 6 Troubleshooting the PCA 5 Run the Impedance Check as shown below If the Impedance Check shows a failure condition refer to Section 4 1 High Impedance FI...

Page 34: ...34 ALGO 5 Newborn Hearing Screener Service Manual P N 000976 Rev A 4 Technical Troubleshooting Guide 4 1 High Impedance FIGURE 28 High Impedance...

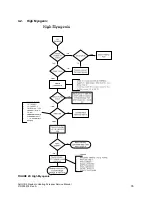
Page 35: ...ALGO 5 Newborn Hearing Screener Service Manual P N 000976 Rev A 35 4 2 High Myogenic FIGURE 29 High Myogenic...

Page 36: ...36 ALGO 5 Newborn Hearing Screener Service Manual P N 000976 Rev A 4 3 High Refer Rate FIGURE 30 High Refer Rate...

Page 37: ...ALGO 5 Newborn Hearing Screener Service Manual P N 000976 Rev A 37 4 4 High Ambient FIGURE 31 High Ambient...

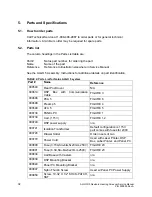
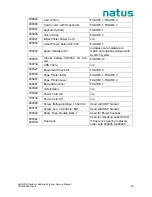
Page 38: ...ALGO 5 system Part Name Reference 000540 Rear Post Cover N A 000619 DSP Box with Communication Cable FIGURE 3 000696 PCA 5 FIGURE 6 000698 Preamp 5 FIGURE 4 000699 ATA 5 FIGURE 5 000734 PANEL PC FIGUR...

Page 39: ...em 000972 Lithium battery CR2032 3V coin cell FIGURE 19 030734 USB Cable n a 040527 Equipment Check Kit FIGURE 8 040950 Page Printer Inkjet FIGURE 1 FIGURE 2 040951 Page Printer Laser FIGURE 1 FIGURE...

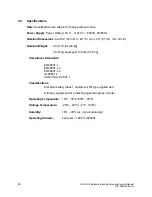
Page 40: ...H x W x D Nominal Weight Cart 110 lbs 50 kg Cart fully equipped 140 lbs 63 5 kg Compliance Standards EN60601 1 EN60601 1 2 EN60601 1 4 UL60601 1 CAN CSA 22 2 601 1 Classifications Electrical Safety Cl...

Page 41: ...23 E Earth leakage current 14 Enclosure leakage current 14 G Ground Integrity 13 H High Ambient Troubleshooting 37 High Impedance Troubleshooting 34 High Myogenic Troubleshooting 35 High Refer Rate Tr...

Page 42: ...42 ALGO 5 Newborn Hearing Screener Service Manual P N 000995 Rev A...

Reviews: