background image

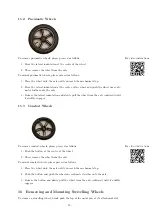
To mount swivelling wheels, place the wheel in the attachment slot until it audibly engages.

WARNING!

Verify the secure hold of the wheels after you mount them.

17

Adjusting the Suspension

If the suspension is not fully functional – due to the terrain being travelled on or a load of
the stroller of 10 kg or more – so that the stroller is no longer continuously sprung when
being used, the preload of the suspension needs to be adjusted. Please proceed as follows:

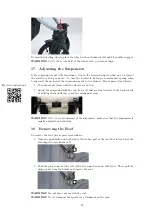
1. Turn the empty frame until the wheels are on top.

For video instructions

2. Adjust the suspension with the two levers (8) that are located close to the back wheels

by shifting them until they reach the mechanical stop.

8

8

WARNING!

After every adjustment of the suspension, make sure that the suspension is

equally adjusted on both sides.

18

Removing the Roof

To remove the roof, please proceed as follows:

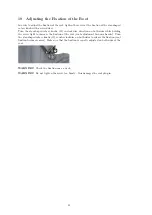
1. Open the push button on both sides of the fabric part of the roof that is located at the

star-shaped rotary knobs (19).

19

2. Push the plug-in part of the roof (20)in the round recess on both sides. Then, pull the

plug-in part from the holder and remove the roof.

20

WARNING!

Do not place any load on the roof.

WARNING!

Never transport the sports car attachment on the roof.

20

Summary of Contents for Varius pro

Page 1: ...dren from six months up to a weight of 15 kg It is only suitable for children under six months in combination with a matching carrycot or a matching baby basket This model is not suitable for jogging skating or similar activities Climate neutrally printed on recycled paper made of 100 recovered paper ...

Page 2: ... good and healthy start in life We thank you for the trust you have placed in us and hope you have a lot of fun with your new Naturkind stroller All our efforts are focused on creating a cozy first living space for your baby with loving attention to detail and the finest materials we can find This is our aim and we pursue it with love great sensitivity and a sense of responsibility It is important...

Page 3: ...the Soft Carrycot in your Stroller 15 12 Removing the Fixture or Baby Basket from the Frame 15 13 Folding the Frame 16 14 Locking and Releasing the Swivelling Wheels 17 15 Removing and Mounting the Back Wheels 18 16 Removing and Mounting Swivelling Wheels 19 17 Adjusting the Suspension 20 18 Removing the Roof 20 19 Adjusting the Fixation of the Roof 21 II Care 22 1 Fabric Parts 22 2 Cork Handles 2...

Page 4: ... 00 safety bar 1 00 seat cover 1 00 roof with roof mount 1 00 safety bar cover 2 00 shoulder pad 1 00 instructionsVarius pro Optional soft carrycot 1 00 cover for soft carrycot 2 00 shoulder strap 1 00 coco latex mattress 1 00 wooden board lying surface 2 00 wooden board side part left and right 1 00 wooden board headrest 1 00 wooden board footrest 1 00 instructions soft carrycot Optional baby bas...

Page 5: ... Varius pro sports stroller Varius pro with soft carrycot Varius pro with baby basket 5 ...

Page 6: ...each when you fold and unfold the stroller WARNING Do not let your child play with the stroller WARNING Use a seatbelt as soon as your child is able to sit upright unaided WARNING This seating unit is not suitable for children under six months WARNING Always use the restraint system WARNING It is important to check whether your carrycot or baby basket or child car seat adapter is properly engaged ...

Page 7: ...ld is in it Please also note The maximum load of the shopping basket may not exceed 3 kg The load of the bag located on the rear of the roof part may not exceed 0 2 kg The load of the diaper bag that is attached to the handlebar may not exceed a maximum of 1 kg Otherwise the suspension will not function properly If you push your stroller at a speed exceeding 5 km h the driving characteristics of y...

Page 8: ... and 16 The adjustable backrest enables your child to lie and moreover to sit in horizontal position by opting for one of the three adjustable tilts of the backrest You can find the lever for adjusting the backrest 4 on the rear end of the backrest For further information on this see page 12 The adjustable roof part can easily be adapted to changing weather influences This can be achieved by adjus...

Page 9: ...the corresponding pedal 9 to activate and release the parking brake For further information on this see page 11 If you leave the street and choose bumpy forest trails gravel roads or similar terrain lockable swivelling wheels can increase driving comfort Use the directional lock 10 to lock and release the swivelling wheels For further information on this see page 17 This stroller is equipped with ...

Page 10: ...s own and both locks audibly engage 11 Strollers with pneumatic wheels or comfort wheels 2 Release the transportation lock 11 For video instructions 11 3 Slightly press the swivelling wheels inward so that the tires no longer touch the trans verse axis Then pull the steering arm a upward until the stroller sets itself up on its own and both locks audibly engage WARNING Before you use your stroller...

Page 11: ... make sure that the parking brake is activated WARNING Always check whether the back wheels of the stroller are blocked after you activate the parking brake Only let go of the stroller if you are certain that the parking brake works WARNING The brake cables must not be bent this can lead to brake failure 5 Adjusting the height of the steering arm Push the buttons on both sides of the steering arm ...

Page 12: ...ou are adjusting the backrest please beware of resulting clamping points They can cause injuries in a moment of distraction 7 Adjusting the Footrest Push the buttons for adjusting the footrest 7 on both sides keep pushing them and make sure that the footrest is locked in the desired position Make sure that the footrest maintains the set position 7 7 c d WARNING Whenever you use the soft carrycot t...

Page 13: ...e belt 18 Hang the carabines of the shoulder straps 17 in the eyelets on the locking piece of the lap belt Adjust the belt with the sliding buckles 15 and pull it tight 18 16 12 12 17 17 5 Loop the crotch strap around the centerpiece of the belt 18 and fasten it with the push button attached to it Make sure that this pillow and the pillows on the shoulder straps are properly positioned to prevent ...

Page 14: ...f the locking devices 6 down For video instructions ward until they audibly lock on both sides of the stroller Make sure that the locking device as depicted in the following figure is locked above the metal pins of the attachment or the baby basket on both sides of the stroller 6 WARNING Before use make sure that the attachment or the baby basket is properly engaged WARNING When you fixate the att...

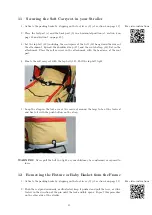
Page 15: ...ead area at the roof part 4 Fixate the soft carrycot with the lap belt 12 Pull the lap belt tight 12 5 Loop the strap in the foot area of the carrycot around the large tube of the footrest and fixate it with the push button on the strap 13 WARNING Never pull the belt too tight or your child may be constrained or exposed to force 12 Removing the Fixture or Baby Basket from the Frame 1 Activate the ...

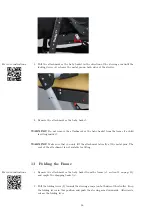
Page 16: ...sitting inside it WARNING Make sure that you only lift the attachment laterally at the metal pins The roof of the attachment is not suitable for lifting 13 Folding the Frame 1 Remove the attachment or the baby basket from the frame cf section 12 on page 15 For video instructions and empty the shopping basket e 2 Pull the folding levers 2 towards the steering arm a on both sides of the stroller Kee...

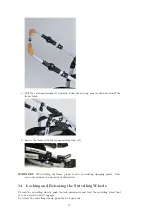
Page 17: ... WARNING When folding the frame please beware of resulting clamping points They can cause injuries in a moment of distraction 14 Locking and Releasing the Swivelling Wheels To lock the swivelling wheels push the lock downwards and turn the swivelling wheel that is to be arrested until it engages To release the swivelling wheels push the lock upwards 17 ...

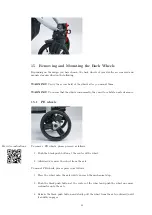
Page 18: ...rance 15 1 PE wheels To remove PE wheels please proceed as follows For video instructions 1 Push the black push button at the center of the wheel 2 Afterwards remove the wheel from the axle To mount PE wheels please proceed as follows 1 Place the wheel onto the axle until you reach the mechanical stop 2 Push the black push button at the center of the wheel and push the wheel one more centimeter on...

Page 19: ...d slowly pull the wheel from the axle outward until it audibly engages 15 3 Comfort Wheels To remove comfort wheels please proceed as follows For video instructions 1 Push the button at the center of the wheel 2 Then remove the wheel from the axle To mount comfort wheels please proceed as follows 1 Place the wheel onto the axle until you reach the mechanical stop 2 Push the button and push the whe...

Page 20: ...video instructions 2 Adjust the suspension with the two levers 8 that are located close to the back wheels by shifting them until they reach the mechanical stop 8 8 WARNING After every adjustment of the suspension make sure that the suspension is equally adjusted on both sides 18 Removing the Roof To remove the roof please proceed as follows 1 Open the push button on both sides of the fabric part ...

Page 21: ... on both sides while holding the screw tight to increase the fixation of the roof roof adjustment becomes harder Turn the star shaped rotary knobs 19 counterclockwise on both sides to release the fixation roof fixation becomes easier Make sure that the fixation is equally adjusted on both sides of the roof 19 WARNING Check the fixation once a week WARNING Do not tighten the screw too firmly this d...

Page 22: ...ght fastness and abrasion resistance fabrics light fastness abrasion resistance dry wet light organic cotton colors 3 to 4 3 2 dark organic cotton colors 3 to 4 2 2 Please note that higher ozone levels have a negative effect on the color fastness of the fabrics Because fabrics also react sensitively to solar radiation we recommend to keep the stroller away from the blazing sun 2 Cork Handles Clean...

Page 23: ...carefully apply a new coating layer to the affected areas with a paint stick from a specialist shop according to the instructions WARNING Please note that the stroller needs to be cleaned after every use under certain environmental conditions proximity to the ocean grit contact with sand etc WARNING Whenever your stroller comes in contact with cleaning agents please note that the corresponding par...

Page 24: ... at the brake pedal Make sure that the brake cables are not bent and that they function properly 5 Spray oil into the opening of the brake pedal from left and right and from below and above Actuate the brake and repeat the procedure 3 Suspension and Frame Maintenance 1 Spray oil in the spring suspension at both back wheels both inside and outside 24 ...

Page 25: ...ain press the pedal of the parking brake from below and oil the innerspring construction inner wall left and right between the plastic parts and the middle guide 4 Now put some oil in the frame holder inside and outside 5 Put some drops of oil between the plastic connections of the frame 6 Finally put some drops of oil on and behind the pins of the locking mechanism 25 ...

Page 26: ...endent repairs or changes of the product without prior approval of Naturkind 2 Examples None of the following examples are guarantee claims Color differences cannot always be avoided during production and do not constitute a reason for complaint The fading or lighter edges of textiles do not constitute a material defect they are a result of normal wear and tear Mechanical effects such as friction ...

Page 27: ...e of the frame With plastic parts there is a certain risk of breakage when loaded at very low tempe ratures which is why the stroller must be stored in frost proof rooms Broken plastic parts are covered by the guarantee if they turn out to be material defects after being tested accordingly The handles consist of the pure natural material cork and under normal use have a service life of over a year...

Page 28: ... organic virgin sheep s wool from controlled organic livestock kbT for the filling cork coconut wood Every Naturkind stroller is manufactured for you by hand Our models comply with the Euro standards EN 1888 2012 EN 1466 Naturkind GmbH Langwiesen 19 A 4209 Engerwitzdorf Tel 43 7235 62243 Fax 43 7235 622433 kinderwagen naturkind at www naturkind at 28 ...

Reviews: