background image


877-565-1457 


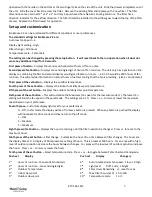
opened with the handle on the bottom or the two finger tabs on the side of the unit.  Slide the drawer completely out of 
the unit.  Slide the cover back to access the filter.  Remove the existing filter and replace with a new filter.  The filter 

dimensions are a nominal 12” x 12” x 1” and may be purchased from Nature’s Cooling Solutions.  The filter has a 

direction indicator for the airflow direction.  The filter should be installed so the airflow goes toward the top of the filter 
drawer.  Replace the filter drawer for operation.  

Set up and customization 

EcoBreeze 2.2 can be customized for different conditions or user preferences.   

The standard settings for EcoBreeze 2.2 are: 

Auto low Fan Speed 

 6  

Display Light setting - High 

Filter change 

 500 hours 

Temperature scale 

 Fahrenheit 

The settings can be changed by pressing the setup button.   It will revert back to the run operation when it does not 
sense any additional input for 10 seconds.   

First press of button 

 Displays thousands and hundreds of hours of fan run time  

Second press of set button

 - Displays tens and single digit of hours of fan run time.  The unit only has 2 positions on the 

display so combining the first and second display would give lifetime run hours.  I.e. 01, 95 would be 0195 hours of fan 
run time. This will provide information on actual hours of natural cooling that the fan is providing.  (Like a car odometer)  

Third press of the set button 

 Displays the outdoor temperature 

Fourth press of the set button 

 Displays the indoor humidity dew point temperature 

Fifth press of the set button 

 Displays the outdoor humidity dew point temperature 

Sixth press of the set button 

 This will customize the 

Maximum


fan

 speed for the low auto mode (1). The lower fan 

setting will limit the fan speed in the quiet mode.  The settings are 1-10.   Press + or 

 to raise or lower the maximum 

speed based on your preference.  


Seventh press 

 Customize display light level for your preferences.  

 Off - in this mode the display will be off unless a button is pressed.  When any button is pushed the display            

will illuminate for 30 seconds and they return to the off mode.   


 Dim 


 Medium 


 Maximum 

Eighth press of set button 

 displays the hours remaining until the filter needs to be changed.  Press +/- to reset to the 

maximum hours 

Ninth press of the set button 

 Filter change.   Customize the hour of run time between filter changes.  The hours are 

the display times 10.  A display of 50 represents a setting of hours.  This is preset at 500 hours.  For an area with a high 
level of outdoor pollution decrease the hours between changes.  For areas with a low level of outdoor pollution increase 
the hours.  Press + or 

 to raise or lower the hours.  

Tenth press of the set button 

 Select temperature scale.  Press + or 

 to toggle between Fahrenheit and Centigrade. 

Push set          Display                         


Push set          Display                         /

1

st

          Hours of run time - thousands & hundreds 

2

nd

         Hours of run time 

 tens and single digits 

3

rd


Outdoor Temperature 

4

th


Indoor dew point 

5

th


Outdoor dew point 

6

th


Auto low Maximum fan speed - 1 low, 10 high 

7

th


Light level        0 off, 1 dim, 3 bright 

8

th


Filter Hours Remaining   +/-  reset to max 

9

th


Max Filter hours (x10)  10 to 100 

10

th


Temperature scale 

F or C 


Summary of Contents for EcoBreeze 2. 2

Page 1: ...oBreeze 2 tab Call us at 877 565 1457 or email us at Naturescoolingsolutions gmail com Owner s Manual Contents Page Important Safety Instructions 2 Parts List 3 Installation Double Hung Windows 4 Installation Slider Windows 5 Operating Instructions 6 Trouble Shooting 8 Maintenance Instructions Warranty Information 8 Mother Nature provides the cool fresh air we provide the technology EcoBreeze 2 2 ...

Page 2: ...ce the risk of electrical shock this plug is intended to fit in a polarized outlet only one way Match the wide blade of the plug to the wide slot Fully insert If the plug does not fit in the outlet contact a qualified electrician Do not attempt to defeat this safety feature 8 This product employs overload protection fuse A blown fuse indicates and overload or short circuit situation If the fuse bl...

Page 3: ...liquids are stored 14 DO NOT attempt to repair or adjust any electrical or mechanical functions on this unit Doing so will void your warranty The inside of this contains no user serviceable parts All servicing should be performed by qualified personnel only 15 This fan is not suitable for use in agricultural facilities including areas where livestock poultry or other animals are confined Please re...

Page 4: ...e center screw Insert the extenders into the window bracket and secure with the 2 end screws Tighten the middle screw Note for windows that are between 20 and 22 use only one extender Install EcoBreeze 2 2 in the window Place EcoBreeze 2 2 so it is centered in the window Slide the extenders to the window frame and into the window channel Install the extender foam panels Measure the opening in the ...

Page 5: ...he extender Remove the upper screw from the window bracket Loosen the center screw Insert the extender into the window bracket with the open slot on the top Secure with the 2 end screws Tighten the middle screw Install the window side weather strip Place 4 glue squares on the window where EcoBreeze 2 2 will be placed Cut the 42 weather strip to the window height Attach the weather strip to the win...

Page 6: ...oo high the Outdoor Humidity will be illuminated When air conditioning is not used the control can be turned off and the Hum display light will turn off Please note EcoBreeze 2 2 measures dew point not relative humidity Select the fan mode The fan button changes the fan mode Press the fan button to toggle through the fan modes The first press shows the current mode O for manual ON 1 for automatic ...

Page 7: ...ton Displays the indoor humidity dew point temperature Fifth press of the set button Displays the outdoor humidity dew point temperature Sixth press of the set button This will customize the Maximum fan speed for the low auto mode 1 The lower fan setting will limit the fan speed in the quiet mode The settings are 1 10 Press or to raise or lower the maximum speed based on your preference Seventh pr...

Page 8: ...chase is required to obtain warranty performance This warranty does not cover normal wear of parts or damage resulting from any of the following negligent use or misuse of the product use on improper voltage or current and use contrary to the operating instructions disassembly repair or alteration by anyone other than NCS or an authorized NCS service center Further the warranty does not cover Acts...

Reviews: