NATURE & DECOUVERTES 42002710 Manual Download Page 4

6

7

FAQ

TIPS

PARTS LIST 

Glue is needed if 
it’s not firm enough 
after assembly, which 
should be prepared 
by yourself.s

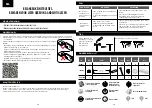
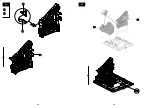
Make sure the gears are  

appropriately engaged with  

each other.

Perspective changed. Rotate 

the product based on the 

direction of arrow.

Assemble the parts  

symmetrically 

Wax or lubricant needed 
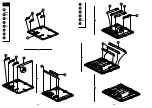
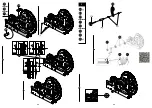
Step 1

Step 2

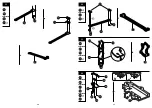
Polish the parts with  

sandpaper.

 Special attention 

in assembly.

Make sure the parts could  

rotate freely.

Complete 2 pieces.

Press the slot to the end. 

PROBLEM 

CAUSE

SOLUTION

The assembly 

could not rotate 

freely.

1. The friction between boards is 

excessive.

2. The connecting points are not 

smooth.

1. Wax related parts. 

2. Polish the connecting points with 

sandpaper and make sure each part is 

well assembled. 

The marble 

gets stuck in 

the track.

1. The slot is not connected to 

the end correctly.

2. The track is not inclined  

appropriately.

1. Press the slot ta connect it properly with 

the end.

2. Check if the tracks are engaged with 

each other appropriately and make sure 

each parts are well assembled.

Item 

Shaft 

Sleeve

Steel Shaft 

Isolation 

Column

Screw 

Screw Nut

Steel Ball

Wax 

Number 

P1

P2

P3

P4

P5

P6

P7

Illustration

Quantity 

10

4

1

1

2

10

1

EN

PLEASE CAREFULLY READ THIS MANUAL  

AND KEEP IT IN A SAFE PLACE.

ENTRETIEN 

CUSTOMER SERVICE

AVERTISSEMENT 

• This product is for people whose age is over 14, kids should assemble under the guidance of adults. 

1.  Keep the product far away from sources of ignition and water ta prevent any damage.
2.  Don’t use any chemical reagents like alcohol, ammonia water or window cleanser ta clean the 

product.

3. Use clean and soft fabric ta clean the product if necessary.

Attention :

•  Store the small parts away after opening the package prevent losing when 

assembling.

•  Make sure that the numbers match to their corresponding number while 

assembling.

•  Additional pieces can be used as spare parts.
•  For some difficult assembling steps, you can scan the QR codes for  

assembly videos.

•  Use the sandpaper to polish the pieces if needed.
• Please keep the manual well for future reference.

Facebook: RokrOfficial 
Please contact us on Facebook, our online customer service group will try thier best ta help you 
salve any problems there. We offer online instruction support, you can find the latest version on 
our website: www.robotime.com. 

Summary of Contents for 42002710

Page 1: ...tentivement et conserver soigneusement ce mode d emploi Please carefully read this manual and keep it in a safe place Lea detenidamente este manual y guárdelo en un lugar seguro Lees deze gebruiksaanwijzing aandachtig en bewaar deze op een veilige plaats Leia atentamente este manual e guarde o num local seguro ...

Page 2: ...tites pièces après l ouverture de l emballage pour éviter de les perdre lors de l assemblage Assurez vous que les numéros correspondent lors de l assemblage Des pièces supplémentaires peuvent être utilisées comme pièces détachées Pour les étapes d assemblage difficiles vous pouvez scanner les codes QR pour voir les vidéos d assemblage Utilisez le papier de verre pour polir les pièces si nécessaire...

Page 3: ...usqu à l extrémité PROBLÈME CAUSE SOLUTION Les pièces ne tournent pas librement 1 Il y a trop de friction entre les planches 2 Les points de raccordement ne sont pas lisses 1 Cirez les pièces concernées 2 Polissez les points de raccordement avec le papier de verre et assurez vous que chaque partie est bien montée La bille se coince dans le circuit 1 La fente n est pas correctement raccordée à l ex...

Page 4: ...ft Sleeve Steel Shaft Isolation Column Screw Screw Nut Steel Ball Wax Number P1 P2 P3 P4 P5 P6 P7 Illustration Quantity 10 4 1 1 2 10 1 EN PLEASE CAREFULLY READ THIS MANUAL AND KEEP IT IN A SAFE PLACE ENTRETIEN CUSTOMER SERVICE AVERTISSEMENT Thisproductisforpeoplewhoseageisover14 kidsshouldassembleundertheguidanceofadults 1 Keep the product far away from sources of ignition and water ta prevent an...

Page 5: ...as después de abrir el paquete para evitar que se pierdan al montarlo Asegúrese de que los números coincidan con su número correspondiente durante el montaje Las piezas adicionales pueden ser utilizadas como piezas de repuesto Para los pasos de montaje difíciles puede escanear los códigos QR para ver los vídeos de montaje Use el papel de lija para pulir las piezas si es necesario Guarde el manual ...

Page 6: ...anura hasta el final PROBLEMA CAUSA SOLUCIÓN El montaje no puede girar libremente 1 La fricción entre las tablas es excesiva 2 Los puntos de conexión no son uniformes 1 Piezas vinculadas con cera 2 Pula los puntos de conexión con papel de lija y asegúrese de que cada pieza esté bien montada El mármol se atasca en la pista 1 La ranura no está conectada correctamente al extremo 2 La pista no está in...

Page 7: ...n Wij bieden online ondersteuning bij de montage U vindt de actuele versie op onze website www robotime com FAQ TIPS ONDERDELENLIJST Als de baan na de montage niet stevig genoeg is gebruik dan lijm niet inbegrepen Zorg ervoor dat de tandwielen correct in elkaar grijpen Perspectief gewijzigd Draai het product in de richting van de pijl Monteer de onderdelen symmetrisch Was of smeermiddel vereist St...

Page 8: ... Guarde as peças pequenas depois de abrir a embalagem para evitar perdê las durante a montagem Certifique se que os números correspondem ao número indicado durante a montagem Podem ser utilizadas peças adicionais como peças sobressalentes Para algumas partes difíceis de montar pode passar o código QR para visualizar os vídeos de montagem Use a lixa para lixar as peças se necessário Guarde o manual...

Page 9: ...ranhura até ao fim PROBLEMA CAUSA SOLUÇÃO A montagem não gira livremente 1 Há demasiado atrito entre as placas 2 Os pontos de ligação não estão lisos 1 Encere as peças em questão 2 Lixe os pontos de ligação com uma lixa e certifique se de que cada peça está bem montada A esfera fica presa na pista 1 A ranhura não está devidamente encaixada até ao fim 2 A pista não está devidamente inclinada 1 Pres...

Page 10: ...18 19 1 ...

Page 11: ...20 21 4 2 3 ...

Page 12: ...22 23 5 ...

Page 13: ...24 25 11 13 12 6 7 9 10 8 ...

Page 14: ...26 27 15 14 ...

Page 15: ...28 29 17 16 ...

Page 16: ...30 31 19 18 ...

Page 17: ...32 33 20 ...

Page 18: ...34 35 22 21 ...

Page 19: ...36 37 24 25 26 23 ...

Page 20: ...38 39 29 30 31 27 28 ...

Page 21: ...40 41 35 36 37 32 33 34 ...

Page 22: ...42 43 39 38 ...

Page 23: ...44 45 41 40 ...

Page 24: ...46 47 43 42 ...

Page 25: ...48 49 45 46 44 ...

Page 26: ...50 51 48 47 ...

Page 27: ...52 53 50 49 ...

Page 28: ...54 55 ...

Page 29: ...conserver WARNING Not for children under 3 years Choking hazard Small parts Please keep all the relevant information for future reference ATENCIÓN No apto para niños menores de 3 años Peligro de asfixia Presencia de piezas pequeñas que pueden ingerirse Retirar el embalaje antes de darle el juguete al niño OPGELET Niet geschikt voor kinderen jonger dan drie jaar Bevat kleine onderdelen die ingeslik...

Reviews: