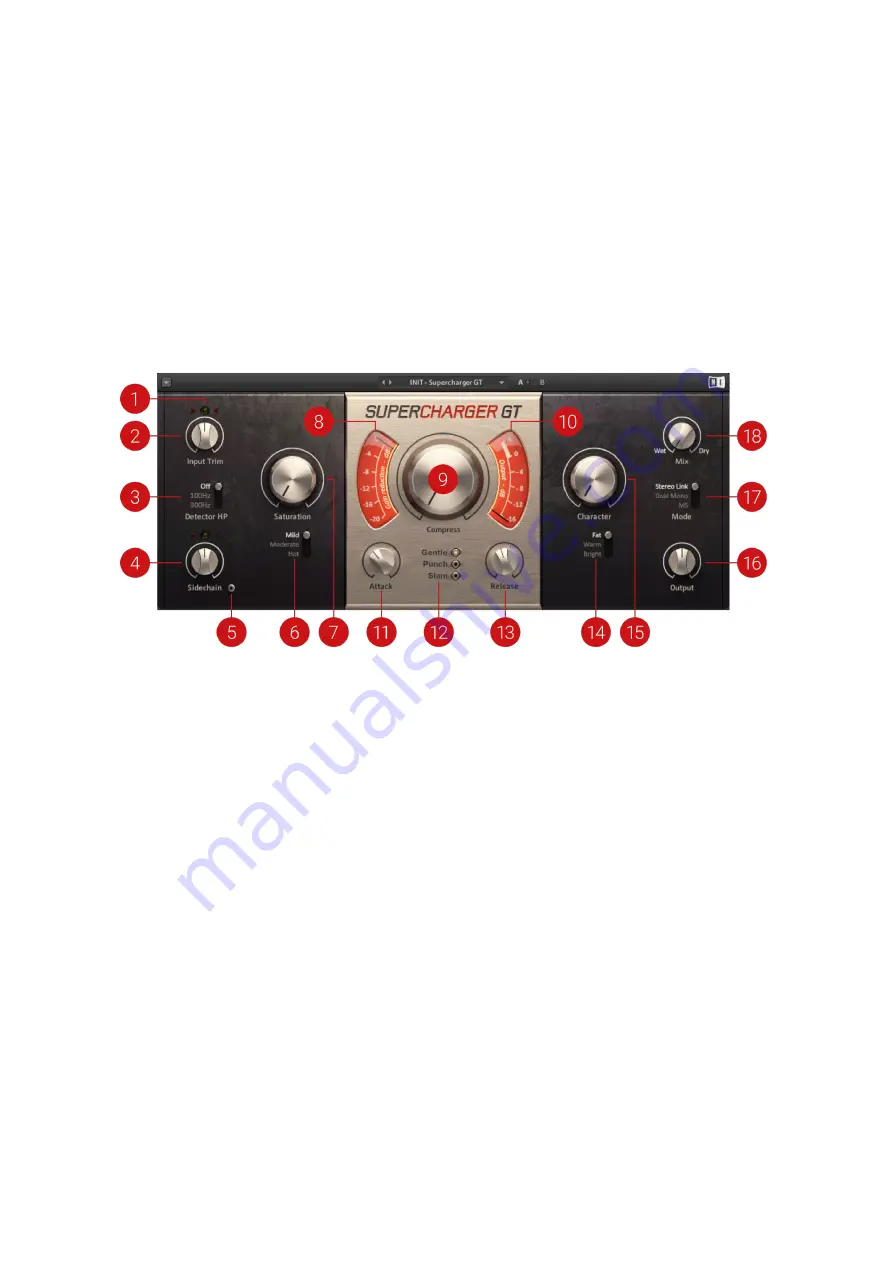
3. Overview
SUPERCHARGER GT's clear but powerful interface enables you to quickly find the right settings
whilst providing detail parameters for fine-tuning your sound. The
Saturation
stage creates rich
sounds by adding harmonics. The
Attack
and
Release
times can be used to add more bite or
sustain to sounds. The
Character
control colors the sound based on three different modes,
Fat
,
Warm
, and
Bright
. Finally, the Expert Panel provides a filter for the sidechain signal and different
stereo routing modes including M/S (mid/side) processing.
SUPERCHARGER GT contains the following parameters and controls:
1. Input Level Indicator
: Displays the input level and indicates the correct setting of the
Input
Trim
control. When the level is set correctly, the center indicator is lit green. When the level is
too low, the left arrow indicator is lit red. When the level is too high, the right arrow indicator is
lit red.
2. Input Trim
: Adjusts the input level. The correct setting is shown by the Input Level indicator.
3. Detector HP
: Switches between three different settings for a high-pass filter that is applied
to the compressor's control signal.
Off
deactivates the high-pass filter.
100Hz
attenuates
frequency content below 100 Hz.
300Hz
attenuates frequency content below 300 Hz.
4. Sidechain
: Adjusts the level of the sidechain signal, which can be used to control the
compressor when the
Sidechain
switch is activated.
5. Sidechain switch
: Activates the sidechain input, allowing you to use an external signal as the
compressor's control signal.
6. Mild/Moderate/Hot
: Switches between three types of saturation.
Mild
subtly colors the sound.
Moderate
produces a pronounced saturation effect.
Hot
adds strong saturation and even
distortion to the sound.
7. Saturation
: Adjusts the amount of saturation added to the input signal. The type of saturation
can be switched between
Mild
,
Moderate
, and
Hot
.
8. Gain Reduction Meter
: Displays the amount of gain reduction applied to the input signal.
9. Compress
: Adjusts the amount of compression applied to the input signal. Turning the control
to the right increases the amount of compression while retaining an even loudness level (as
long as Input Trim is set correctly).
10
.
Output Level Meter
: Displays the level of the output signal.
OVERVIEW
4
Summary of Contents for SUPERCHARGER GT
Page 1: ...SUPERCHARGER GT Manual...


