background image

MASCHINE 1.5 Reference Manual – 164


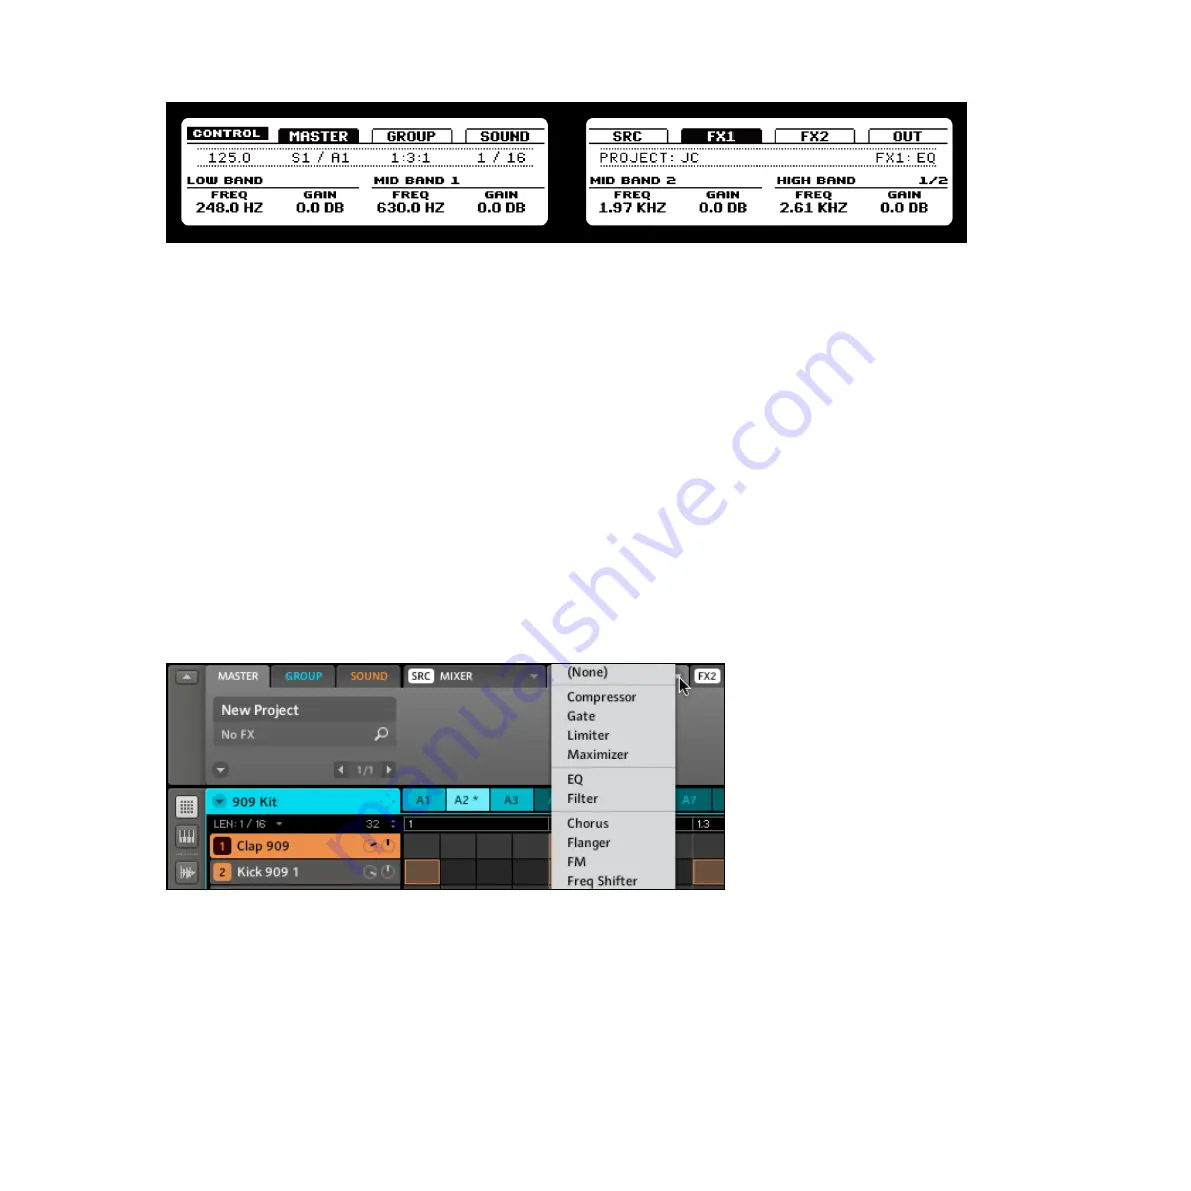
The parameters of the EQ in the FX1 Module of the Master Tab on the Left and Right Display

Some of the Effects will have more than one parameter page (like the EQ pictured above); 
in this case, use the Page Buttons to navigate between them.


If you want to load a FX Preset, press BROWSE without SHIFT. You will now be pre-
sented with a list of the available FX Presets; you can browse them by turning Knob 5 
and load one by pressing Button 8, or load them directly by using Buttons 5 and 6.

Software

1. 

First you select the Master Tab by clicking on it in the Control Area 

2. 

Click on the Arrow on the right of one of the FX Modules to select an Effect for the Master.


The list of available Effects for the Master

You can also load FX Presets from the Browser either by double-clicking them or by 
dragging them to the FX Slot you want to use.

Summary of Contents for Maschine

Page 1: ...REFERENCE MANUAL...

Page 2: ...uced or otherwise transmitted or recorded for any purpose without prior written permission by Native Instruments GmbH hereinafter referred to as Native Instruments All product and company names are or...

Page 3: ...rlin Germany info native instruments de www native instruments de USA Native Instruments North America Inc 5631 Hollywood Boulevard Los Angeles CA 90028 USA sales native instruments com www native ins...

Page 4: ...subject to change 17 1 4 6 Copyright 17 1 4 7 Disclaimer 17 1 5 Installing MASCHINE 18 1 5 1 System Requirements 18 1 5 2 Installing MASCHINE on Windows XP and Windows Vista 18 1 5 3 Installing the MA...

Page 5: ...ces 38 2 4 1 Preferences General Tab 39 2 4 2 Preferences Default Tab 41 2 4 3 Preferences User Paths Tab 42 2 4 4 Preferences Libraries Tab 43 2 4 5 Preferences Hardware Tab 44 2 5 Audio and MIDI Set...

Page 6: ...ings and Engine 66 4 2 2 Page 2 Pitch Gate and Amplitude Envelope 68 4 2 3 Page 3 FX and Filter Settings 70 4 3 FX 70 4 3 1 Page 4 Modulation Envelope and Destination 71 4 3 2 Page 5 LFO and Destinati...

Page 7: ...s without Patterns 100 5 8 MPC Program Import to Groups 101 5 8 1 Supported parameters from MPC Programs 101 5 8 2 Importing MPC Program files 103 6 Working with Patterns Hardware 105 6 1 Creating Pat...

Page 8: ...Patterns 121 7 2 1 Mouse actions in the Pattern Editor 122 7 2 2 The Zoom Tool 123 7 2 3 Compare Split 124 7 2 4 The Piano Roll Keyboard 125 7 2 5 Recording and editing automation 125 7 2 6 Adding a M...

Page 9: ...5 1 Beat Delay 151 8 5 2 Grain Delay 152 8 5 3 Grain Stretch 153 8 5 4 Resochord 154 8 6 Distortion 155 8 6 1 Distortion 155 8 6 2 Lofi 156 8 6 3 Saturator 157 9 Using FX 158 9 1 Adding FX to a Sound...

Page 10: ...Hardware 186 11 1 1 Recording a Sample Hardware 186 11 1 2 Editing a Sample Hardware 188 11 1 3 Slicing a Sample Hardware 191 11 1 4 Mapping a Sample Hardware 194 11 2 Controlling Sampling from the So...

Page 11: ...Secondary Pad Functions 223 14 14 Navigation Shortcuts on the MASCHINE Controller 224 14 15 Other Shortcuts on the MASCHINE Controller 226 15 Appendix B Keyboard Shortcuts 229 15 1 Views 229 15 2 Navi...

Page 12: ...3 Create variations of your drums in the Step Sequencer 235 16 2 4 Use Note Repeat 235 16 2 5 Set up your own Multi FX Groups and automate them 236 16 3 Special Tricks 236 16 3 1 Changing Pattern Leng...

Page 13: ...aving to stop the music Since you can integrate it into any sequencer that supports VST Audio Units or RTAS plug ins you can reap the benefits in almost any software setup or use it as a standalone ap...

Page 14: ...ng Special Formatting This manual contains some elements that appear in a different font type These distinctive formats have been applied in order to let you recognize certain elements in the text at...

Page 15: ...E Controller for controlling other MIDI enabled 3rd party software or external MIDI hardware For further information on these functions please refer to the Controller Editor Manual located in the Docu...

Page 16: ...of any kind penetrate the unit Never use or store the unit in areas subject to extreme temperatures e g direct exposure to sunlight in an enclosed vehicle and or near heat generating equipment or hig...

Page 17: ...Native Instruments reserves the right to make changes to the speci fications at any time without notice or obligation to update existing units 1 4 6 Copyright Native Instruments GmbH 2010 This publica...

Page 18: ...llation DVD in your computer s DVD ROM drive 2 Use Windows Explorer to browse the content of the DVD ROM 3 Double click the installer file named MASCHINE Setup exe 4 Click Next 5 To continue you need...

Page 19: ...ow the MASCHINE Controller hardware driver installation will finish Subsequently go through the same procedure in order to install the MASCHINE Controller USB driver 1 5 3 Installing the MASCHINE Soft...

Page 20: ...ation e g to an external hard disk click the folder icon in the Location column to open a dialog in which you can specify a destination for the installation Deselecting the Service Center application...

Page 21: ...SCHINE Controller on a USB hub instead make sure the hub has its own power supply the MASCHINE Controller will not work on a passive bus powered USB hub If you have any MIDI equipment such as synthesi...

Page 22: ...troller s hardware elements Virtually all functions are available on both interfaces and you can access them through the software as well as through the hardware If you need to look up a certain user...

Page 23: ...Tap Tempo Button 9 Master Encoders Volume Tempo and Swing 10 Group Buttons 11 Grid Button 12 Transport Buttons 13 Buttons 1 8 14 MASCHINE Displays 15 Knobs 1 8 16 Pads 17 Erase Button 18 Shift Button...

Page 24: ...iously in the MASCHINE Controller Overview chapter you can access virtually all of MASCHINE s functions via the MASCHINE Controller as well as in the software If you need to look up a certain user int...

Page 25: ...he Header 1 Menu Button 2 Browser Button 3 Display Area 4 Transport Controls 5 Connect Button 6 Audio Engine Button 7 CPU Meter 8 Volume Control 9 NI Logo 1 7 2 The Arranger 1 Play Mode Controls 2 Gro...

Page 26: ...MASCHINE 1 5 Reference Manual 26 1 7 3 The Browser 1 Browser Mode Selector 2 File Type Selector 3 Tag Filter 4 Text Search Field 5 Search Result List 6 Tag Editor 7 Audition Controls...

Page 27: ...erence Manual 27 1 7 4 The Control Area 1 Master Tab 2 Group Tab 3 Sound Tab 4 Source Tab 5 FX1 Tab 6 FX2 Tab 7 Output Tab 8 Quick Browse Area 9 Page Selector 10 Parameter Pages depending on the selec...

Page 28: ...itor 1 Step Editor View Switch 2 Dragger Icon 3 Step Editor 4 Piano Roll Keyboard View Switch 5 Sampling View Switch 6 Sound Slots 7 Automation Lane 8 Automation View Switch 9 Edit Controls 10 Pattern...

Page 29: ...29 1 7 6 The Sampling Area 1 Record Tab 2 Edit Tab 3 Slice Tab 4 Mapping Tab 5 Trim Controls 6 Sample Loop Controls 7 Zone Envelope Controls 8 Info Bar 9 Sample Timeline 10 Sample View 11 Zoom Tool 1...

Page 30: ...hat allows you easy access to all of them MASCHINE s Factory Library is already completely tagged and you can also import your own Samples to the Library and tag them as well To learn more about the B...

Page 31: ...the same Pattern or different Sounds with a given melody More information on Patterns can be found in chapter 6 Working with Patterns Software and chapter 7 Working with Patterns Software Scenes A Sce...

Page 32: ...le from your computer keybord via the F5 function key 2 2 2 Showing and hiding user interface areas There are several areas on the software s user interface that you can fold away or reduce in size in...

Page 33: ...E now press Button 5 to hide the Browser To bring it back press Button 5 again The Navigate screen on the Left and Right Display of the MASCHINE Controller Software Click on the Browser Button with th...

Page 34: ...ranger to minimize the Arranger to the currently selected Group Slot and again to show all Group Slots The Arranger in minimized view showing the Group Slot in focus Hiding Parameter Pages in the Cont...

Page 35: ...ome situations the Control Area consist of more parameters than the displays can show at once Examples of this are the Groups Output Tab and the Sounds Source Tab if set to Sampler In these cases the...

Page 36: ...do and Redo Undo and Redo are useful to cancel operations you have performed or to compare two ver sions before and after a change also see the Compare Split functions explained in chapter 6 2 5 Compa...

Page 37: ...dd them in chapter 1 5 Installing MASCHINE Differences between Stand alone and Plug in Mode When you are using MASCHINE as a plug in within a host application i e sequencer soft ware like Cubase or Pr...

Page 38: ...rences You can find the Preferences dialog under MASCHINE in the Main Menu Mac OS X or in the File menu Windows as well as in the File submenu of the Plug in menu Preferences on the Main Menu Mac OS X...

Page 39: ...ab Startup Reload last Project If this option is checked the last Project you worked on when quitting MASCHINE will be loaded as soon as you start MASCHINE again Recording Audio Prefer Project Folder...

Page 40: ...nome sound on both MASCHINE see chapter 6 1 4 The Metronome on how to activate the Metronome and the external MIDI Master and mix them together moving the slider until they are played at exactly the s...

Page 41: ...th of the Patterns Input Quantise This allows you to select one of the three quantise options None no quantization Record quantization only in Record mode or Play Rec quantization in Play and Record M...

Page 42: ...rectory ADD Click ADD to manually add directories to the Library keep in mind that any MASCHINE compatible files in those direc tories will not be tagged if you add them like this see the Browser chap...

Page 43: ...references Libraries Tab The Preferences Libraries Tab RESCAN Click this button to rescan the MASCHINE Factory Library This is useful if you have moved the Factory Library to anoth er hard drive or to...

Page 44: ...shold at which MASCHINE will register a hit Velocity Scaling Velocity Scaling determines how your playing is translated into velocity values starting from Soft 3 a soft touch is enough to get a big ve...

Page 45: ...play gives you access to all of the settings described above with the exception of the Velocity Scaling The Knobs 1 4 allow you to adjust the Brightness Pad Sensitivity Contrast Left and Contrast Righ...

Page 46: ...more immediate playing response but are heavier on both the CPU and the audio driver and may result in audible clicks and pops Larger values are easier on the CPU but introduce a larger latency i e t...

Page 47: ...audio interface on the right column by clicking on the fields you will be presented with a dropdown menu with all the available Inputs The choices made here will determine which Inputs can be used whe...

Page 48: ...puts Clicking on Outputs displays a list of all the available MIDI Outputs of your system You can activate each Output by clicking in the Status column Offset Use the Offset control to compensate dela...

Page 49: ...this in chapter 10 Creating a Song using Scenes 2 6 1 Sync to External MIDI Clock MASCHINE can be controlled externally via MIDI Clock by any device that is capable of sending MIDI Clock This could be...

Page 50: ...send a MIDI Clock signal to any device that is capable of receiving MIDI Clock This could be hardware such as a drum machine another groovebox or sequencer or even another software sequencer To enabl...

Page 51: ...ords Have a look at the tutorial videos Browser Library Part One and Browser Library Part Two available on the Native Instruments website http www native instruments com for more information Given tha...

Page 52: ...Groups mgrp 3 Sounds msnd 4 Patterns mpat 5 FX Presets mfxp 6 Samples wav aiff The File Type Selector only appears up when you have selected the Library tab in the Browser Mode Selector On the File T...

Page 53: ...and Subtype The Tag Filter with the filetype Sample selected Bank The Bank category is meant to define a basic structure If you add a large library with many types of Samples this might be the place t...

Page 54: ...List shows all the files that match your query Double clicking one of the matches will load the respective file Depending on what File type you have selected the file will be loaded to different loca...

Page 55: ...Presets and Samples into specific Slots or Tabs by dragging them from the Browser and dropping them on the desired location 3 1 6 Locating missing Samples If you are loading a MASCHINE Project and the...

Page 56: ...ted file types are Wav and Aiff To be able to find them in the Browser from the Hardware you will have to import them into the Library Importing Samples does not mean they will be moved from the direc...

Page 57: ...that contains your Samples You can preview the Samples automatically before loading them by activating the Audition function in the lower row of the Browser Click on the Audition Button the slider to...

Page 58: ...tiple files at once such as a folder of your favorite Samples you can select the whole folder and tag all files at once using the same dialog as when importing single files You can also make non conti...

Page 59: ...r to be able to find what you are looking for later You can add as many Tags to a file as you want to by clicking on them A checkmark will ap pear next to the selected Tags To remove the Tag from the...

Page 60: ...Mac OS X Control click on the selection to open the delete menu 3 3 Quick Browse Quick Browse is a feature that allows you to quickly recall a search query you performed to get to a given file Let s...

Page 61: ...e Browser which will be highlighted in white Activating In Place Auditioning by clicking the Swap Button In Place Auditioning is not only useful to look for an appropriate Sound Group FX or Sample but...

Page 62: ...ays with the Sound Tab in focus Filter Dial Knob 1 to select a file type you are looking for Depending on which of the Buttons 2 4 are selected the picture above shows the Browser with Button 4 i e th...

Page 63: ...e your Hardware a lot make sure to tag all the files you want to use extensively This makes it a lot easier to access them using the Hardware You can browse through the Search Result List by turning K...

Page 64: ...Sounds 4 1 Choosing a Source for Your Sound We will first look at the Source Tab of your Sound which allows you to define what source the Sound is going to use Hardware On the MASCHINE Controller fir...

Page 65: ...automati cally any time you load a sound into the slot 4 2 The Sampler Parameters in the Sound s Source Tab SRC The Sampler Parameters offer various ways to further shape each of your Sounds individua...

Page 66: ...through the pages by pressing the Page Buttons Software In the Software use the Page Selector to step through the Parameter Pages In the software step through the pages by clicking the Page Selector...

Page 67: ...Legato is selected this allows for a portamento effect between consecutive steps Pitchbend Here you can adjust how the Sound reacts on incoming MIDI Pitchbend messages from an external MIDI Controlle...

Page 68: ...ower pitch Start Determines the start point of the Sample can also be modulated with Velocity control on Page 6 see below Reverse If Reverse is activated the Sample will be played backwards Amplitude...

Page 69: ...you can make the Pads behave like a MIDI keyboard and sustain a note only for as long as it is held down Amplitude Envelope Controls Attack Attack determines how quickly the Sound reaches full vol ume...

Page 70: ...ixed up with the FX section covered in depth in chapter 9 Using FX FX Controls Comp Basic compressor allowing you to give a Sound more den sity Drive Defines the amount of saturation applied to a Soun...

Page 71: ...ilter with Cutoff and Resonance Cutoff can be modulated by Velocity the Modulation Envelope the LFO or the MIDI Modulation Wheel BP2 BP2 is a bandpass filter with Cutoff Cutoff can be modu lated by Ve...

Page 72: ...ng the envelope will stay at its maximum level Decay With Decay you adjust how fast the envelope drops to the Sustain level in ADSR mode in AHD mode it is used to adjust how fast the envelope fades ou...

Page 73: ...g Sync it will show musical values instead Phase Defines the initial phase of the LFO waveform expressed as a percentage Sync This button is used to activate synchronization of the LFO to the tempo of...

Page 74: ...lay harder negative values shift it closer to the beginning of the sample as you play harder Tip a typical example for this parameter is setting it so that the initial attack transient of a snare drum...

Page 75: ...n Page 5 Pan Another modulation target for the MIDI Modulation Wheel the panorama position on Output Parameter Page 1 4 4 The Sampler Parameters in the Sound s Output Tab OUT The Sound s Output Tab al...

Page 76: ...st This allows you to send individual Sounds from MASCHINE to their own mixer channel within your DAW for example Aux 1 Destination The destination for Aux 1 available destinations are Master Group al...

Page 77: ...will be fed into Aux 1 before Main Level and Pan of the Sound Aux 2 Pre Mix If this is enabled the Sound will be fed into Aux 2 before Main Level and Pan of the Sound 4 5 Saving a Sound To save a Sou...

Page 78: ...ne of the Group Buttons by hitting its Pad All parameters of the Sound will be copied including the source s Pattern content To duplicate Sounds excluding the Pattern content disable the EVENTS option...

Page 79: ...its associated Sample s and FX as well as putting all Sampler Parameters back to their default value Hardware Hold SHIFT ERASE and then touch the Pad corresponding to the Sound to be reset Software T...

Page 80: ...sequences together Hardware Soloing Sounds and Groups Press SOLO and hold it now you can solo Sounds by hitting their Pads and Groups by hitting the corresponding Group Buttons Solo is a temporary mo...

Page 81: ...g MUTE again Like in the Solo Mode there are two more functions in the Mute Mode All On press Button 3 to turn all Sounds on and None press Button 4 to turn all Sounds of the Group currently in focus...

Page 82: ...und right click on Mac Control click on the Pad icon again Soloing a Group To solo a Group right click on Mac Control click on the Group icon in the Arranger Soloing a Group To unsolo a Group right cl...

Page 83: ...DI notes Only REX2 files are currently supported 1 First select an empty Sound that you want to load the REX file to by clicking on its Sound Slot 2 Now use the Browser to navigate to the REX file on...

Page 84: ...nd individually To configure the appropriate MIDI settings you have two functions at your disposal Sound MIDI Batch Setup for whole Groups and Sound MIDI Settings for individual Sounds Furthermore you...

Page 85: ...nc tion Here you can set up how all Sounds of the selected Group respond to MIDI Right click on Mac OS X Ctrl click on the Group Slot in the Arranger and choose Sound MIDI Batch Setup from the pop up...

Page 86: ...Sounds to MIDI Notes Select this radio button to have Sounds mapped to MIDI notes starting with the Root Note This is useful for drum kits MIDI Channel Select a MIDI channel here if you have selected...

Page 87: ...us Options Enable To enable Sound MIDI Settings click this checkbox Input Options Channel Choose on which MIDI Channel the Sound will receive MIDI by selecting it in the dropdown menu Low Note Define...

Page 88: ...ne settings 4 10 3 MIDI Output from Sounds You can output MIDI notes from individual Sounds allowing you to control your host applica tion and or external MIDI gear from MASCHINE s sequencer Hardware...

Page 89: ...rity s sake Software 1 Select an empty Sound Slot by clicking on it 2 Select the Source tab SRC and click on the arrow to open the dropdown menu The dropdown menu in the Source tab 3 Choose MIDI Out t...

Page 90: ...ks More on Patterns in chapter 6 Working with Patterns Hardware and chapter 7 Working with Patterns Software 5 1 The Group Source Tab Parameters 5 1 1 Page 1 Voice Settings The Group Source Tab Parame...

Page 91: ...of the Global Swing settings Swing allows for rhythmic shift ing of a Pattern where the first note in a series plays up to twice as long as the one that follows creating a shuffled feel This effect i...

Page 92: ...em as automation in a Pattern for more information on that see section 6 1 8 Recording automation for the Hardware and section 7 2 5 Recording and editing automation for the Software Software The Macr...

Page 93: ...Now choose one of the available Macro Controls 1 8 After assignment is made a blue dot shows that the parameter is assigned to a Macro Control Tune assigned to a Macro Control Removing a Parameter fr...

Page 94: ...t back to the Page 3 of the Group Source Tab right click on Mac OS X Ctrl click on the Macro Control and choose your MIDI CC Assigning MIDI CC 1 to Macro Control 1 Alternatively you can also let MASCH...

Page 95: ...an incoming MIDI CC The white dot next to the Macro Control When the MIDI CC has been received the white dot will stop flashing 5 2 The Group Out Tab Parameters 5 2 1 Page 1 Routing Volume and Pan Pa...

Page 96: ...he destination for Aux 1 available destinations are Master all Sounds with Input enabled the External Outputs 1 8 and None Level Here you adjust the amount of the signal that gets sent to the Aux 1 de...

Page 97: ...Group Aux 2 Pre Mix If this is enabled the Group will be fed into Aux 2 before the volume control of the Group 5 3 Saving a Group To save a Group right click on Mac OS X Control click on the Group s S...

Page 98: ...clicking on Mac OS X Control click on the Group Slot In the dropdown menu choose Copy to copy a Group To paste a Group select an empty Group Slot by clicking on it and select Paste from the dropdown m...

Page 99: ...by default To name a Sound double click on its Sound Slot Renaming the Sound Marcato Strings You can now edit the name of that Sound Press the Return key to confirm Some hosts will catch the Enter ke...

Page 100: ...Software Other than that previously loaded Patterns will not be removed enabling you to try out a Pattern using different Sounds Hardware 1 On the Hardware enter the Browser by hitting BROWSE and sel...

Page 101: ...ecked 5 8 MPC Program Import to Groups MASCHINE allows you to import Drum program files PGM and AKP from the Akai MPC series to Groups Supported models include the MPC 4000 MPC 3000 MPC 2000 MPC 500 M...

Page 102: ...mple Pan x Zone Pan Range Lower Higher x x High Low Key Tuning x x x x Tune Attack x x x x Attack Decay x x x x Decay Voice Overlap x x x Polyphony Filter1 Type x Filter Type Filter1 Frequency x x x F...

Page 103: ...MPC Program files 1 To import an MPC Program file open the Browser on the MASCHINE software and enter DISK Mode 2 Navigate to the MPC Program you want to import and double click it You will be prompte...

Page 104: ...nput Import All Banks Here you can import all Banks of an MPC Program Each Bank will be loaded into a separate Group Import Single Bank If you only want to import a single Bank choose this option Use...

Page 105: ...nt it needs some practice and some trial error to get to know it but you will be rewarded with a fun way of making music 6 1 Creating Patterns 6 1 1 Pattern Mode The Pattern Mode is where you select y...

Page 106: ...delete the Pattern Pattern Length The Pattern Length can be adjusted in Pattern Mode by dialing Knob 1 The units available here are dependent upon the setting of the Length parameter in Grid mode See...

Page 107: ...ose when and if Input Quantization will be applied None no quantization Record only while re cording or Play Rec while playing and recording This is described in more detail below You can select the q...

Page 108: ...taste you will have even more fun playing MASCHINE 6 1 4 The Metronome The Metronome will help you to keep time when recording in realtime To activate the Metronome hold down SHIFT and press PLAY To d...

Page 109: ...activate that step by hitting the Pad once lighting it up If you hit it again the step is gone This way it s easy to quickly put some drums together By default the first 16 steps will be represented i...

Page 110: ...fferent quantization settings while playing 3 If you want to use quantization settings other than the ones currently on display turn Knobs 5 8 to select the desired quantization setting You can lock N...

Page 111: ...You can also navigate the scale in semitones use Button 5 semitone down and Button 6 semitone up Press PLAY then RECORD and start to record your melody Try to experiment with all kinds of Samples in...

Page 112: ...corded now if you want to discard it and try again press ERASE hold it and again turn the Knob you used to record automation to delete its Automation SHIFT Pad 10 CLR AUTOMATION deletes all selected A...

Page 113: ...s as the automated one since only the offsets are recorded If you want to automate only one of the Steps set the parameter of the next Step back to its default value 6 1 10 Step Grid Pattern Length Gr...

Page 114: ...breaks and rolls Quantization after recording You can quantize your notes no matter how you recorded them They will be quantized ac cording to the Step Grid selected in your Pattern If you turn the St...

Page 115: ...are To do this hold SELECT and press Button 2 EVENTS While further holding SELECT you can now select notes and events of Sounds using their Pads The notes and events of every additional Sound you sele...

Page 116: ...ery fast but you can always use Undo Redo SHIFT Pad 1 SHIFT Pad 2 to get back to where you were before SHIFT Pad 9 CLEAR will erase all selected notes and events if nothing is selected it will clear a...

Page 117: ...s SHIFT Pad 3 COMPARE If you want to keep the new version and the old version you can copy the edited version to the next Pattern by pressing SHIFT Pad 4 SPLIT 6 2 6 Transpose You can transpose select...

Page 118: ...1 The Pattern Editor 1 Step Editor View Switch 2 Dragger Icon 3 Step Editor 4 Piano Roll Keyboard View Switch 5 Sampling View Switch 6 Sound Slots 7 Automation Lane 8 Automation View Switch 9 Edit Con...

Page 119: ...can distinguish between different Pattern states by the brightness of the Pattern Slots the brightest Slot represents the currently selected one a little less bright on the picture A2 to A6 are the on...

Page 120: ...it to that Pattern 7 1 3 Resetting Patterns You can reset Patterns choosing Reset from the dropdown menu pictured above This will erase all notes as well as any automation data and reset the Pattern...

Page 121: ...g Patterns You can enter notes by double clicking in the Grid of the Pattern Editor They will be applied according to the selected Step Grid To delete them you can either double click or right click o...

Page 122: ...ion selection frame Click in Grid Deselect notes Double click on note Delete selected note s Alt Mac OS X Cmd drag on note ver tically adjust note velocity Switching to Paint Mode To switch the mouse...

Page 123: ...5 Reference Manual 123 7 2 2 The Zoom Tool Using the Zoom Tool you can zoom in and out in the Pattern Editor Click on the Zoom Tool and drag upwards to zoom in and downwards to zoom out The Zoom Tool...

Page 124: ...n menu Compare Split in the dropdown menu Edit a given Pattern by adding some notes or automation to it then click on Compare to toggle between the original content and the new version you just create...

Page 125: ...put them the lowest note being the lowest row in the Piano Roll Keyboard Editor The Software view of the Piano Roll Keyboard Editor 7 2 5 Recording and editing automation If you take a closer look at...

Page 126: ...click on them To edit the Automation drag the automation points in the Automation Lane You can select several automation points in the Automation Lane together by clicking and dragging a rect angle a...

Page 127: ...on it opens a list of automat able parameters for the selected Sound of the current Pattern The Add Modulator dropdown menu showing a list of automatable parameters In the Automation Lane you can now...

Page 128: ...e default value is 1 16th Select the Step Grid by clicking the STEP label in the Edit Controls at the bottom left This opens up a dropdown menu The dropdown menu of the Step Grid Pattern Length Grid I...

Page 129: ...ngth Grid in a range from 1 1 one full note to 1 64T 1 64th note triplet you can also turn it off Pattern Length To adjust the Pattern Length click on the number in the right part of the Pattern Lengt...

Page 130: ...ing the Pattern Length by dragging the grey arrow Quantization To apply quantization after recording some notes from a connected MIDI keyboard or after changing the Step Grid to another value you can...

Page 131: ...by simply dragging the respective Group onto the target location or application This function is only available on the Software The audio will be exported as a WAV or AIFF file according to the Option...

Page 132: ...to your desktop or into your host software by simply dragging the respective Group onto the Desktop or into a MIDI channel of your host software This is useful if you want to edit them in another appl...

Page 133: ...n Editor The Dragger will display the name of the MIDI file you are about to drag Rendered MIDI file ready to be dragged You can now drag the exported MIDI file to your desktop or into a MIDI channel...

Page 134: ...ts can be used There are also two interesting tutorial videos on the Native Instruments website www native instruments com covering FX FX Automation Part 1 and FX Automation Part 2 The titles say it a...

Page 135: ...metimes called Ratio in typical applications Knee This parameter defines how the Compressor starts to work with a low setting the transition into compression is soft whereas with a high setting the Co...

Page 136: ...dest parts of the signal through the Gate Time Attack With Attack you can adjust how fast the Gate reacts to the incoming signal the more you dial it to the right the slow er it will react resulting i...

Page 137: ...uces a small latency Depth Threshold This value determines the threshold where the Limiter kicks in If you use it to prevent your signal from clipping leave it at 0 dB if you want to make your signal...

Page 138: ...rbo Turbo intensifies the effect the Maximizer has on the sig nal causing the maximizing algorithm to be applied twice 8 2 Filtering 8 2 1 Filter The Filter on the hardware Filter with selectable char...

Page 139: ...he modulation source Source Here you can select between three different modulation sources Envelope LFO Sync and LFO Depending on your choice for the modulation source the following parameters appear...

Page 140: ...ffect Note that the parameters cover two pages Page 1 Low Band Freq Frequency selector for the Low Band Ranges from 20 Hz to 8 kHz Gain Gain Control for the Low Band Mid Band 1 Freq Frequency selector...

Page 141: ...n 8 3 1 Chorus The Chorus on the software The Chorus is useful to thicken signals and enhance the stereo content It is most effective on melodic sounds but can also be used on hihats to make them more...

Page 142: ...Envelope Follower modulators The Flanger sounds a bit like the Chorus but the difference between them is that the Flanger modulates the signal faster and is equipped with a Feedback parameter and can...

Page 143: ...p to 1 16 note Stereo This parameter widens the stereo field of the effect Feedback Amount Adjust the amount of the Feedback here Invert Inverts the Flanger Output Mix Mix lets you adjust the amount o...

Page 144: ...igh frequencies via a crossover Turn to the right to affect higher frequencies It can be useful to eliminate noise artifacts caused by FM of very high signals With high Split settings the effect becom...

Page 145: ...e This is used to define the basic frequency of the Freq Shifter Fine Finetune the Frequency here Feedback Amount Adjust the amount of Feedback introduced in the Frequency Shifter here Stereo This par...

Page 146: ...Sync and Lfo Depending on your selection the parameter to the right will change Envelope Shape Change the Shape of the envelope here Lfo Speed The Speed of the Lfo in a range from 0 03 Hz up to 8 Hz...

Page 147: ...hear how it creates deep soundscapes in the FX Group Room Color With lower settings the general sound is a bit more muf fled The higher the settings the brighter it sounds Ice The ICE factor higher v...

Page 148: ...a much more synthetic sound which is particularly suited for melodic content Room Size Adjust the size of the virtual room here EQ Low Low band EQ to cut or boost bass frequencies High High band EQ to...

Page 149: ...lic textures Automating the Color parameter usually yields very pleasing results Room Color At lower settings the general sound is a bit more muffled the higher the settings the brighter it sounds Smo...

Page 150: ...he Reverb Shatter Guitar Bright and General Size Adjust the size of the virtual room here Eq Low Low band EQ to cut or boost bass frequencies High High band EQ to cut or boost high frequencies Positio...

Page 151: ...from 1 32 to 16 16 Offset This parameter is used to shift the start of the delay in re lation to the tempo Feedback Amount Amount of the Feedback introduced to the Beat Delay Crossover Allows for pann...

Page 152: ...a deep slowly repeating grain high values speed up the grain making it sound faster and higher Size Defines the length of the grains Jitter Introduces artifacts into the grains Rev This button if act...

Page 153: ...ime this button is switched on the Grain Stretch effect buffers incoming audio for 32 x 1 16th Time Stretch Defines the timestretch amount Set to 50 for half speed Loop Sets a loop length in 1 16th st...

Page 154: ...nge Spread Spread is only available if String mode is selected It allows you to define how big the difference in tuning between the combs is Style Style is only available if Chord mode is selected You...

Page 155: ...eneral sound is a bit more muffled the higher the settings the brighter it sounds Feedback Amount Adjust the amount of the Feedback here Tone General tonal characteristic of the Feedback Tone Mod Modu...

Page 156: ...at extreme settings Resample SR SR stands for Sample Rate and ranges from CD quality 44 1 kHz to 0 1 kHz which results in a hissy crackle Smooth Smooth reduces the aliasing introduced by the Lofi effe...

Page 157: ...ation to increase the overall loudness and add additional harmonics Compress Amount This parameter lets you adjust the amount of compression performed on the audio signal Drive Amount The amount of th...

Page 158: ...2 Select FX1 by pressing Button 6 or FX2 by pressing Button 7 The Right Display showing the Modules FX1 and FX2 with FX1 selected 2 To select an Effect for the selected FX Module press SHIFT followed...

Page 159: ...FX Some of the Effects will have more than one parameter page in this case use the Page Buttons to navigate between them You can also choose to select an FX module FX1 or FX2 after pressing BROWSE by...

Page 160: ...FX Presets from the Browser either by double clicking them or by dragging them to the FX Slot you want to use 9 2 Adding FX to a Group You can apply two effects FX directly to each Group The effects...

Page 161: ...dule The Right Display showing the Load option If you want to load an FX Preset press BROWSE without SHIFT You will now be pre sented with a list of the available FX Presets you can browse them by tur...

Page 162: ...trol Area to switch to the Group level The selected Group Tab 3 Select one of the two FX Modules and click the Arrow to the right to get a list of all avail able FX The list of available Effects for t...

Page 163: ...into the Effect Hardware 1 Press Button 2 to put the focus on the Master Tab which gets selected on the Left Display 2 On the Right Display you can now see Modules FX1 and FX2 Select one of them by pr...

Page 164: ...u will now be pre sented with a list of the available FX Presets you can browse them by turning Knob 5 and load one by pressing Button 8 or load them directly by using Buttons 5 and 6 Software 1 First...

Page 165: ...s configuration in the Audio and MIDI Settings dialog Audio signals coming from external sources will now be routed to MASCHINE s FX section Hardware 1 Choose an empty Group by selecting it with one o...

Page 166: ...one of the available FX Presets loading it using Button 8 Now the external audio will be processed by the Effect Software 1 Choose an empty Group by selecting it in the Arranger then choose one of the...

Page 167: ...cessed by the Effect 9 5 Recording FX automation Automating FX is performed in the same way as automating one of the sampler parameters see chapter 7 Working with Patterns Software If you don t know e...

Page 168: ...68 The dropdown menu of the FX Module with the Save entry This function is only available in the MASCHINE Software Your FX Presets are automatically included in the MASCHINE Library after saving them...

Page 169: ...e one of the FX hold SHIFT and press either Button 6 for FX1 or Button 7 for FX2 The Right Display with FX1 and FX2 muted To unmute the FX hold SHIFT followed by the respective Button 6 or 7 again Sof...

Page 170: ...r MIDI Out 6 Select Input and press Button 8 to confirm your selection Selecting the input source 7 Switch back to Control Mode by pressing BROWSE again or pressing CONTROL You will notice that our So...

Page 171: ...d Slot of an empty Group now load an Effect into the Sound Slot s FX Tab by selecting it in the dropdown menu Loading the Filter 2 On the Source Tab SRC select Input and leave the Source set to Intern...

Page 172: ...nare 909 The Output Tab 4 You can see the two Aux Sends Aux 1 and Aux 2 In the dropdown menu of Aux 1 select H Input 1 to send the Snare 909 Sound to the Effect in the Sound Input 1 of the Group H in...

Page 173: ...setup or in the studio Although this might seem like overkill you can afterwards still add two more Effects on the Multi Effect Group itself Make sure to name every Sound in this Multi Effect Group a...

Page 174: ...iltered Delays The Multi FX Dual LFO Filtered Delays consists of a combination of the Beat Delay with the Filter Try out some other Multi FX from the Library to get some ideas on how to set up your ow...

Page 175: ...such as a beginning a chorus or a break To get you started we recommend you load a Project from the Factory Library and have a look at the Arranger Factory Project Deeper in the Arranger with Scene 2...

Page 176: ...lip Area of the Arranger references one of the Patterns created in the Pattern Editor Therefore when a Pattern or any of its content is edited all referencing clips in the Arranger will automatically...

Page 177: ...on the Right Display To remove a Clip from a Scene press Button 4 labeled Remove For further information regarding the Pattern Mode take a look at chapter 6 Working with Patterns Hardware and 7 Workin...

Page 178: ...the Scene change will be performed immediately after you select the next Scene Hardware The Scene Sync on the hardware Press GRID Button 2 using the Pads you can now select a Scene Sync Retrigger If R...

Page 179: ...However the new Scene will also pick up at the same bar location as the previous Scene This can be musically useful If Retrig is enabled however click in the checkbox next to the Retrig label the nex...

Page 180: ...e The copied Scene will immediately begin playback To remove the Scene press Button 4 REMOVE Scene View on the hardware use Button 3 to duplicate a Scene and Button 4 to remove a Scene Software Right...

Page 181: ...consecutive Scenes and play them one after the other in a Loop This is useful to check if the Scenes go well together and or if the arrangement works but also comes in handy in a live situation Hardwa...

Page 182: ...ht 2 Release the mouse button in the Scene where you want the Loop to end The currently active Loop will be highlighted in light grey Now you will hear the first Scene and the second Scene in sequence...

Page 183: ...ccess Scene MIDI Settings 1 Click on the arrow in the Header Area of the Arranger next to the Project s name Scene MIDI Settings selected in the dropdown menu 2 Choose Scene MIDI Settings from the dro...

Page 184: ...om Root Note This determines the MIDI note which triggers the first Scene The following Scenes will be triggered by the follow ing next higher MIDI notes MIDI Program Change If this radio button is ch...

Page 185: ...rearrange Loops by editing or muting their Slices changing the order of the Slices applying a different quantization or adding Swing Last but not least you can map your Samples Hardware section 11 1 4...

Page 186: ...tself either from another Group or from the Master Output Input Using Knob 2 you can choose between the available Inputs If Extern is selected you can choose the external input of MASCHINE In 1 L In 1...

Page 187: ...ing will start as soon as the Threshold value is met Cancel Button 6 cancels the recording the recorded Sample will not be saved Cancel is only available after starting the recording using Button 5 De...

Page 188: ...Setting a Loop within a Sample on the hardware Loop Mode Here you can choose to either disable or enable Loop Mode by dialing Knob 1 If enabled you can see the Loop high lighted on the Right Display...

Page 189: ...r being triggered Decay Decay is used to adjust how fast the Sample Slice dies down Audio Editing Audio Editing allows you to process your Samples Press Button 5 to enter Audio Editing RANGE Using Kno...

Page 190: ...cted Sample to the maximum possible value without inducing distortion Reverse This reverses the Sample Fade In This creates a Fade In to the Sample Fade Out This creates a Fade Out of the audio file D...

Page 191: ...Sample will be sliced into equally spread Slices Slices Here you can choose how many slices you want the Sample to be split into 4 8 16 or 32 Tempo Determines the tempo of the Sample available options...

Page 192: ...because more transients will be recognized lower values will result in less slices This parameter should be adjusted until all the musically significant slices are being detected in the Right Display...

Page 193: ...ressing Button 5 again to return to the Slice Tab Apply To Apply To allows you to copy the selected the selected Loop to another Group or Sound After you hit Apply To select the Group or Sound you wan...

Page 194: ...one press Button 5 Remove Adding Samples to the Map 1 To add a new Sample to the map activate the ADD option Button 7 on the right Browser display 2 Select the Sample in the MASCHINE Browser A new zon...

Page 195: ...define the lowest velocity for the Zone s ve locity range High Dial Knob 2 to define the highest velocity for the Zone s velocity range Page 3 Tune Gain and Pan Basic parameters of the selected Zone...

Page 196: ...e Software 1 First choose an empty Sound Slot to record into by clicking on its name If you choose a Sound Slot that is not empty all Samples assigned and mapped to it will be removed 2 Now click the...

Page 197: ...Entering the length in bars 3 Start Stop and Cancel Start will start the recording If you selected Sync MASCHINE will wait for the next bar before starting to record if you have selected Detect the re...

Page 198: ...ouse vertically to zoom in out and hori zontally to scroll through the waveform 7 Recording History Under the large waveform representing the recorded Sample you can see a small icon for each Sample t...

Page 199: ...ing the mouse or by entering the Start and End points in their respective fields 2 Loop Settings Here you can define a Loop by clicking on the Loop Button The Loop will be repeated as long as the note...

Page 200: ...Sample Silence This silences the selected part of the Sample Cut This causes the part of the Sample that is inside of the range to be deleted Copy This copies the selected Sample Paste This pastes th...

Page 201: ...mple Slice dies down 11 2 3 Slicing a Sample Software Slicing allows you to chop up Loops to be able to extract single Sounds the drum sounds of a drum loop for example but is also good for preparing...

Page 202: ...its transients Slices Depending on the Mode selection you have made you can adjust the following here In Split mode Choose the amount of Slices 4 8 16 or 32 In Grid mode Choose the musical value 4th 8...

Page 203: ...ble of that tempo 3 Add and Remove Add This allows you to add a Slice according to the current se lection and the Mode and Slices Settings Remove Here you can remove the currently selected Slice 4 App...

Page 204: ...at the Loop automatically adjusts to the new tempo Loop Dragger The Loop Dragger allows you to drag the Loop to another Sound or another Group If you select a Group the Slices will be mapped to indivi...

Page 205: ...lows you to save the Sample 7 Timeline Shows the length of the Sample in seconds When you put the mouse cursor over the time line the cursor turns into a small magnifying glass drag your mouse horizon...

Page 206: ...py a Slice to another Sound simply click and drag it Dragging an individual Slice to another Sound 9 Zoom Tool Use this to zoom in and out of the Sample by click dragging up zoom in and down zoom out...

Page 207: ...drag it into the mapping area A Zone will be created you can drag the left and the right border of the Zone with your mouse thereby extending or minimizing it and defining a note range 3 Now you can a...

Page 208: ...ed Zone will be marked on the Keyboard with a slightly lighter color High Note Set the highest note of the Zone by entering it here Alternatively you can drag the right border of the Zone to the highe...

Page 209: ...lick dragging up zoom in and down zoom out Vertical Zoom Too Use this to zoom in and out vertically by click dragging up zoom in and down zoom out Dropdown Menu Remove sample from map Allows you to re...

Page 210: ...is set Just like the Groups and Sounds the Master can host up to two Insert FX 12 1 The Master Source Tab SRC 12 1 1 Page 1 Master Mixer The Master Mixer on the hardware The Master Mixer on the softw...

Page 211: ...g on the hardware The Group Panning on the software Pan Pan knobs A H This allows you to adjust the panorama position of each Group If you adjusted it already in the Group Out Tab this will be represe...

Page 212: ...ld like to send the Master Signal available options are Ext Out 1 8 On the Software click on the label to open the dropdown menu allowing you to choose an output on the hardware use Knob 1 Level This...

Page 213: ...u might want to export your Groups Sounds or complete Songs to files in order to be able to edit them further in other applications or burn a CD The format of the exported audio files is WAV 13 1 Expo...

Page 214: ...the checkbox next to the Sound names in the box below you can include and exclude Sounds Destination Folder This allows you to choose a folder on your harddrive where you want to save the exported aud...

Page 215: ...elated files this comes in handy Choose Collate Audio from the File menu Choosing Collate Audio from the File menu You will be presented with the Collate Audio dialog The Collate Audio dialog Folder Y...

Page 216: ...ng for the basic functions 14 1 Basic Sequencer Controls Play Stop Press PLAY Activate Record Press REC Replace Events Press and hold REC and ERASE REPLACE to replace Events with new Events Play Loop...

Page 217: ...e with the Pads Switching Scene Banks Press and hold SCENE now use Button 5 8 to switch Scene Banks Skip 1 Scene forward Press SCENE and in the Transport Section Skip 1 Scene backward Press SCENE and...

Page 218: ...switch Pattern Banks Duplicate Patterns In Pattern Mode press and hold DUPLICATE tap the Pad of the Pattern you want to copy then tap the Pad where you want to paste the Pattern Delete Patterns Press...

Page 219: ...T then use the Pads to choose the Events you want to select Change Knob Resolution Press SHIFT while turning a Knob 14 6Group Operations Selecting a Group Press one of the Group Buttons A H Loading a...

Page 220: ...ing Knob 1 3 Select a Sample by dialing Knob 5 4 Load it by hitting Button 8 Resetting a Sound Slot Press and hold SHIFT together with ERASE and then the Pad of the Sound you want to reset Sound Volum...

Page 221: ...cking Solo Mode Press SOLO together with Button 1 Soloing a Group Press and hold SOLO and one of the Group Buttons A H Soloing a Sound Press and hold SOLO and one of the Pads 1 16 14 11 Automation Rec...

Page 222: ...ose your Input Source by dialing Knob 2 4 Dial Knob 4 to set the recording threshold level 5 Press Button 5 to start the recording Sampling from an internal Source 1 Press SAMPLING 2 Set the Source to...

Page 223: ...Pad 1 Redo Pad 2 Compare Pad 3 Split Pad 4 Quantize Pad 5 Quantize 50 Pad 6 Nudge left Pad 7 Nudge right Pad 8 Clear Pad 9 Clear Automation Pad 10 Copy Pad 11 Paste Pad 12 Semitone Pad 13 Semitone Pad...

Page 224: ...ng the lit Pads in Navigate mode press NAVIGATE to enter Navigate mode and Button 1 to lock it and or dialing the Knobs as described below The Navigate Screen on the Hardware Arranger Navigation Use K...

Page 225: ...d View Navigation 5 Pad 6 Zoom In in the Pattern Editor Sampling View Keyboard View 6 Pad 2 Zoom Out in the Pattern Editor Sampling View Keyboard View 7 Pad 1 Scroll Left in the Pattern Editor Samplin...

Page 226: ...CORD on the MASCHINE Controller Sound Volume Shortcut To adjust the volume of a selected Sound press the corresponding Pad and dial the VOLUME Master Encoder The Left Display will show a temporary lev...

Page 227: ...p Group Pitch Shortcut To adjust the pitch of a Group hold the respective Group Button and dial the TEMPO Master Encoder The Left Display will show a temporary indicator for the pitch of the Group Tem...

Page 228: ...the Step Sequencer To adjust the Pitch of a Step in the Step Sequencer in semitones hold the corresponding Pad and dial the TEMPO Master Encoder The Left Display will show a temporary meter displaying...

Page 229: ...5 Reference Manual 229 15 Appendix B Keyboard Shortcuts 15 1 Views Key Function F5 Full Screen Mode F6 Drum Grid View F7 Piano Roll View F8 Sampling View F9 Browser F10 Arranger F11 Middle area F12 A...

Page 230: ...ork outside of MASCHINE s Browser Key Function Page Up Prev Group Page Down Next Group Numeric Prev Pattern Numeric Next Pattern Numeric Prev Pattern Bank Numeric Next Pattern Bank Left right Select S...

Page 231: ...t 1 7 Triplet Version Q Quantize Shift Q Quantize 50 Ctrl Cmd D Duplicate Pattern Function as on HW Alt Left Nudge Left Alt Right Nudge Right P Paint Mode on off Del delete events Ctrl Cmd Z Undo Ctrl...

Page 232: ...MASCHINE 1 5 Reference Manual 232 15 4 Transport Key Function Space start stop sequencer Ctrl Alt Space Start Sequencer from Scene Loop Start...

Page 233: ...MASCHINE Software to the MASCHINE Hardware 16 1 2 Customize the Pads of the Hardware Take your time to setup the Pad Sensitivity and Velocity Scaling to your personal taste see section 2 4 5 Preferenc...

Page 234: ...MIDI clock If you have other gear such as a drum machine a synthesizer or another sequencer that is able to send MIDI Clock hook it up to the MASCHINE Controller s MIDI In and activate Sync to Extern...

Page 235: ...with the MUTE Button 16 2 2 Use Scene Mode and Scene Sync Scene Mode is useful to trigger different parts of an arrangement by switching Scenes By using a short value for the Scene Sync you can quick...

Page 236: ...and change the Pattern Length in Pattern Mode see chapter 6 1 10 Step Grid Pattern Length Grid and Quantization using Button 1 to create variations of a Pattern If you select an even higher value like...

Page 237: ...7 Audio outputs selecting 47 Audio Source Internal 171 Audition Controls 26 52 Automation Hardware recording 112 recording in Step Sequencer 113 Automation Software drawing with mouse 127 Automation V...

Page 238: ...FX 155 Dynamics FX 135 Filter FX 138 Modulation FX 141 Modules 167 Spatial and Reverb FX 147 using 158 Equalizer 140 Event selecting using MASCHINE Controller 219 Exporting Audio 213 External Sync 50...

Page 239: ...rd 154 Saturator 157 FX automation recording using MASCHINE Controller 221 G GRID Button 113 Grids Software 128 Grid Value changing 219 Group 80 81 adjusting volume using MASCHINE Controller 219 loadi...

Page 240: ...Controls assigning parameters to 92 Manual Update 15 Mapping Samples 207 Mapping Tab 29 194 207 MASCHINE Controller Interface elements 22 MASCHINE Controllersecuring 21 Master Introduction 31 using Ef...

Page 241: ...ontroller 216 note snap 113 O OUT 75 Output Tab 27 own Samples 56 P Pad icon 82 Pads recording 108 Page 27 Page Selector 27 Parameter automation recording using MASCHINE Controller 221 Parameter Page...

Page 242: ...Hardware 44 Libraries 43 User Paths 42 Pre Listening 61 Projects Introduction 30 Q Quantization Hardware quantizing after recording 114 quantizing while playing 115 Quantization Software 130 Quick Br...

Page 243: ...ling Hardware 186 editing a Sample 188 mapping a Sample 194 recording a Sample 186 slicing a Sample 191 Sampling Mode 186 Sampling Software 196 editing a Sample 199 slicing a Sample 201 Saving Groups...

Page 244: ...nvelope 68 copying and pasting 78 FX 70 Introduction 30 muting and soloing 80 Pitch Gate 68 resetting 79 saving 77 Velocity Destination 74 Voice Settings 67 working with 64 Sound Source 170 Sound Tab...

Page 245: ...52 Threshold 136 137 186 Transport Controls 25 Transpose Hardware transposing 117 transposing by octaves 117 transposing by semitones 117 U Undo 36 Update 176 USB 19 21 User interface showing and hidi...

Reviews: