background image

68OM-06/03

6

SAFETY INFORMATION

3.  OPERATION

Do not operate the engine in a confined space where
dangerous carbon monoxide fumes can collect.

Mow only in daylight or good artificial light.

Before attempting to start the engine, disengage all cutting
unit clutches and shift into neutral.

Do not use on slopes of more than 15°.

Remember there is no such thing as a safe slope.  Travel
on grass slopes requires particular care.  To guard against
overturning:

• do not stop or start suddenly when going up or downhill;

• engage clutch slowly, always keep machine in gear, es-

pecially when travelling downhill;

• machine speeds should be kept low on slopes and dur-

ing tight turns;

• stay alert for humps and hollows and other hidden haz-

ards;

• never mow across the face of the slope, unless the ma-

chine is designed for this purpose.

Watch out for traffic when crossing or near roadways.

Stop the reel rotation before crossing surfaces other than
grass.

Never direct discharge of material toward bystanders or
allow anyone near the machine while in operation.

Never operate the lawnmower with defective guards, or
without safety devices in place.

Do not change the engine governor setting or overspeed
the engine.  Operating the engine at excessive speed can
increase the hazard of personal injury.

Before leaving the operator's position,

• disengage the power take-off and lower the cutting units;

• shift into neutral and set the parking brake;

• stop the engine and remove the key.

Disengage drive to the cutting units, stop the engine,
remove the ignition key, and disconnect the spark plug
wire:

• before cleaning blockages or unclogging chute;

• before checking, cleaning, or working on the machine;

• after striking a foreign object.  Inspect the lawn mower

for damage and make repairs before restarting and op-
eration the lawn mower;

• if lawn mower starts to vibrate abnormally (check imme-

diately).

Disengage drive to attachments when transporting or not
in use.

Stop the engine and disengage drive to attachment:

• before refuelling;

• before removing the grass catcher;

• before making height adjustment;

• before cleaning blockages;

• before checking, cleaning, or working on the mower;

• after striking a foreign object.  Inspect the mower for

damage and make repairs before restarting and oper-
ating the equipment.

Reduce the throttle setting during engine shutdown and
turn the fuel off at the conclusion of mowing.

4.  MAINTENANCE AND STORAGE

Keep all nuts, bolts, and screws tight to be sure the
equipment is in safe working condition.

Never store the equipment with fuel in the tank inside a
building where fumes can reach an open flame or spark.

Allow the engine to cool before storing in any enclosure.

To reduce the fire hazard, keep the engine, silencer,
battery compartment, and fuel storage area free of grass,
leaves, or excessive grease.

Replace worn or damaged parts for safety.

If the fuel tank has to be drained, this should be done
outdoors.

When machine is to be parked, stored, or left unattended,
lower the cutting means unless a positive mechanical
lock is used.

Be careful during adjustment of the machine to prevent
entrapment of the fingers between moving blades and
fixed parts of the machine.

On multi-reel machines, take care as rotating one reel can
cause other reels to rotate.

CALIFORNIA SAFE OPERATING PRACTICES

Mowers used in California, USA are required by law (CA
PRC 4442 & CA H & SC 13005) to have their engines
equipped with spark arresters when operating in flam-
mable vegetation. Arresters must be obtained from your
engine dealer and are not available from National Mower
Company.

Summary of Contents for 68 DL TRIPLEX

Page 1: ... 68 DL TRIPLEX MOWER NATIONAL MOWER CO 700 Raymond Ave P O Box 14299 St Paul Minnesota 55114 0299 U S A Phone 651 646 4079 Fax 651 646 2887 www nationalmower com OWNER S MANUAL Includes Operation Maintenance and Parts List June 2003 ...

Page 2: ...urnished by their manufacturer or supplier All service under this warranty will be furnished and performed by our Factory Authorized Service Stations THERE IS NO OTHER WARRANTY EXPRESSED OR IMPLIED Warranties including those of merchantability and fitness for a particular purpose are limited to one year from purchase or 45 days if the product is rented and to the extent permitted by law any and al...

Page 3: ...ions 52 Parts Ordering Information 53 Declaration of Conformity 55 INTRODUCTION This manual has been prepared by National Mower Company as an aid to users in the assembly safe operation maintenance adjustment and ordering re placement parts Additional information will gladly be furnished by calling or writing the manufacturer or his authorized agent Please furnish us with the Model Number Serial N...

Page 4: ...ren to operate mower Do not allow adults to operate mower without proper instruction Do not carry passengers Keep children and pets at a safe distance from an operating mower Stop the mower if anyone approaches the mower Disengage all cutting unit clutches and shift into neutral before attempting to start the engine Disengage main clutch before shifting cutting unit clutches Disengage power to the...

Page 5: ...iar with the controls and the proper use of the equipment Never allow children or people unfamiliar with these instructions to use the lawnmower Local regulations can restrict the age of the operator Never mow while people especially children or pets are nearby Keep in mind that the operator or user is responsible for accidents or hazards occurring to other people or their property Do not carry pa...

Page 6: ...iking a foreign object Inspect the lawn mower for damage and make repairs before restarting and op eration the lawn mower if lawn mower starts to vibrate abnormally check imme diately Disengage drive to attachments when transporting or not in use Stop the engine and disengage drive to attachment before refuelling before removing the grass catcher before making height adjustment before cleaning blo...

Page 7: ... to a stop or resume mowing speed Before using disengage the cutting unit clutches and raise the cutting units to their transport position NEVER USE THE TRANSPORT CLUTCH WHILE THE CUTTING UNITS ARE TURNING OR WHEN THE DIFFEREN TIAL SHIFT IS IN REVERSE 07585 ENGINE THROTTLE located on steering wheel Move the engine throttle lever forward for fast speed backward for slow speed 07586 IGNITION KEY Mod...

Page 8: ...so release the main engine clutch in order for the mower to come to a complete stop 07599 WARNING DECAL locatedoninstrument cluster 68DL ormain belt guard 68 SR Read and understand the information in the Owner s Manual be fore operating this mower Read and understand the information in the Owner s Manual before attempting to repair service or maintain this mower Turn off the mower engine remove th...

Page 9: ...re seated on the mower Keep all guards and shields in place 07083 SERIAL NUMBER DATA PLATE located on mower frame left side below seat 205341 INSTRUCTIONS for OPTIONAL DIAL A HEIGHT ADJUSTER located on the top shield of each cutting unit Raise and turn the adjuster knob counterclockwise to lower the height of cut Raise and turn the adjuster knob clockwise to raise the height of cut Read the instru...

Page 10: ... DIAL A HEIGHT SCALE Wing cutting units located on each Dial A Height bracket Align the bottom edge of the Dial A Height bracket with thedesiredheightofcutonthisdecal Readtheinstructions for the Dial A Height adjusters in the Operations section of this manual SAFETY AND CONTROL DECALS ...

Page 11: ...t Latches 6 Knock down all sides of crate and remove Roll mower backwards off of crate base UNCRATING INSTRUCTIONS RECEIPT OF SHIPMENT Carefully inspect your machine and crate for damage that could have occurred during shipment If damages or shortages are noted have the transportation company s representative note this on the bill of lading In order to prevent possible damage to the machine or per...

Page 12: ... tighten fasteners Plug the wire harness socket H into the seat safety switch J Use care in routing the wires so that they are not pinched by the switch lever or seat support mechanisms REAR CUTTING UNIT 1 Pivot the Seat Brace A from the axle so that the top end aligns with the tab at the back of the seat hinge assembly Fasten with a 5 16 x 1 Hex Head Bolt Lock Washer and Hex Nut 2 Slide the rod e...

Page 13: ...lip wing Cutting Unit belts B over Countershaft Pulleys C 4 Block mower wheels to prevent mower from moving forward Pull Wing Cutting Units D forward so that they slide on Pull Rods E and compress springs F This will allow enough slack to enable belts to be installed over Reel Pulleys G 5 Pull Cutting Units backwards to adjust belt tension Tighten bolt H to lock in place REEL TO BED KNIFE ADJUSTME...

Page 14: ...debris buildup SAFETY SWITCH OPERATION Check operation of all safety switches Do not use mower if safety switches are disconnected or not operational as dangerous conditions will result DANGER OPERATION The following is a description of the machine controls and their function A Main Clutch Lever Engage slowly before full engagement Always disengage the drive when stopping or leaving the machine En...

Page 15: ...ng unit until the latch E engages the lift arm socket F To release the latch lift the handle until the latch E swingsupwardintoanearlyverticalposition thencarefully lower the cutting unit onto the ground Avoid dropping the cutting unit as damage may result to the cutting unit the mower or your turf OPERATION G Rear Cutting Unit Clutch Engages drive to the Rear Cutting Unit Pull lever forward and t...

Page 16: ...notch in the stop disc and positioned securely in the new notch M Parking Brake Lever Provides a lock for the brake Push brake lever forward over center to lock Pulling brake lever back toward the rear of the machine will disengage the brake N Service Brake DepresstheSer vice Brake foot pedal to slow the mower and lock the rear wheels in the full stop position Note It is best to slow the mower wit...

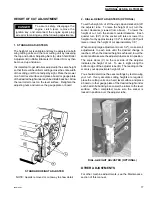
Page 17: ... A HEIGHT ADJUSTER OPTIONAL 2 DIAL A HEIGHT ADJUSTERS OPTIONAL To set the height of cut lift the vinyl cap and socket A off the adjuster tube To raise the height of cut turn the socket clockwise viewed from above To lower the height of cut turn the socket counterclockwise Each quarter turn 90 of the socket will raise or lower the height of cut by approximately 1 32 A full turn 360 will raise or lo...

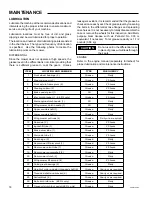
Page 18: ... n o r F e s a e r G s r u o h 5 2 4 2 n m u l o c g n i r e e t S e s a e r G s r u o h 5 2 5 1 t o v i p l a d e p e k a r B l i O y l i a D 6 y l n o L D 8 6 1 t e k c a r b t o v i p r e l d I e s a e r G s r u o h 5 2 7 1 e l d n a h h c t u l c e n i g n e n i a M l i O y l i a D 8 1 e l d n a h h c t u l c r e w o m g n i W l i O y l i a D 9 1 t f a h s r e t n u o c r e p p U e s a e r G y...

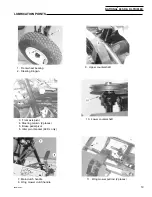
Page 19: ... Front wheel bearing 2 Steering Kingpin 3 Front axle pivot 4 Steering column 2 places 5 Brake pedal pivot 6 Idler pivot bracket 68 DL only 7 Main clutch handle 8 Wing mower clutch handle 9 Upper countershaft 10 Lower countershaft 11 Wing mower pull rod 2 places ...

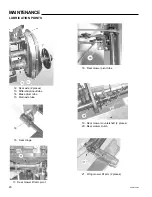
Page 20: ...S 12 Rear axle 2 places 13 Differential input tube 14 Brake drum tube 15 Main axle tube 16 Seat Hinge 17 Rear mower lift arm pivot 18 Rear mower pivot tube 19 Rear mower countershaft 2 places 20 Rear mower clutch 21 Wing mower lift arm 2 places ...

Page 21: ...POINTS 22 Cutting reel bearing 6 places 23 Height of cut adjuster 6 places Dial A Height adjusters optional 24 Threaded shaft 6 places 25 Swivel block 6 places Belt clutch arm pivot arms 68 DL only 26 Belt clutch idler arm 27 Transport clutch foot pedal ...

Page 22: ...e position of the lower adjustment nut Proper cutting action may be tested by holding paper strips between the reel and the bed knife Turn the reel by hand and check to see if the assembly cuts the paper all the way across the width of the bed knife Make sure that the adjusting and the locking nuts on both side are tightened securely REEL END PLAY ADJUSTMENT Test for end play periodically by tryin...

Page 23: ...ill be necessary to readjust the engine belt Replace all belt guards before using the mower ENGINE DRIVE BELT TENSION Engine to Main Countershaft No photo Belt tension is increased by loosening the four engine mounting bolts and sliding the engine forward in the slottedframeholes Testforthepropertensionasdetailed in the section Wing Cutting Unit Drive Belt Tension When tension is correct tighten a...

Page 24: ... bed bar 4 Fasten the new bed knife to the bottom of the backbar in the position shown bent edge up Shoulder of shoulder nuts C must be seated firmly in the backbar and screws D must be flush with the bottom of the bed knife 5 Torque shoulder nuts 35 to 40 ft lbs MAINTENANCE DANGER REAR CUTTING UNIT CHAIN TENSION A chain drive is located on the left side of the rear cutting unit It maybe helpful t...

Page 25: ...fe so that the bed knife is parallel to the reel and light contact is maintained 2 Reels must be run in a reverse direction to be lapped Remove the lower drive belts and attach a back lapping machine not supplied by National Mower to the reels Follow the instructions furnished by the machine manufacturer 3 Apply the lapping compound with the reels running using a 2 or a 3 5 7 5 cm brush Apply the ...

Page 26: ...68OM 06 03 26 MAINTENANCE RECORD e t a D k s a T e c n a n e t n i a M n o s r e P ...

Page 27: ...utting units will not turn Clutches may not be engaged Look for anything that could be jammed between the reel and the bed knife Drive belts or drive chain may need tightening Visually check that both the drive pulleys and the shafts are rotating Cutting units turn but Reel bed knife position may be out of adjustment see Reel to Bed Knife will not cut Adjustment in Maintenance section Drive belts ...

Page 28: ...68OM 06 03 28 FRAME RUNNING GEAR PARTS LIST ...

Page 29: ..._________ ________________________________________________________________________________________________________________________________________________ _____________________________________________________________________________________________________________________________________________ 1 2 1 2 6 1 1 2 1 1 1 1 1 1 4 2 2 1 1 1 1 1 1 1 1 1 1 1 2 FRAME REAR TIRE WHEEL ASSEMBLY FOOT REST Left...

Page 30: ...uxe Wide 2 13 07560 INTERLOCK 1 Item Description Part No Qty RUNNING GEAR MISC PARTS MODEL 68 DL ____________________________________________________________________________________________________ ____________________________________________________________________________________________________ ____________________________________________________________________________________________________ ...

Page 31: ...__ _________________________________________________________________________________________________________________________________________ _________________________________________________________________________________________________________________________________________ 1 07101 ADJUSTER Seat 1 2 200814 HINGE Seat 2 3 205470 BRACKET Seat Switch 1 4 02614 WASHER 2 5 04512 SPRING Seat 2 6 202...

Page 32: ...68OM 06 03 32 DRIVE MECHANISM UPPER PORTION ...

Page 33: ...ountershaft A29 200530 03607 03608 200179 200176 200172 200173 202445 201541 201538 200165 08021 202437 200162 03609 03903 200208 200184 04501 200163 07024 09002 03606 200157 03902 04013 02602 06006 200154 200158 03901 ______________________________________________________________________________ ______________________________________________________________________________ _______________________...

Page 34: ...__________________________________________ ____________________________________________________________________________________________________________________________________________ Item Description Part No Qty DRIVE MECHANISM MIDDLE PORTION 203622 07023 205486 07325 02288 205471 205472 205477 200172 202437 200182 200170 04552 200676 205451 04056 SHIELD Engine GRIP Lever 96 and up LEVER Lower Co...

Page 35: ...__________________________________ _______________________________________________________________________________________________________________________________________ ________________________________________________________________________________________________________________________________________ ____________________________________________________________________________________________...

Page 36: ...68OM 06 03 36 DRIVE MECHANISM MODEL 68 DL ...

Page 37: ...________________________________________________________ _________________________________________________________________________________________________________________________________________ _________________________________________________________________________________________________________________________________________ 1 09100 GUARD Engine Clutch 1 2 201881 RETAINER Mowing Belt 1 3 201...

Page 38: ...68OM 06 03 38 REAR AXLE DIFFERENTIAL ...

Page 39: ... _ _ _ _ _ _ _ _ _ _ _ _ _ _ _ _ _ _ _ _ _ _ _ _ _ _ _ _ _ _ _ _ _ _ _ _ _ _ _ _ _ _ _ _ _ _ _ _ _ _ _ _ _ _ _ _ _ _ _ _ _ _ _ _ _ _ _ _ _ _ _ _ _ _ _ _ _ _ _ _ _ _ _ _ _ _ _ _ _ _ _ _ _ _ _ _ _ _ _ _ _ _ _ _ _ _ _ _ _ _ _ _ _ _ _ _ _ _ _ _ _ _ _ _ _ _ _ _ _ _ _ _ _ _ _ _ _ _ _ _ _ _ _ _ _ _ _ _ _ _ _ _ _ _ _ _ _ _ _ _ _ _ _ _ _ _ _ _ _ _ _ _ _ _ _ _ _ _ _ _ _ _ _ _ _ _ _ _ _ _ _ _ _ _ _ _ _ _ _ _...

Page 40: ...68OM 06 03 40 WING CUTTING UNITS NOTE Skids and Reel End Shields are not shown See parts page Skids Reel End Shields Guards ...

Page 41: ..._____________________________________________________________ __________________________________________________________________________________________________________________________________ 1 201513 BRACKET Shield 4 2 200235 UPRIGHT Shield 4 3 204497 ROLLER 21 2 4 203248 ROLLER BRACKET L H 2 5 204495 ADJUSTER Roller 4 6 201775 FRAME Bed Knife Bolt on 2 7 02109 SCREW Flat Head 14 201802 NUT Bed ...

Page 42: ...68OM 06 03 42 REAR CUTTING UNIT NOTE Skids and Reel End Shields are not shown See parts page Skids Reel End Shields Guards ...

Page 43: ... _ _ _ _ _ _ _ _ _ _ _ _ _ _ _ _ _ _ _ _ _ _ _ _ _ _ _ _ _ _ _ _ _ _ _ _ _ _ _ _ _ _ _ _ _ _ _ _ _ _ _ _ _ _ _ _ _ _ _ _ _ _ _ _ _ _ _ _ _ _ _ _ _ _ _ _ 25 302550 REEL CARRIER ASSEMBLY Left Hand 1 26 200223 FRAME Rear Mower 1 27 07481 CHAIN Roller Rear Mower 1 28 203452 LIFTER TEE Rear Mower 1 29 200214 BRACKET Guard 1 30 202301 BRACE Seat 1 31 200271 SHIFTER YOKE Rear Mower 1 32 03905 BELT Rear M...

Page 44: ...03727 SKID BAR R H 2 5 202410 GUARD Inside Rear Mower 1 6 202281 CHAIN GUARD Rear Mower 1 Item Description Part No Qty SKIDS REEL END SHIELDS GUARDS _________________________________________________________________________________________________________________________________________________ ...

Page 45: ...T Jam 5 16 24 12 6 205375 BRACKET Roller Scraper L H 3 7 09092 CABLE Roller Scraper 21 2 09090 CABLE Roller Scraper 30 1 8 205376 BRACKET Roller Scraper R H 3 9 204495 ADJUSTER Roller not included _______________________________________________________________________________________________________ ___________________________________________________________________________________________________...

Page 46: ...___ Item Description Part No Qty per Kit DIAL A HEIGHT ROLLER SCRAPER KIT P N 860033 includes items 1 4 1 205384 BRACKET Cable Mounting L H 3 2 04107 U BOLT 1 4 20 x 1 25 ID x 2 25 6 3 09092 CABLE Roller Scraper Wing Cutting Unit 2 09090 CABLE Roller Scraper Rear Cutting Unit 1 4 205385 BRACKET Cable Mounting R H 3 ...

Page 47: ...__________________________________________________________________________________________________ Item Description Part No Qty per Kit DIAL A HEIGHT ROLLER ADJUSTER KIT P N 860034 1 205341 DECAL Instruction 6 2 205348 ASSEMBLY Roller Adjuster L H 3 3 205380 WELDMENT Roller Bracket L H 3 4 204991 PLATE Scale 6 5 205346 DECAL Wing Cutting Unit 4 205339 DECAL Rear Cutting Unit 2 205381 WELDMENT Roll...

Page 48: ...ight of Cut Adjuster R H 1 205400 WELDMENT Height of Cut Adjuster L H 1 6 204997 END Swivel 1 _______________________________________________________________________________________________________ _______________________________________________________________________________________________________ __________________________________________________________________________________________________...

Page 49: ...n i g n E e s n o p s e R D E G A G N E D E G A G N E F F O N W O D L L I K L L I K P U L L I K L L I K N O N W O D N U R N U R P U L L I K L L I K L A R T U E N F F O N W O D L L I K L L I K P U L L I K L L I K N O N W O D N U R N U R P U N U R N U R L A R T U E N D E G A G N E F F O N W O D N U R L L I K P U L L I K L L I K N O N W O D N U R N U R P U L L I K L L I K L A R T U E N F F O N W O D ...

Page 50: ...68OM 06 03 50 ELECTRICAL DIAGRAMS MODEL 68 DL ELECTRICAL SAFETY SWITCH AND CIRCUIT DIAGRAM MODEL 68 SR ELECTRICAL SAFETY SWITCH AND CIRCUIT DIAGRAM ...

Page 51: ...________________________________________________________________________ 07034 07065 KEY SWITCH 1 07063 HOURMETER 1 07064 AMPMETER 1 BATTERY Exide GT H or equiv 12V U1 235 CCA 0 F 1 07104 GROUND WIRE Battery 1 07570 07580 HARNESS ASSEMBLY 1 07325 07325 SWITCH Safety 5 07560 INTERLOCK MODULE 1 Description Part No Qty ELECTRICAL PARTS MODELS 68 SR 68 DL Model 68 SR Model 68 DL Note Your mower may be...

Page 52: ...acity 4 80 US qt 4 5 liter Maximum Fuel Consumption 0 68 gal hr 2 4 liter hr Oil SAE 30 Engine Oil Oil Capacity 30 fl oz 0 90 liter Carburetor Float Type with Fixed Main Jet Starter 68 SR Recoil Starter with Automatic Compression Release Starter 68 DL Electric Starter and Recoil Starter Lubrication Type Splash Air Cleaner Dual Element Muffler Low Tone Type Alternator 12v 10 A 68 DL Net Weight Engi...

Page 53: ...e Description of your order do not agree the Part Number will be used to fill your order Note For your records and future ordering fill in the following information V BELT CROSS REFERENCE CHART d e s a h c r u P e t a D r e b m u N l e d o M r e b m u N l a i r e S e m a N r o t u b i r t s i D s s e r d d A e n o h P X A F e t i S b e W n o s r e P s e l a S n o i t c n u F r e b m u N l a n o i ...

Page 54: ...nch de ancho se ajustan a las especificaciones de las siguientes instrucciones de la Unión Europea y sus reformas actuales 98 37 EC 89 336 EEC 2000 14 EC siguiendo el Anexo VI Producción de Control Interno con evaluación de documentación técnica y revisión periódica con un nivel MEDIDO de potencia del sonido de 97 dB A y un nivel GARANTIZADO de potencia del sonido de 105 dB A Nombre y dirección de...

Page 55: ...er Anmeldebehörde Société Nationale de Certification et d Homologation 11 route de Luxembourg L 5230 Sandweller Rechtsverbindliche Unterschrift R S Kinkead III Generaldirektor Datum Ort der Erklärung 27 März 2003 St Paul Minnesota USA DECLARATION OF CONFORMITY We National Mower Company 700 Raymond Avenue St Paul Minnesota 55114 USA Declare that the following riding reel cylindrical lawn mowers 68 ...

Reviews: