background image

NI USB-621x OEM User Guide

10

ni.com

2.

Edit the device INF file by opening 

OEM

x.inf

 with a text editor. 

At the bottom of this file are the descriptors where Windows looks to 
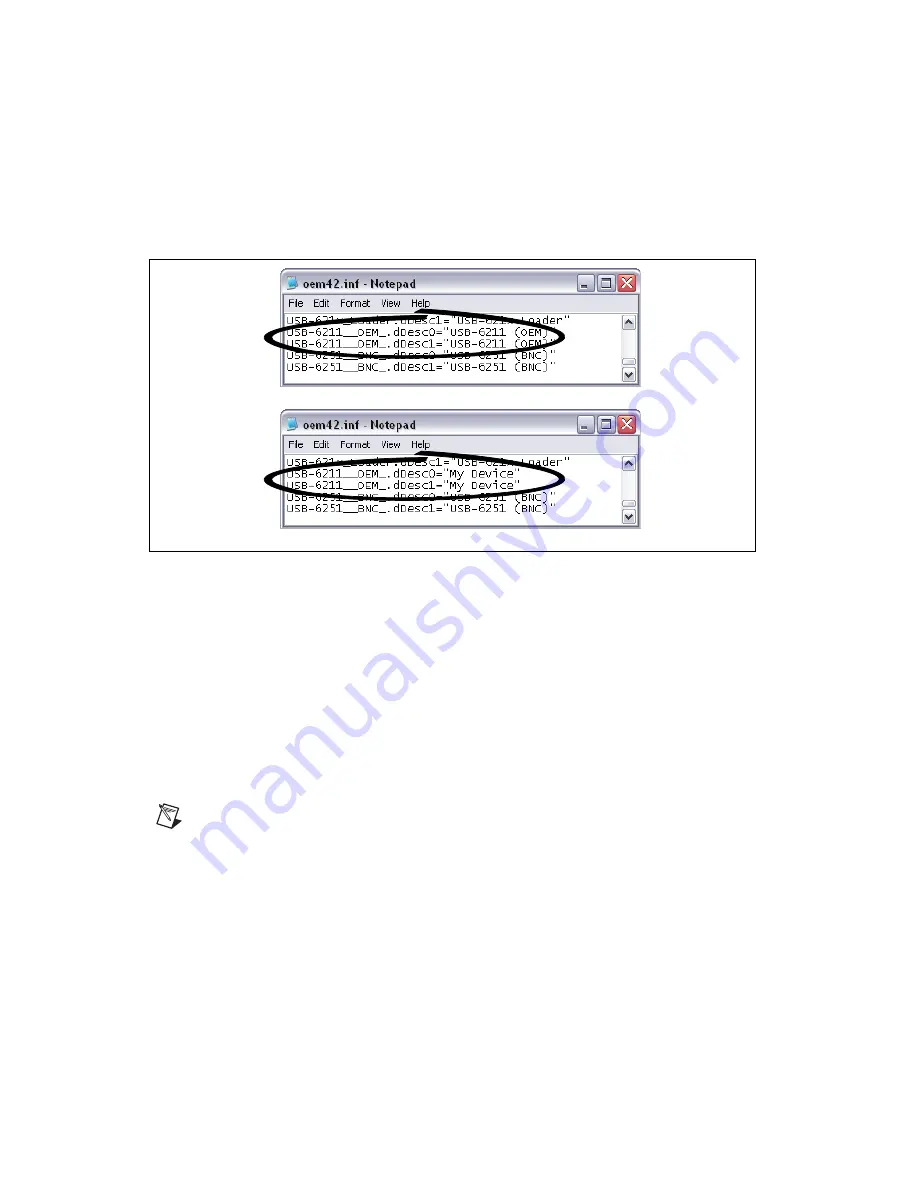
identify the device. Locate the two lines of text that contain in quotes 
the descriptors for the device name you are modifying. Change the 
descriptor on 

both

 lines to the new device name, as shown in Figure 10.

Figure 10.  

INF File Descriptors Changed to “My Device” (Windows Vista/XP)

3.

Save and close the INF file.

4.

Go to the Windows Device Manager.

(Windows Vista)

 In the Device Manager, notice that the OEM device 

now appears as 

My Device

, as shown in Figure 11.

(Windows XP)

 In the Device Manager, right-click the OEM device under 

Data Acquisition Devices, and select 

Uninstall

. Disconnect the USB 

cable from your PC.

When you reconnect the device, it appears as 

My Device

 in the Found New 

Hardware Wizard and Windows Device Manager, as shown in Figure 11.

Note

When the device is initially installed, the Windows alert message may display the 

following: 

Found New Hardware: M Series USB 621

x (OEM)

. This message appears 

for a few seconds until the custom name appears and the Found New Hardware Wizard is 
launched. This alert message device name cannot be changed.

Original File

Modified File

Summary of Contents for USB-6211 OEM

Page 1: ...uct safety electromagnetic compatibility EMC or CE marking compliance claims made for the USB 6211 6212 6216 6218 OEM devices Conformity to any and all compliance requirements rests with the end product supplier Figure 1 shows the USB 6211 OEM and USB 6212 6216 6218 OEM devices Figure 1 USB 621x OEM Devices Refer to the NI USB 621x Specifications document for USB 6211 6212 6216 6218 specifications...

Page 2: ...3 9 47 0 000 0 00 0 420 10 66 1 321 33 54 3 022 76 75 3 441 87 40 2 582 65 58 5 372 136 45 5 877 149 28 6 250 158 75 0 373 9 47 0 489 12 42 Ø 0 130 3 30 3X Ø 0 142 3 61 3 441 87 40 3 101 78 77 1 958 49 72 0 420 10 66 3 022 76 75 1 484 37 68 1 321 33 54 Ø 0 144 Drill Size 27 Recommended Front Panel Hole Cutout for LED 0 091 2 31 0 000 0 00 0 433 11 00 0 063 1 60 0 516 13 11 ...

Page 3: ...31 0 000 0 00 0 000 0 00 0 373 9 47 0 000 0 00 0 000 0 00 0 420 10 66 1 321 33 54 3 022 76 75 3 441 87 40 0 433 11 00 2 582 65 58 5 372 136 45 5 877 149 28 6 250 158 75 0 063 1 60 0 516 13 11 0 373 9 47 0 489 12 42 Ø 0 130 3 30 3X Ø 0 142 3 61 3 441 87 40 3 101 78 77 1 958 49 72 0 420 10 66 3 022 76 75 1 484 37 68 1 321 33 54 0 340 8 64 Ø 0 144 Drill Size 27 Recommended Front Panel Hole Cutout for...

Page 4: ... 7 AI 14 AI GND AI 5 AI 12 AI GND AI 3 AI 10 AI GND AI 1 AI 8 AI GND NC AO 1 AO 0 D GND D GND D GND D GND D GND D GND D GND D GND 5 V AI 15 AI 6 AI 13 AI 4 AI 11 AI GND AI 2 AI GND AI GND AI 9 AI GND AI 0 AI SENSE AI GND AO GND AO GND PFI 7 P1 3 Out PFI 6 P1 2 Out PFI 5 P1 1 Out PFI 4 P1 0 Out PFI 3 P0 3 In PFI 2 P0 2 In PFI 1 P0 1 In PFI 0 P0 0 In 5 V 49 47 45 43 41 39 37 35 33 31 29 27 25 23 21 ...

Page 5: ...10 P2 2 PFI 9 P2 1 PFI 8 P2 0 5 V 49 47 45 43 41 39 37 35 33 31 29 27 25 23 21 19 17 15 13 11 9 7 5 3 1 50 48 46 44 42 40 38 36 34 32 30 28 26 24 22 20 18 16 14 12 10 8 6 4 2 AI GND AI 7 AI 14 AI GND AI 5 AI 12 AI GND AI 3 AI 10 AI GND AI 1 AI 8 AI GND NC AO 1 AO 0 D GND D GND D GND D GND D GND D GND D GND D GND 5 V AI 15 AI 6 AI 13 AI 4 AI 11 AI GND AI 2 AI GND AI GND AI 9 AI GND AI 0 AI SENSE AI...

Page 6: ...t PFI 13 P1 5 Out PFI 11 P0 7 In PFI 10 P0 6 In PFI 9 P0 5 In PFI 8 P0 4 In 5 V 49 47 45 43 41 39 37 35 33 31 29 27 25 23 21 19 17 15 13 11 9 7 5 3 1 50 48 46 44 42 40 38 36 34 32 30 28 26 24 22 20 18 16 14 12 10 8 6 4 2 NC No Connect AI GND AI 7 AI 14 AI GND AI 5 AI 12 AI GND AI 3 AI 10 AI GND AI 1 AI 8 AI GND NC AO 1 AO 0 D GND D GND D GND D GND D GND D GND D GND D GND 5 V AI 15 AI 6 AI 13 AI 4 ...

Page 7: ... use either one or both 50 pin connectors to board mount the USB 6212 6216 6218 OEM device Figure 7 USB 621x OEM Mounting Using 50 Pin Connectors USB 6218 OEM Device Shown Figure 8 USB 621x OEM Device Installed on Motherboard USB 6218 OEM Device Shown Refer to the Device Components section for more information about mounting components 1 Mounting Standoff 2 Board Mount Socket 3 50 Pin Connector 4 ...

Page 8: ... the Found New Hardware Wizard and Windows Device Manager Table 1 USB 621x OEM Components Component Reference Designator s on PCB Manufacturer Manufacturer Part Number 50 pin connector J6 J7 3M N2550 6002UB USB connector J5 AMP 787780 1 50 pin board mount socket 3M 8550 4500PL or equivalent Mounting standoff using board mount socket RAF Electronic Hardware M1261 3005 SS with M3 0 5 screw Mounting ...

Page 9: ...ter installed on your PC 1 Locate the OEMx inf file in the y WINDOWS inf directory where x is the random number assigned to the INF file by Windows and y is the root directory where Windows is installed Note New security updates to Microsoft Vista and NI DAQ 8 6 create random INF files for NI hardware Windows assigns random file numbers to all INF files which causes the user to search through seve...

Page 10: ...ows Vista In the Device Manager notice that the OEM device now appears as My Device as shown in Figure 11 Windows XP In the Device Manager right click the OEM device under Data Acquisition Devices and select Uninstall Disconnect the USB cable from your PC When you reconnect the device it appears as My Device in the Found New Hardware Wizard and Windows Device Manager as shown in Figure 11 Note Whe...

Page 11: ...on 11 NI USB 621x OEM User Guide Figure 11 My Device in the Found New Hardware Wizard and Device Manager Windows Vista XP Note Modifying the INF file will not change the USB 621x OEM device name in Measurement Automation Explorer MAX ...

Page 12: ...d Device Manager Windows 2000 To modify the device name in the Found New Hardware Wizard and Windows Device Manager in Windows 2000 complete the following steps Note You must have NI DAQmx 8 6 or later installed on your PC 1 Locate the nimioxsu inf file in the x WINNT inf directory where x is the root directory where Windows is installed If you want to revert back save a copy of this file as nimio...

Page 13: ...e Windows 2000 3 Save and close the INF file 4 Go to the Windows Device Manager right click the OEM device under Data Acquisition Devices and select Uninstall 5 Disconnect the USB cable from your PC When you reconnect the device it appears as My Device in the Found New Hardware Wizard and Windows Device Manager as shown in Figure 14 Note When the device is initially installed the Windows alert mes...

Page 14: ...names of their respective companies For patents covering National Instruments products refer to the appropriate location Help Patents in your software the patents txt file on your CD or ni com patents 2006 2007 National Instruments Corporation All rights reserved 372083C 01 Oct07 Figure 14 My Device in the Found New Hardware Wizard and Device Manager Windows 2000 Note Modifying the INF file will n...

Reviews: