background image

SCXI Quick Start Guide

14

ni.com

Alternatively, you can right-click 

Devices and Interfaces

 and select your chassis from 

New» 

NI-DAQmx SCXI Chassis

.

Step 12. Configure the Chassis and Modules

If you are configuring a chassis with an SCXI-1600, right-click the chassis, select 

Properties

and skip to step 6 of this section. The SCXI-1600 auto-detects all other modules.

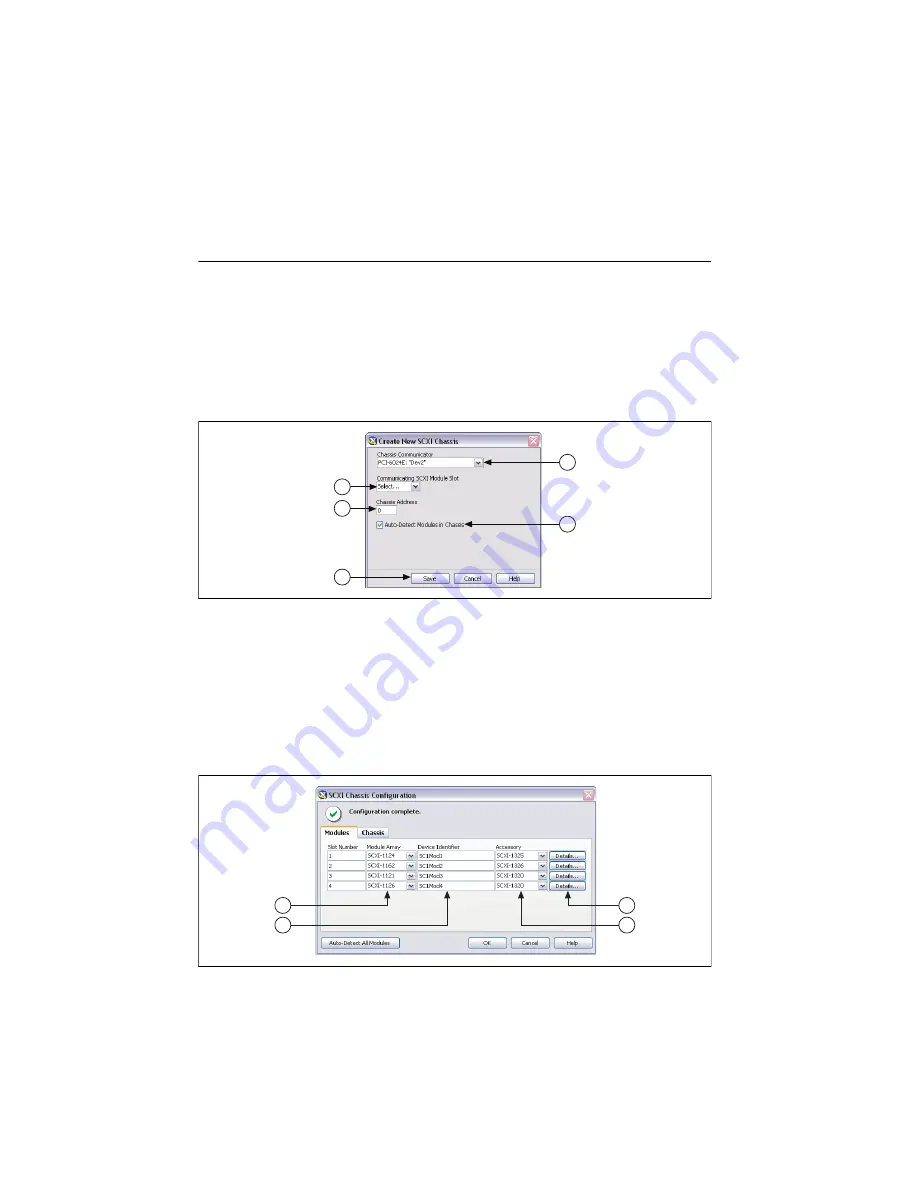
Complete the following steps as shown in the figures. Numbered callouts in the figures 
correspond to the step numbers.

1.

Select the DAQ device cabled to the communicating SCXI module from 

Chassis 

Communicator

. If MAX detects only one DAQ device, the device is chosen by default, and 

this option is disabled.

2.

Select the module slot connected to the chassis communicator from 

Communicating 

SCXI Module Slot

.

3.

Enter the chassis address setting in 

Chassis Address

. Make sure the setting matches the 

address setting on the SCXI chassis.

4.

Select whether to auto-detect SCXI modules. If you do not auto-detect modules, MAX 
disables Communicating SCXI Module Slot.

5.

Click 

Save

. The SCXI Chassis Configuration window opens. The 

Modules

 tab is selected 

by default.

2

5

3

1

4

6

7

9

8

Summary of Contents for SCXI-116 Series

Page 1: ...SCXI 1143...

Page 2: ...ating properly and set up multichassis systems It also describes the NI DAQmx software relative to SCXI and integrated signal conditioning products This document assumes you have already installed con...

Page 3: ...liers Figure 1 SCXI System Components This icon denotes a caution which advises you of precautions to take to avoid injury data loss or a system crash When this symbol is marked on a product refer to...

Page 4: ...section after installing a DAQ device or an SCXI USB device SCXI Chassis 1 Power off and unplug the chassis 2 Set the chassis address if your chassis is addressable Some older chassis are not address...

Page 5: ...shown in the off position 3 Set the voltage selection tumbler to the correct voltage for your application Refer to the chassis documentation for more information 4 Connect the power cord Figure 4 PXI...

Page 6: ...the PXI chassis complete the following steps 1 Touch any metal part of the chassis to discharge static electricity 2 Place the module edges into the top and bottom PXI module guides as shown in Figure...

Page 7: ...n SCXI system and a USB compatible computer or USB hub so no intermediate DAQ device is needed SCXI USB modules such as the SCXI 1600 cannot be used in a PXI SCXI combination chassis or in multichassi...

Page 8: ...pinout locations For information about sensors refer to ni com sensors For information about IEEE 1451 4 TEDS smart sensors refer to ni com teds 1 New SCXI Module 2 Existing SCXI Module 3 SCXI Chassi...

Page 9: ...adapter such as the SCXI 1349 If there is an analog input module with simultaneous sampling capability in the chassis you must connect that module to the cable assembly or an error message appears ea...

Page 10: ...annot have an external cable inserted into its rear 50 pin connector SCXI 1000 chassis through revision D do not have address jumpers or switches and respond to any address but you cannot use them in...

Page 11: ...5 Install the SCXI 1349 cable adapter into the last SCXI chassis in the chain Refer to step 1 of the previous Single Chassis System section for instructions on installing the SCXI 1349 Step 8 Connect...

Page 12: ...I System Step 9 Power On the SCXI Chassis If you are using an SCXI chassis the chassis power switch is shown in Figure 3 If you are using a PXI SCXI combination chassis the PXI and chassis power switc...

Page 13: ...ches LabVIEW Choose this option if you have already configured your device in MAX Run Test Panels Launches MAX test panels for your device Configure and Test This Device Opens MAX Take No Action Recog...

Page 14: ...Chassis If you installed an SCXI USB module such as the SCXI 1600 skip to Step 12 Configure the Chassis and Modules The SCXI USB module and associated chassis appear automatically under Devices and In...

Page 15: ...he step numbers 1 Select the DAQ device cabled to the communicating SCXI module from Chassis Communicator If MAX detects only one DAQ device the device is chosen by default and this option is disabled...

Page 16: ...put module in parallel mode in a multichassis configuration or another special configuration click the Cabling tab to adjust the settings for cabling If you are using standard multiplexed mode operati...

Page 17: ...assis A message at the top of the SCXI Chassis Configuration window displays the status of the configuration You cannot save the chassis configuration if an error appears until you finish entering mod...

Page 18: ...for NI DAQmx by selecting Help Help Topics NI DAQ MAX Help for NI DAQmx for instructions about creating NI DAQmx simulated devices and importing NI DAQmx simulated device configurations to physical de...

Page 19: ...tart the Return Merchandise Authorization RMA process Make sure the SCXI chassis is powered on If you are using a PXI SCXI combination chassis make sure the PXI chassis is powered on Make sure you hav...

Page 20: ...is for the positive analog supply and the fuse marked with a copper is for the negative analog supply 4 Using long nose pliers carefully remove the fuse 5 Take a new fuse and bend its leads so the com...

Page 21: ...ith a thermocouple How do I stop the thermocouple reading from fluctuating Average the temperature readings to minimize fluctuations Also ensure proper field wiring techniques Most thermocouples are f...

Page 22: ...1 Class A emissions FCC 47 CFR Part 15B Class A emissions ICES 001 Class A emissions Note For the standards applied to assess the EMC of this product refer to the Online Product Certification section...

Page 23: ...nvironmental regulations and directives with which NI complies as well as other environmental information not included in this document Waste Electrical and Electronic Equipment WEEE EU Customers At t...

Page 24: ...red trademark of Microsoft Corporation in the United States and other countries Other product and company names mentioned herein are trademarks or trade names of their respective companies For patents...

Reviews: