©
National Instruments Corporation
3
SCXI Quick Start Guide
Step 3. Set Up the Chassis
Caution
Refer to the
Read Me First: Safety and Radio-Frequency Interference
document packaged
with your chassis before removing equipment covers or connecting or disconnecting any signal
wires. Follow proper ESD precautions to ensure you are grounded before installing the hardware.
You can test NI-DAQmx applications without installing hardware by using an NI-DAQmx simulated
device. Refer to the
Measurement & Automation Explorer Help for NI-DAQmx
by selecting
Help»Help
Topics»NI-DAQmx
in Measurement & Automation Explorer for instructions on creating NI-DAQmx
simulated devices and importing NI-DAQmx simulated device configurations to physical devices.
Refer to the
section after installing a DAQ device or an SCXI
USB Device.
SCXI Chassis
1.
Power off and unplug the chassis.
2.
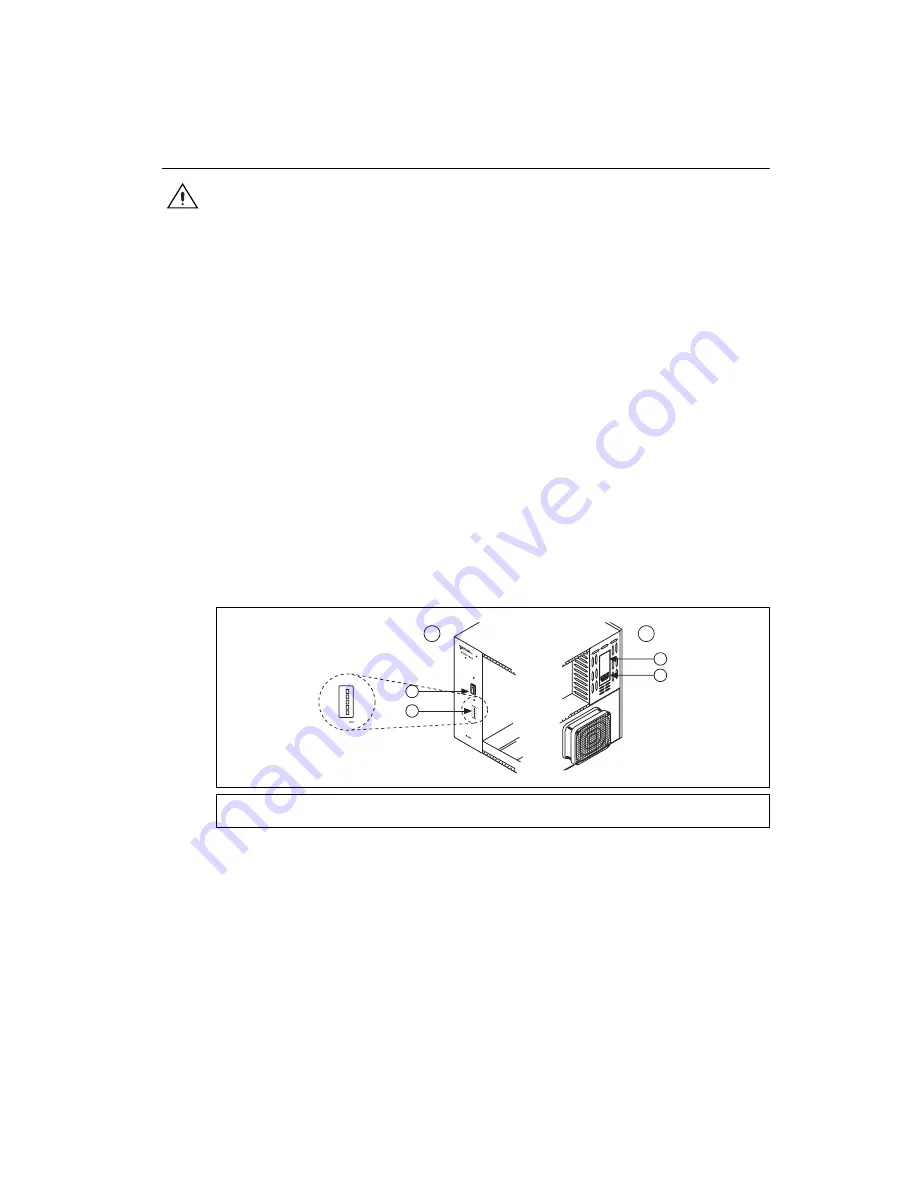
Set the chassis address if your chassis is addressable. Some older chassis are not addressable.
•
If the chassis has address switches, you can set the chassis to a desired address. When
configuring the chassis in MAX in Step 12, make sure the software address settings match the
hardware address settings. All switches are shown in the off position, the default setting, in
Figure 3.
•
Some older chassis use jumpers inside the front panel instead of chassis address switches.
Older chassis also differ in fuses and AC power selection. Refer to the chassis documentation
for more information.
3.
Confirm the correct power settings (100, 120, 220, or 240 VAC).
4.
Connect the power cord.
Figure 3.
SCXI Chassis Setup
1
Front
2
Back
3
Chassis Power Switch
4
Chassis Address Switch
5
Voltage Selection Tumbler
6
Power Cord Connector
ADDRE
SS
ON
5
4
3
2
1
S
CXI
120V
ac
~
®
5
4
3
2
1
PO
WE
R
RE
S
ET
ADDRE
SS
1
2
5
6
4
3


