background image

RMX-8268 Installation Guide

|

© National Instruments

|

11

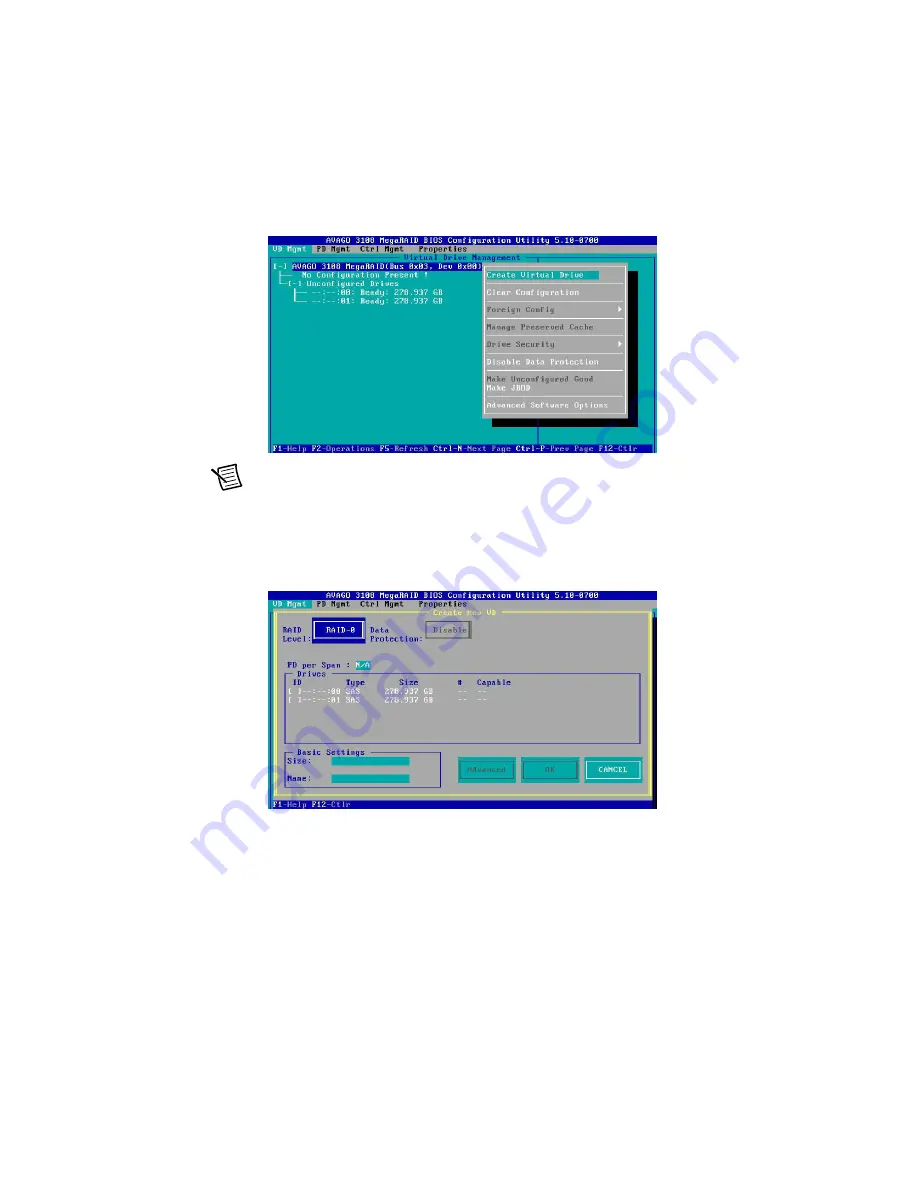
Move the cursor to select the controller and press <F2>. Press <Enter> to create new virtual 
drives when the following screen displays.

Note

You can use the up and down arrow keys to select enabled commands, 

highlighted in white, such as 

Create Virtual Drive

 or 

Clear Configuration

.

Press <Enter> for the RAID level selection when the following screen shows. You also can use 
this screen to select the new virtual drive’s parameters using the up or down arrow keys or 
<Tab>.

Summary of Contents for RMX-8268

Page 1: ... a PXIe 8394 6 Cabling 7 Powering Up the RMX 8268 for PXI Express System 7 Powering Down the RMX 8268 for PXI Express System 7 Driver Installation 7 Partitioning and Formatting 8 Instructions for Formatting the RAID Volume 8 Virtual Disk Configuration 8 Reconfiguring the RMX 8268 Virtual Disk for PXI Express Systems 8 Rackmount Installation 19 Hardware Overview 23 LED Indicators 23 RAID Card Manuf...

Page 2: ...stalled during operation of the hardware This equipment is for use in Restricted Access Locations only To obtain the safety certification s for this product visit ni com certification search by model number or product line and click the appropriate link in the Certification column Rack Mount Safety Information Caution Due to the device weight two people should work together to mount the device in ...

Page 3: ...nvironment This product is not intended for use in industrial locations Any modifications to the product not expressly approved by National Instruments could void your authority to operate it under your local regulatory rules Notice To ensure the specified EMC performance operate this product only with shielded cables and accessories Sicherheitshinweise Im folgenden Abschnitt finden Sie wichtige S...

Page 4: ...llrahmen installieren installieren Sie die schwersten Module unten und die leichteren Module mit abnehmendem Gewicht weiter oben Dies hält den Schwerpunkt des Gestellrahmens möglichst tief und verhindert ein Umkippen beim Anstoßen Beim Einbau in einen Gestellrahmen sind folgende Sicherheitsrichtlinien zu befolgen Betriebstemperatur In einem geschlossenen Gestell oder einem Gestell für mehrere Gerä...

Page 5: ...394 PXIe 8399 or PCI 8398 Note The remainder of the manual describes systems connecting the RMX 8268 to the PXIe 8394 but the information is also applicable to systems using the PXIe 8399 and PCIe 8398 RMX 8268 Gen3 x8 System The RAID system consists of a PXIe 8394 in a PXI Express or CompactPCI Express chassis connected to the RMX 8268 This system can use the full bandwidth of Gen3 x8 MXI Generat...

Page 6: ...s or CompactPCI Express chassis but leave it plugged in while installing the PXIe 8394 The power cord grounds the chassis and protects it from electrical damage while you install the module 2 Locate an available PXI Express or CompactPCI Express slot in the chassis The PXIe 8394 must not be installed in the controller slot slot 1 in a PXI Express chassis Caution To protect both yourself and the ch...

Page 7: ...estart your computer Note Refer to the Cable Options section for cable specifications Powering Up the RMX 8268 for PXI Express System To power up the RMX 8268 for PXI Express system power on the host The RMX 8268 chassis now should turn on Powering Down the RMX 8268 for PXI Express System Because operating systems and drivers commonly make the assumption that PCI devices are present in the system ...

Page 8: ...hat Perform a quick format is selected and click Next 10 Click Finish to exit the New Simple Volume Wizard Note Powering off the RMX 8268 chassis while the host still is on can cause data loss crashes or hangs When you shut down your host computer your RMX 8268 turns off Virtual Disk Configuration Reconfiguring the RMX 8268 Virtual Disk for PXI Express Systems The RMX 8268 systems are preconfigure...

Page 9: ...o MegaRAID Main Screen As shown in the following figure at the top of the Avago MegaRAID main screen are the following configurable menu items VD Mgmt Virtual Drive Management PD Mgmt Physical Management Ctrl Mgmt Controller Management Properties Foreign View Note The Foreign View menu item displays only when a foreign configuration is connected to the controller Press Ctrl N or Ctrl P to select t...

Page 10: ... screen that displays as shown below This screen provides information about the configuration of controllers drive groups and virtual drives The right panel displays information about the selected device To select a submenu item use the up and down arrow keys Use the right arrow key to open a submenu and the left arrow key to close a submenu ...

Page 11: ... following screen displays Note You can use the up and down arrow keys to select enabled commands highlighted in white such as Create Virtual Drive or Clear Configuration Press Enter for the RAID level selection when the following screen shows You also can use this screen to select the new virtual drive s parameters using the up or down arrow keys or Tab ...

Page 12: ...sponding RAID level s displayed are based on the number of hard drives connected to the selected controller as shown in Table 1 Table 1 Minimum Number of Hard Drives Required for RAID Levels RAID Minimum Number of Hard Drives RAID 0 2 RAID 1 2 RAID 5 3 RAID 6 3 RAID 10 4 2 RAID 1 Arrays RAID 50 6 2 RAID 5 Arrays RAID 60 6 2 RAID 6 Arrays ...

Page 13: ... National Instruments 13 Press Enter to select all drives Tab to the Advanced menu as shown below In the Advanced menu set Strip Size to 512 KB and Write Policy to Write Through as shown below Leave all other settings at default ...

Page 14: ...drive Refer to Partitioning and Formatting for the next step PD Mgmt Physical Drive Management Press Ctrl N or Ctrl P to select the PD Mgmt menu item as shown below The PD Mgmt screen provides information about hard drives connected to the selected controller The right panel shows information about the selected device ...

Page 15: ... a failed drive locating a drive or making a drive offline as shown below Ctrl Mgmt Control Management Press Ctrl N or Ctrl P to select the Ctrl Mgmt menu item as shown below The Ctrl Mgmt screen provides information about the selected controller s settings On this screen use the up or down arrow or Tab to move the cursor To apply changes navigate to APPLY and press Enter ...

Page 16: ...screen as shown below Use the following screen to view and change settings such as the link speed or power save Properties Press Ctrl N or Ctrl P to select the Properties menu item as shown below The Properties screen provides read only information about the selected controller s properties ...

Page 17: ...the controller Press Ctrl N or Ctrl P to select the Foreign View menu item as shown below The Foreign View screen provides information about the foreign configurations such as drive groups virtual drives physical drives and hot spare drives You also can use this menu to import or clear the foreign configurations Reconfiguring RAID Arrays Using the RAID Management Utility Install the RAID managemen...

Page 18: ...r Windows username and password 3 Under the Logical tab right click Controller0 and select Create Virtual Drive 4 Select Advance and click Next 5 Select RAID0 from the RAID Level pull down menu 6 Select all drives CTRL A 7 Click ADD and then Next 8 Make the following changes on the Virtual Drive properties page and leave everything else at default Stripe Size KB 512 KB Write cache Write Through 9 ...

Page 19: ...steners as shown in Figure 1 Note Do not fully tighten the fasteners The rails need to slide to allow for final adjustments within the rack 2 Attach a front rail to each side of the RMX 8268 as shown in Figure 1 These parts snap lock into place The parts are marked LH and RH for left hand and right hand the orientation is relative to the unit when you look toward the hard drive bays Figure 1 Attac...

Page 20: ...hown in Figure 2 Refer to the following figure for placement of the front brackets on the rails relative to the 2U space that the RMX 8268 will occupy Install the front bracket with the threaded hole oriented downward Figure 2 Installing the Front Brackets on the Rack 1 Threaded Hole Oriented Downward 2 10 32 x 5 16 in Fastener x4 2U 2 1 ...

Page 21: ... RMX 8268 into a 2U space within the rack as shown in Figure 3 Two people should support the unit during this step Be sure the rear hinges are rotated inward to prevent collision with the rack Figure 3 Sliding the RMX 8268 into the Rack 1 Hinged Bracket Rotated 1 1 ...

Page 22: ... in fasteners as shown in Figure 4 Align the front screws to the bracket as shown in the enlargement Figure 4 Securing the RMX 8268 to the Rack 7 Fully tighten the 8 32 x 1 4 fasteners installed in step 1 on each side of the RMX 8268 You may need to remove the rack side covers to access the fasteners 1 Rear Bracket Installation with 10 32 x 7 16 in Fasteners x4 2 Front Bracket Installation with 10...

Page 23: ...the meaning of the LEDs on the back of the RMX 8268 RAID Card Manufacturer Manufacturer Supermicro Model AOC S3108L H8iR Website www supermicro com Cable Options The RMX 8268 system supports only the cable specified in Table 3 If any other Gen3 x8 cable is used the RMX 8268 may not operate per its specifications Table 2 RMX 8268 Back Panel Status LED Messages LED Color Meaning LINK Off Link not es...

Page 24: ...ata NI MAKES NO EXPRESS OR IMPLIED WARRANTIES AS TO THE ACCURACY OF THE INFORMATION CONTAINED HEREIN AND SHALL NOT BE LIABLE FOR ANY ERRORS U S Government Customers The data contained in this manual was developed at private expense and is subject to the applicable limited rights and restricted data rights as set forth in FAR 52 227 14 DFAR 252 227 7014 and DFAR 252 227 7015 Worldwide Support and S...

Reviews: