background image

Quick Start Guide

QNET Mechatronic Interfacing

for

LabVIEW™

Step 1: Check Components and Details

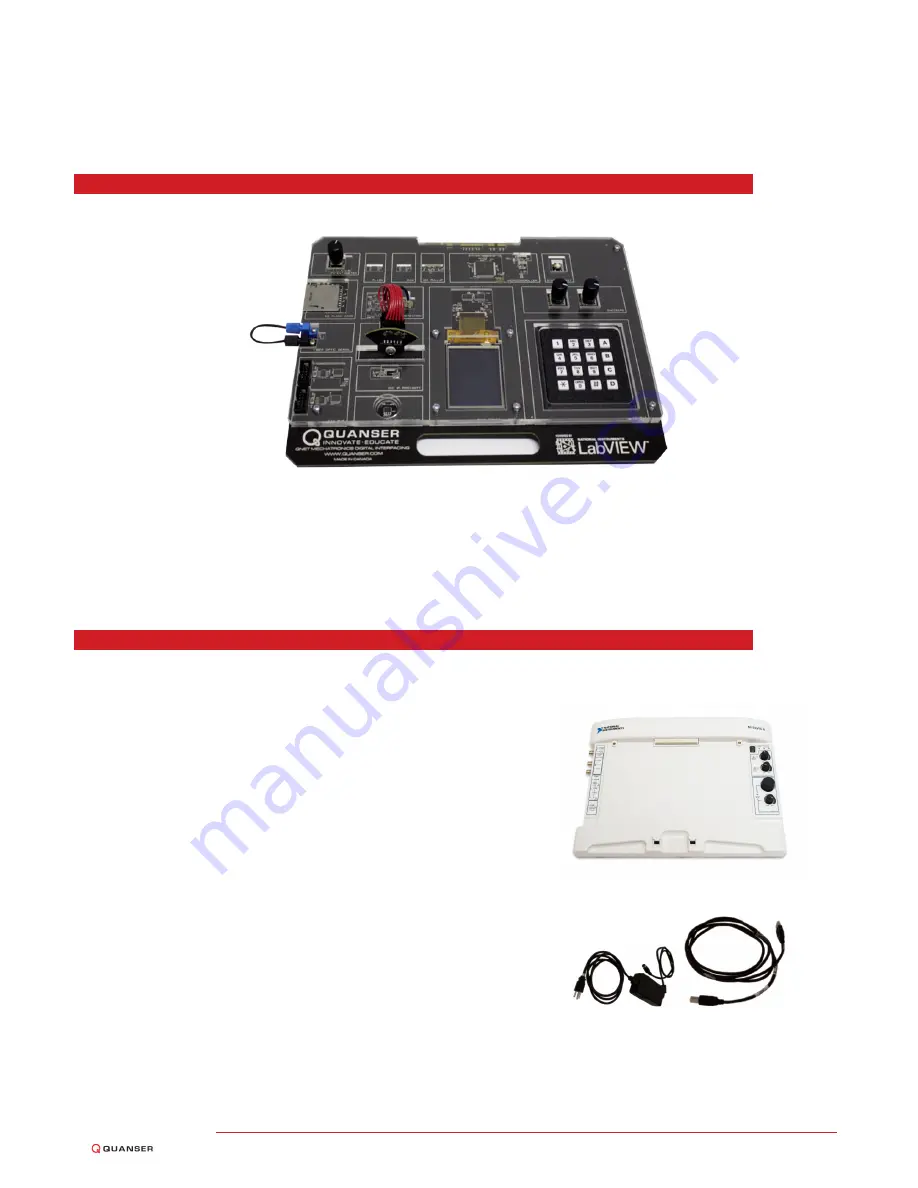
Figure 1: QNET Mechatronics Interfacing Board

The Quanser QNET Mechatronic Interfacing consists of a single PCB module (shown in Figure

??

)

Note:

The QNET curriculum resources are available for

download at www.ni.com/ni-elvis/courseware or www.quansershare.com/qnets

Step 2: Additional Components Required for Setup

(a) ELVIS II

(b) Power Supply

(c) USB Cable

Figure 2: ELVIS II

(+)

Components

To complete your QNET Mechatronic Interfacing setup, you will
also need the following hardware:

1. NI ELVIS II or ELVIS II+ workstation

2. +5VDC / 5A, +15VDC / 2A, -15VDC / 0.8A Power Supply

3. USB Cable

QNET MI Quick Start Guide

v 1.0

Summary of Contents for Quanser QNET MI

Page 1: ...curriculum resources are available for download at www ni com ni elvis courseware or www quansershare com qnets Step 2 Additional Components Required for Setup a ELVIS II b Power Supply c USB Cable Figure 2 ELVIS II Components To complete your QNET Mechatronic Interfacing setup you will also need the following hardware 1 NI ELVIS II or ELVIS II workstation 2 5VDC 5A 15VDC 2A 15VDC 0 8A Power Suppl...

Page 2: ...ronics Interfacing please read the following instructions carefully For full details see the QNET Mechatronic Interfacing User Manual Ensure that the NI ELVIS II power switch is in the off position A Place the handle on the front of the QNET board over the bracket located on the front of the NI ELVIS II B Slide the PCI connector at the back of the QNET board into the female connector on the NI ELV...

Page 3: ... II D Connect the USB cable to the back of the NI ELVIS II E Power on the NI ELVIS II using the power switch on the rear of the workstation The READY and ACTIVE LEDs should briefly light fol lowed by the READY LED alone F QNET MI Quick Start Guide v 1 0 ...

Page 4: ... LED next to the switch should light up H Ensure that the 5V Power LED on the QNET board is lit I The LCD screen should display the Quanser and National Instruments logos If the LCD shows a blank screen or another image please contact Quanser s technical support team J QNET MI Quick Start Guide 4 ...

Page 5: ...he QNET Re sources are available for download from www ni com ni elvis courseware and www quansershare com qnets B Open the LabVIEW VI vi found under the Quick Start folder C Select the device name that matches your NI ELVIS II device as shown in the NI Mea surement Automation Explorer in the Device control D Click on the white ar row to run the VI E QNET MI Quick Start Guide v 1 0 ...

Page 6: ...r and the left hand encoder F Adjusting the position of any of these sensors should cause the associated value to change both on the graph and in the light output of the LED Otherwise consult the troubleshooting section at the end of this guide G Click on the STOP button to stop running the VI H QNET MI Quick Start Guide 6 ...

Page 7: ...e ELVIS are ON C If the 5V Power LED is still not lit then the 5V fuse on the Protection Board of the NI ELVIS II may have been triggered See the Protection Board Fuses in the NI ELVIS II User Manual One or more of the values on the graph do not update when the sensor is per turbed A Ensure the cable connecting the accelerometer board to the main board is se curely in place B Stop the Quick Start ...

Reviews: