background image

Appendix B

Pinouts

PXI-1000B User Manual

B-6

©

 National Instruments Corporation


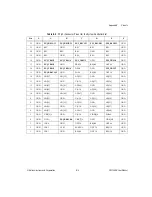
Table B-5.  

P1 (J1) Connector Pinout for the Peripheral Slot

Pin

Z

A

B

C

D

E

F

25

GND

5V

REQ64#

ENUM#

3.3V

5V

GND

24

GND

AD[1]

5V

V(I/O)

AD[0]

ACK64#

GND

23

GND

3.3V

AD[4]

AD[3]

5V

AD[2]

GND

22

GND

AD[7]

GND

3.3V

AD[6]

AD[5]

GND

21

GND

3.3V

AD[9]

AD[8]

M66EN

C/BE[0]#

GND

20

GND

AD[12]

GND

V(I/O)

AD[11]

AD[10]

GND

19

GND

3.3V

AD[15]

AD[14]

GND

AD[13]

GND

18

GND

SERR#

GND

3.3V

PAR

C/BE[1]#

GND

17

GND

3.3V

SDONE

SBO#

GND

PERR#

GND

16

GND

DEVSEL#

GND

V(I/O)

STOP#

LOCK#

GND

15

GND

3.3V

FRAME#

IRDY#

GND

TRDY#

GND

12–14

Key Area

11

GND

AD[18]

AD[17]

AD[16]

GND

C/BE[2]#

GND

10

GND

AD[21]

GND

3.3V

AD[20]

AD[19]

GND

9

GND

C/BE[3]#

IDSEL

AD[23]

GND

AD[22]

GND

8

GND

AD[26]

GND

V(I/O)

AD[25]

AD[24]

GND

7

GND

AD[30]

AD[29]

AD[28]

GND

AD[27]

GND

6

GND

REQ#

GND

3.3V

CLK

AD[31]

GND

5

GND

BRSVP1A5

BRSVP1B5

RST#

GND

GNT#

GND

4

GND

BRSVP1A4

GND

V(I/O)

INTP

INTS

GND

3

GND

INTA#

INTB#

INTC#

5V

INTD#

GND

2

GND

TCK

5V

TMS

TDO

TDI

GND

1

GND

5V

 –12V

TRST#

 +12V

5V

GND

Summary of Contents for PXI 1000B

Page 1: ...PXI PXI 1000B User Manual PXI 1000B User Manual February 1999 Edition Part Number 321710C 01...

Page 2: ...725 11 France 0 1 48 14 24 24 Germany 089 741 31 30 Hong Kong 2645 3186 India 91805275406 Israel 03 6120092 Italy 02 413091 Japan 03 5472 2970 Korea 02 596 7456 Mexico D F 5 280 7625 Mexico Monterrey...

Page 3: ...DVISED OF THE POSSIBILITY THEREOF This limitation of the liability of National Instruments will apply regardless of the form of action whether in contract or tort including negligence Any action again...

Page 4: ...ential area is likely to cause harmful interference in which case the user will be required to correct the interference at his own expense Notices to User Changes or modifications not expressly approv...

Page 5: ...0B Adjustments and service to internal components must be undertaken by qualified service technicians During service of this product the mains connector to the premise wiring must be disconnected Dang...

Page 6: ...Star Trigger Slot 1 6 Peripheral Slots 1 7 Local Bus 1 7 Trigger Bus 1 8 System Reference Clock 1 8 Chapter 2 Installation Configuration and Operation Site Considerations 2 1 Rack Mounting 2 2 Setting...

Page 7: ...ppendix B Pinouts Appendix C Customer Communication Glossary Index Figures Figure 1 1 Front View of the PXI 1000B Mainframe 1 4 Figure 1 2 Rear View of the AC Only PXI 1000B Mainframe 1 5 Figure 1 3 R...

Page 8: ...Input Specifications for DC Capable Power Supply A 3 Table A 5 DC Output Specifications for DC Capable Power Supply A 4 Table A 6 Cooling Specifications A 5 Table A 7 Safety Specifications A 5 Table A...

Page 9: ...rm on the PXI 1000B mainframe Appendix A Specifications contains complete specifications for the PXI 1000B mainframe Appendix B Pinouts describes the P1 and P2 connector pinouts for the PXI 1000B back...

Page 10: ...s device names functions variables filenames and extensions Related Documentation The following documents contain information that you may find helpful as you read this manual Compact PCI Specificatio...

Page 11: ...amaged Inspect the inner chassis for any possible damage debris or detached components If damage appears to have been caused in shipment file a claim with the carrier Retain the packing material for p...

Page 12: ...can install an optional 1 7 Ah NiCd battery pack The mainframe can draw power from this battery pack and operate when no AC or DC input are present or if the DC input drops below 10 V The battery can...

Page 13: ...auto voltage and auto frequency ranging Over current protection via push reset circuit breaker no loose fuses to replace Removable modular power supply Remote power status and inhibit via a rear pane...

Page 14: ...Figures 1 1 1 2 and 1 3 show some of the key features and components of the PXI 1000B mainframe Figure 1 1 shows the front view of the PXI 1000B Figure 1 2 shows the rear view of the AC only chassis...

Page 15: ...tion 1 5 PXI 1000B User Manual Figure 1 2 Rear View of the AC Only PXI 1000B Mainframe 1 Module Cooling Air Outlets 2 Fan Speed Selector 3 Remote Power Status and Inhibit Connector 4 Chassis Ground Sc...

Page 16: ...to prevent the controller from using up peripheral slots Star Trigger Slot The Star Trigger ST slot is located at Slot 2 This slot has a dedicated trigger line between each peripheral slot see Figure...

Page 17: ...s or provide a high speed side band communication path that does not affect the PXI bandwidth Local Bus signals may range from high speed TTL signals to analog signals as high as 42 V Initialization s...

Page 18: ...stem is monitoring or controlling System Reference Clock The PXI 1000B supplies the PXI 10 MHz system clock signal PXI_CLK10 independently to each peripheral slot An independent buffer having a source...

Page 19: ...want to use your PXI 1000B and follow the appropriate installation instructions Apertures in the rear and along both sides of the mainframe facilitate power supply and module cooling Air enters throu...

Page 20: ...to the instructions supplied with the rack mount kit to install your PXI 1000B in an instrument rack Note You may wish to remove the feet from your PXI 1000B when rack mounting To do so remove the sc...

Page 21: ...r must be non insulated bare 2 Attach the opposite end of the wire to permanent earth ground using toothed washers or a toothed lug Connecting to Power Source and Testing Power up Caution Do not insta...

Page 22: ...that the rear panel D sub connector is to be used to check voltages only Do not use these voltages to supply power to external devices Note If the fans or power unit fail to function properly refer t...

Page 23: ...is uses this inhibiting feature For remote reset connect a momentary switch between pin 5 and pin 1 or pin 9 on the AC only input power supply or between pin 5 and pin 3 for the DC capable power suppl...

Page 24: ...on the rear handles 2 Connect the two cables on the battery pack to the two cables in the opening in the rear of the power supply module 3 Insert the battery pack into the opening in the rear of the...

Page 25: ...off the mainframe power before installing CompactPCI or PXI modules Install a module into a mainframe slot by first placing the module s card edges into the front module guides top and bottom as show...

Page 26: ...ce push up on the injector ejector handle to inject the card into the frame Secure the module s front panel to the mainframe using the module s front panel mounting screws Figure 2 2 Installing PXI or...

Page 27: ...ounting screws Using the Chassis Initialization File To assist system integrators the PXI specification requires manufacturers of PXI chassis and system modules to document the capabilities of their p...

Page 28: ...ified service personnel Read the For Your Safety section at the beginning of this manual before attempting any procedures in this chapter Caution Many components within the mainframe are susceptible t...

Page 29: ...ater Do not use abrasive compounds on any part of the mainframe Cautions Avoid getting moisture inside the mainframe during exterior cleaning Use just enough moisture to dampen the cloth Do not wash t...

Page 30: ...nt panel power switch to the Standby position 2 Disconnect the mainframe from the AC mains power source 3 Remove all modules from the mainframe 4 Complete the test procedure described in the Connectin...

Page 31: ...system s remote inhibiting control Circuit breaker is tripped Reset the circuit breaker Refer to the Resetting the AC Mains Circuit Breaker section in this chapter If DC capable PXI 1000B is powered b...

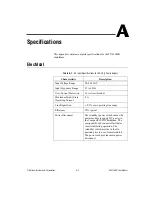
Page 32: ...uency Range 47 to 63 Hz Over Current Protection 10 A circuit breaker Maximum Steady State Operating Current 8 A Line Regulation 0 2 over operating line range Efficiency 70 typical Power Disconnect The...

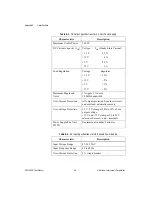
Page 33: ...V 5 Maximum Ripple and Noise 1 ripple 1 noise 20 MHz bandwidth Over Current Protection All outputs protected from short circuit and overload automatic recovery Over Voltage Protection 3 3 V 5 V clamp...

Page 34: ...main power disconnect Table A 4 DC Input Specifications for DC Capable Power Supply Characteristic Description Input Voltage Range 10 32 V DC to DC Isolation 500 VAC Over Current Protection Inline fus...

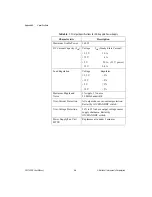
Page 35: ...State Current 3 3 V 10 A 12 V 4 A 5 V 20 A 3 3 V power 12 V 0 4 A Load Regulation Voltage Regulator 3 3 V 2 12 V 2 5 V 2 12 V 5 Maximum Ripple and Noise 1 ripple 1 noise 20 MHz bandwidth Over Current...

Page 36: ...2 bottom of module to top of module Module Cooling Intake Bottom rear of mainframe Module Cooling Exhaust Along both sides of mainframe Power Supply Cooling System Forced air circulation via integrate...

Page 37: ...Shock Pulse 11 ms duration 30 g peak Operating Location Indoor use Random Vibration Operational 5 to 500 Hz 0 31 gRMS Random Vibration Non Operational 10 to 500 Hz 2 46 gRMS EMC Emissions FCC Class A...

Page 38: ...e system slot with three system expansion slots and seven peripheral slots Compliant with IEEE 1101 10 mechanical packaging PXI Specification Revision 1 0 compliant Accepts both PXI and CompactPCI PIC...

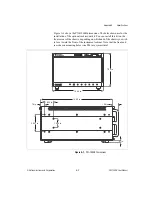
Page 39: ...n 37 85 cm 14 90 in Notes 1 80 cm 71 in added to height when feet are installed When tilted with front feet extended on table top height is increased approximately 5 29 cm 2 083 in in front and 1 48 c...

Page 40: ...f the optional rack mount kit You can install this kit on the front or rear of the chassis depending on which end of the chassis you wish to face toward the front of the instrument cabinet Note that t...

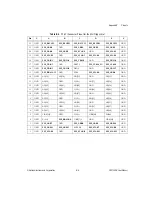
Page 41: ...stem Controller slot Table B 2 shows the P2 J2 connector pinout for the System Controller slot Table B 3 shows the P1 J1 connector pinout for the Star Trigger slot Table B 4 shows the P2 J2 connector...

Page 42: ...3V AD 15 AD 14 GND AD 13 GND 18 GND SERR GND 3 3V PAR C BE 1 GND 17 GND 3 3V SDONE SBO GND PERR GND 16 GND DEVSEL GND V I O STOP LOCK GND 15 GND 3 3V FRAME IRDY GND TRDY GND 12 14 Key Area 11 GND AD 1...

Page 43: ...PXI_TRIG1 PXI_TRIG0 DEG GND PXI_TRIG7 GND 15 GND PXI_BRSVA15 GND FAL REQ5 GNT5 GND 14 GND AD 35 AD 34 AD 33 GND AD 32 GND 13 GND AD 38 GND V I O AD 37 AD 36 GND 12 GND AD 42 AD 41 AD 40 GND AD 39 GND...

Page 44: ...AD 15 AD 14 GND AD 13 GND 18 GND SERR GND 3 3V PAR C BE 1 GND 17 GND 3 3V SDONE SBO GND PERR GND 16 GND DEVSEL GND V I O STOP LOCK GND 15 GND 3 3V FRAME IRDY GND TRDY GND 12 14 Key Area 11 GND AD 18...

Page 45: ...GND PXI_TRIG1 PXI_TRIG0 DEG GND PXI_TRIG7 GND 15 GND PXI_BRSVA15 GND FAL PXI_STAR6 PXI_LBR6 GND 14 GND AD 35 AD 34 AD 33 GND AD 32 GND 13 GND AD 38 GND V I O AD 37 AD 36 GND 12 GND AD 42 AD 41 AD 40 G...

Page 46: ...AD 15 AD 14 GND AD 13 GND 18 GND SERR GND 3 3V PAR C BE 1 GND 17 GND 3 3V SDONE SBO GND PERR GND 16 GND DEVSEL GND V I O STOP LOCK GND 15 GND 3 3V FRAME IRDY GND TRDY GND 12 14 Key Area 11 GND AD 18 A...

Page 47: ...PXI_TRIG1 PXI_TRIG0 DEG GND PXI_TRIG7 GND 15 GND PXI_BRSVA15 GND FAL PXI_LBL6 PXI_LBR6 GND 14 GND AD 35 AD 34 AD 33 GND AD 32 GND 13 GND AD 38 GND V I O AD 37 AD 36 GND 12 GND AD 42 AD 41 AD 40 GND A...

Page 48: ...ttp www natinst com From this Web site you can connect to our Web sites around the world http www natinst com niglobal and access technical support http www natinst com support FTP Site To access our...

Page 49: ...514 694 8521 514 694 4399 Denmark 45 76 26 00 45 76 26 02 Finland 09 725 725 11 09 725 725 55 France 0 1 48 14 24 24 0 1 48 14 24 14 Germany 089 741 31 30 089 714 60 35 Hong Kong 2645 3186 2686 8505 I...

Page 50: ...___ Instruments used _________________________________________________________________ _______________________________________________________________________________ National Instruments hardware pro...

Page 51: ...uments Products Complete Part Number ____________________________________________________________ Serial Number __________________________________________________________________ Line Voltage ________...

Page 52: ...Other Products List and describe all devices installed in your mainframe Slot Manufacturer Description and Function 1 2 3 4 5 6 7 8...

Page 53: ..._______ _______________________________________________________________________________ _______________________________________________________________________________ ________________________________...

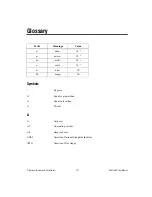
Page 54: ...fix Meanings Value n nano 10 9 micro 10 6 m milli 10 3 c centi 10 2 k kilo 103 M mega 106 Symbols Degrees Equal or greater than Equal or less than Percent A A Amperes AC Alternating current Ah Ampere...

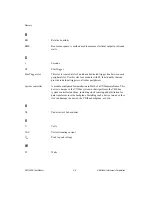
Page 55: ...el Research CSA Canadian Standards Association D daisy chain A method of propagating signals along a bus in which the devices are prioritized on the basis of their position on the bus DC Direct curren...

Page 56: ...per second I IEC International Electrotechnical Commission an organization that sets international electrical and electronics standards IEEE Institute of Electrical and Electronics Engineers IMP Mainf...

Page 57: ...functionality that can provide individual triggers to all other peripherals System controller A module configured for installation in Slot 0 of a VXIbus mainframe This device is unique in the VXIbus s...

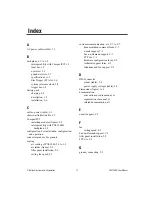
Page 58: ...tion configuration and operation connector pinouts See pinouts cooling air cooling of PXI 1000 2 1 to 2 2 air intake figure 2 2 filler panel installation 2 9 setting fan speed 2 2 customer communicati...

Page 59: ...y with CompactPCI 1 3 K key features 1 3 kit contents 1 1 L local bus routing figure 1 7 M maintenance of PXI 1000 cleaning exterior cleaning 3 2 fan filters 3 1 3 2 interior cleaning 3 2 preparation...

Page 60: ...ntenance See maintenance of PXI 1000B optional equipment 1 2 rack mounting 2 2 rack mount kit 1 2 rearview of AC only figure 1 5 rearview of DC capable figure 1 6 safety ground connecting 2 3 PXI 1000...

Page 61: ...ruments Corporation P2 J2 connector pinouts table B 3 system reference clock 1 8 T testing power up 2 3 trigger bus 1 8 troubleshooting the PXI 1000B table 3 4 U unpacking the PXI 1000B 1 1 V voltages...

Reviews: